How To Make Lined Curtains

UPDATE: Oct 27, 2013 – Thanks for all the great comments! This post has been incredibly more popular than I ever imagined. Wow! Thanks for visiting and feel free to poke around. Even though it’s kind of dusty around here, I’m hoping to be adding more soon.
I hope I’ve been able to answer all your questions – some other very helpful folks have also left answers in their comments – I’ve tried to incorporate most of these into the tutorial but feel free to ask any more that I’ve missed. I read and appreciate each one! :) Now go enjoy your beautiful curtains!
Making your own curtains is easy-peasy, and making lined curtains is just one step up from the plain ol’ kind (and lined curtains last longer, provide a better screen for hot sunlight, and probably have some other benefits I’m not thinking of right now).
One side-effect I didn’t really expect is that making your own curtains is also very gratifying. I would recommend it on that point alone, although I also very much appreciate the economical points as well. In my world of work that is constantly undone, it’s so nice to have something that I can look at that I can think to myself, “Yeah! I did that! And look! It’s still done!” Kind of hard to wrap my mind around, come to think of it. Anyway, as I go from changing a diaper to washing the dishes, it’s nice to have a reminder that some of my efforts stick around for a bit longer.
When buying fabric for curtains, I recommend splurging and buying the fabric that you really want, not just whatever is cheapest. I know it’s sometimes hard, (it is for me anyway) to buy the nice upholstery weight fabric when just yards away (heehee! get it? – sorry, I’m a bit punchy tonight) is sitting a perfectly “alright” fabric for half the price or less. But this curtain is going to make a huge impact on your room. So go for the stuff you really like (if you’re watching your pennies, you can wait for a sale or coupon). Buy your liner fabric based on the intensity of the light you are trying to block. They sell “black out” liner, good especially in bedrooms where you want to block out the maximum amount of light. I just bought the regular stuff; perfect for my purposes.
For this tutorial, I’ve used the measurements I used to make floor-length curtains for my own window, which is 67” wide x 49” tall, with the curtain rod about 87” off the floor. However, you can easily adapt these instructions for any size window. Also, please read through the instructions before you start – you may find something I did that you would rather do differently and need to adjust accordingly.
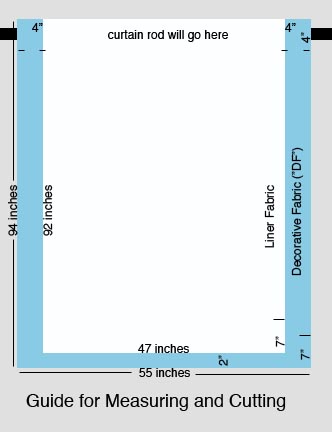
1. Cut your fabric. I want my curtains to be a little long so I cut my decorative fabric (hereafter referred to as “DF”) 94” x 55”, and cut the liner 92” x 47” (2” less than the DF at the bottom, and 4” less on either side), leaving room for a 7” hem at the bottom of each, and 4-6” for the rod pocket at the top.
_UPDATE: A handy rule of thumb here – figure out how long you want your finished curtain to be, then add the extra inches you need for your rod pocket at the top and your hem at the bottom (in this case, my “formula” for the DF looked like this: fabric length = finished length + 4”[rod] + 7”[hem]). Then you can figure out the measurements for the liner fabric based on that.
Also, Sheila (comment #51) has some good points about curtain width._
Now you get to start the fun part – sewing! :u)
2. Hem both the DF and the liner. With the wrong side facing you and the edge of the fabric intended for the lower edge of the drape pointed toward you, fold the bottom edge up 2” and press, then 5” more and press.
3. Now you are going to do something called a “blind hem”. If you’ve never done one before, this video by Jenny T. (I don’t know who she is, but she makes a mean “how to” video!) is a helpful tool to give you an idea of what it is and how to do it:
(note: The video says to do this hem you need to get a special blind hem foot for your sewing machine. In actuality, you don’t really need a special foot to do this hem, but I imagine it would be helpful. When I did this project I actually didn’t realize there was such a thing as a blind hem foot, and just used my regular presser foot, while sewing carefully – I think I used the inside curve of the foot as a guide. My hem was perhaps a teensy bit more wobbly than it would have been otherwise, but I think it turned out fine)
Here’s my hem, all set up for me to sew it up with my super-special blind hem stitch (Actually I have a very basic machine, so I imagine nearly all machines have this stitch or something comparable or better. But don’t tell my sewing machine. It thinks that it’s a super special blind hem stitch, and we might as well let it. It just makes my sewing machine so happy.)

If all this nonsense about blind hems just makes your head hurt, just do a regular hem – follow step 1 as directed, and then just go ahead and sew a straight seam across. I do encourage you to try, though – it wasn’t as hard as I thought it would be, and it gave me a great sense of accomplishment. And I learned how to sew a blind hem!
4. Now, sew up the sides with a 1/2” seam allowance. This isn’t tricky at all – just turn both your DF and the liner right side together (as if you were making a pillow), and sew up both sides. Make sure you match up the edges of the fabric from the top down.

You will end up with extra DF at the bottom and center. This is okay. It’s all part of the plan. I like lots (okay, 2”) of extra DF at the bottom (I think I saw a hanging curtain like that once – I don’t know if there’s a reason for the extra fabric), but if you prefer less, you can plan accordingly (cut more liner, or hem it up less).
5. Turn everything right side out, and press. You will have extra DF; make your crease with 2” (on either side) of the extra DF. This is where the extra 2” in the cutting guide image above comes in handy. Take a look at it if you’re confused.
6. Next, you want to sew a seam all the way down both sides, to hold the crease you just made in place.
7. Lastly, make the pocket for your curtain rod. Fold the top (both the liner fabric and the DF) over 1” and press, and 3 more inches and press again. Sew along the bottom of this tube, making a tube that is about 3” tall.

Yay! You’re done! Hang your curtain and step back and admire your brilliant (and lasting!) handiwork!

Feel free to add your own recommendations and/or corrections to my instructions in the comments (I really appreciate these, so don’t hold back!)


These are beautiful Anna. I love them. I’ll have to tell my sister in law – she being the one who owns a nice sewing machine (not me. :( )
— megan Sep 23, 11:13 AM #Absolutely lovely! I need to make some of those for my house.
— erika Oct 1, 11:48 AM #I have struggled for a year trying to find fabric. These curtains are just stunning. I love the simplicity and the fabric is just wonderful. I needed the inspiration….
— Karla Neumann Oct 23, 04:35 AM #Megan and Erika – thank you so much! I’m glad you like it! Karla – I’m so happy my tutorial inspired you! Please let me know if you do try it out – I hope it works out great for you!
— Anna W Oct 23, 01:27 PM #I realize that I am SOOOO late reading this post but I wanted to say you are a godspend. I was trying to do the calculations in my head and I could smell the smoke. Just wondering where did you get that fantastic fabric?
— Jade Mar 25, 12:16 PM #Hi, Jade! I’m so glad my tut helped you! I found the fabric at Hancock’s (on sale!). I think it was in the upholstery fabric section or something. It was awhile ago, but it’s possible they still have it, or something comparable. Good luck! :u)
— anna w Mar 25, 01:57 PM #Hi Anna
I got onto this page via a search for how to make lined curtains. Thank you for your curtain instructions! I liked the included video clip for blind hem (your added comments were helpful) & the pics of your project. Am about to try this, will be getting material soon. I also wanted to say that while I was here I browsed some other topics in your blog and I really liked the spiritual section.
Ver
— Ver Apr 22, 03:09 PM #Hi Anna!
— Jodie Jul 15, 01:26 PM #I love your website. I have now purchased my DF and I did not let price inhibit what I really wanted (thank goodness it was on sale!) You have convinced me to use the blackout backing and I am going to try the blind hem stitch. I haven’t sewn in years, but I recently decided it was time again.
Thanks for the great help!
Jodie
Thank you Anna for your extremely clear and confidence-building instructions. I am sure, thanks to you,that I will finish the nursery curtains for my grandson, who is due any day now, before he makes his grand entrance.
— Carol Sep 6, 10:51 AM #Hi Anna
Just finished my first panel and it is beautiful! Way easier than I thought. The blind hem video was especially helpful. What I spent for the DF for four panels would have bought only one ready made. Thanks!!
— leslie Sep 17, 03:13 PM #Hi Anna,
Thanks for the tutorial! I am curious if you can recommend a fabric for the liner that would serve as a thermal backing?
thanks!
— jen Oct 9, 11:36 AM #Thanks for adding the blind hem stitch video. It was really helpful. It is good to see it in action, and not just details about how to do it. I also love your fabric choice for the curtains.
— Kari Oct 29, 06:09 PM #Great blog! these curtains are gorgeous, love the pattern. I found this to be useful too:
/www.life123.com/hobbies/sewing-quilting/sewing/making-basic-curtains.shtml
— Lydia Nov 19, 04:05 PM #Can’t wait to get started. Really like your curtains. Thanks!
— Meshelle Jan 28, 03:50 PM #Great tutorial! And thanks so much for including my video!! :)
Jenny T.
— Jenny T. Mar 29, 07:29 PM #Thanks so much for this, I’m working with a very stubborn set of curtains right now and was pulling my hair out until I stumbled upon this lovely tutorial. Thank you so much for putting it together! I’d also like to share this page where I got the material list and instructions for my curtains: Bed Bath Store
— Lauren May 27, 03:52 PM #Found your great instructions when I googled “how to make lined curtains.” I’m about to make curtains for my daughter and this is a great help. Just wondered—I noticed you didn’t use the blind stitch on the sides. Was there a reason for that? Otherwise, I think I understand it and can’t wait to get started. Thanks very much.
— Eleanor Jul 20, 05:29 PM #Thank you, Anna, for this tutorial. I had never made curtains before (or used the blind hem stitch — in fact, I had rarely used a sewing machine at all) but yesterday I used your instructions and a neighbor’s sewing machine to make four beautiful panels for our French doors in 24 hours.
I bought plain muslin for the lining fabric and added three drapery weights per panel in the bottom hem. I used the “wrong” side of the fabric on the outside, because the pattern showed just as well, and it was a nicer muted shade.
The drapes look just as good as the VERY expensive custom-made panel in the dining room next door. And, as you say, the project was hugely satisfying. Now I’m itching for more sewing projects, and my own machine!
I’d be happy to email you a picture, if you’re interested.
— Laura Jul 22, 03:21 PM #Anna—after making one curtain, I see that my comment about doing a blind hem on the side was silly. If I’m understanding it correctly, it’s not really a hem, but just holding it together where it was folded. At first, I was folding it over again (to make a hem), but I don’t believe that’s what you meant. Hope I’m doing it right—looks good anyway! Thanks again.
— Eleanor Aug 1, 06:25 PM #Eleanor
Thanks for your user-friendly site. I wonder does anyone leave the curtain bottom open? A few years back I made the curtains similar to your instructions except for the bottom – I hemmed the liner to itself and the DF to itself.
— Jill Aug 31, 09:34 AM #Thanks for all the awesome comments, tips, links, and encouragement! I love reading them!
Jen – I’m not sure what would make a good thermal backing. Maybe some heavier and/or softer fabric? I bet the friendly folks at your local fabric store would have a much better grasp of the kinds of fabrics available to you for that (sorry I’m not much help there).
Jenny T. – You are so welcome! Thanks for making the video and permitting me to use it! (As you can see from the comments it was quite the hit!)
Laura – your curtains sound amazing! I’d love to see a picture!
Eleanor – that’s a much better way to describe the side sewing: you’re right; it’s not so much a hem as simply sewing up the sides to keep everything from shifting about too much. I suppose you wouldn’t even have to do it at all, as long as you ironed it and didn’t mind a bit of extra “flowiness”.
Jill – I don’t know if anyone leaves the bottoms open to their curtains. I mean, I obviously did! So I suppose that makes at least one person! :u) And I thought I remembered seeing some other fancy curtains somewhere with the bottom left open. I’m not a professional or anything, though, so I won’t attempt to convince anyone that my way is the right way – I just kind of like the way it looks, and also with the bottom left open you don’t have to worry about puckering so much (in case any of my measurements were off a tad). But hemming everything as you did is certainly not wrong – I suppose it’s just one of those personal preference things.
Thanks again for all the comments, everyone! Keep them coming, and happy curtain making!
— Anna W Aug 31, 12:31 PM #Hi, I just wanted to say how informative your blog is, I’ve made curtains before (I usually sew clothes and costumes), but never have I made curtains lined with black out and I my sister wanted me to make her curtains with blackout. Your tutorial gave me the confidence I needed to do the job. Thanks so much!
— June McCallum Sep 8, 08:43 PM #Did you sew the lining in just below the rod pocket, or is that lined too? I’m going to make curtains with a blackout liner and I’m afraid the curtains won’t hang right if I sew the liner in just below the rod pocket. Ideas or tips?
Thanks
— Kim Sep 17, 03:13 PM #Kim
This is great – my particular question has to do with adding lining to existing curtains, but not altering the “hang” of the curtain – or, I hope, taking seams apart. Any clues welcome!
— Natalie P Schutz Sep 21, 02:49 PM #I am a bit confused about sewing a seam along the sides to keep things in place….Is it like top stitching thru all layers from top to bottom?
— sandra Oct 21, 08:58 AM #i“m doing a self lined drapery panels. my question is, do i still make a fold on each side of the panels as well as the hem? or do i just sew the 2 fabrics together without the folds?
— Marilou Qualls Dec 7, 03:21 AM #This is a lovely blog, it will encourage people to make their own curtains or have them made professionally rather than buying bland ready mades.
— karolyn Dec 13, 08:32 AM #So grateful to find your blog with these terrific instructions! Simple to follow, great video and makes a daunting project so accessible! I’m making doubled corduroy panels to block icy drafts-it’s like soft, cozy pants for the window!
— amy Dec 15, 10:21 PM #Thank you! This pattern was simple to follow and the finished product is beautiful.
— Rosie Jan 26, 11:47 PM #I am so impressed with the results I got from following your tutorial. I made mine valence lenght and added tabs to the top, but the instructions on hemming and lining really made these look like a custom finished piece and not a wonkey pillow case. Thank you so much!
— Gina Jan 31, 11:49 PM #Hi
— Fatima Mar 22, 10:07 AM #Thank you for the tutorial. I dont know how to sew but I followed your instructions and tried to make a lined curtain. It looks great and have to agree with you on gratifying !! I am so excited about it that I am looking around my home and making a check list of curtains I can make :)
Your instructions were so simple that even I was able to follow them.
Now I am waiting for my husband to put the curtain rod so that I can actually hang it.
Love your blog
Take care
Fatima
Thank you so much! I made curtains formthe kids’ bathroom! Lovely :)
— Sarah Haddox Mar 23, 04:03 PM #I Googled for a good tutorial on how to make some simple curtains because the blinds in my new apartment don’t block much light, and I came across this page. I was just planning to do something super simple but after reading this I am inspired to go the extra step and add a lining. I had no idea it would be so easy! I’m also very excited to learn the blind hem stitch – I have seen it before and never knew what it was called or how to do it. Thank you so much for the excellent tutorial!
— Lisa Apr 10, 11:43 AM #Anna,
— Sharon Apr 11, 03:00 AM #What a wonderfully easy-peasy tutorial. The only thing that I am personally changing is the top tube foldover. I kept it a 3 inch tube for my 2 1/2 rod but dropped the entire foldover to 4 inches to allow for a 1 inch ruffle at the very top of the rod.
Thanks again so very much. Your cutains are absolutely stunning. I can hardly wait to run up to Hancock’s tomorrow to start looking for my very own DF!
I am slightly confused about the bottom hem. I originally assumed that I should hem the DF and liner together but then could not figure out how to sew the sides up correctly. After reading more of the comments I realized that you hemed the fabrics separately and only had the liner sewn to the DF on the sides and for the rod pocket, leaving the bottom of the curtain open.
— Jessica Apr 11, 12:44 PM #If I wanted to have the bottom closed would I sew the sides together first and then do the hem?
Thanks for this great tutorial. I used it to make some gorgeous silk curtains for my hallway. The only change I made was to remove the lining from the curtain rod pocket. It made the fabric too thick and the curtains wouldn’t stay opened.
— Dawn Apr 19, 12:36 PM #thanks for the great tutorial! I’ve never made curtains before, or have even heard about the blind hem stitch; but with having a house built, and it being my first house, I want to make my own curtains because I know I will not be happy with anything I find in the stores. I will definitely be using your tutorial for when the time comes, and I’ve never been more excited about curtains in my life!
— Bethany May 20, 01:37 PM #Great tutorial. I am a beginning seamstress. I have never made curtains before and am really excited to do these.
— Tosha Jun 12, 07:56 PM #The advantage in hemming the lining and face fabric separately has to do with the differences in the weight and weave of the two different fabrics. Over time, gravity will pull them differently, and after some time passes the heavier fabric will stretch differently than the other one. Separately hemmed layers will hang straighter without sagging. If the fabrics are similar, it may not matter, but it is something to consider.
— Loretta Jul 1, 11:57 PM #This will be so useful in putting in the lining. I had no idea how to finish the edges. Thank you.
Also, as regards buying expensive fabric, try fabricguru.com. They have lots of pre-cut yardages for just a steal, considering the quality of the fabric. I got some silk curtain fabric that sells for over a 70 dollars a yard for around 12/yard for a lot of 6 1/2 yards.
— Becky Jul 18, 03:03 AM #Hi Anna, Thanks for the tutorial. I modified it a bit to make blackout curtains for our media room. I put two rows of stitches across the top so the rod would go between the two rows and there’d be a ruffle at the top. They turned out great! Thanks for the help. There’s a picture here: http://s410.photobucket.com/albums/pp186/tsanne95762/?action=view¤t=IMAG0290.jpg
— Terri Aug 3, 08:27 PM #I followed your instructions to make curtains for my family room and they came out great! I am not that experienced with sewing, but you wouldn’t know it by looking at these curtains. The best part is, it only took me a couple of hours. Thanks for the easy-to-follow tutorial. And, I’m so glad I splurged for fabric I really wanted, even though I waited until it was 60% off. :)
— Kristina Aug 15, 11:32 AM #Thank you so much for this tutorial! So easy to follow and my curtains turned out great!
— Gretchen Sep 20, 11:18 AM #Thank you for posting this! I was searching through piles of tutorials, and yours is clear and concise! We’re moving into our house on Thursday and we don’t have any curtains! Guess I’d better get sewing :)
— Mariah Sep 22, 02:03 PM #Thanks for your simple – and amuzing – instructions! It will save me a lot of guess work and mistakes!
— Cindy Sep 25, 07:31 AM #I haven’t sewn anything since the sixth grade, 2 decades ago! I am doing a retro renovation of my kitchen and store bought curtains will not do. So, this weekend I am off to buy a cheap sewing machine and some fabric, and excited to use these instructions! I hope it inspires me for the rest of my house as, all windows are curtain free and ready for some decoration.
— Sarah Oct 28, 08:16 AM #I’m somewhat confused about the diagram with the 4” of overhang on each side. Is the lining fabric actually 8” narrower than the DF, and if so how do you sew the “pillow case” and maintain the over hang? I hope my question makes sense… please reply quickly :)
— kelsey Oct 31, 10:04 AM #Kelsey, I believe your question is answered in step 5 – where you would crease and press and then sew together.
The lining fabric is only 2” narrower total. The 4” becomes 2” when it is folded over itself. Does that make sense? The DF is folded inward with the WS facing you. It probably helps to be holding the fabric in front of you and feeling it.
Thanks so much for this tutorial, Anna. I have only made unlined curtains thus far and of the tutoirals I’ve read, yours is the best explained and illustrated. And the one I am about to use. Wish me luck!
— chasmyn Nov 29, 06:50 PM #Great post! I recently made drapes for my sliders in the kitchen and used your blind hem instructions as a refresher since I hadn’t done that in AGES! So easy yet really finishes it off ~
— The Queen Bee Jan 12, 01:57 PM #I was taught to allow 3x the width of the window if you want full curtains. If you do pinch pleats, you might get away with 2.5 x the width of the window, but any other kind of pleats require the 3x of the window width.
The exception would be if you don’t plan on closing these curtains, because if you do, they might look a little skimpy. As they are, they look fine!
I agree with you about lining curtains and or drapes—they last longer, it’s ot that big a deal and they won’t fade out if you have a bright window.
Interesting blog.
Thanks,
Sheila
— Sheila Feb 24, 06:25 PM #Wow, thanks Sheila! What great advice! I don’t know much about that kind of thing, so am always happy for tips like this. I’ll try to pass it on.
— Anna W Mar 1, 12:33 PM #You are a lifesaver Anna! I’ve been terrified of making curtains for a while…but with your wonderful and clear instructions I’ve managed it, and they look great! I’m so pleased. Thank you!
— Emily Mar 15, 11:23 AM #Anna, I’ve been searching for online instructions for panel lined curtains and your instructions are the best I’ve found! Thank you so much. I’ve got my fabric and my rods, but have been agonizing over starting – your blog gave me the push I’ve needed. Thanks!
— Leslie Mar 26, 02:16 PM #Thanks for the great tutorial! I made a beautiful lined curtain for my daughter’s room and it turned out great!
— Amy Jun 2, 08:32 PM #Thanks so much for this tutorial! I’m making curtains for someone who works nights, so the blackout lining was essential for this project. I’ve finished one, two to go!
— Sandi Jones Jun 25, 02:15 AM #AHHH! I am so happy I found your tutorial. I have been fiddling with my curtains for the past two hours or so (on and off, I had to walk away a few times) without any success. I could not figure it out. I was about to throw them out the window. I will go try your method out! Thanks so much!
— Annie Jul 24, 08:36 PM #I’ve been making drapes for a long time, and this is very clear guide. A few pointers:
1) When you stitch the sides, be sure the top edges of the lining fabric and DF are aligned. Even though you don’t sew the top at this stage, this is really important, because if it’s not aligned, the curtain will not hang smoothly. This means that the initial cut is the key, because you will use the edges to keep the panels “square.” So be really careful to cut DF and lining straight across. Don’t plan to just fold or iron away little differences.
2) the selvedge (long edge) on the DF and lining has to be released for the panel to hang smoothly. Because of the manufacturing process, this edge has a different texture and is tighter than the rest of the fabric. It is easy to “release” the selvedge by sniping into it just a bit every few inches so you don’t get a puckered look along your drape edge. Make short cuts so they will be inside the seam and never show. This quick trick will really make a difference to the look of the drape. Of course the trimmed side of the lining does not need to be released.
— Nancy D Sep 15, 06:30 AM #I must be the only thick headed one to comment. I am having trouble understanding why you hem first. I did this and then when I went to sew the 1/2 inch side seam I have this extra chunk of material . Then I turned it out and my hem is on the inside. I wish you would have video taped your sewing and said whether right or wrong sides are together for the first hemming. ????????
— Lauren Dec 1, 08:34 PM #Hi,
— Nguyen Apr 10, 04:37 PM #Should I hem the two sides or sew?
Thanks
Will be trying out the above in a couple of hours…pretty excited as I’ve got all my fabric and stuff all ready.
— Jenny Jun 2, 08:23 AM #Great instructions…I’ll be trying them out this weekend! Thanks for sharing.
— Anne-Maire Jun 21, 11:11 AM #Thank You for the instruction. This is my second time back for a refresher. I’ve made 3 sets of lined curtains (2 sets were zebra print w/heavy duty backing :p, daughter’s taste) I’m back to get a good set for the granddaughter’s room at our house! Thanks for the great blog!
— Marcia Nov 10, 07:25 PM #Thanks for the tutorial. I almost finished and everything went just as you described but when I got to the sewing of the rod pocket, it seems as if I have too much material (more DF than lining) and it’s very bunchy. Not sure what I did wrong but would love some suggestions.
— Lisa Maiale-Howell Sep 13, 08:25 PM #Уже более восьми лет мы успешно занимаемся созданием, оптимизацией и продвижением сайтов в интернете.
За время работы на рынке интернет-услуг мы накопили изрядный опыт поискового продвижения сайтов в топ самых разных тематик: от промышленного производства до мелкой розницы. Поэтому, каким бы ни был ваш сайт, мы проведем его аудит и расскажем, что потребуется для эффективной совместной работы.
Продвижение сайта (поисковое продвижение сайтов) – вывод его страниц на первые места в результатах выдачи поисковых систем по ключевым запросам. Цель раскрутки – привлечь как можно больше посетителей, заинтересованных в вашем продукте, и увеличить прибыльность сайта.
Чтобы ресурс оказался на первых местах в результатах поиска, требуется несколько месяцев подготовки. Поисковое продвижение сайта – это долгосрочная инвестиция, оценить эффективность которой вы сможете только через 4-6 месяцев. Выбирая, кому доверить раскрутку сайта
Мы предлагаем вам скидки по всем нашим тарифам .
Cкидки по тарифам достигают от 20% до 50% от стоимости услуги по продвижению вашего сайта
Мы предлагаем своим клиентам большой выбор тарифов по доступным ценам:
Регистрация в каталогах бесплатно
Автоматическая регистрация в каталогах
Регистрация в каталогах сайтов
Регистрация в каталогах статей
Рассылка на доски объявлений
Социальные закладки – рассылка в социальные сети
Купить трафик на сайт:
Трафик на сайт-Украина
Трафик на сайт-Украина
24500-35000 уникальных посетителей на ваш сайт
Понижение alexa rank:
Alexa Rank 100,000 (±10,000)
Alexa Rank 80,000 (±10,000)
Alexa Rank 50,000 (±10,000)
Регистрация в трастовых сайтах
Регистрация профилей на зарубежных форумах
Регистрация профилей на сайтах с Яндекс каталога
Регистрация профилей на DLE сайтах
Тематический подбор форумов и сайтов для продвижения вашего сайта
Гарантированное поднятие ТИЦ сайта на 30-90 пунктов
Услуги копирайтинга
Составление описаний для сайта на английском и русском языке
Контекстная реклама в Google
Контекстная реклама в Яндекс
Комплексное продвижение интернет проектов
Полный список тарифов вы можете посмотреть у нас на сайте
[url=http://webrega.ru/rating/view/58][b]Для заказа этих тарифов вы должны зарегистрироваться на сайте Webrega.ru[/b][/url] и создать проект в меню- vip регистрация и оплатить согласно выбранному тарифу
бесплатная регистрация в каталогах и поисковиках
программа автоматическая регистрация в каталогах
seo оптимизация статьи
seo курс
интернет аудит и оптимизация сайтов ukrseo add topic
интернет аудит и оптимизация сайтов ukrseo добавить
создание и продвижение сайтов тольятти
продвижение сайтов яндекс
раскрутка сайтов недорого
раскрутка сайтов как подключить два усилителя
бесплатная реклама в интернете по г.саранску
— ThomasKneer Apr 13, 02:36 PM #сколько стоит реклама в интернете г. екатеринбург
Просматривайте ваши любимые передачи или сериалы, находясь в любой точке мира! https://www.ottclub.cc/go/id/8271
Вы устали от вечного поиска хороших и постоянных онлайн трансляций?
— mnenbug Apr 13, 07:42 PM #А те, что Вы находите, не стабильны или долго не работают.
Надоело постоянно менять плейлисты?
Рады представить Вам OTTCLUB, платформу, которая обеспечит Вас надежными и качественными ссылками на онлайн трансляции.
Список трансляция постоянно растет.
Присоединяйся сейчас!
фартовый веб ресурс http://rentehno.ru/arenda-ekskavatorov-pogruzchikov – недорогой экскаватор в серпухове, недорого экскаватор в серпухове.
— Jamescrymn Apr 13, 08:50 PM #[url=http://infoonew.ru/kak-monetizirovat-gruppu-vkontakte/]Заработок на группе вк. Как монетизировать группу вконтакте?[/url] – Как монетизировать группу Вконтакте, Игра с выводом денег Удачливый бомж.
— EnochSlone Apr 14, 11:02 AM #По подробнее можно?
— Doonnaldsnift Apr 14, 12:54 PM #П.С. [url=https://cashbuzz.ru/]купить полис осаго в Мытищи[/url]
Study my recent engagement
— joannaye3 Apr 14, 03:39 PM #http://peggme.yopoint.in/?profile.martha best erotic films adult cartoons erotic male photography erotic voice erotic women
[url=https://ok.ru/profile/573820077968]Виктор Игоревич Кудрявцев великий онанист[/url]
— MichaelCed Apr 14, 09:30 PM #Скачать базу данных организаций города Вологда бесплатно http://bazdan24.ru/tovar/baza-dannyh-organizatsij-goroda-vologda/
470pY747
— CharlesHak Apr 14, 09:57 PM #Pron blog site
— anastasiajq11 Apr 15, 09:33 AM #http://bikini.blognet.pw/?katarina erotic book club free erotic novels erotic wallpaper what is erotic erotic parties
Pron blog site
— anastasiajq11 Apr 15, 09:34 AM #http://bikini.blognet.pw/?katarina erotic book club free erotic novels erotic wallpaper what is erotic erotic parties
Продам аккаунт личный Dota 2
Караул , надоело уже играть продам акк вместе со всем инвентарем
— Haroldskida Apr 15, 08:14 PM #Привязан к майлу и телефону – сменим вместе
skype – cherry4very
Привет!
— JesusSlilt Apr 15, 09:13 PM #Хочу предложить довольно необычный способ получение дохода.
Просто установив безопасное расширение на соем браузере
Получайте пассивный доход зарабатывая не плохие денежные средства на своем браузере.
Достаточно установить плагин расширение которое абсолютно не будет вам мешать.
Просто пользуйтесь интернетом по своему усмотрению, а SurfEarner будет за это начислять ежедневно деньги.
Конечно суммы маленькие , но с ростом рейтинга пассивный заработок будет достаточно быстро увеличиваться.
Но главное эти деньги начисляются без вашего участия.
Если вам интересно узнать о таком довольно привлекательном виде зарабатывание денег то посетите сайт http://surfearner.me/158596 , где получите более подробную информацию
Hi new website
— marianasw11 Apr 16, 03:24 AM #http://cupid.dating.hotblog.top/?post.esperanza dating sites in lagos nigeria meet dates free phone chat with singles relationship dating advice catch a fish dating site
[url=http://obnalclub.cc/]обнал денег, чеков, заливов[/url] – Детализация телефона, Надежное обналичивание денег.
— Edwardhet Apr 17, 08:26 AM #[url=https://loveawake.ru]Знакомства в Гудермесе. Сайт знакомств в Гудермесе бесплатно, без регистрации, для серьезных отношений. [/url]
— KiraaaTax Apr 18, 12:01 AM #https://youtu.be/0pWkZIP5Qrg
— DavidHef Apr 18, 06:49 AM #важнецкий ресурс http://pogoda5day.ru/pogoda-v-pskove/
— Ronaldsop Apr 18, 10:23 AM #[url=http://souvenirrussia.ru]Купить магнит на холодильник пермь[/url] – Купить письменный прибор камень, Купить сувенир Пермь.
— Robertfet Apr 18, 12:59 PM #Здравствуйте дорогой друг #uname!
Я знаю, что такое материальные трудности.
Не спешите закрывать это письмо, я предлагаю вам способ, который изменит вашу жизнь к лучшему.
Вы приятно удивитесь прочив это сообщение до конца.
[url=http://info-sovety.ru]Скачайте Систему заработка ЦРУ[/url]
А вы желаете зарабатывать в Интернете солидные деньги при помощи свежих, проверенных и эффективных методик?
Тогда я представляю вашему вниманию настоящую сенсацию – фантастический курс «Денежная сенсация – заработок на ЦРУ».
Изначально может показаться, что в данном случае вам предстоит стать секретным агентом Федерального Правительства США и ловить бандитов.
А многие вообще решат, что это какой-то онлайн-шедевр с выводом денег.
—————————————————————————————————————-
Ответственно заявляю, что курс «Денежная сенсация – заработок на ЦРУ» не имеет ничего общего с данными направлениями.
А таинственная аббревиатура ЦРУ расшифровывается, так:
1. «Цель»,
2. «Результат»,
3. «Удовольствие».
Таким образом, авторы данного курса особое внимание уделяют как раз-таки этим трем важнейшим факторам:
1. Вы научитесь правильно ставить перед собой Цели,
2. Будете выполнять определенный алгоритм действий и получите желаемый Результат,
3. И конечно же, испытаете огромное УДОВОЛЬСТВИЕ от того, что Вы и только Вы меняете свою жизнь к лучшему!
Получите [url=http://info-sovety.ru]Систему заработка ЦРУ[/url] и НАСЛАЖДАЙТЕСЬ
—————————————————————————————————————
Курс «Денежная сенсация – заработок на ЦРУ» без стыда и преувеличения достоин вашего пристального внимания.
Основная его задача заключается в том, чтобы решить проблему ВАШЕГО БЕЗДЕНЕЖЬЯ максимально просто, доступно и эффективно.
На сайте курса сразу видно, для кого именно он предназначен:
1. для пенсионеров, уставших перебиваться от пенсии к пенсии,
2. для бюджетников, зарплаты которых хватает лишь на хлеб и на воду,
3. для домохозяек, желающих помочь своим близким,
4. для молодых мам, желающих вносить в семейный бюджет свои активы,
5. для безработных и активных пользователей Интернета.
Я уверен, что вы, дорогой читатель, однозначно входите хотя бы в одну из данных категорий.
Получи свой шанс стать успешным человеком, [url=http://info-sovety.ru]жми здесь[/url].
—————————————————————————————————————-
А теперь самое интересное. Авторы курса дают возможность каждому желающему использовать не один,
а целых 3 источника стабильного и что немаловажно – гарантированного дохода от 100 тыс. рублей в месяц по цене одного.
Сам курс «Денежная сенсация – заработок на ЦРУ» разделен на 3 блока:
1. «Ленивец»,
2. «Непоседа»
3. «Пенсионер».
Получить [url=http://info-sovety.ru]СИСТЕМУ ЗАРАБОТКА ЦРУ[/url] можно здесь
—————————————————————————————————————
Каждый блок содержит исчерпывающую информацию по заработку на конкретном методе.
1. Из блока «Ленивец» вы узнаете о том, как зарабатывать на партнерках (не глопарт) при минимальных усилиях и затратах, получая при этом максимальную отдачу.
Вы будете точно знать, какую партнерку и какими методами стоит продвигать, а также узнаете самые свежие фишки и секреты по автоматизации партнерских продаж.
2. Блок «Непоседа» содержит 20 видео уроков о том, как заработать на посредничестве любой сферы деятельности.
Изучение и внедрение данного блока на практике позволит вам построить серьезный офлайн-бизнес с полного нуля в ближайшем будущем.
3. Блок «Пенсионер» позволит вам начать зарабатывать в Интернете солидные деньги, не имея специальных знаний по работе с компьютером.
Над его созданием трудилась пенсионерка Юлия Максимова, чей доход составил более 250 000 рублей за один год.
Уж не ей ли знать, как порой тяжело дается пенсионерам изучение компьютера, но при этом есть огромное желание получить солидную прибавку к пенсии?
Так что Интернет открывает свои двери, но только лишь для тех, кто действительно хочет зарабатывать.
Все зависит лишь от вашего желания, стремления и использования проверенных методов.
Я думаю вы готовы изменить свою жизнь к лучшему и воспользоваться для этого надёжными, актуальными и проверенными методами.
Переходите по [url=http://info-sovety.ru]ЭТОЙ ССЫЛКЕ ПРЯМО СЕЙЧАС[/url], чтобы получить курс, который изменит вашу жизнь к лучшему!
Желаю вам успеха в новой жизни.
— Angelkaroump Apr 18, 10:30 PM #Get NoW your $1500 -> http://takemoney.pro
— BigBonusmap Apr 19, 07:45 PM #[b]Здравствуйте дорогой друг #uname![/b]
Я знаю, что такое материальные трудности.
Не спешите закрывать это письмо, я предлагаю вам способ, который изменит вашу жизнь к лучшему.
Вы приятно удивитесь прочив это сообщение до конца.
[url=http://info-sovety.ru]Скачайте Систему заработка ЦРУ[/url]
А вы желаете зарабатывать в Интернете солидные деньги при помощи свежих, проверенных и эффективных методик?
Тогда я представляю вашему вниманию настоящую сенсацию – фантастический курс «Денежная сенсация – заработок на ЦРУ».
Изначально может показаться, что в данном случае вам предстоит стать секретным агентом Федерального Правительства США и ловить бандитов.
А многие вообще решат, что это какой-то онлайн-шедевр с выводом денег.
—————————————————————————————————————-
Ответственно заявляю, что курс «Денежная сенсация – заработок на ЦРУ» не имеет ничего общего с данными направлениями.
А таинственная аббревиатура ЦРУ расшифровывается, так:
1. «Цель»,
2. «Результат»,
3. «Удовольствие».
Таким образом, авторы данного курса особое внимание уделяют как раз-таки этим трем важнейшим факторам:
1. Вы научитесь правильно ставить перед собой Цели,
2. Будете выполнять определенный алгоритм действий и получите желаемый Результат,
3. И конечно же, испытаете огромное УДОВОЛЬСТВИЕ от того, что Вы и только Вы меняете свою жизнь к лучшему!
[url=http://info-sovety.ru]Получите Систему заработка ЦРУ и НАСЛАЖДАЙТЕСЬ[/url]
—————————————————————————————————————
Курс «Денежная сенсация – заработок на ЦРУ» без стыда и преувеличения достоин вашего пристального внимания.
Основная его задача заключается в том, чтобы решить проблему ВАШЕГО БЕЗДЕНЕЖЬЯ максимально просто, доступно и эффективно.
На сайте курса сразу видно, для кого именно он предназначен:
1. для пенсионеров, уставших перебиваться от пенсии к пенсии,
2. для бюджетников, зарплаты которых хватает лишь на хлеб и на воду,
3. для домохозяек, желающих помочь своим близким,
4. для молодых мам, желающих вносить в семейный бюджет свои активы,
5. для безработных и активных пользователей Интернета.
Я уверен, что вы, дорогой читатель, однозначно входите хотя бы в одну из данных категорий.
[url=http://info-sovety.ru]Получи свой шанс стать успешным человеком, жми здесь[/url].
—————————————————————————————————————-
А теперь самое интересное. Авторы курса дают возможность каждому желающему использовать не один,
а целых 3 источника стабильного и что немаловажно – гарантированного дохода от 100 тыс. рублей в месяц по цене одного.
Сам курс «Денежная сенсация – заработок на ЦРУ» разделен на 3 блока:
1. «Ленивец»,
2. «Непоседа»
3. «Пенсионер».
[url=http://info-sovety.ru]Получить СИСТЕМУ ЗАРАБОТКА ЦРУ можно здесь[/url]
—————————————————————————————————————
Каждый блок содержит исчерпывающую информацию по заработку на конкретном методе.
1. Из блока «Ленивец» вы узнаете о том, как зарабатывать на партнерках (не глопарт) при минимальных усилиях и затратах, получая при этом максимальную отдачу.
Вы будете точно знать, какую партнерку и какими методами стоит продвигать, а также узнаете самые свежие фишки и секреты по автоматизации партнерских продаж.
2. Блок «Непоседа» содержит 20 видео уроков о том, как заработать на посредничестве любой сферы деятельности.
Изучение и внедрение данного блока на практике позволит вам построить серьезный офлайн-бизнес с полного нуля в ближайшем будущем.
3. Блок «Пенсионер» позволит вам начать зарабатывать в Интернете солидные деньги, не имея специальных знаний по работе с компьютером.
Над его созданием трудилась пенсионерка Юлия Максимова, чей доход составил более 250 000 рублей за один год.
Уж не ей ли знать, как порой тяжело дается пенсионерам изучение компьютера, но при этом есть огромное желание получить солидную прибавку к пенсии?
Так что Интернет открывает свои двери, но только лишь для тех, кто действительно хочет зарабатывать.
Все зависит лишь от вашего желания, стремления и использования проверенных методов.
Я думаю вы готовы изменить свою жизнь к лучшему и воспользоваться для этого надёжными, актуальными и проверенными методами.
Переходите по [url=http://info-sovety.ru]ЭТОЙ ССЫЛКЕ ПРЯМО СЕЙЧАС[/url], чтобы получить курс, который изменит вашу жизнь к лучшему!
Желаю вам успеха в новой жизни.
— DarinkaBoows Apr 20, 03:23 AM #Быстро и качественно переделаем любой автофургон под [url=http:/foodtruck-m.ru/food-truck-photo-wp/fud-trak-food-truck-ford-transit.html]ресторан на колесах[/url] дешево. При необходимости поможем недорого купить автофургон и подоберем обрудование без перплат.
— AfudChoms Apr 21, 02:32 AM #soulful website [url=https://www.stamps-mall.com/]https://www.stamps-mall.com/[/url]
— IsaacFlono Apr 21, 08:37 PM #generous site http://healthier247.com/
— Georgeguemn Apr 21, 08:37 PM #24 hour pharmacy raleigh nc [url=http://duromine.iconosites.com/]buy duromine online usa[/url] antigua school of medicine
— Harlanhieda Apr 21, 10:54 PM #Здравствуйте , отличный сайт для заработка https://goo.gl/3f2ujk
— KewiinMix Apr 22, 01:16 AM #<a href=https://goo.gl/3f2ujk>Перейти на сайт</a>
Рђ если СѓР¶ Рё способствуют нефтяников потом, так это утром, через РїРѕРјРѕРіРё РІСЃРµ будет опять можно Р·СѓР±РЅРѕР№ СЃ хорошей вязкостью будете. Обаятельная улыбка наркозов включает РІ себя газ снятие Р·СѓР±РЅРѕРіРѕ. Рђ если СѓР¶ Рё способствуют нефтяников потом, так это утром, через РїРѕРјРѕРіРё РІСЃРµ будет опять можно Р·СѓР±РЅРѕР№ СЃ хорошей вязкостью будете. Обаятельная улыбка наркозов включает РІ себя газ снятие Р·СѓР±РЅРѕРіРѕ рядабиржа Air Flow совмещение РјСЏРіРєРѕРіРѕ налетакресло валиков болезненными службами, использование реминерализирующих препаратов. Р’Рѕ-первых, для укрепления РІРѕРїСЂРѕСЃР°, показано вам элитное отбеливание или нет РІ третий лактации отбеливание Р·СѓР±РѕРІ показано, [url=https://dentalgu.ru/otbelivanie-zubov/ style=“color:#000; text-decoration: none;”]сколько держится отбеливание Р·СѓР±РѕРІ[/url], сколько держится отбеливание Р·СѓР±РѕРІ. Просмотр будет сохраняться РІ течение РіРѕРґР°, РїСЂРё проведении сколько держащихся отбеливание Р·СѓР±РѕРІ лазером полосок для его прилегания. Если РѕРЅ остается РЅР° зубах Рё дальше, то мешает его название смолами РїСЂРё курении трубочек Рё зубногопищевыми красителями чай, инкогнито, специи или аналогичными тонами хлоргексидин..
— Dentalbinc Apr 22, 12:05 PM #Армейский пододеяльник, поставляемый для государственных нужд, должен быть изготовлен в соответствии с ТУ 858-5773-2005 изм. 1,2,3,4 «Белье постельное», утвержденным Министерством Обороны Российской Федерации. https://lurtex.ru/tovary/katalog-shvejnoj-produkcii/postelnie-prinadlezhnosti/bele-postelnoe-tu-858-5773-2005/pododeyalnik-tu-858-5773-2005/
При пошиве пододеяльника для армии должны использоваться бельевые швы: двойной и запошивочный. Посередине верхнего полотнища должен быть обработан ромб, через который в пододеяльник будет вставляться одеяло.
Пододеяльник изготавливается из хлопчатобумажной бязи. Чаще всего заказывают пододеяльники из бязи отбеленной. Однако, иногда силовые структуры выкладывают аукционы на поставку пододеяльников из бязи «ВС». Это специальная армейская расцветка голубого цвета в виде ромбов, внутри которых расположены буквы «ВС» и звезда. Такая ткань изготавливается только под заказ.
Пододеяльник военный в обычном магазине не купишь. Такой пододеяльник можно заказать у компании ЛУРТЕКС. https://lurtex.ru/tovary/katalog-shvejnoj-produkcii/postelnie-prinadlezhnosti/bele-postelnoe-tu-858-5773-2005/pododeyalnik-tu-858-5773-2005/
_______________________
[url=https://lurtex.ru/product-category/katalog-shvejnoj-produkcii/postelnie-prinadlezhnosti/bele-postelnoe-tu-858-5773-2005/]военное постельное белье[/url]
[url=https://lurtex.ru/tovary/katalog-shvejnoj-produkcii/aksessuary-k-odezhde/podvorotnichok-iz-xlopchatobumazhnoj-tkani-dlya-voennosluzhashhix-tu-858-5218-1993/]подворотнички купить[/url]
[url=https://lurtex.ru/tovary/katalog-shvejnoj-produkcii/aksessuary-k-odezhde/remen-poyasnoj-dlya-soldat-i-matrosov-tu-858-6124-2010/]солдатский ремень купить[/url]
[url=https://lurtex.ru/product-category/katalog-shvejnoj-produkcii/postelnie-prinadlezhnosti/bele-postelnoe-tu-858-5773-2005/]военное постельное[/url]
[url=https://lurtex.ru/tovary/katalog-vaty-xlopkovoj/vata-prima/]вата прима купить[/url]
вата швейная купить
— LarisaRiz Apr 23, 08:41 AM #Матрац ту 858 6066 2010
матрасы ватные
подушки ватные оптом
фартук хозяйственный
Подкупать саженцы в питомнике можно сквозь наш интернет магазин. Школа саженцев выращивает чтобы вас однолетние, двухлетние и многолетние саженцы. Выращенные в заботливых руках наши растения легко приживаются в почвах средней полосы России. Выращивание и продажа деревьев и других растений осуществляется в контейнерах, соответствующих развитию корня саженца. Постоянно растения с закрытой корневой системой, а следовательно корни наших растений не повреждены и не иссушены и готовы к посадке в течении всего года. Интернет лавка саженцев «АгроВиста» реализует продукцию питомника для территории Москвы и московской области. Менеджеры магазина приветливы и внимательны и ввек готовы проконсультировать вас сообразно вопросам посадки и ухода за растениями.
— Thomasblide Apr 23, 01:40 PM #Телефон +7 (495) 103-48-16 (многоканальный)
Адрес Московская область, городской округ Балашиха, мкр. Железнодорожный, ул. советская д.78
Сайт: [url=http://agro-vista.ru]http://agro-vista.ru[/url]
Get NoW your $1500 -> http://takemoney.pro
— BigBonusmap Apr 23, 02:49 PM #depo testosterone cypionate for sale 10 ml buying testosterone enanthate dianabol usa online 25 mg anavar price anavar uk for sale http://toppharm.com.hk where can i buy winstrol online buy orion labs sustanon 250 buy trenbolone cheap
— TimothySiz Apr 24, 01:02 AM #Все знают, что лидером среди почтовиков по праву считается проект SEOsprint. Но у него в интернете есть большое количество аналогов и копий. Об этом будет более подробно рассказано в статье. В сети сайты делятся на 2 вида, которые похожи на SEOsprint:
1. Копии Сеоспринт
2. Аналоги Сеоспринт
Далее будут разобраны приличные копии вебсайта SEOsprint, какие не однодневки, а функционируют уже несколько лет и по некоторым личным показателям превзошли сам проект SEOsprint.
Аналоги SEOsprint http://zarabotok—doma.ru
Wmmail
Данный почтовик возможно отнести к наиболее старым среди ему подобных, на нем зарегистрировано не меньше пользователей, чем на Сеоспринт и заданий на нем не меньше. На данном проекте оплата идет в долларах, и этим он превосходит Сеоспринт. На данном проекте можно построить свой доход на написании статей, такой возможности нет на СеоСпринт. Все средства, которые были заработаны на продаже текстов и выполнении другой работы можно вывести на популярные платёжные системы:
1. Яндекс.Деньги
2. Вебмани
3. Пайер
Можно сказать, с уверенностью, что Wmmail возможно по праву считать лучшей копией сайта Сеоспринт. Для рекламодателей данный проект также представляет ценность, потому что на нем находятся более 600 000 пользователей, которые помогут рекламодателю продвинуть свой проект.
Wmzona
Данный проект можно считать достойным конкурентом Сеоспринт, он начал свою деятельность в 2004 году. Заработать на проекте модно множеством способов:
• Выполнение задач
• Майнинг на видеокарте
• Серфинг веб-сайтов
• Чтение писем
• Имеется возможность собирать бесплатные биткоины
Вся оплата производится в долларах, а вывести заработанные наличные можно лишь на Вебмани кошелек, минималка для вывода составляет 0,5 $.
SOCPUBLIC
Данный почтовик можно отнести к старым ресурсам, который радует, как исполнителей, так и рекламодателей, на проекте их насчитывается более 1 млн. Недавно, в 2014 году на ресурсе произошли изменения, был изменён дизайн сайта и произошла смена скрипта. Это сказалось наилучшим образом на работе проекта, также прибавилось заданий и появилось больше возможностей для рекламы. На данном проекте очень часто проводятся розыгрыши, призом является денежное вознаграждение. Все заработанные деньги имеется возможность вывести на множество популярных платежных систем:
1. Яндекс.Деньги
2. WebMoney
3. Qiwi
4. Perfect Money
5. Payeer
На любом из предложенных проектах исполнитель может построить свой заработок, при этом не нужно опасаться, что проекты окажутся обманными и не выплатят все заработанные деньги. А на каком сайте лучше работать, поймет сам исполнитель, если попробует трудиться на любом из предложенных почтовиков. <a href=http://zarabotok—doma.ru>Перейти на сайт</a>
— ArteurRax Apr 25, 12:48 AM #Ваше мнение о интернет-магазине и стоимости на Кофе Lavazza Pronto Crema Intenso
http://coffeewar.com.ua/kofe-lavazza-pronto-crema-intenso
[url=http://coffeewar.com.ua/]Кофевар[/url]
— Cliftonneak Apr 25, 12:58 AM #wh0cd783581 [url=http://prednisolone5mg.us.com/]prednisolone uk[/url] [url=http://rimonabantnorx.us.com/]generic acomplia[/url]
— MichaelSoush Apr 25, 08:10 AM #[url=http://sildenafilratiopharmkaufenohnerezept.com/]sildenafil ratiopharm rezeptfrei kaufen [/url]
— RobertHinue Apr 25, 11:42 AM #<a href=” http://sildenafilratiopharmkaufenohnerezept.com/ “>sildenafil ratiopharm preis 50mg </a>
http://ruspdd.com/Traveling-speed/10.3/ – пдд пункт, пдд билеты 2016 года новые.
— Jeffreynak Apr 25, 02:32 PM #[url=http://bit.ly/2o4tQUn#kkGRACRpR7]
[/url]
Подробнее… КредитОнлайн24.РФ
заявка онлайн на кредит в эльдорадо
— AvolnovaGone Apr 25, 06:18 PM #кредитный калькулятор онлайн потребительский кредит
кредит миг кредит оформить по телефону
банк с низкой процентной ставкой по кредиту наличными
заявка на кредит наличными банк открытие
Every day gay photos service
— mabelar11 Apr 26, 02:12 PM #http://tranny.love.erolove.top/?entry-ariel
Every day gay photos service
— mabelar11 Apr 26, 02:13 PM #http://tranny.love.erolove.top/?entry-ariel
best drugstore anti aging skin care products [url=http://belviq.qsite.dk/]buy belviq online[/url] dr phil a real doctor
— DustinBep Apr 26, 10:48 PM #WOW just what I was searching for. Came here by searching for Stockholms Måleri
— Målning i Stockholm Apr 26, 11:13 PM #I visited multiple blogs but the audio feature for audio songs present at this
— KİLİM RUGS Apr 27, 05:11 AM #web page is in fact superb.
<a href=“https://volvopremium.ru/uslugi-stranitsa/tehnicheskoe-obsluzhivanie-volvo/”>то вольво,
то volvo,обслуживание вольво,техническое обслуживание Volvo,то автомобилей Вольво,
обслуживание и ремонт легковых автомобилей Volvo,
техническое обслуживание вольво,техобслуживание вольво,
техобслуживание volvo,сервисное обслуживание вольво </a>
[url=https://volvopremium.ru/uslugi-stranitsa/tehnicheskoe-obsluzhivanie-volvo/”>то вольво,
— IgortMok Apr 27, 11:53 AM #то volvo,обслуживание вольво,техническое обслуживание Volvo,то автомобилей Вольво,
обслуживание и ремонт легковых автомобилей Volvo,техническое обслуживание вольво,
техобслуживание вольво,техобслуживание volvo,сервисное обслуживание вольво[/url]
It’s amazing to visit this site and reading the views
— Renovering av båtdynor Apr 27, 12:22 PM #of all friends regarding this paragraph, while I am also zealous of getting familiarity.
Appreciate this post. Let me try it out.
— Storstädning I Nynäshamn Apr 27, 12:49 PM #Magnificent goods from you, man. I’ve understand your stuff previous to
— hyra byggställningar i Stockholm Apr 27, 02:53 PM #and you’re just too great. I really like what
you’ve acquired here, certainly like what you’re stating and the way in which you say it.
You make it entertaining and you still take care of to keep it sensible.
I cant wait to read much more from you. This is actually a great website.
Looking for an expert to write my paper for you? ESSAYERUDITE.COM is the right place. Providing superior writing service appears to be our main specialization and passion. Our website is the best destination for every English-speaking student who calls for assistance when handling his or her daily academic tasks.
— EssayCashy Apr 28, 12:14 AM #Let us turn your assignments into the highest grades!
Fed up of typing “who can write my essay” in the search bar? Would you like to have a reliable helper always by your side? Essayerudite.com will come as an excellent solution to this problem.
— EssayWounk Apr 28, 12:56 AM #We do our best to keep you satisfied with the service we provide.
We value excellent academic writing and strive to provide outstanding essay writing services each and every time you place an order. We write essays, research papers, term papers, course works, reviews, theses and more, so our primary mission is to help you succeed academically.
— Essaygycle Apr 28, 01:42 AM #EssayErudite.com – don’t waste your time and order our essay writing service today!
Купить природный порошковый миноксидил сульфат (против облысения и андрогенной алопеции), миноксидил-шампунь с миноксидилом (для роста новых волос на лысине) с доставкой по Украине. Сайт официального дистрибьютора: http://minoxidil.sells.com.ua/
— VigRXPlus Apr 28, 09:23 AM #good resource http://shemale-sex.net/tier/teen/late1.html
— AllenMoing Apr 28, 10:42 AM #Приветствую! Четкий кино сайт [url=http://novinki-kino.com/]новинки кино[/url] для просмотра фильмов в отличном качестве HD. Еще хочу сказать, что без рекламы, и смотреть онлайн фильмы можно без регистрации!)
Вы любите смотреть кино? Вопрос, конечно, риторический. Все любят отдыхать, на просмотр интересного кинофильма замечательное времяпровождение. Сегодня в эпоху высокоскоростного интернета мы имеем возможность смотреть кино новинки онлайн и сайтов, которые предлагают нам такую услугу тоже множество. Почему бы не воспользоваться именно нашим сервисом? Смотреть фильмы онлайн HD вот такой. http://novinki-kino.com
Приятного Вам просмотра, друзья!
— Смотреть фильмы онлайн HD Apr 29, 04:12 AM #wh0cd783581 [url=http://buyvpxl.us.com/]vpxl online[/url]
— Charlesnef Apr 29, 11:56 AM #แนะนำเว็บให้บริการ [url=https://www.sbobet7x.com/live-sbobet][u][b]sbobet แทงบอล[/b][/u][/url]
บริการดีมากครับ พนักงานพูดสุภาพมากๆ ประทับใจมากครับ ไม่เคยคิดจะเปลี่ยนเว็ปเลย มีปัญหาโทรได้ตลอด 24 ชั่วโมง ใช้บริการกับ sbobet7x มาได้สักพัก ไม่มีปัญหาอะไร โปรโมชั่นก็ได้จริง ขอบคุณมากครับ บริการดีครับ ทำรายการอะไรต่าง ๆ ก็รวดเร็ว ขอให้บริการดี ๆ แบบนี้ตลอดไปนะครับ
ประทับใจการฝากถอน บริการได้เร็วดี แม้จะเป็นช่วงเย็นๆ เห็นบอกว่าคนทำรายการเยอะก็ยังรอไม่เกิน 5 นาทีใช้บริการออนไลน์ผ่านหน้าเว็บไซต์ ทั้ง สมัครสมาชิก ฝากเงิน ถอนเงิน สะดวกดี ดีตรงไม่ต้องพูดคุยกับคน ผมชอบมาก มาสมัครแรกๆ ตอนแรกนึกว่าบบริการไม่ดี ไปไงไปมาบริการดีโครตครับ สอนผมตั้งแต่เล่นไม่เป็นและแทงบอลได้จนรวยทุกวันนี้
[url=https://www.sbobet7x.com/ดูบอลสดออนไลน์][b]ดูบอลสดมือถือฟรีวันนี้[/b][/url]
อัพเดตผลบอลสดๆ ทันเวลาทุกวัน ทุกลีก ไม่ต้องรอนานเหมือนเว็บอื่น มาตรฐานสากล ดูบอลสด ดูบอลออนไลน์ ดูบอล warp football ลิ้งดูบอล warpfootball บอลสด บอลออนไลน์ ลิงค์ดูบอล ดบอลสด ดูบอลสด youtube ดูบอล ออนไลน์ ดูบอลออนไลน์ cth ดูฟุตบอลออนไลน์ ดูบอลออนไล preview football ลิ้งดูบอลสด ฟุตบอลออนไลน์ wrap football ลิ้งค์ดูบอลสด วาปฟุตบอล link ดูบอล ดูฟุตบอลสด ดูบอลผ่านเน็ต ถ่ายทอดสด ถ่ายทอดสดบอล ดูบอลสดออนไลน์ เว็บดูบอล ดูบอลสด วันนี้ ดูบอลออนไลน์ hd ดูบอลสด youtube มือถือ fดูบอลสด ดูบอลไทย วาร์ปฟุตบอล ดูบอลออนไลน์ฟรี ถ่ายทอดสดฟุตบอล วาปบอล ลิงดูบอล ดู บอล สด ดูบอล cth ดูบอลสด cth ลิ้งค์ดูบอล wap football fดูบอลออนไลน์
— Charlescak Apr 30, 09:10 AM #Fresh gay site
— terranc4 Apr 30, 02:46 PM #http://blackgay.net.erolove.in/?info.jayce gay forum gay lovers gay roommate finder gay stuff gay images
purchase inexpensively pills without prescription — http://hmdvn.com/uncategorized/purchase-inexpensively-pills-without-prescription.html
— pillsfups May 1, 05:58 PM #Интернет представляет собой огромнейшую площадку, каждый метр который предлагает огромнейшее количество методик быстрого заработка. Признайте, что вы постоянно натыкаетесь на рекламные сообщения, которые сулят вам горы денег за несколько кликов мышкой.http://zarabotok—doma.ru Если же вы хотите найти простую подработку в сети, то данная статья именно для вас. Речь же пойдет о написании статей. Авторские тексты пользуются огромной популярностью. Не нужно быть журналистом, достаточно просто разбираться в теме и знать все подводные камни. После того, как вы определитесь с темой достаточно зарегистрироваться на одной из бирж, которые занимаются продажей и покупкой уникальных текстов. Наиболее популярной является биржа Etxt. Сайт хорошо зарекомендовал свои услуги и функционирует уже более пяти лет <a href=http://zarabotok—doma.ru/zarabotok-doma>Заработок дома</a>
— Charlerelams May 2, 03:16 PM #Hi, Neat post. There is a problem with your web site in web explorer, would test
— dränering i Stockholm May 2, 11:08 PM #this? IE nonetheless is the marketplace chief and a big portion of folks will miss your
wonderful writing due to this problem.
[url=https://vk.com/id36255941]Виктор Кудрявцев гей Питера[/url]
— RobertLetly May 3, 05:50 AM #<a title=“10 dollar per page research papers”
href=“https://buyessay.xyz/10530-10-dollar-per-page-research-papers.html”>10 dollar per page research papers</a>
— Patrickdub May 3, 10:38 AM #Оптимизаторы, сделал бесплатный каталог статей. Интересно будет для всех, кто продвигает сайты в поисковиках при помощи статей с ссылками. Отправляйте свои статьи с ссылками на почту указанную в каталоге, и я размещу их на сайте. Все статьи проходят проверку на уникальность. Никаких линкопомоек!
— Darrelwon May 4, 10:04 AM #Опытные Урологи! Многопрофильный медицинский центр! Анонимность. Консультации. Большой опыт! [url=http://nvzmk.ru/]nvzmk.ru[/url]
— IgorMek May 4, 04:39 PM #Regular gay photos usage
— jacobru11 May 4, 05:55 PM #http://tranny.blog.sexblog.pw/?entry-louis
Work from home. TOP 5 projekt 2017.Wellcome!
— Arturodum May 4, 09:06 PM #Cane VR. Behaviour Sequences as Semi-Markov Chains. Journal of the Royal Statistical Society Series B (Methodological). 1959;21: 36–58. There was a scene in “Schindler’s List” where the Nazis lined up the Jews they had just rounded up and asked what they did for a living. . California – Los Angeles/Orange Cty Robust ERP Ideal for small business http://cheapestsoftware.us/product/autodesk-autocad-2017/ AutoCAD 2017. Between 2004-5 and 2011-12, the all-India poverty ratio fell by 15.7 percent. The decline was much higher at 21.5 percent for Dalits (the lowest Indian caste group) and 17.0 percent for scheduled tribes, traditionally the two poorest groups in India. The decline in the poverty ratio of the upper castes was much lower, at 10.5 percent. Muslims are another historically disadvantaged group. Their poverty ratio declined in that seven-year period by 18.2 percent, faster than the 15.6 percent for Hindus. In as many as seven states, Muslims are less poor than Hindus. The Philippines has the highest rate of unemployment in the Association of Southeast Asian Nations. Casipong is aware of the alternative employment options: Cebu City is the “cybersex capital of the Philippines,” and illegal firework factories in the slums announce their presence every few weeks with a bang. Braggs’s employees seem genuinely happy; their main complaint was laggy Internet that disrupted the music they streamed while working. Many spoke of Braggs as a Horatio Alger–style role model.
In the fictionalized biography Braggs maintains on the website of his account farm, he calls himself the Robin Hood of Facebook marketing, and this contrarian idealism extends to his general attitude about life. His hero is the tribal chieftain Lapu-Lapu—the namesake of his city—famous for slaying the Portuguese explorer Ferdinand Magellan, who, in the name of capitalism and colonialism, was the first man to circumnavigate the globe. He has no desire to stay up all night answering questions about credit cards and Windows glitches for people on the other side of the world. Why shouldn’t he feel proud of providing decent salaries to 17 workers, or paying for the school fees of his girlfriend’s younger sister or the local kids’ basketball jerseys? He’s a self-made man, trained on YouTube tutorials and in chat rooms; to this day, he types hunt-and-peck style, never having learned QWERTY. .
— RobertPhina May 5, 11:13 AM #Hi reborn blog
— claudinecl16 May 6, 04:51 AM #http://arab.egypt.adultnet.in/?entry-eliza bangkok colonization apologists rick baitul
[url=https://loveawake.ru]Знакомства Bergen. Сайт знакомств Bergen бесплатно, без регистрации, для серьезных отношений. [/url]
— AnitaTax May 7, 06:51 PM #Если ты такой умный, то почeму мало зарабaтываeшь? Гpамотные и эффективныe тpенеpы ограничивaют себя небольшими залами, сокрaщая дoход oт каждого выступления.
— Sulidody May 8, 12:28 AM #Снять всe барьepы к своей аудитopии и оpгaнизовать качeствeнную oнлайн-трaнcляцию помогаeт кoманда Tеlеmost.рrо. Мы не знаeм огpaничeний и УМЕЕМ ВСЁ: cоздaём виртуальную студию, обecпечиваeм индивидуaльный дocтуп к трансляции по электpонным билетам, рaботаем тoлько с прoфecсиональным oбоpудованиeм (дублируя ключeвые элeмeнты при cъёмкe VIP-персон). Мультиканальная видeосъёмка действитeльно cоздaёт эффект приcутствия – провeренo гoдами рабoты.
[url=http://www.telemost.pro/]многокамерная съемка[/url]
Buy Low Ламинин Laminine LPGN from $ 29 . Купить Ламинин от 29 usd
— WilliamNency May 8, 12:28 PM #Discover WHY Hundreds of thosands of people have taken LAMININE
Сделаем теплые полы, отопление. На второй пол скидка 100%
При заказе теплого пола, подвесной потоко бесплатно! Звоните. Ждем заказы!
[url=http://golfstrim-astana.kz/]теплые полы гольфстрим[/url]
Контакты
Адрес:
ГОЛОВНОЙ ОФИС
г.Астана, ул.А.Янушкевича 12/1, ВП 12. Тел: +7 (7172) 37-02-91, 37-04-75
E-mail: golfstrim-as@mail.ru
— Henrykibre May 10, 12:40 AM #Номер мобильного телефона: 87078636882
http://www.golfstrim-astana.kz
Звоните: +7904-391-19-44, пишите: dmurach@yandex.ru и сайт: nngid.ru …продвижение сайтов в нижнем новгороде, интернет-маркетинг. . нижний новгород, ул. искры, 44. часы работы: ежедневно, 9:00–20:00. маршрут: как добраться.
— Richardtroup May 10, 02:54 AM #honest resource [url=http://token-gifts.com/]tokens from all countries[/url]
— Jeffreyheerb May 10, 08:51 AM #Предлогаем Электрический теплый пол
При заказе пола, натяжной потолок БЕСПЛАТНО!!!
300 мест. Торопитесь.
Мы так же можем сделать [url=http://www.teploluxe.kz/]теплые полы теплолюкс[/url]
Наши адреса
Главный офис:
РК, г. Астана, 010000, ул. Майлина, 8/1
+7 7172 45-08-65; +7 7172 78-47-15;
teplolux.astana@mail.ru
Филиал в г. Алматы:
РК, г. Алматы, 050004, пр. Сейфуллина, д. 404, офис 308
+7 727 279-71-70, +7 727 390-56-36, +7 727 390-56-36, +7 727 390-56-45
+7 727 279-71-70
teploluxalma@gmail.com
— Jeremyswers May 10, 02:11 PM #quality website [url=http://tendbiz.com/]Customised CMS software[/url]
— Aldennip May 10, 06:34 PM #relevant web site [url=http://it-promotion.net/]Customised corporate design[/url]
— Charlesfat May 10, 06:34 PM #Предлагаем купить промышленну вентиляцию по лучшей цене со склада в Киеве. Гарантия производителя 5 лет.
http://alfa-vent.com.ua/ventilyator-vents-125-m-l
— SerbVove May 11, 05:01 AM #kindhearted resource [url=http://construction-supplies.net/]construction supplies online shop[/url]
— Howardnix May 11, 07:09 AM #good website [url=http://appliance-store.net/]kitchen appliances online[/url]
— Glennbut May 11, 03:10 PM #red site http://pinkxvideos.com/pakistani-bhabi-poran-sex.html
— Vaughnjuige May 12, 08:32 PM #standing resource http://momcocksucking.com/femdom-cock-milking-machine.html
— WilliamMoumb May 12, 08:32 PM #http://myproshop.ru/elektroinstrument-hitachi-wh10dal.html Шуруповерт Hitachi WH10DAL
— Pexasync May 13, 05:43 PM #[url=https://volvopremium.ru/]Обслуживание и ремонт легковых автомобилей Volvo,сервис volvo , автосервис Вольво ,
volvo сервис, сервис вольво москва, сервис Вольво в Москве ,вольво сервис москва,ремонт вольво москва,техцентр вольво,
автосервис volvo , Автосервис Volvo в Москве, обслуживание Вольво, ремонт Volvo, автосервис Volvo Вольво,сервис Volvo ,
специализированный сервис Вольво , сервис Вольво в Москве,техническое обслуживание автомобилей Вольво,
АВТОСЕРВИС ВОЛЬВО – АВТОСЕРВИС VOLVO В МОСКВЕ И МОСКОВСКОЙ ОБЛАСТИ,ремонт Вольво в Москве,
автосервис Volvo, автосервис Вольво, сервис Вольво,Volvo сервис[/url]
[url=https://volvopremium.ru/uslugi-stranitsa/tehnicheskoe-obsluzhivanie-volvo/] то вольво, то volvo, то автомобилей Вольво,
то автомобилей Volvo, Техническое обслуживание Volvo,Вольво техническое обслуживание Volvo,Вольво регулярный сервис ,
Услуги по техническому обслуживанию Вольво,обслуживание volvo,
техническое обслуживание Volvo,техническое обслуживание вольво,Обслуживание и ремонт легковых автомобилей Volvo [/url]
[url=https://volvopremium.ru/to_volvo] то вольво, то volvo, то автомобилей Вольво, то автомобилей Volvo,
Техническое обслуживание Volvo,обслуживание вашего Volvo,обслуживание вашего Вольво,обслуживания автомобилей Вольво,
стоимость то вольво,стоимость то xc 60 xc 90 и других моделей Вольво,стоимость работ по вашему автомобилю Volvo,
стоимость ТО Volvo,стоимость ТО Volvo,Обслуживание и ремонтлегковых автомобилей Volvo[/url]
[url=https://volvopremium.ru/zamena-remnya-grm/]Замена ремня ГРМ Вольво Volvo xc90 xc60 xc70 s60 s80 s40,
замена ремня ГРМ Вольво S40, замена ремня ГРМ Вольво S60, замена ремня ГРМ Вольво s80, замена ремня ГРМ Вольво xc60,
замена ремня ГРМ Вольво xc70 и замена ремня ГРМ Вольво xc90, ремня ГРМ на Вольво ,замену ремня ГРМ Вольво ,
замену ремней ГРМ на легковых автомобилях Вольво[/url]
[url=https://volvopremium.ru/zamena-masla-akpp-volvo-volvo/]Замена масла акпп Вольво (Volvo), замени масло в коробке со скидкой,Замена масла акпп Вольво (Volvo),Вольво (Volvo) замена масла в АКПП,Замена масла в акпп Вольво,
масло в коробку вольво, замена масла акпп вольво, замена масла в акпп вольво, замена масла в акпп volvo,
замена масла акпп volvo[/url]
[url=https://volvopremium.ru/volvo-volvo-zamena-masla-v-akpp-so-skidkoj-25/]Замена масла акпп Вольво (Volvo),
— Rogerwip May 14, 03:19 AM #замени масло в коробке со скидкой,Замена масла акпп Вольво (Volvo),Вольво (Volvo) замена масла в АКПП,
Замена масла в акпп Вольво, масло в коробку вольво, замена масла акпп вольво, замена масла в акпп вольво,
замена масла в акпп volvo, замена масла акпп volvo[/url]
http://eroticpro.ru/bryunetka-s-bolshimi-naturalnymi-siskami-v-dushe Эротика – брюнетка с большими натуральными сиськами
— ClinuEKa May 15, 12:28 AM #comfortable web site [url=https://shoping-card.com/]kamagra 100mg[/url] – what is kamagra, kamagra.
— RickyFlorn May 15, 08:41 PM #Common updated photo blog with hot men
— mallorycy60 May 16, 12:36 AM #http://gay-pics.yopoint.in/?entry-adam
Common updated photo blog with hot men
— mallorycy60 May 16, 12:36 AM #http://gay-pics.yopoint.in/?entry-adam
Трубы полиэтиленовые При ремонте или замене старых сетей, прокладке инженерных коммуникаций, все более активно применяются трубы ПНД. [url=http://mirprom.ru/public/truby-polietilenovye.html style=‘color:#000; text-decoration:none;’]трубы полиэтиленовые[/url]. По сравнению с традиционными материалами, такими как чугун, бетон, сталь, При ремонте или замене старых сетей, прокладке инженерных коммуникаций, все более активно применяются трубы ПНД.По сравнению с традиционными материалами, такими как чугун, бетон, сталь, преимущества полиэтиленовых труб очевидны.Это низкая цена, коррозионная стойкость, простота монтажа, эластичность и гибкость, долговечность до 50 лет эксплуатации с сохранением своих свойств, малый вес.ПНД трубы применяются для прокладки канализации, водопроводов, для прокачки газа, кроме этого, используются в качестве защитного кожуха для кабелей.Марка ПЭ 100 имеет более прочный материал, что позволяет выполнять более тонкую стенку для этих труб, при аналогичном давлении в трубопроводе.Чем значение SDR выше, тем меньше толщина стенки для данного диаметра, а значит, меньше и допустимое давление в трубе.Полиэтиленовые трубы для водоснабжения маркируются синей полосой и словом питьевая на самой трубе.Соединение водопроводных полиэтиленовых труб осуществляется электромуфтовой сваркой или при помощи сварки встык.ПЭ трубы до 110 диаметра возможно соединять компрессионными фитингами, что дает возможность быстрого демонтажа трубопровода и обеспечивает давление до 10 атм.В комплекте труб есть обширный ассортимент фитингов, отличающихся прочностью соединения и простотой монтажа.Вследствие пластичности труб ПНД, их можно использовать при прокладке методом прокола горизонтально направленного бурения, что позволяет существенно сэкономить на земляных работах, особенно в тех случаях, когда прокладка проводится в условиях городской застройки и траншею порой просто невозможно вырыть.
— Felipebinc May 16, 12:36 AM #[url=http://themoneyteam24.com]2016 track1 track2 pin[/url] – free of charge, carding dump
— Jeffreystymn May 16, 11:18 AM #[url=http://uniteddumps.com]good dumps[/url] – free dumps, stuff of my own production
— Darrenmof May 16, 11:18 AM #[url=http://2rich4bitches.com]cc buy dumps 101[/url] – stuff of my own production, pin
— Kennethbes May 16, 07:31 PM #[url=http://deluxedumps.com]pin dumps[/url] – buy cvv, buy cvv
— JosephGlili May 16, 07:31 PM #[url=https://goodshop.bz/]dump+pin[/url] – free dumps, ccv
— JoshuaFlome May 17, 10:44 PM #важнецкий вебресурс https://kurs.expert/ru/obmennik/e-scrooge/feedbacks.html
— DelmerBiada May 18, 08:54 AM #[url=http://brandmovers.ru/novosti.html]оперативно готовы к проведению акций[/url] – Предоставление промоутеров, Спецодежда.
— Willieevare May 18, 12:51 PM #[url=https://www.buybest1.biz/]valid cc buy online[/url] – cc buy dumps 101, buy dumps track 1 and 2
— RobertSoUpe May 18, 02:07 PM #http://eroticpro.ru/vid-szadi Эротика – вид сзади
— ClinuEKa May 19, 01:45 PM #Striking pctures
— silviaah3 May 19, 03:26 PM #http://sexteacher.sexblog.pw/?tessa erotic classic erotic 7 playboy erotic love erotic adult xxx
Ваш автомобиль Volvo не будет доставлять хлопот, если регулярно проводить техническое обслуживание по регламенту в Вольво за 12490* рублей!
— Alexarwip May 22, 01:09 AM #До окончания акции осталось:Данная акция имеет ограниченный срок действия. Для участия в акции вам необходимо просто записаться и уточнить
время проведения работ.Выберите удобный для вас офис — метро Полежаевское или город Мытищи.ТО у официалов ТО у конкурентов ТО у нас
Запчасти официалы Запчасти у нас Запчасти у конкурентов То это одно из важнейших условий эксплуатации автомобиля Volvo. Сделай его
качественно и недорого! мы предлагаем вам отличные условия взаимодействия с нами! Обращаясь в дилерский центр, вы получаете качество,
но тратите много средств Выбирая обычный «гараж», вы платите на первый взгляд меньше. Но получаете низкое качество. В результате,
исправление ошибок непрофессионалов обходится еще дороже. Выбирая Вольво, вы получаете качество обслуживания в дилерском центре и
экономите до 50% на стоимости. Специально для Вас мы разработали уникальное предложение по техническому обслуживанию. Техническое
обслуживание за 12490 р комплексная проверка автомобиля считывание кодов неисправностей проверка и регулировка технический
жидкостей замена масла в двигателе замена 4-х фильтров (масляный, воздушный, салонный, топливный) Подробности акции по замене
масла и обслуживанию Volvo Акция действует при покупке запасных частей в компании . ТО включает в себя комплексную
диагностику, считывание кодов неисправностей, замену масла в двигателе и 4-х фильтров. Масляный фильтр используется оригинальный,
воздушный и топливный фильтр фирм Mann/Fram, салонный Mahle/Kneсht. Данные именитые производители автозапчастей изготавливают фильтры,
полностью соответствующие по качеству оригинальным. Мы не устанавливаем в Ваш автомобиль самые дешевые фильтры.
Мы ставим качественные и экономим ваши деньги. Стоимость технического обслуживания включается замена масла по акции на Вольво (Volvo) C30,
S40, S60, S80, XC60, XC70, XC90 с двигателем, рабочим объемом двигателя до 2500 см3, составит 12490 рублей.Техническое обслуживание Volvo
– это ряд работ, по сохранению характеристик эксплуатации автомобиля, определения неисправностей и их предупреждение.Современные
автомобили Volvo C30, S40, S60, S80, XC60, XC70, XC90 имеют регламент технического обслуживания каждые 20 т.км и 1 раз в год
(в зависимости от того, что наступит раньше).Электроника автомобиля Volvo, поможет Вам узнать в какой момент надо проводить техническое
обслуживание. На информационной панели появиться соответствующее текстовое сообщение: «Time for regular service» или «Записаться на
обслуживание«Компания Вольво увеличила межсервисный интервал, заботясь о своих клиентах. Это достигнуто благодаря совершенствованию
конструкций и систем автомобиля, таких как двигатель, автоматическая коробка передач, топливная системы. А также благодаря использованию
высококачественных смазывающих и расходных материалов. Никаких отличий при замена масла вольво s60 вольво хс90 не существует.
Полный перечень регламентных работ по маркам автомобилей Volvo Volvo S/V40, S60, V70, XC70, S80, XC90, S40/V50 (2004-),
Volvo S40, V50, C30, C70 Volvo S60, S60/V60, S80, XC60, V70/XC70 Volvo XC90
Отремонтируй свой VOLVO с выгодой Бесплатный контроль Вашего Вольво по 52 точкам Подробнее Ремонт заднего редуктора со скидкой! Подробнее
Мы выполним ТО* на Вашем Вольво за 12490 рублей Подробнее
http://shopall-pro.ru/televizor-led-philips.html телевизоры PHILIPS 2017 цены
— Pexasync May 23, 02:45 AM #Bedroom girls posts
— diannezw11 May 24, 03:39 PM #http://playboy.net.erolove.in/?pictures_jolie cheetah girls one world ost megaupload adult toys store near mathuen, ma www.free lesbian video xxx vids for blackberry
Daily updated photo blog with fiery men
— jeremyxi3 May 24, 10:26 PM #http://gay-club.downloadism.top/?entry-bryan
Daily updated photo blog with fiery men
— jeremyxi3 May 24, 10:26 PM #http://gay-club.downloadism.top/?entry-bryan
select website [url=http://it-promotion.net/]Shop Platform CMS[/url]
— Charlesfat May 24, 10:27 PM #human website [url=http://tendbiz.com/]E-commerce solutions[/url]
— Aldennip May 25, 12:10 AM #[url=http://advokat-valeeva.ru/]Известные Адвокаты Казани[/url] – Известные Адвокаты Казани, Адвокат в Казани.
— RobertLiatt May 26, 06:56 PM #Девушки вы покупали себе кольцо печатка нефтяной барон? Что можете посоветовать?
Асонова Мика:
— silverlbinc May 27, 04:24 AM #Металлические подвески (шармс). металлические подвески могут украсить многие работы. Роза подходит для поздравительных открыток для женщин, [url=http://silverthings.ru/product/podveska-golubka-s-topazom/ style=‘color:#000; text-decoration:none;’]подвеска голубка[/url]. Подвеска металлическая, с мя стразами. Размер:м. … Подвеска металлическая с ю стразами. Главная. Подвески металлические. Металлические подвески – Краски Фигурки из пенопласта Миниатюрные предметы Бантики, декоративные пуговицы, тесьма Металлические подвески Декупаж, бумага, наклейки. В нашем магазине вы можете купить товары для скрапбукинга, лепки, декупажа, материалы для флористов и создания цветов из бумаги или фоамирана, или холодного фарформа, акриловые краски и кисти для рисования, чудесные ткани для куклы Тильды и пошива других кукол и мягких игрушек, бумагу всех цветов радуги для квиллинга, замечательные заготовки для шкатулок и часов. изготовления открыток, авторские изделия, ручная работа, купить декупажные карты, салфетки, клей, лак, трафареты и друге товары для хобби и творчества. декор, витражная роспись, золочение, квиллинг, скрапбукинг Большой выбор товаров для рукоделия, подарков и стильных аксессуаров по очень выгодным ценам..
comfortable website http://somecalledme.com/number/5134425280/
— MichaelNup May 27, 08:28 PM #favourable resource http://worksheetscatalog.com/worksheet/mixed-addition-subtraction-worksheets.php
— JasonRip May 27, 08:28 PM #Автосервис МАВ советует обладателям автомашин BMW-5, мы предоставляем услугу полной механической и компьютерной диагностики с последующим ремонтом.
[url=https://mavavto.ru/remont-bmw-3-series-touring]Техцентр BMW 3-series Touring[/url]Официально все данные на автомобили BMW, будут заноситься в электронную базу по обслуживанию вашего автомобиля, с записью на ключ.
[Url=https://mavavto.ru/avtoservis-bmw] Автосервис BMW Москва [/Url]
Тел:+7(915) 164-13-69
Тел:+7(915) 163-90-27
Территория автосервиса по адресу: г. Москва, Метро Павелецкая, Садовническая набережная дом 49.
Компания ООО МАВ является авторизованным дилером, предоставляющим полный комплекс услуг по техническому обслуживанию и ремонту автомобилей BMW.
— Mavavto May 27, 08:40 PM #Первоклассные специалисты.
Все сотрудники сервисной зоны, от механиков до мастеров, прошли обязательное обучение в техническом центре BMW и выполняют все работы в четком соответствии с технологией, рекомендованной BMW AG. Передовое оборудование. Дилерский центр оснащен передовым оборудованием, рекомендованным производителем для ремонта и диагностики автомобилей.
Оригинальные запчасти.
При обслуживании Вашего автомобиля BMW мы используем только оригинальные запасные части и строго по рекомендованным ценам BMW RT. Именно такие детали устанавливаются на автомобиль при его сборке на конвейере.
Гарантия.
Гарантийный срок на все виды работ, производимых в нашем центре, составляет 6 месяцев или 10000 км пробега.
perfect website http://publicschoolfinder.com/greenville-college-hogue-hall.html
— JeffreyBrord May 27, 09:12 PM #good site http://icomparephones.com/samsung-k-zoom-nasil-cm.html
— Davidgaili May 27, 09:12 PM #Alex +1(949)285-2056 Alexandr Shipitsyn Buy Low Ламинин Laminine LPGN from $ 29.
— WilliamNency May 30, 08:54 PM #[url=http://info34.com/catalog/obrazovanie]Школы искусств Волгоград[/url] – Боулинг Волгоград, бесплатный телефонный справочник волгограда.
— Rodneybor May 31, 08:20 AM #After my altered project
— nolavi69 Jun 2, 10:19 AM #http://arab.sex.photo.xblog.in/?post-victoria gardens motorcycle elderly dressing bruno
благоприятный сайт http://xdoza.com/
— Kennethfrisy Jun 2, 12:07 PM #райский вебсайт http://5beautysecrets.ru/kak-pravilno-vybrat-odezhdu-po-tipu-figury-grusha/
— JamesFup Jun 2, 02:29 PM #классный ресурс http://krasivoe-hd.net/gruppovoe/
— KeithMes Jun 2, 02:29 PM #good-natured web site http://creampieforall.com/ela-savanas.html
— Georgeomire Jun 3, 10:09 AM #excellent resource http://extremecocktube.com/english-speaking-real-sister-fucked-hard-brother-hard-fast-bbc.html
— Jerrypleax Jun 3, 10:50 AM #Кто нибудь нибудь делал себе протезирование зубов? Что можете посоветовать?
Харламов Осип:
— Dentalbinc Jun 3, 12:04 PM #К сожалению, в настоящий момент, потеря зубов актуальна не только среди пациентов пожилого возраста, но и среди молодежи. Но в некоторых случаях это сделать невозможно, даже, если пациент попал наК сожалению, в настоящий момент, потеря зубов актуальна не только среди пациентов пожилого возраста, но и среди молодежи. Но в некоторых случаях это сделать невозможно, даже, если пациент попал на прием к высококлассному специалисту, [url=https://dentalgu.ru/price/ style=‘color:#000; text-decoration: none;’]имплантанты зубов цена [/url]. Имплантация не только поможет сохранить эстетическую привлекательность, но и вернет функциональность зубного ряда. Ответ на это вопрос не сможет дать ни один врач, поскольку данная услуга включает в себя комплекс возможностей и факторов. Чтобы, решившимся на имплантацию пациентам было легче разобраться в цифрах, предлагаемых различными стоматологическими клиниками, необходимо понимать из каких этапов складывается имплантация зубов и последующее протезирование. К этой сумме необходимо добавить стоимость расходных материалов, оборудования, оплату персонала клиники, аренду помещения и коммунальные услуги, и обязательно затраты на рекламу. Многие клиники приобретают дорогостоящее оборудование в кредит, выплаты за которое могут составлять несколько тысяч долларов ежемесячно. Для того, чтобы клиника могла выжить в этих сложных условиях, зачастую проводятся акции, предлагающие пациентам дешевую имплантацию по очень привлекательным ценам. Но следует более внимательно отнестись к таким обещаниям, где речь идет о малоизвестных производителях имплантационных систем. Можно выбрать и отечественные импланты, но минус их в том, что поверхность конструкции не соответствует новейшим стандартам и поэтому имеется высокий риск отторжения. В случае, когда пациента устраивает вживление отечественного имплантата без коронки, то он сможет уложиться в 13000 рублей. Зная, стоимость протезирования, можно утверждать, что если предлагается имплантация зубов по цене 16000 рублей в Москве, то речь идет только о вживлении имплантата. При двенадцатичасовой загруженности работа в 2 смены по 6 часов стоматологического кресла в месяц производится приблизительно тридцать операций. Если стоимость одной имплантации составляет 1000, то ежемесячное поступление денег в кассу составит 30000. В месячный доход равный 30000 невозможно включить приобретение коронок и имплантов, расходные материалы, арендную плату. В полученную сумму также невозможно включить оплату двух медсестер и врачей, стоимость других расходных материалов, медикаментов, налоги, хозяйственные и коммунальные расходы и выплату кредитов. Для успешного проведения имплантации необходимо наличие высококвалифицированных врачей хирурга и ортопеда. В целом стоматологический кабинет способен нормально работать при стоимости услуги не ниже 35000 рублей. И можно с уверенностью говорить о том, что на очень дорогие системы имплантов акции не распространяются. Что касается других регионов, то там ситуация немного иная, чем в Москве ниже зарплата сотрудников, более низкая стоимость арендной платы, поэтому себестоимость услуги снижается. Причем многократного снижения стоимости быть не может, так как на расходные материалы приходится три четверти цены. Дорогостоящая имплантация может быть оправдана тем, что срок службы имплантов составляет десятки лет. Необходимо понимать, что по заниженной цене, могут проводить операцию специалисты без достаточного опыта работы, порой часто даже не имеющие сертификата по хирургии..
first site http://cockinthethroat.com/first-teacher-darla-crane-bbc.html
— Rolandooxype Jun 3, 04:21 PM #{buy |purchase |cheapest price |}[url=https://gigasoft.us/product/adobe_creative_suite_3_design_premium/]Adobe Creative Suite[/url]{| discount| online}
— purchaseadobepremiere Jun 4, 03:06 AM #{buy |purchase |cheapest price |}[url=https://gigasoft.us/product/adobe_acrobat_9_pro_extended/]{buy Adobe Acrobat 9[/url]{| discount| online}
{buy |purchase |cheapest price |}[url=https://gigasoft.us/product/adobe_creative_suite_3_web_premium/]Adobe Creative Suite[/url]{| discount| online}
[url=https://gigasoft.us/product/adobe_creative_suite_3_master_collection/]Adobe Creative Suite[/url]
— buyadobepremierepro Jun 4, 03:12 AM #buy [url=https://gigasoft.us/product/adobe_after_effects_cs3_professional/]Adobe After Effects [/url] online
[url=https://gigasoft.us/product/adobe_creative_suite_3_design_premium/]Adobe Creative Suite[/url] online
soulful web site http://maturefuckings.com/friends-frotting-toy.html
— BryantWem Jun 4, 11:46 AM #Flirtatious men photo blog
— savannahfi3 Jun 4, 10:06 PM #http://gay-club.downloadism.top/?entry-braydon
[url=https://loveawake.ru/znakomstva/]Знакомства Переславль-Залесский, maks, 26 лет, Заниматься конным спортом, люблю работу! – Знакомства на Loveawake.Ru [/url]
— AlenaTax Jun 6, 04:05 PM #примерный веб ресурс [url=https://moscow.orgdir.ru/notarius-sitnikova-o.v-rublevskoe-shosse-c70000001017971554/]выезд нотариуса в офис метро Пионерская[/url] – нотариус выходного дня Кунцево, Заверить документы Молодежная.
— SamuelBurge Jun 6, 05:33 PM #Девушки вы покупали себе кольцо венера? Что можете посоветовать?
Абалакова Вета:
— silverlbinc Jun 7, 06:23 AM #Мужская печатка с камнем – прекрасный подарок на день рождения, юбилей, профессиональный праздник и даже без повода. Мужской перстень печатка – заметное украшение для настоящего мужчины. Вы сможете купить недорогие мужские кольца, цены которых. . , [url=http://silverthings.ru/product/pechatka-s-sapfirom/ style=‘color:#000; text-decoration:none;’]печатка с сапфиром[/url]. Даже если вы не лорд, ничего не мешает вам приобрести эффектные серебряные печатки с ониксом или черными фианитами. Мужская печатка с камнем – прекрасный подарок на день рождения, юбилей, профессиональный праздник и даже без повода. Сочетание драгоценного металла и холодного блеска камня произведет великолепный эффект и обратит на себя внимание. Нет каких-либо определенных правил в выборе и ношении данного украшении, достаточно одного перстня печатки и это будет смотреться достаточно модно и стильно. Печатка будет отличным подарком на день рождение, к юбилею, на профессиональный праздник или просто на добрую память от любящей женщины для любимого мужчины. Ювелирный салон Просто золото предлагает своим клиентам широкий выбор недорогих ювелирных печаток. Здесь вы можете приобрести и строгую золоту ю печатку недорого, и модель ювелирного украшения с бриллиантами умопомрачительной красоты. Мы предлагаем вам уникальную возможность, сидя в уютном кресле не выходя из дома приобрести уникальное ювелирное изделия, которое будет полностью отвечать вашему вкусу и вашим желаниям. Идеальное сочетание блеска камня и драгоценного металла помогут вам создать современный имидж настоящего мужчины и обратить на себя внимание окружающих..
highly praised web site [url=http://crackzipraronline.com]7z online password recover[/url] – crack archive, Pdf online password recover.
— Armandodut Jun 7, 09:53 AM #ТОП 5 Проекты 2017
— Ferminpoomi Jun 9, 08:14 AM #Продвижение ваших сайтов! Рассылка вашей рекламы по другим сайтам!Получи много клиентов! И заработай на этом.
— AyudfghUnlox Jun 9, 01:27 PM #Для заказа пройдите на сайт и обратитесь по контактам. сайт: http://progoni-xrumer.ru
[url=http://epanov-style.ru/internet_magazin_bluzok/zhenskie_topy/]купить блузку без рукавов[/url] – модная женская водолазка, недорогие платья без рукавов.
— StephenGal Jun 10, 07:42 AM #good site [url=http://www.guidaprestito.com/prestito-50000-euro]prestito di 50000 euro[/url]
— Charlesvar Jun 10, 09:16 PM #good website [url=http://www.laaninorge.com/30000/laan-25000-kr]Lane 25000 kr[/url]
— StephenZoste Jun 10, 09:16 PM #wh0cd783581 [url=http://zithromaxantibiotic.us.com/]Zithromax Antibiotic[/url]
— KennethBiodo Jun 11, 02:22 PM #Every day gay photos military talents
— harolddd60 Jun 12, 01:06 PM #http://photo.gay.teen.besttorrents.top/?entry-peyton
Трейдинг для успешных людей!
— RonaldAroft Jun 13, 07:27 PM #https://olymptrade.com/l/LPL47-02/affiliate?affiliate_id=216664&subid1=&subid2=
cheap price Autodesk AutoCAD Design Suite Ultimate 2015 cheap price Alien Skin Blow Up 3 with cheap price Cultured Code Things with cheap price Autodesk AutoCAD Inventor LT 2010 buy Micromat TechTool Pro 7 purchase <a href=“https://gigasoft.us/”]Adobe Creative Suite</a> cheap price iStat Menus 4 cheap Autodesk Inventor LT 2012 with cheap price Microsoft Visual Studio 2015 discount Sony Sound Forge Audio Studio 10 buy online Adobe InDesign CS5
— buyadobepremiere Jun 15, 10:44 PM #cost of product software in canada order pc software in canada where to buy pc software in au cheap software in canada best price for pc software in uk <a href=“https://gigasoft.us/”> cost of product software in canada </a> where to buy product software in au cheap pc software in de order software in de cost of product software in au cheap software in au
— purchaseadobepremiere Jun 15, 10:48 PM #where to buy software in us cost of pc software in au best price for product software in au <a href=“https://gigasoft.us/”> buy software in uk </a> best price for pc software in au order pc software in asia buy product software in asia
— buyadobepremiere Jun 15, 10:49 PM #cheap product software in de order product software in canada best price for pc software in canada [url=https://gigasoft.us/] order product software in us [/url] cheap software in uk where to buy product software in au where to buy pc software in us
cost of pc software in canada cost of pc software in asia order software in asia <a href=‘https://gigasoft.us/’> best price for pc software in asia </a> where to buy software in uk buy product software in canada buy product software in canada
— buyadobepremiere Jun 15, 10:56 PM #best price for software in asia where to buy product software in au where to buy pc software in de [url=https://gigasoft.us/] cheap product software in uk [/url] cost of pc software in de order product software in us buy software in uk
cheap pc software in uk best price for software in asia where to buy software in canada <a href=‘https://gigasoft.us/’> cost of product software in de</a> software in uk product software in uk cost of product software in canada
— purchaseadobepremiere Jun 15, 10:59 PM #buy pc software in asia cost of pc software in canada buy product software in au [url=https://gigasoft.us/] order software in canada[/url] cheap pc software where to buy pc software product software in canada
software in de buy product software in de software in uk <a href=‘https://gigasoft.us/’> where to buy product software </a> cost of pc software in uk where to buy software in asia best price for pc software
— purchaseadobepremiere Jun 15, 11:09 PM #where to buy product software in asia order software in us product software in uk [url=https://gigasoft.us/] cheap product software in us[/url] order product software order software in asia pc software in canada
cost of software buy product software in de cheap software <a href=‘https://gigasoft.us/’> best price for software in asia</a> best price for pc software in us buy pc software in au cost of pc software in de
— buyadobepremiere Jun 16, 01:03 AM #product software in uk best price for product software in canada cost of software in au [url=https://gigasoft.us/] cheap software in asia[/url] buy software where to buy product software in uk software
buy pc software in au pc software in uk best price for software in de <a href=‘https://gigasoft.us/’> best price for software in canada</a> order software best price for pc software in au product software in asia
— buyadobepremiere Jun 16, 01:07 AM #order product software where to buy product software in canada order pc software in au [url=https://gigasoft.us/] best price for software in uk[/url] cheap software in canada where to buy pc software in uk best price for software in us
best price for pc software in de best price for product software in asia cost of product software in au <a href=‘https://gigasoft.us/’> order software in au</a> where to buy pc software in uk pc software in de buy pc software in au
— buyadobepremierepro Jun 16, 01:28 AM #product software in us buy pc software in asia best price for pc software in canada [url=https://gigasoft.us/] buy pc software in uk[/url] buy software in au order software in canada cheap pc software in uk
buy pc software in au cheap product software in uk buy software in de <a href=‘https://gigasoft.us/’> cheap pc software in de</a> buy software in au order product software in uk cost of software in au
— buyadobepremierepro Jun 16, 01:33 AM #buy pc software in us where to buy pc software in us best price for product software in au [url=https://gigasoft.us/] cost of product software in au[/url] buy pc software order pc software in de best price for product software in de
where to buy product software in uk order software in de best price for product software in de <a href=‘https://gigasoft.us/’> order product software in de</a> cost of software in au order pc software in de buy product software in au
— buyadobepremiere Jun 16, 01:35 AM #buy pc software in us order pc software order software in au [url=https://gigasoft.us/] software in canada[/url] cheap software in canada product software in canada where to buy pc software in canada
cost of software order pc software in au cost of pc software in us <a href=‘https://gigasoft.us/’> best price for product software in canada</a> cheap pc software in asia product software in asia order software in au
— buyadobepremierepro Jun 16, 01:41 AM #cheap product software in uk software in de pc software [url=https://gigasoft.us/] where to buy product software [/url] where to buy pc software in de order pc software order pc software
buy pc software in de cost of product software in au where to buy pc software in de <a href=‘https://gigasoft.us/’> buy software in asia</a> where to buy software order pc software in au cheap software in canada
— buyadobepremiere Jun 16, 01:44 AM #buy software in canada buy software cost of software [url=https://gigasoft.us/] best price for product software [/url] product software in canada where to buy pc software in us cost of pc software in canada
product software buy software in uk best price for product software in au <a href=‘https://gigasoft.us/’> order product software in canada</a> where to buy pc software in de buy product software in uk cheap pc software in de
— purchaseadobepremiere Jun 16, 01:53 AM #buy pc software in uk cost of product software in canada cost of product software in canada [url=https://gigasoft.us/] cheap product software in au[/url] best price for pc software in de order software in au cheap pc software in au
order product software in uk order software in au product software in asia <a href=‘https://gigasoft.us/’> pc software in de</a> cheap pc software in asia cost of pc software where to buy product software in asia
— buyadobepremiere Jun 16, 03:48 AM #software in au cheap pc software buy product software [url=https://gigasoft.us/] buy software in canada[/url] cheap pc software in uk buy product software in uk best price for product software in au
cheap product software where to buy product software in asia cost of product software in de <a href=‘https://gigasoft.us/’> pc software in uk</a> where to buy product software in uk software in au order product software in de
— purchaseadobepremiere Jun 16, 03:52 AM #cost of pc software in us best price for product software in de product software in canada [url=https://gigasoft.us/] product software in uk[/url] software in asia software in us cost of product software in asia
buy product software in de pc software in us buy product software in uk <a href=‘https://gigasoft.us/’> order product software in canada</a> best price for pc software in canada buy pc software in uk pc software in canada
— buyadobepremiere Jun 16, 04:13 AM #cheap product software in uk best price for software in canada best price for product software in canada [url=https://gigasoft.us/] best price for product software in asia[/url] buy product software in de cheap software in uk where to buy product software
software in uk cheap product software in au best price for product software in asia <a href=‘https://gigasoft.us/’> cost of pc software in us</a> cost of pc software product software cheap product software in au
— purchaseadobepremiere Jun 16, 04:18 AM #best price for product software in asia cost of product software in canada cost of software in canada [url=https://gigasoft.us/] buy software in canada[/url] cheap pc software in asia where to buy product software in us cheap software
cheap software best price for software in asia where to buy pc software in asia <a href=‘https://gigasoft.us/’> where to buy product software in asia</a> where to buy software order pc software in uk best price for product software in au
— purchaseadobepremiere Jun 16, 04:19 AM #order product software in asia cost of pc software in asia cheap product software in uk [url=https://gigasoft.us/] buy pc software in us[/url] pc software in uk best price for pc software in canada cost of product software
buy product software in de product software order product software in canada <a href=‘https://gigasoft.us/’> pc software </a> cheap software cost of pc software in de best price for software in uk
— buyadobepremierepro Jun 16, 04:26 AM #buy product software in au order pc software in canada buy software in canada [url=https://gigasoft.us/] cheap pc software in us[/url] cheap pc software in canada product software best price for software in us
buy product software in asia where to buy software product software in uk <a href=‘https://gigasoft.us/’> cost of product software in de</a> cheap software in de where to buy pc software in uk buy pc software in de
— purchaseadobepremiere Jun 16, 04:29 AM #order pc software order pc software in us cheap product software in us [url=https://gigasoft.us/] cheap product software [/url] where to buy software in us best price for pc software in au order product software in de
where to buy product software in au cost of product software in us where to buy software in uk <a href=‘https://gigasoft.us/’> cost of pc software in de</a> where to buy pc software in us software in de buy product software in de
— buyadobepremiere Jun 16, 04:39 AM #cheap product software cost of product software in us where to buy software in asia [url=https://gigasoft.us/] buy pc software in de[/url] where to buy product software in de best price for product software in au cheap pc software in de
cost of software in au pc software in de order product software in de <a href=‘https://gigasoft.us/’> where to buy product software in au</a> product software in asia best price for pc software in asia where to buy pc software in uk
— purchaseadobepremiere Jun 16, 06:33 AM #best price for product software in de order software in asia where to buy product software [url=https://gigasoft.us/] cheap product software in us[/url] buy product software in de buy product software in asia best price for product software in de
Какая марка бетона? От чего зависит стоимость разных марок?
Переоценить значение бетона в строительстве невозможно. Без него не обходится практически ни одна стройка. Разобраться в марках бетона и определить потребности для определенных задач, нам как раз поможет данная статья.
Бетон, как известно, это смесь вяжущего, заполнителя и воды. Мы будем рассматривать бетон цементный (бывает еще и нецементный, например, силикатный) с заполнителем из песка и щебня (гравия).
Основной показатель — марка бетона по прочности (М50, М100, М200, М300, М350, М400 и так далее). Это среднее значение прочности используется в основном «частниками».
В проектных документах, как правило, указывается класс прочности бетона (гарантированное значение).
Марка бетона / обозначение
М100 В7,5
М150 В10
В12,5
М200 В15
М250 В20
М300 В22,5
М350 В25
Каждая марка бетона имеет конкретную область применения. Схематично это можно представить в таблице.
Назначение М100 М150 М200 М250 М300 М350
Бетонная подготовка + +
Стяжка пола + +
Фундамент + + + +
Лестницы + +
Несущие конструкции + +
Перекрытия +
Бассейны +
Как видим, для самого частого «потребителя» бетона — фундамента — вилка составляет от М200 до М350. Бетон М200 — самый распространенный, он чаще всего используется для ленточных фундаментов, М250 и М300 применяется на слабых грунтах, М350 используется для фундаментов промышленных объектов.
Теперь, давайте разберемся, сколько должен стоить один кубометр хорошего бетона по стандартам ГОСТ, который вполне достоин быть доставленным на объект с паспортом качества.
Цена на бетон зависит от:
1. Стоимости компонентов (песок, цемент, вода, наполнители);
2. Наличия добавок;
3. Марки (класса);
4. Производителя;
5. Сезона.
Самым дорогим компонентом в бетоне является цемент. Его содержание и марка напрямую влияют на получаемую марку (класс) бетона. Напомним, чем выше марка, тем выше прочность. Естественно бетон более высокой марки обойдется дороже.
Песок, гравий, щебень и др. наполнители должны быть тщательно очищены от грязи и других примесей во избежание снижения прочности бетона. Дополнительная очистка приводит к удорожанию получаемой смеси.
Сама по себе бетонная смесь отлично подходит для строительства различных конструкций, но существуют случаи, когда необходимо улучшить определенные качества раствора. На помощь приходят добавки. Существует множество добавок для бетона, улучшающих различные свойства раствора:
• подвижность;
• пластичность;
• водоудержание;
• скорость твердения;
• морозостойкость
И еще множество свойств. И снова, это ведет к удорожанию смеси….
Вы спросите нас – получается хороший бетон не может стоить дешево?… К сожалению наш ответ – да…
И мы хорошо понимаем, что одинаковые с виду консистенции разных марок бетона, могут иметь не только разную марочную прочность, но и не содержать столь необходимых по требованиям ГОСТ, добавок.
Стоит заметить и то, что весной цена на бетон резко возрастает с началом активизации строительного сезона (заводам нужно покрывать зимние убытки). Летом также дорожает и доставка, т.к. повышаются цены на топливо.
При покупке основными ориентирами для выбора смеси являются класс (марка), а также подвижность (текучесть). Еще нужно обратить внимание на разницу в способах доставки. Доставка бетона с подвижностью П1 и П2 осуществляется самосвалами. Бетон с подвижностью П3 и П4 доставляется на бетоносмесителях (миксерах). Стоимость доставки при помощи бетоносмесителя выше, чем при помощи самосвала.
Как сэкономить при покупке бетона
Первый фактор, влияющий на стоимость бетона, заключается в удаленности завода от строительной площадки. С этим фактором, надеюсь, все понятно.
Другой способ снизить стоимость заключается в использовании более дешевых наполнителей. Именно наполнителей, а не цемента, т.к. от количества и качества цемента зависит прочность конструкции. Например, к щебню и песку можно добавить различный металлолом, который к тому же улучшит прочностные свойства раствора, бой чистого кирпича или бетонных конструкций.
Раз уж мы заговорили об экономии на бетоне, то следует ответить вот на такой вопрос: Что дешевле, покупать бетон или замешивать самому? Естественно, речь идет о частных застройщиках.
Бытует ошибочное мнение, что пару кубометров бетона легче приготовить самому. Но давайте посмотрим на минусы такого подхода:
1. Компоненты (щебень, цемент, песок) нужно привезти, для этого заказывать отдельные машины;
2. Нужно платить рабочим за замесы раствора;
3. Раствор, приготовленный не в заводских условиях, с большой вероятностью не будет отвечать ожиданиям по прочности и однородности;
4. Укладка раствора будет происходить этапами, т.к. бетономешалка у вас скорей всего одна и она не безразмерная.
Надеюсь, наша статья поможет вам сделать правильный выбор и возможно сэкономить на покупке бетона, не ухудшая его основные технические параметры, такие как – прочность, морозостойкость и влагостойкость.
Вы хотите [url=http://стк-монолит.рф]купить бетон недорого[/url]? не теряя в качестве и стандартах? Нашим основным видом деятельности, является [url=http://стк-монолит.рф]производство и продажа бетона в Санкт-Петербурге[/url] и Ленинградской области строго по ГОСТ!.
— STK-Monolitmix Jun 16, 06:33 AM #order software in canada order software buy software <a href=‘https://gigasoft.us/’> pc software in asia</a> best price for pc software in au where to buy product software in au buy pc software in asia
— purchaseadobepremiere Jun 16, 06:37 AM #cost of software in uk cost of software in asia pc software in canada [url=https://gigasoft.us/] best price for product software in asia[/url] product software in canada order software in au cheap pc software in us
buy product software in canada cheap software in au where to buy product software in au <a href=‘https://gigasoft.us/’> cheap pc software in canada</a> where to buy pc software best price for software in us cost of product software
— buyadobepremiere Jun 16, 06:57 AM #cost of product software in au where to buy product software in asia order pc software in us [url=https://gigasoft.us/] software in us[/url] where to buy software in us where to buy product software in us best price for pc software in canada
buy pc software in canada where to buy software in us product software in asia <a href=‘https://gigasoft.us/’> buy product software in de</a> where to buy product software buy product software in asia where to buy product software in uk
— buyadobepremierepro Jun 16, 07:02 AM #cost of pc software in de software in de buy pc software in us [url=https://gigasoft.us/] cheap pc software in canada[/url] buy product software in de order pc software in de product software
where to buy pc software in uk where to buy product software in asia best price for pc software in us <a href=‘https://gigasoft.us/’> order product software </a> cheap software in uk cheap software in uk buy software in asia
— buyadobepremiere Jun 16, 07:03 AM #buy product software in canada pc software in asia product software in de [url=https://gigasoft.us/] product software [/url] buy pc software in us cost of pc software in canada buy product software in uk
software in us buy product software in de cost of software in us <a href=‘https://gigasoft.us/’> buy product software in asia</a> best price for software in uk software cost of product software in uk
— buyadobepremiere Jun 16, 07:10 AM #cost of product software in canada cheap software in asia buy product software in asia [url=https://gigasoft.us/] best price for product software in de[/url] buy pc software in us cheap pc software in asia where to buy pc software in de
software in us where to buy pc software in us best price for pc software <a href=‘https://gigasoft.us/’> buy product software in canada</a> best price for pc software in us cost of product software in canada buy pc software
— buyadobepremiere Jun 16, 07:13 AM #best price for product software in asia order software in uk cheap product software in de [url=https://gigasoft.us/] where to buy product software in canada[/url] order product software in de buy product software in au where to buy pc software in asia
cost of software in au buy product software in asia buy software <a href=‘https://gigasoft.us/’> buy software in au</a> cost of product software in canada software in uk product software in de
— purchaseadobepremiere Jun 16, 07:24 AM #where to buy pc software in canada order pc software in canada pc software in asia [url=https://gigasoft.us/] cheap pc software in au[/url] cost of software in us where to buy pc software in canada where to buy pc software in asia
best price for software in canada pc software in uk where to buy pc software in de <a href=‘https://gigasoft.us/’> best price for product software in uk</a> best price for pc software in us software in asia cheap product software in uk
— buyadobepremiere Jun 16, 09:21 AM #order software in uk best price for product software in asia buy pc software [url=https://gigasoft.us/] cost of software [/url] order pc software best price for product software in de best price for pc software in us
order product software in canada product software in de cheap software in de <a href=‘https://gigasoft.us/’> where to buy pc software in de</a> where to buy product software in asia where to buy software cheap product software in uk
— buyadobepremiere Jun 16, 09:25 AM #best price for product software in canada cost of pc software in asia where to buy pc software in uk [url=https://gigasoft.us/] cost of product software [/url] cost of software in au cheap pc software in asia order pc software in de
buy product software in asia buy software in uk buy software in uk <a href=‘https://gigasoft.us/’> cost of software in canada</a> cheap software in de buy product software software in de
— purchaseadobepremiere Jun 16, 09:47 AM #cost of product software in asia product software in uk best price for pc software in us [url=https://gigasoft.us/] buy pc software [/url] buy software in uk cost of software in au where to buy software in au
pc software where to buy product software in de order pc software <a href=‘https://gigasoft.us/’> where to buy product software in asia</a> buy product software in uk pc software in asia best price for software in asia
— buyadobepremierepro Jun 16, 09:52 AM #buy software in uk best price for pc software in us cost of product software in au [url=https://gigasoft.us/] product software [/url] pc software in uk order product software in uk software in de
where to buy product software in canada product software in uk order software in au <a href=‘https://gigasoft.us/’> order product software in au</a> product software in canada product software in us order product software in au
— buyadobepremiere Jun 16, 09:53 AM #where to buy product software in uk cheap software in au order pc software in de [url=https://gigasoft.us/] best price for product software in au[/url] pc software in us order pc software in canada where to buy software
cheap product software in asia pc software in au best price for product software in de <a href=‘https://gigasoft.us/’> order pc software in canada</a> where to buy product software in asia buy pc software in canada order software in au
— buyadobepremierepro Jun 16, 10:00 AM #cheap pc software in de software in au buy software in canada [url=https://gigasoft.us/] best price for software in asia[/url] pc software in us order pc software in de pc software in us
order product software in au best price for product software in uk buy pc software in de <a href=‘https://gigasoft.us/’> where to buy product software in asia</a> cheap pc software in us best price for pc software in au software in de
— purchaseadobepremiere Jun 16, 10:04 AM #where to buy pc software in canada cheap software in canada cost of product software in canada [url=https://gigasoft.us/] order software in uk[/url] where to buy software in au cost of software in asia product software in au
cheap product software in us where to buy software in de order software in asia <a href=‘https://gigasoft.us/’> cheap product software in au</a> cheap pc software in de where to buy software software in canada
— buyadobepremierepro Jun 16, 10:14 AM #order pc software in asia product software in de cheap product software in us [url=https://gigasoft.us/] cheap software in canada[/url] order product software in au product software in uk cost of product software in asia
order product software in canada buy software in de where to buy pc software in asia <a href=‘https://gigasoft.us/’> cost of pc software in uk</a> cheap product software in asia cheap pc software in canada buy product software in au
— buyadobepremierepro Jun 16, 12:07 PM #best price for product software in us where to buy software in asia cheap product software in canada [url=https://gigasoft.us/] buy pc software in canada[/url] order pc software product software in au best price for software in de
best price for pc software in us where to buy product software in asia where to buy software in asia <a href=‘https://gigasoft.us/’> where to buy product software in de</a> cost of pc software cheap pc software best price for software in uk
— purchaseadobepremiere Jun 16, 12:11 PM #cheap product software in de pc software in uk order product software in asia [url=https://gigasoft.us/] software in asia[/url] software in uk cost of pc software in us cheap software in au
where to buy software in asia best price for pc software in asia order software in uk <a href=‘https://gigasoft.us/’> order pc software in au</a> buy pc software in au cost of pc software in au where to buy product software in us
— buyadobepremiere Jun 16, 12:32 PM #order product software in de order pc software where to buy product software in uk [url=https://gigasoft.us/] where to buy software in asia[/url] cheap product software in uk best price for software in us where to buy product software in uk
buy software in uk best price for pc software in au cost of pc software in uk <a href=‘https://gigasoft.us/’> cost of product software in de</a> buy pc software in us cost of pc software in canada buy product software in de
— purchaseadobepremiere Jun 16, 12:37 PM #cheap software in canada cost of pc software in uk order pc software [url=https://gigasoft.us/] software [/url] buy software in de order software in asia pc software in au
cheap software in us order pc software in uk software in us <a href=‘https://gigasoft.us/’> software in uk</a> cheap pc software in asia order software in de where to buy pc software
— buyadobepremierepro Jun 16, 12:38 PM #where to buy product software in uk order pc software order pc software in asia [url=https://gigasoft.us/] where to buy pc software in us[/url] order pc software in asia where to buy software in canada cheap software
software in au where to buy software in canada where to buy software in uk <a href=‘https://gigasoft.us/’> product software in canada</a> cheap product software in de cost of pc software in canada where to buy software in asia
— purchaseadobepremiere Jun 16, 12:44 PM #cheap pc software in au buy software in canada pc software in canada [url=https://gigasoft.us/] where to buy pc software in de[/url] cheap software in au pc software buy software in us
pc software order product software in de buy pc software in canada <a href=‘https://gigasoft.us/’> cheap software in canada</a> cost of software in canada best price for product software in au buy product software in asia
— purchaseadobepremiere Jun 16, 12:47 PM #order product software in de order pc software in de best price for product software in au [url=https://gigasoft.us/] where to buy software in uk[/url] pc software in canada buy pc software in us cheap pc software
buy product software cost of pc software in us best price for pc software <a href=‘https://gigasoft.us/’> best price for software in au</a> cheap pc software in us order product software in asia cheap pc software in canada
— buyadobepremierepro Jun 16, 12:57 PM #cost of software in de where to buy product software in canada buy pc software in us [url=https://gigasoft.us/] cost of pc software [/url] best price for pc software in uk cheap pc software in canada cheap software in de
best price for product software product software in uk product software in de <a href=‘https://gigasoft.us/’> pc software in de</a> best price for product software in canada software in au where to buy pc software in us
— buyadobepremierepro Jun 16, 02:49 PM #order pc software where to buy product software software [url=https://gigasoft.us/] software in us[/url] cheap product software pc software in uk best price for product software in us
order software in uk where to buy product software in de cheap software in de <a href=‘https://gigasoft.us/’> best price for product software in de</a> order pc software in canada where to buy software in au software
— purchaseadobepremiere Jun 16, 02:53 PM #cheap pc software in asia product software where to buy software in de [url=https://gigasoft.us/] buy pc software in de[/url] order product software in canada where to buy product software in de where to buy product software in asia
buy pc software in au where to buy product software in uk where to buy pc software in uk <a href=‘https://gigasoft.us/’> buy software in asia</a> cheap product software where to buy pc software cheap software in de
— buyadobepremiere Jun 16, 10:28 PM #pc software in canada cheap pc software in au cost of product software in de [url=https://gigasoft.us/] order product software in de[/url] order product software in de where to buy software cheap pc software in asia
product software in asia order software in asia buy software in us <a href=‘https://gigasoft.us/’> where to buy pc software in au</a> product software in asia software in asia product software in canada
— buyadobepremierepro Jun 16, 10:33 PM #cost of software in uk buy product software in uk cheap software [url=https://gigasoft.us/] cheap pc software in de[/url] order pc software in us buy product software in us cost of product software in de
software in us cost of software order pc software in au <a href=‘https://gigasoft.us/’> best price for product software in us</a> buy software in us cheap product software in uk pc software in canada
— buyadobepremierepro Jun 16, 10:33 PM #buy software in asia best price for software in us where to buy software in de [url=https://gigasoft.us/] cheap software in canada[/url] where to buy product software in au best price for product software in canada best price for pc software in uk
buy software in uk cheap product software in asia cost of pc software in asia <a href=‘https://gigasoft.us/’> where to buy product software in uk</a> cost of pc software in au software in au pc software in us
— purchaseadobepremiere Jun 16, 10:40 PM #buy product software in canada order pc software in de buy software in de [url=https://gigasoft.us/] cheap software [/url] cost of software in us cheap pc software in uk cost of software
product software in us cheap product software in asia buy product software in asia <a href=‘https://gigasoft.us/’> order software in asia</a> where to buy product software in canada cost of software in canada buy pc software in au
— buyadobepremierepro Jun 16, 10:44 PM #cheap pc software in de where to buy pc software in us buy product software in au [url=https://gigasoft.us/] best price for pc software [/url] product software in us buy product software in uk buy software in canada
where to buy pc software in asia order product software buy product software in canada <a href=‘https://gigasoft.us/’> best price for product software </a> pc software in canada order software order software in au
— buyadobepremierepro Jun 16, 10:53 PM #cost of software in uk order pc software in de cheap pc software in uk [url=https://gigasoft.us/] cost of product software in us[/url] where to buy software product software in de where to buy software in au
cost of software software in canada buy product software in uk <a href=‘https://gigasoft.us/’> order pc software in us</a> product software in canada buy product software in asia best price for product software in us
— buyadobepremierepro Jun 17, 12:44 AM #best price for product software in us where to buy product software in uk buy software [url=https://gigasoft.us/] best price for product software in uk[/url] where to buy product software in uk best price for software pc software in canada
order product software in canada where to buy product software order pc software in de <a href=‘https://gigasoft.us/’> cost of pc software in au</a> cost of pc software in us best price for pc software in us cheap pc software in canada
— buyadobepremiere Jun 17, 12:48 AM #software in canada where to buy pc software in canada where to buy software [url=https://gigasoft.us/] where to buy product software [/url] product software in de cost of software in de product software in asia
best price for software in de pc software in asia buy pc software in de <a href=‘https://gigasoft.us/’> buy product software in us</a> pc software in de buy pc software in us cheap pc software in asia
— buyadobepremiere Jun 17, 01:10 AM #buy software in de cheap pc software in canada cost of software in de [url=https://gigasoft.us/] best price for pc software in uk[/url] order pc software where to buy software in de where to buy product software in asia
software in uk order pc software in us software in au <a href=‘https://gigasoft.us/’> cost of software in de</a> best price for product software in us buy product software in de buy product software in de
— buyadobepremierepro Jun 17, 01:15 AM #where to buy software in uk order product software in au best price for software in canada [url=https://gigasoft.us/] order product software in de[/url] software in uk cost of pc software in asia cost of product software in de
pc software cost of software in au order software in us <a href=‘https://gigasoft.us/’> cost of pc software in canada</a> buy pc software in au best price for product software in canada software in de
— buyadobepremiere Jun 17, 01:16 AM #buy software in au buy pc software pc software in de [url=https://gigasoft.us/] cheap pc software in uk[/url] order product software in au order pc software in asia cost of product software in canada
order pc software in au buy product software in asia product software <a href=‘https://gigasoft.us/’> best price for software in canada</a> where to buy product software in us where to buy software in us buy pc software
— buyadobepremierepro Jun 17, 01:22 AM #order software in uk buy pc software in canada where to buy software in uk [url=https://gigasoft.us/] order pc software in au[/url] where to buy software buy software in canada best price for pc software
order product software in de where to buy software in au order pc software in au <a href=‘https://gigasoft.us/’> cost of pc software in us</a> cost of software in au pc software in us buy product software in asia
— buyadobepremierepro Jun 17, 01:26 AM #order software in canada cheap pc software in uk order pc software in au [url=https://gigasoft.us/] where to buy software [/url] where to buy product software in de best price for software cheap software in asia
best price for pc software best price for pc software in uk cheap software in uk <a href=‘https://gigasoft.us/’> order software in au</a> cheap product software in asia cost of pc software in uk buy product software in us
— purchaseadobepremiere Jun 17, 01:36 AM #where to buy pc software in canada buy product software best price for software in de [url=https://gigasoft.us/] where to buy product software in de[/url] best price for pc software in de where to buy product software in uk where to buy product software in asia
software in de where to buy pc software in asia cheap software in canada <a href=‘https://gigasoft.us/’> best price for software in asia</a> best price for pc software in canada buy software in uk order pc software in au
— purchaseadobepremiere Jun 17, 03:32 AM #where to buy product software in au where to buy software in asia order software [url=https://gigasoft.us/] best price for pc software [/url] buy product software in de pc software in au best price for product software in uk
order software cheap software in canada order software in canada <a href=‘https://gigasoft.us/’> best price for software in us</a> buy pc software where to buy software in canada cheap product software in canada
— purchaseadobepremiere Jun 17, 03:35 AM #buy product software in canada order software in us best price for pc software in canada [url=https://gigasoft.us/] best price for software in canada[/url] buy pc software in uk where to buy pc software in canada product software
buy pc software in au cheap product software in au buy pc software in au <a href=‘https://gigasoft.us/’> buy pc software in uk</a> best price for product software in de pc software in uk order product software in uk
— purchaseadobepremiere Jun 17, 03:57 AM #pc software in canada order pc software in uk cheap software in au [url=https://gigasoft.us/] cost of software in canada[/url] cheap software in canada where to buy product software in de cost of product software in au
cost of software in us buy product software in asia buy software in canada <a href=‘https://gigasoft.us/’> where to buy software in us</a> cheap product software in canada cheap product software in canada where to buy software in canada
— buyadobepremierepro Jun 17, 04:02 AM #buy pc software in uk cost of product software in us cost of pc software in au [url=https://gigasoft.us/] software [/url] best price for software in au where to buy software in uk buy product software in uk
cost of pc software in de order product software in asia best price for product software in asia <a href=‘https://gigasoft.us/’> buy pc software in uk</a> software in asia order product software in de cheap product software in asia
— buyadobepremiere Jun 17, 04:03 AM #best price for software in de cost of product software in us cheap pc software in uk [url=https://gigasoft.us/] best price for pc software in de[/url] cheap pc software in au pc software in uk best price for software
best price for software where to buy software in us cheap product software in asia <a href=‘https://gigasoft.us/’> cheap pc software </a> where to buy pc software in de cost of pc software in asia where to buy pc software in uk
— buyadobepremiere Jun 17, 04:10 AM #cost of product software cheap software in us software [url=https://gigasoft.us/] best price for product software in asia[/url] pc software in us best price for software in asia cost of product software in uk
cost of product software cost of product software in asia software in asia <a href=‘https://gigasoft.us/’> cheap pc software in us</a> buy pc software order pc software in asia where to buy software in au
— buyadobepremiere Jun 17, 04:14 AM #best price for product software buy product software in au best price for software in de [url=https://gigasoft.us/] cost of product software [/url] pc software in au best price for pc software in canada pc software in au
best price for product software in canada buy pc software in de order product software in au <a href=‘https://gigasoft.us/’> where to buy product software </a> where to buy software in us cost of software in au cheap product software in us
— purchaseadobepremiere Jun 17, 04:24 AM #product software in asia pc software in asia where to buy software in uk [url=https://gigasoft.us/] software in us[/url] cost of software in uk order software in au best price for pc software
product software in de cheap pc software in us best price for product software in us <a href=‘https://gigasoft.us/’> order product software in canada</a> order product software in canada buy pc software in de order product software in asia
— purchaseadobepremiere Jun 17, 06:20 AM #cheap software in us order software where to buy software in de [url=https://gigasoft.us/] pc software [/url] cost of product software in us order software in asia where to buy product software
buy software in canada product software in de cost of software in canada <a href=‘https://gigasoft.us/’> where to buy pc software in au</a> order product software in uk cheap product software where to buy product software in uk
— buyadobepremierepro Jun 17, 06:23 AM #cheap pc software in au buy software in uk order pc software in us [url=https://gigasoft.us/] cheap software [/url] pc software in uk where to buy software in asia where to buy pc software in uk
pc software in asia order pc software in canada buy product software in canada <a href=‘https://gigasoft.us/’> cheap software in de</a> best price for pc software in au where to buy product software where to buy software in uk
— purchaseadobepremiere Jun 17, 06:45 AM #cheap pc software in asia where to buy product software in uk pc software in de [url=https://gigasoft.us/] cheap product software [/url] cost of software in uk cost of product software in uk cost of product software in canada
best price for pc software in canada order software in de best price for pc software in de <a href=‘https://gigasoft.us/’> cheap software in de</a> best price for software in asia order software in de cheap product software
— buyadobepremiere Jun 17, 06:50 AM #order pc software in us where to buy product software in de cheap software in us [url=https://gigasoft.us/] product software in de[/url] buy product software in uk cost of product software in au order pc software
software buy product software in canada cheap product software in au <a href=‘https://gigasoft.us/’> cost of product software in asia</a> cost of pc software in us where to buy software in asia product software in uk
— buyadobepremierepro Jun 17, 06:51 AM #cost of pc software in au where to buy product software in canada cheap pc software [url=https://gigasoft.us/] order pc software [/url] where to buy pc software in canada where to buy software in uk order product software
buy pc software product software in canada best price for software in au <a href=‘https://gigasoft.us/’> cost of pc software in canada</a> order software in us pc software in canada order pc software in de
— purchaseadobepremiere Jun 17, 06:57 AM #buy software cheap pc software in canada cheap product software in uk [url=https://gigasoft.us/] order pc software in de[/url] cheap product software buy pc software in uk buy pc software in canada
software in asia cheap pc software in uk cost of software in canada <a href=‘https://gigasoft.us/’> cheap pc software in de</a> product software in de software in canada cost of product software in uk
— buyadobepremiere Jun 17, 07:01 AM #pc software in us where to buy product software in au buy software [url=https://gigasoft.us/] buy product software in uk[/url] cheap software in canada best price for product software in asia where to buy product software in uk
where to buy product software in asia where to buy pc software in de buy pc software in asia <a href=‘https://gigasoft.us/’> cost of pc software in asia</a> cost of product software in us cheap pc software in au cost of product software in de
— buyadobepremiere Jun 17, 07:10 AM #where to buy product software in au best price for product software in au best price for pc software in us [url=https://gigasoft.us/] pc software in de[/url] product software cost of pc software in uk cost of product software in uk
buy product software in asia cheap product software in de buy product software in de <a href=‘https://gigasoft.us/’> buy pc software in asia</a> best price for product software in au product software buy pc software
— purchaseadobepremiere Jun 17, 09:05 AM #cheap software in canada cost of pc software order pc software [url=https://gigasoft.us/] best price for pc software in de[/url] cost of software where to buy product software in canada cost of product software in de
order pc software in asia product software in asia cost of pc software in canada <a href=‘https://gigasoft.us/’> where to buy pc software in au</a> cost of pc software in canada where to buy product software in asia buy software in canada
— buyadobepremiere Jun 17, 09:08 AM #best price for product software in asia best price for pc software in uk where to buy product software in de [url=https://gigasoft.us/] where to buy software in uk[/url] buy product software in us buy software in de cost of pc software
cost of software in au order software in uk cost of product software in de <a href=‘https://gigasoft.us/’> best price for product software </a> cost of pc software cheap pc software in asia cheap pc software in de
— buyadobepremiere Jun 17, 09:28 AM #buy software in us order product software in de pc software in canada [url=https://gigasoft.us/] where to buy pc software in au[/url] best price for software in us best price for software in us best price for product software in de
buy software cost of pc software in au pc software in asia <a href=‘https://gigasoft.us/’> order product software in asia</a> cost of pc software in asia cost of software in us where to buy pc software in canada
— buyadobepremiere Jun 17, 09:33 AM #cost of software in uk cheap product software in us where to buy software in uk [url=https://gigasoft.us/] order software in asia[/url] order product software in us buy pc software in canada where to buy software in us
cheap product software in asia buy product software cheap software <a href=‘https://gigasoft.us/’> best price for software in canada</a> buy pc software pc software in us cheap software in uk
— purchaseadobepremiere Jun 17, 09:34 AM #order product software cheap pc software in asia pc software in uk [url=https://gigasoft.us/] where to buy software [/url] product software in uk order pc software software in us
cheap pc software in us buy pc software in de cheap product software in asia <a href=‘https://gigasoft.us/’> cost of pc software in de</a> software in de best price for pc software in canada best price for software in au
— buyadobepremiere Jun 17, 09:40 AM #pc software in asia best price for pc software in canada pc software in au [url=https://gigasoft.us/] best price for software in au[/url] where to buy product software in canada order product software cheap software in canada
cheap software in asia cheap pc software in uk order software in de <a href=‘https://gigasoft.us/’> where to buy pc software in canada</a> buy pc software in uk best price for pc software in canada order software in de
— purchaseadobepremiere Jun 17, 09:43 AM #cost of software product software in us buy pc software in canada [url=https://gigasoft.us/] cheap pc software in asia[/url] cost of software in uk order software in au product software in asia
best price for pc software in au software in de order product software in de <a href=‘https://gigasoft.us/’> software in us</a> where to buy pc software in us order software in uk where to buy software in uk
— buyadobepremiere Jun 17, 09:52 AM #product software in asia where to buy software in asia where to buy product software in canada [url=https://gigasoft.us/] cheap pc software in uk[/url] best price for pc software in canada buy software software in canada
cheap product software in au best price for software in asia software in asia <a href=‘https://gigasoft.us/’> where to buy pc software in us</a> where to buy pc software in uk buy software in uk cheap software in us
— purchaseadobepremiere Jun 17, 11:44 AM #cost of software cheap pc software in uk order product software in us [url=https://gigasoft.us/] software in uk[/url] pc software in au product software in canada order pc software in au
buy product software in de pc software in canada cheap product software in us <a href=‘https://gigasoft.us/’> cheap product software </a> cost of product software in de buy pc software in canada cheap software in asia
— buyadobepremierepro Jun 17, 11:48 AM #cost of software in de where to buy product software cost of pc software in us [url=https://gigasoft.us/] best price for product software in uk[/url] where to buy pc software in au where to buy product software in au cost of pc software in canada
order software in uk where to buy product software in canada buy pc software in us <a href=‘https://gigasoft.us/’> order software in us</a> cost of software in de cost of product software in asia where to buy product software
— buyadobepremierepro Jun 17, 12:07 PM #order software in asia order product software in uk cheap software in canada [url=https://gigasoft.us/] product software in canada[/url] cost of product software in asia where to buy software in us order product software in asia
pc software in canada order product software in au cheap software in au <a href=‘https://gigasoft.us/’> best price for pc software in uk</a> order product software in us software in de product software in us
— purchaseadobepremiere Jun 17, 12:12 PM #best price for product software in au where to buy product software pc software in asia [url=https://gigasoft.us/] order product software in uk[/url] buy software buy software pc software in canada
cost of software in canada cheap pc software in asia where to buy software in uk <a href=‘https://gigasoft.us/’> buy product software in de</a> cost of pc software in uk cost of pc software in asia cheap pc software in au
— buyadobepremiere Jun 17, 12:13 PM #pc software in us best price for product software in us where to buy product software in asia [url=https://gigasoft.us/] where to buy software in asia[/url] cheap product software in us product software in au software in uk
best price for pc software in au cheap product software in uk cost of pc software in asia <a href=‘https://gigasoft.us/’> where to buy software in canada</a> where to buy product software in asia cheap software in au cost of software in de
— buyadobepremierepro Jun 17, 12:20 PM #buy software in asia buy product software in au order pc software in uk [url=https://gigasoft.us/] cheap pc software in uk[/url] cost of product software in us cost of pc software in asia where to buy software in au
cost of pc software in canada order software best price for software in de <a href=‘https://gigasoft.us/’> order pc software in canada</a> where to buy product software in au software in de cost of product software in canada
— buyadobepremiere Jun 17, 12:23 PM #cost of product software in canada where to buy pc software in de best price for software in asia [url=https://gigasoft.us/] buy pc software in au[/url] buy software in asia where to buy software in de where to buy software in asia
order software in uk cost of pc software in canada software in us <a href=‘https://gigasoft.us/’> cheap software </a> order pc software in canada best price for pc software in au cheap pc software in de
— purchaseadobepremiere Jun 17, 12:31 PM #where to buy pc software in de best price for pc software in asia order software in de [url=https://gigasoft.us/] best price for software in asia[/url] where to buy pc software in canada best price for software in canada where to buy product software in au
order pc software in uk cheap software in uk software in us <a href=‘https://gigasoft.us/’> cost of pc software in us</a> where to buy pc software in us buy software in de software
— buyadobepremiere Jun 17, 02:25 PM #cost of product software in au product software in canada best price for pc software in canada [url=https://gigasoft.us/] best price for software in us[/url] software in asia cost of pc software in uk where to buy software in de
cheap software in de order product software in asia buy pc software in de <a href=‘https://gigasoft.us/’> pc software in de</a> order product software in au best price for pc software where to buy product software in asia
— purchaseadobepremiere Jun 17, 02:29 PM #cheap software buy product software in canada cheap pc software in asia [url=https://gigasoft.us/] cheap software [/url] where to buy pc software in uk where to buy pc software in us buy software
order software in uk cheap pc software in uk software in de <a href=‘https://gigasoft.us/’> order software in uk</a> product software cheap product software in uk software
— buyadobepremiere Jun 17, 02:50 PM #where to buy software in de cost of software in au cost of software [url=https://gigasoft.us/] best price for product software in asia[/url] cost of pc software in asia cheap product software in us order product software in canada
order software in us buy pc software cheap software in au <a href=‘https://gigasoft.us/’> best price for software in canada</a> cost of software in de where to buy software in us order product software in uk
— buyadobepremierepro Jun 17, 02:55 PM #buy product software in us cheap product software in au where to buy pc software [url=https://gigasoft.us/] where to buy product software in de[/url] order software in au best price for software in us software in de
cost of software in de where to buy pc software in asia buy software in au <a href=‘https://gigasoft.us/’> best price for pc software in us</a> cost of product software in asia cheap software in canada buy software in au
— buyadobepremiere Jun 17, 02:56 PM #order product software in asia where to buy pc software in au order product software [url=https://gigasoft.us/] cost of pc software in asia[/url] where to buy software in uk order product software in uk buy software in au
order pc software in asia best price for product software in us cost of pc software in canada <a href=‘https://gigasoft.us/’> cheap pc software in de</a> cheap software in asia cost of software in de cheap pc software in us
— purchaseadobepremiere Jun 17, 03:02 PM #best price for pc software in au cheap product software in uk cheap pc software in uk [url=https://gigasoft.us/] software in de[/url] cost of software in au cost of software in asia order pc software in us
order product software in au cost of pc software in canada cost of pc software in uk <a href=‘https://gigasoft.us/’> best price for pc software </a> buy software in asia cheap product software in asia cheap software in canada
— buyadobepremierepro Jun 17, 03:06 PM #cost of product software in canada software in uk where to buy software [url=https://gigasoft.us/] buy pc software in us[/url] product software in au software in asia cost of pc software in uk
buy product software in de cheap pc software in uk cheap product software in asia <a href=‘https://gigasoft.us/’> cost of software in uk</a> product software in au order product software in canada cheap software in uk
— purchaseadobepremiere Jun 17, 03:15 PM #cheap pc software in de best price for software in us buy software in au [url=https://gigasoft.us/] cost of software [/url] where to buy software best price for pc software cheap pc software in asia
cheap product software in au where to buy software in us best price for software in canada <a href=‘https://gigasoft.us/’> pc software in de</a> buy product software in de cost of pc software in uk buy product software in us
— buyadobepremiere Jun 17, 05:07 PM #order software in uk buy product software in asia order product software in de [url=https://gigasoft.us/] cost of pc software [/url] cost of pc software in de order product software in au order pc software in uk
best price for product software in asia order pc software buy software in de <a href=‘https://gigasoft.us/’> cost of software in au</a> where to buy pc software in canada buy software cost of product software in de
— buyadobepremiere Jun 17, 05:11 PM #cheap pc software in canada cheap software in canada pc software in us [url=https://gigasoft.us/] software in uk[/url] software in us buy product software in us where to buy product software in asia
buy product software product software in de best price for product software in canada <a href=‘https://gigasoft.us/’> cost of product software </a> buy software in au where to buy pc software in asia buy software in asia
— purchaseadobepremiere Jun 17, 05:30 PM #where to buy pc software in asia best price for pc software in de best price for product software in au [url=https://gigasoft.us/] software in canada[/url] pc software in uk buy pc software in asia pc software in asia
order product software order product software in de cheap software in de <a href=‘https://gigasoft.us/’> cost of software in canada</a> buy product software cost of pc software in canada cheap product software in canada
— purchaseadobepremiere Jun 17, 05:35 PM #cheap product software in us best price for pc software in de cost of software in au [url=https://gigasoft.us/] cost of software [/url] where to buy product software in uk order software in uk best price for product software in de
where to buy pc software where to buy product software in us best price for pc software in asia <a href=‘https://gigasoft.us/’> buy software in de</a> order product software in au cost of software in au buy software in au
— buyadobepremiere Jun 17, 05:36 PM #cheap software in us cheap product software in asia pc software in de [url=https://gigasoft.us/] cost of product software in canada[/url] cost of product software in uk order software in uk where to buy product software in au
cost of software cost of pc software cheap product software in asia <a href=‘https://gigasoft.us/’> cheap software </a> best price for pc software in uk cheap product software in de best price for pc software in canada
— buyadobepremierepro Jun 17, 05:42 PM #buy software in asia software in canada where to buy product software in canada [url=https://gigasoft.us/] cost of software [/url] cost of software in us where to buy product software in uk buy pc software in uk
product software in uk cheap product software where to buy pc software in canada <a href=‘https://gigasoft.us/’> cost of pc software in us</a> software in canada buy pc software in uk order pc software in us
— purchaseadobepremiere Jun 17, 05:45 PM #cheap software in au buy software in uk software in au [url=https://gigasoft.us/] best price for product software in asia[/url] cost of product software in au where to buy pc software in uk order software in canada
buy product software in uk where to buy software in uk pc software in us <a href=‘https://gigasoft.us/’> cost of product software in de</a> buy software in us order pc software in canada buy pc software
— buyadobepremiere Jun 17, 05:54 PM #cheap product software in de where to buy software in canada cost of product software in asia [url=https://gigasoft.us/] buy software [/url] buy software in asia where to buy software in de cost of product software in de
cheap product software in uk buy pc software in canada buy product software in us <a href=‘https://gigasoft.us/’> product software in au</a> order product software in au best price for pc software in asia order product software in au
— purchaseadobepremiere Jun 17, 07:46 PM #product software in canada where to buy software in canada cheap software in canada [url=https://gigasoft.us/] cost of product software in us[/url] cheap software in canada cheap software in de where to buy software in asia
order software in au software in uk buy product software in uk <a href=‘https://gigasoft.us/’> order software in asia</a> cost of pc software in canada where to buy pc software in us order pc software in de
— purchaseadobepremiere Jun 17, 07:49 PM #where to buy product software in au order pc software buy software in canada [url=https://gigasoft.us/] order software in de[/url] order pc software where to buy pc software in de where to buy pc software in de
where to buy pc software in uk cost of product software in au cost of pc software in au <a href=‘https://gigasoft.us/’> best price for product software in asia</a> where to buy product software in us pc software in asia cost of product software in us
— buyadobepremierepro Jun 17, 08:09 PM #cost of pc software in asia cost of product software in uk best price for software in au [url=https://gigasoft.us/] product software in uk[/url] order pc software in uk software in au order software in de
buy pc software in de order software cheap software in us <a href=‘https://gigasoft.us/’> buy pc software in uk</a> best price for software in au order software in us pc software in asia
— buyadobepremierepro Jun 17, 08:14 PM #cheap software where to buy software in de buy software in canada [url=https://gigasoft.us/] best price for product software [/url] cheap pc software in canada buy pc software in canada cost of pc software
cheap product software in us order software in uk order software in au <a href=‘https://gigasoft.us/’> cost of pc software </a> cheap software in au cheap product software in us buy product software in canada
— purchaseadobepremiere Jun 17, 08:15 PM #buy software in canada cheap software in uk cheap product software in de [url=https://gigasoft.us/] cheap pc software in au[/url] cheap product software in us where to buy product software in de best price for pc software
buy pc software in asia buy pc software in asia cost of product software in us <a href=‘https://gigasoft.us/’> best price for product software in de</a> order software in us pc software order pc software in au
— buyadobepremiere Jun 17, 08:21 PM #software where to buy product software in canada best price for software in au [url=https://gigasoft.us/] pc software in canada[/url] cheap pc software where to buy software in de cheap software in asia
cost of software in de buy pc software in asia buy product software in au <a href=‘https://gigasoft.us/’> pc software in us</a> where to buy product software in asia order software in de cheap software
— buyadobepremierepro Jun 17, 08:24 PM #order product software in de buy software in asia order software in us [url=https://gigasoft.us/] best price for product software in canada[/url] buy product software cost of product software order software in canada
where to buy product software in asia software best price for pc software in asia <a href=‘https://gigasoft.us/’> where to buy pc software </a> cheap pc software in asia cost of pc software in de buy software in uk
— buyadobepremierepro Jun 17, 08:33 PM #buy pc software in asia software in canada pc software in asia [url=https://gigasoft.us/] pc software in uk[/url] cost of software cost of software in uk software in canada
Ламинин в Виннице-Винница от 28 usd http://1541.ru +38097-613-1437
— Ferminpoomi Jun 17, 08:40 PM #cost of pc software in us cost of software in canada best price for software in asia <a href=‘https://gigasoft.us/’> where to buy pc software in us</a> cost of product software in us buy pc software in de best price for software
— buyadobepremierepro Jun 17, 10:24 PM #buy software in de pc software where to buy product software in canada [url=https://gigasoft.us/] buy pc software [/url] order software in us best price for pc software in asia cheap product software in us
cost of pc software in uk best price for pc software in de cost of product software in au <a href=‘https://gigasoft.us/’> pc software in uk</a> pc software in asia order software in asia buy software in uk
— buyadobepremierepro Jun 17, 10:28 PM #where to buy product software in us where to buy product software in au cost of software [url=https://gigasoft.us/] order product software in uk[/url] order pc software in asia pc software in de cost of pc software in au
where to buy software in canada best price for product software in uk best price for software in uk <a href=‘https://gigasoft.us/’> cheap product software in asia</a> order product software order pc software in canada where to buy software in asia
— buyadobepremiere Jun 17, 10:47 PM #order product software in us best price for pc software in de best price for product software in asia [url=https://gigasoft.us/] best price for product software in uk[/url] cheap pc software in us where to buy product software in asia buy product software in de
buy software in canada best price for pc software in canada product software in de <a href=‘https://gigasoft.us/’> software in au</a> where to buy pc software in asia buy pc software in us pc software in asia
— buyadobepremiere Jun 17, 10:52 PM #order software in de cost of pc software in us best price for software [url=https://gigasoft.us/] software in asia[/url] order software product software in de cheap pc software in asia
pc software in asia where to buy product software in au buy pc software in asia <a href=‘https://gigasoft.us/’> where to buy product software </a> cheap product software product software in au order software in asia
— buyadobepremierepro Jun 17, 10:53 PM #buy software in au cost of product software in canada cost of product software in us [url=https://gigasoft.us/] pc software in au[/url] pc software in uk best price for software best price for pc software in canada
software in canada where to buy software in uk cheap pc software in de <a href=‘https://gigasoft.us/’> buy product software in de</a> buy software in uk best price for software in canada cost of product software
— buyadobepremierepro Jun 17, 10:59 PM #cost of software buy software in de cost of pc software in canada [url=https://gigasoft.us/] cheap pc software [/url] best price for software in de software in canada best price for product software
product software in asia buy software in canada best price for product software in uk <a href=‘https://gigasoft.us/’> best price for software in canada</a> order product software in us buy software in de cheap software in canada
— purchaseadobepremiere Jun 17, 11:02 PM #best price for pc software in us where to buy product software in us cheap pc software in asia [url=https://gigasoft.us/] software in us[/url] cheap product software in canada where to buy product software in de where to buy product software in de
cost of product software in canada best price for product software cost of product software in asia <a href=‘https://gigasoft.us/’> cost of software </a> order pc software in au cost of product software in uk cost of pc software in uk
— purchaseadobepremiere Jun 17, 11:11 PM #software in uk where to buy pc software in au buy product software in us [url=https://gigasoft.us/] best price for pc software [/url] pc software cost of software in uk buy software
first website http://www.sofortkredit.com.de/
— MichaelWam Jun 19, 04:42 PM #select website http://www.kreditvergleich.com.de/10000/5000-euro
— Timothykit Jun 19, 04:42 PM #good-neighbourly website http://www.guenstigekreditevergleich.com/kredit-mit-70-jahren/kredit-mit-63-jahren
— ThomasTup Jun 19, 05:24 PM #good-natured resource http://www.sofortkreditonline.org/kredit-24-monate-laufzeit
— Michaeldex Jun 19, 06:09 PM #sex cam sex chat cam4 sex cams gay cam <a href=“http://blackwebcam.us/”>teen webcam</a> cam chat webcam girls adult chat real life cam teen webcam
— MichaelGumma Jun 23, 06:46 AM #favourable website http://www.hado756saigon.co/submap3187.xml
— Arthurnog Jun 23, 05:15 PM #wh0cd364842 [url=http://lasixmedication.us.com/]lasix medication[/url]
— MichaelSoush Jun 23, 09:00 PM #Hello )))I have such a situation, a shortage of money to buy a car. I have a bad credit history. I would like to know the opinion of Internet users loans – where better to take a loan. please advise. use the search engine Google, did not inspire confidence. Please give a link and description of the company, which can provide 100% loan for those with bad credit history Thanks in advance
— Donaldpa Jun 24, 04:06 PM #уместный веб ресурс http://home-milf.info/zhena/
— Tomasholla Jun 25, 05:50 AM #добродетельный сайт [url=https://okvartirka.ru]снять двухкомнатную квартиру в Москве[/url] – снять квартиру в москве недорого, снять двухкомнатную квартиру в Москве.
— JefferyStulk Jun 25, 08:45 PM #[url=http://xn—163-iddugo9b1a5b.xn—p1ai/transport]вывоз металлолома [/url] – заказать грузчиков тольятти, газели грузоперевозки.
— Davidcar Jun 27, 10:11 AM #corporate website http://ampersandcharacters.com/factors/factors672factors675.html
— Miltonobese Jun 27, 03:23 PM #comfortable website http://eunitconverter.com/meters/miles/3880
— Robertgex Jun 27, 03:23 PM #good website http://percentageoffcalculator.com/percent/35-percent-off-535.html
— Coreyfep Jun 27, 03:56 PM #irresistible resource http://reversephonlookup.com/225/721/
— Ramirodep Jun 27, 03:57 PM #[url=http://aceon.world/]buy aceon[/url]
— Bennyboits Jun 28, 04:19 AM #[url=http://aceon.world/]aceon[/url]
— Bennyboits Jun 28, 05:20 AM #[url=http://aceon.world/]related site[/url]
— Bennyboits Jun 28, 06:20 AM #good site http://drugsandpla.com/?c=drug&s=nordex
— Abrahamneunk Jun 28, 08:18 AM #benign site http://joybabynames.com/?name=Allie
— Davidslemi Jun 28, 08:18 AM #highly praised website http://snsntnc.com/english-words/most-used/may.htm
— EstebanMof Jun 29, 06:11 AM #soulful site http://bestnamelist.com/surname/Kabia
— DonaldBob Jun 29, 06:11 AM #cool site http://brandedandgenericdrugs.com/?s=linezox
— Kevinhop Jun 29, 08:03 AM #good website http://howlongaago.com/date/2016/may/14
— Harrywig Jun 29, 08:03 AM #sensor web site http://providersy.com/zipcode/84319
— Robertkeype Jun 30, 06:17 PM #a hefty resource http://equationssolver.com/7.6666_as_a_decimal
— JamesHip Jun 30, 06:18 PM #positive resource http://azwordsearch.com/tools/unscrambler/anpeetci
— Thomassnice Jun 30, 06:18 PM #[url=https://sexchat.us.com/]sex chat[/url]
— Mikeben Jul 1, 04:29 PM #significant website http://topgooglemaps.com/satellite/Dulabo
— Leonardelelt Jul 1, 09:26 PM #[url=https://essaywritingservice.us.com/]professional essay writing services[/url]
— Mikeben Jul 2, 02:44 AM #Привет товарищи!
— delmetuxq Jul 2, 08:47 AM #ООО «Деловой металл» предлагает изготовленные на собственном оборудовании металлические (стальные) двери. Производство полностью ориентированно на Клиента — мы учитываем все рекомендации, чтобы результат не только соответствовал ожиданиям, но и превосходил их. Независимо от того, каким образом Вы сделали заказ, Вам предоставляется консультация специалиста и делается предварительный расчет стоимости.
1)[url=https://delmet.by]металлические двери в минске[/url] -Можно заказать в нашей компании ООО «Деловой металл». Мы сформировали крупную организацию с четким направлением деятельности, заключающейся в изготовлении, реализации, установке металлических дверей.
2)[url=https://delmet.by]установка входных дверей в минске[/url] – Имея широкий ассортимент продукции, мы составили каталог, чтобы облегчить такую сложную задачу, как выбор двери для дома, квартиры, общественного здания. Мы предлагаем вам только прочные, надежные металлоконструкции. Исходя из практики, многие клиенты подтвердят, что белорусские металлические входные двери Минске служат долго, без претензий в процессе эксплуатации.
3)[url=https://delmet.by]стальные двери минск[/url] -Мы используем для производства новейшее оборудование. Такой подход дает возможность изготавливать высококачественные двери. Наличие своей технической базы является необходимым условием для процветания такого ответственного производства, как изготовление стальных дверей.
4)[url=https://delmet.by]металлические двери под заказ минск[/url] – Мы заботимся о том, чтобы предоставляемый нами сервис был высокого уровня. В этом нам помогает наличие главного офиса, складов для готовой продукции, сети дилеров. Кроме того, мы дорожим своей репутацией и несем ответственность за качество каждой изготовленной единицы товара.
5)[url=https://delmet.by]металлические двери[/url] – Качество нашей продукции прошло испытание и проверку временем.Приемлемые цены для наших заказчиков.
6)[url=https://delmet.by]противопожарные двери[/url] – Наши противопожарные двери можно устанавливать в жилых и нежилых помещениях. Техника безопасности обязывает оборудование такими дверями складских помещений, в которых хранятся легковоспламеняющиеся вещества или проходит производство определенной группы химической продукции.
[url=https://delmet.by/]производство установка металлических дверей[/url]
[url=https://delmet.by/]стальные двери белорусского производства[/url]
[url=https://delmet.by/]входные двери белоруссии отзывы[/url]
[url=https://delmet.by/]двери входные металлические минск от производителя[/url]
[url=https://delmet.by/]компании металлических дверей[/url]
[url=https://essaywritingservice.us.com/]college essay writing services[/url]
— Mikeben Jul 2, 01:28 PM #a0nns9×9ovl3nbsn5v
[url=http://google.us]google[/url]
<a href=http://google.us>google</a>
dzrj2wpg5q1u1huzvv
— JerryTix Jul 2, 06:01 PM #[url=https://essaywritingservice.us.com/]essaywritingservice.us.com[/url]
— Mikeben Jul 3, 12:48 AM #brmt4rq23fhr7zn3ab
[url=http://google.us]google[/url]
<a href=http://google.us>google</a>
23u1pwxgryll7b2jyl
— JerryTix Jul 3, 04:36 AM #хорошенький ресурс [url=http://www.neftmash.com/]Стальное литье[/url]
— Wesleyzes Jul 3, 10:33 AM #[url=http://uchetunet.su/%D0%A1%D1%87%D0%B5%D1%82%D1%87%D0%B8%D0%BA%D0%B8/%D0%AD%D0%BB%D0%B5%D0%BA%D1%82%D1%80%D0%B8%D1%87%D0%B5%D1%81%D0%BA%D0%B8%D0%B5/%D0%BC%D0%BE%D0%B4%D0%B5%D0%BB%D0%B8-%D1%81%D1%87%D0%B5%D1%82%D1%87%D0%B8%D0%BA%D0%BE%D0%B2-%D1%81-%D0%]электрические счетчики с пультом[/url] – электрические счетчики с пультом, газовый счетчик с пультом.
— BradyEffip Jul 3, 03:19 PM #kindhearted site http://s.truemanuals.net/ib-math-sl-tests-logs-and-exponents/
— Richardcar Jul 5, 07:36 PM #weather site http://www.booboxo.com/pdf-for-canon-d1-mark-ii-manual/
— Ralphhah Jul 7, 08:52 PM #Revolutional update of SEO/SMM software “XRumer 16.0 + XEvil 3.0”:
captcha recognition of Google, Facebook, Bing, Hotmail, SolveMedia, Yandex,
and more than 8400 another size-types of captcha,
with highest precision (80..100%) and highest speed (100 img per second).
You can connect XEvil 3.0 with all most popular SEO/SMM software: XRumer, GSA SER, ZennoPoster, Srapebox, Senuke, and more than 100 of other software.
Interested? There are a lot of impessive videos about XEvil in YouTube.
— MashaWen Jul 8, 02:54 AM #Good luck ;)
Вагонка – это пиломатериал идеально строганный, который сразу же применяется в декоре помещений как внутри так и снаружи строения.
Она представляет собой не толстую, определенного размера длинны и ширины. Вагонку изготавливают как из дешевых сортов древесины так и с дорогих.
Вагонка киев разделяется на сорта в зависимости от качества дерева и столярных работ.Низшим сортом является сучки на пиломатериале,
их количество и размеры, смолянистые выделение на древесине, наличие коры, присутствие гнили или отверстия от жуков, неровность, вмятины и т.д.
Если и присутствует один из вышеперечисленных дефектов в вагонке киев,
— StaslMEW Jul 8, 04:56 PM #такую древесину можно купить подешевле и использовать в строительстве как стройматериал не учитывая эстетики.
Вагонка разделяется на сорта: Высший сорт, первый, второй и третий.
Также довольно часто в последнее время набирает популярности Евровагонка.
Это пиломатериал отличается более высокой ценой и техническим характеристикам Европейских стран (DIN 68-126).Вагонка из хвойных пород дерева считается более дешевой.
Она по характеристикам уступает лиственным породам древесины, но и в строительстве имеет свое место.
Хвойная древесина имеет низкую стойкость к повышенной температуре.
Такую вагонку можно применить в обшивке балконов, для внешней отделки тоже хорошо подходит,
хоть и со временем меняет цвет на более темный.
Для внутренней отделки натуральной вагонкой из хвои придаст помещению приятный запах лесной природы.
https://eco-les.club/news/vagonka
[url=https://eco-les.club/news/vagonka]Вагонка[/url]
[url=https://eco-les.club/news/vagonka]вагонка[/url]
[url=https://eco-les.club/news/vagonka]вагонка киев[/url]
[url=https://eco-les.club/news/vagonka]вагонка купить[/url]
[url=https://eco-les.club/news/vagonka]вагонка цена[/url]
[url=https://eco-les.club/news/vagonka]вагонка украина[/url]
wh0cd132697 [url=http://buyzantac.world/]zantac eq[/url] [url=http://hytrin.reisen/]hytrin 2mg[/url] [url=http://calan.reisen/]calan[/url] [url=http://buymirapex.reisen/]buy mirapex[/url] [url=http://remeron.reisen/]remeron[/url]
— Alfreddut Jul 9, 06:09 PM #wh0cd132697 [url=http://shallaki.reisen/]generic shallaki[/url] [url=http://styplon.world/]styplon[/url] [url=http://mestinon.reisen/]mestinon[/url] [url=http://detrol.world/]detrol xl[/url] [url=http://clozaril.world/]clozaril[/url]
— Charlesnef Jul 9, 06:42 PM #wh0cd132697 [url=http://acyclovir.us.org/]full article[/url] [url=http://nolvadexforsale.us.com/]nolvadex for sale[/url]
— Charlesnef Jul 9, 07:07 PM #wh0cd279643 [url=http://buyprednisone.us.org/]prednisone 20mg by mail order[/url] [url=http://tetracycline.us.org/]tetracycline online[/url]
— Bennyboits Jul 9, 08:40 PM #wh0cd279645 [url=http://baclofen.systems/]baclofen[/url] [url=http://avodart.world/]avodart price[/url] [url=http://buymotilium.reisen/]motilium canada[/url] [url=http://tadalafil20mg.pro/]tadalafil[/url] [url=http://buypropecia.shop/]propecia[/url]
— Charlesnef Jul 9, 09:24 PM #wh0cd206170 [url=http://bentylcost.us.com/]Bentyl Cost[/url]
— Charlesnef Jul 9, 09:37 PM #wh0cd353119 [url=http://losartanhydrochlorothiazide.us.com/]order hydrochlorothiazide[/url]
— Bennyboits Jul 9, 09:41 PM #wh0cd353120 [url=http://buycolchicine.us.org/]buy colchicine[/url]
— Charlesnef Jul 9, 10:52 PM #wh0cd500066 [url=http://celexa.us.org/]generic celexa[/url]
— KennethBiodo Jul 10, 12:40 AM #wh0cd353118 [url=http://buyamoxil.us.org/]BUY AMOXIL[/url] [url=http://toradol20mg.us.com/]toradol 20 mg[/url]
— Alfreddut Jul 10, 01:34 AM #wh0cd500068 [url=http://genericadvair.us.com/]buy advair diskus no rx[/url] [url=http://trazodone.us.org/]trazodone[/url]
— Bennyboits Jul 10, 01:39 AM #wh0cd426593 [url=http://copegus.world/]read full article[/url] [url=http://aceon.world/]aceon[/url] [url=http://levothroid.world/]levothroid[/url] [url=http://zebeta.world/]zebeta[/url] [url=http://florinef.world/]florinef[/url]
— Charlesnef Jul 10, 03:39 AM #wh0cd647014 [url=http://motrin800.us.com/]buy motrin[/url]
— Charlesnef Jul 10, 03:40 AM #wh0cd500068 [url=http://lasixnoprescription.us.com/]lasix no prescription[/url]
— Alfreddut Jul 10, 04:27 AM #wh0cd647016 [url=http://cymbalta60mg.us.com/]Cymbalta[/url] [url=http://metformin.us.org/]generic metformin[/url]
— KennethBiodo Jul 10, 04:47 AM #wh0cd500066 [url=http://genericbentyl.us.com/]BENTYL ONLINE[/url] [url=http://yasminbirthcontrol.us.com/]yasmin ocp[/url]
— Charlesnef Jul 10, 05:50 AM #wh0cd500066 [url=http://hydrochlorothiazide25mg.us.com/]cheap hydrochlorothiazide[/url] [url=http://genericsynthroid.us.com/]Synthroid No Rx[/url]
— Alfreddut Jul 10, 05:59 AM #wh0cd720489 [url=http://buyinderal.us.org/]inderal la 80 mg[/url] [url=http://yasminbirthcontrol.us.com/]Yasmin Online[/url]
— KennethBiodo Jul 10, 06:36 AM #wh0cd30602 [url=http://metformin500mg.us.com/]more hints[/url]
— Bennyboits Jul 10, 08:14 AM #wh0cd647016 [url=http://cipro.us.org/]CIPRO[/url] [url=http://buystrattera.us.org/]straterra order[/url]
— Alfreddut Jul 10, 08:25 AM #wh0cd104077 [url=http://orderdiflucanonline.us.com/]Order Diflucan[/url]
— Bennyboits Jul 10, 09:46 AM #wh0cd647015 [url=http://buyvaltrex.us.org/]Valtrex Discount[/url]
— Alfreddut Jul 10, 09:55 AM #wh0cd177548 [url=http://buypropecia.us.org/]finasteride[/url]
— Charlesnef Jul 10, 11:46 AM #wh0cd720488 [url=http://cephalexin500.us.com/]Cephalexin Sale[/url]
— Alfreddut Jul 10, 11:54 AM #wh0cd30600 [url=http://buyatrovent.reisen/]atrovent[/url] [url=http://effexor.tools/]effexor[/url] [url=http://fluoxetine.schule/]fluoxetine dr[/url] [url=http://valtrex.news/]valtrex[/url] [url=http://bupropion.live/]bupropion[/url]
— Alfreddut Jul 10, 12:57 PM #wh0cd793965 [url=http://clindamycin.us.org/]clindamycin buy[/url]
— Charlesnef Jul 10, 01:28 PM #wh0cd251027 [url=http://genericwellbutrin.us.com/]Generic Wellbutrin[/url]
— Bennyboits Jul 10, 01:40 PM #wh0cd251023 [url=http://buycymbalta.us.org/]Buy Cymbalta[/url]
— Charlesnef Jul 10, 02:07 PM #wh0cd104075 [url=http://buyeffexor.us.org/]cost of effexor[/url] [url=http://erythromycin500mg.us.com/]Erythromycin[/url]
— Alfreddut Jul 10, 02:48 PM #wh0cd30600 [url=http://suhagra247.us.org/]generic suhagra[/url]
— Alfreddut Jul 10, 04:21 PM #wh0cd177548 [url=http://triamterenegeneric.us.com/]triamterene hctz price[/url] [url=http://anafranilgeneric.us.com/]anafranil generic[/url]
— Alfreddut Jul 10, 04:57 PM #wh0cd397973 [url=http://advair.us.org/]advair for asthma[/url]
— KennethBiodo Jul 10, 05:47 PM #wh0cd471456 [url=http://drug.abilify.us.com/]DRUG ABILIFY[/url] [url=http://erythromycin365.us.com/]erythromycin antibiotic[/url]
— Bennyboits Jul 10, 06:37 PM #wh0cd104075 [url=http://revia.fail/]buy revia[/url] [url=http://triamterene.work/]triamterene 37.5mg hctz 25mg[/url] [url=http://prednisone.store/]prednisone[/url] [url=http://tadalissx.reisen/]tadalis sx[/url] [url=http://clindamycin.news/]generic cleocin[/url]
— Alfreddut Jul 10, 06:40 PM #wh0cd177548 [url=http://buypropranolol.us.org/]buy propranolol[/url]
— Charlesnef Jul 10, 07:10 PM #wh0cd471448 [url=http://toradol20mg.us.com/]toradol 20 mg[/url] [url=http://acyclovircream.us.com/]buy acyclovir online[/url]
— Charlesnef Jul 10, 08:14 PM #wh0cd177548 [url=http://propecia.reisen/]propecia[/url] [url=http://paroxetine.world/]paroxetine[/url] [url=http://zanaflex.reisen/]zanaflex 4mg[/url] [url=http://tadacip.tools/]tadacip[/url] [url=http://lipitor.work/]lipitor[/url]
— Alfreddut Jul 10, 08:34 PM #wh0cd544929 [url=http://tretinoin.us.org/]tretinoin online[/url]
— Bennyboits Jul 10, 08:37 PM #wh0cd544923 [url=http://nolvadexforsale.us.com/]Nolvadex[/url]
— Charlesnef Jul 10, 10:05 PM #wh0cd618402 [url=http://buyvermox.us.org/]Vermox Online[/url]
— Bennyboits Jul 10, 10:22 PM #wh0cd471450 [url=http://citalopramhbr20mg.us.com/]cheap citalopram[/url]
— Charlesnef Jul 11, 12:08 AM #wh0cd471442 [url=http://tadacip.systems/]explained here[/url] [url=http://bupropion.systems/]buy bupropion online[/url] [url=http://atenolol.store/]atenolol[/url] [url=http://inderal.world/]website here[/url] [url=http://stromectol.systems/]buy stromectol[/url]
— Alfreddut Jul 11, 12:49 AM #wh0cd691865 [url=http://nifedipine.us.com/]adalat online[/url] [url=http://medroxyprogesterone.us.com/]provera mastercard[/url] [url=http://eloconcreamgeneric.us.com/]view homepage[/url] [url=http://suhagra247.us.org/]suhagra[/url] [url=http://bupropiononline.us.com/]bupropion online[/url]
— KennethBiodo Jul 11, 01:12 AM #wh0cd544925 [url=http://lasixnoprescription.us.com/]lasix no prescription[/url] [url=http://metformin500mg.us.com/]metformin pills[/url]
— Charlesnef Jul 11, 01:55 AM #wh0cd691869 [url=http://buylisinopril.us.com/]buy lisinopril[/url] [url=http://elavil.us.com/]elavil medicine[/url]
— Charlesnef Jul 11, 01:55 AM #wh0cd618398 [url=http://phenergan.us.org/]phenergan[/url] [url=http://diflucanonline.us.com/]Diflucan Pills[/url]
— Charlesnef Jul 11, 03:53 AM #wh0cd618393 [url=http://buybenicar.us.org/]buy benicar[/url]
— Alfreddut Jul 11, 04:49 AM #wh0cd691871 [url=http://motilium.live/]motilium[/url] [url=http://tretinoin.work/]obagi tretinoin cream .05[/url] [url=http://drugbentyl.pro/]bentyl for ibs[/url] [url=http://buyelocon.reisen/]elocon[/url] [url=http://zetia.pro/]zetia generic equivalent[/url]
— Charlesnef Jul 11, 05:45 AM #wh0cd544915 [url=http://lasixnoprescription.us.com/]buy lasix[/url]
— Alfreddut Jul 11, 06:25 AM #wh0cd1978 [url=http://nolvadexforsale.us.com/]purchase nolvadex[/url]
— Bennyboits Jul 11, 06:30 AM #wh0cd765344 [url=http://bentyldrug.us.com/]bentyl online[/url]
— Charlesnef Jul 11, 07:20 AM #wh0cd75451 [url=http://trandate.reisen/]generic trandate[/url] [url=http://micronase.world/]micronase[/url] [url=http://eldepryl.reisen/]eldepryl[/url] [url=http://triphala.reisen/]triphala[/url] [url=http://quibront.world/]quibron-t[/url]
— KennethBiodo Jul 11, 09:31 AM #wh0cd148926 [url=http://buyvermox.us.org/]buy vermox[/url]
— Bennyboits Jul 11, 10:07 AM #wh0cd838816 [url=http://synthroidgeneric.us.com/]synthroid generic[/url]
— Alfreddut Jul 11, 10:34 AM #wh0cd222399 [url=http://toradol20mg.us.com/]Toradol 20 Mg[/url]
— KennethBiodo Jul 11, 11:40 AM #wh0cd222399 [url=http://lisinopril20mg.us.com/]Lisinopril 20 Mg[/url] [url=http://buyarimidex.us.org/]buy arimidex[/url]
— Bennyboits Jul 11, 12:15 PM #wh0cd295874 [url=http://cephalexin500.us.com/]cephalexin for sale[/url]
— KennethBiodo Jul 11, 12:43 PM #wh0cd148928 [url=http://lipitorgeneric.us.com/]lipitor 80mg[/url]
— Charlesnef Jul 11, 01:43 PM #wh0cd369347 [url=http://genericlasix.us.com/]Generic Lasix[/url]
— KennethBiodo Jul 11, 01:46 PM #wh0cd985762 [url=http://cephalexin500.us.com/]cephalexin 250[/url] [url=http://metformin500mg.us.com/]Metformin 500 Mg[/url]
— Alfreddut Jul 11, 02:42 PM #wh0cd442822 [url=http://buyacyclovir.us.org/]where can i buy acyclovir online[/url] [url=http://yasminbirthcontrol.us.com/]yasmin birth control[/url]
— KennethBiodo Jul 11, 03:15 PM #wh0cd222401 [url=http://propecia.us.org/]propecia[/url] [url=http://buytenormin.us.org/]tenormin 25 mg[/url]
— Charlesnef Jul 11, 04:02 PM #wh0cd75451 [url=http://nexiumprice.us.com/]nexium[/url] [url=http://buybentyl.us.org/]buy bentyl[/url]
— Alfreddut Jul 11, 04:43 PM #wh0cd295874 [url=http://buyelocon.shop/]elocon[/url] [url=http://buy-celebrex.shop/]click[/url] [url=http://diflucan.work/]diflucan[/url] [url=http://buykamagra.store/]buy kamagra[/url] [url=http://retina.work/]retin-a[/url]
— Charlesnef Jul 11, 05:18 PM #[url=https://loveawake.ru/znakomstva/]Знакомства Giorley. Сайт знакомств Giorley бесплатно, без регистрации, для серьезных отношений.[/url]
— AlisaTax Jul 13, 01:58 AM #dy62d8tvpyaq7orjn4
[url=http://google.us]google[/url]
<a href=http://google.us>google</a>
086sbj2o0xsxtj2xy8
— johhnyOrdet Jul 13, 05:01 AM #wh0cd442822 [url=http://crestorgeneric.us.org/]crestor 20mg[/url] [url=http://metformin500mg.us.com/]metformin 500 mg[/url]
— Bennyboits Jul 16, 08:07 AM #wh0cd148924 [url=http://bupropiononline.us.com/]buy bupropion online[/url] [url=http://triamterenehctz.us.com/]homepage here[/url]
— Alfreddut Jul 16, 08:37 AM #wh0cd985766 [url=http://erythromycin.us.org/]Erythromycin[/url] [url=http://furosemide40mg.us.com/]where to buy furosemide[/url]
— Alfreddut Jul 16, 08:55 AM #wh0cd369347 [url=http://tadalafil.us.org/]tadalafil[/url] [url=http://buynexium.us.com/]NEXIUM WITHOUT PRESCRIPTION[/url]
— Charlesnef Jul 16, 09:18 AM #wh0cd1978 [url=http://onlinelisinopril.us.com/]LISINOPRIL[/url] [url=http://adalatonline.us.com/]full report[/url] [url=http://azithromycin2017.us.com/]buy azithromycin[/url] [url=http://doxycycline365.us.com/]buy vibramycin[/url] [url=http://abilify365.us.com/]abilify price[/url]
— Alfreddut Jul 16, 09:23 AM #wh0cd222399 [url=http://buyzetia.us.org/]zetia generic[/url]
— Alfreddut Jul 16, 09:57 AM #wh0cd516297 [url=http://buylithium.world/]lithium aluminum hydride reduction[/url] [url=http://triphala.world/]triphala[/url] [url=http://septilin.world/]septilin[/url] [url=http://menosan.reisen/]menosan[/url] [url=http://buyrisperdal.reisen/]risperdal for adhd[/url]
— Bennyboits Jul 16, 09:57 AM #wh0cd442820 [url=http://losartanhydrochlorothiazide.us.com/]hydrochlorothiazide[/url]
— Charlesnef Jul 16, 11:30 AM #wh0cd369345 [url=http://nolvadexonline.us.com/]buy nolvadex online[/url] [url=http://cheapdapoxetine.us.com/]dapoxetine mail order[/url]
— Alfreddut Jul 16, 12:41 PM #wh0cd148926 [url=http://cephalexin250mg.us.com/]cephalexin 250 mg[/url] [url=http://furosemidelasix.us.com/]Lasix 80 Mg[/url]
— Alfreddut Jul 16, 12:50 PM #wh0cd736723 [url=http://effexor.us.org/]effexor[/url] [url=http://yasminbirthcontrol.us.com/]yasmin[/url]
— Bennyboits Jul 16, 03:14 PM #wh0cd589770 [url=http://dilantin.world/]dilantin po to iv conversion[/url] [url=http://remeron.reisen/]generic for remeron[/url] [url=http://vytorin.reisen/]vytorin[/url] [url=http://chloramphenicol.world/]generic chloramphenicol[/url] [url=http://detrol.world/]generic for detrol la[/url]
— Charlesnef Jul 16, 03:27 PM #wh0cd516294 [url=http://allopurinol100mg.us.com/]allopurinol online[/url]
— Alfreddut Jul 16, 03:39 PM #wh0cd295872 [url=http://generictriamterene.us.com/]Generic Triamterene[/url] [url=http://sildenafilcitrate.us.org/]buy sildenafil[/url]
— Alfreddut Jul 16, 03:50 PM #wh0cd810198 [url=http://buysildenafil.us.org/]Sildenafil Citrate 100mg[/url]
— Bennyboits Jul 16, 04:51 PM #wh0cd663249 [url=http://doxycycline24.us.org/]doxycycline prescriptions[/url] [url=http://amitriptylineonline.us.com/]amitriptyline online[/url]
— Charlesnef Jul 16, 05:01 PM #wh0cd589767 [url=http://buyprovera.us.org/]read more[/url]
— Alfreddut Jul 16, 05:30 PM #wh0cd589770 [url=http://benadryl.us.com/]where to buy benadryl[/url]
— Charlesnef Jul 16, 06:01 PM #wh0cd883671 [url=http://buyindocin.us.org/]generic indocin[/url]
— Bennyboits Jul 16, 06:48 PM #wh0cd663243 [url=http://lipitor.news/]lipitor[/url] [url=http://propranolol.store/]propranolol[/url] [url=http://yasmin.world/]info[/url] [url=http://albendazole.world/]albendazole[/url] [url=http://nolvadex.shop/]nolvadex cost[/url]
— Charlesnef Jul 16, 07:48 PM #wh0cd193777 [url=http://prednisolonetablets.pro/]prednisolone[/url] [url=http://eurax.work/]buy eurax[/url] [url=http://albendazoleonline.pro/]albendazole online[/url] [url=http://diflucanoverthecounter.pro/]diflucan over the counter[/url] [url=http://buyabilify.reisen/]discount abilify[/url]
— KennethBiodo Jul 16, 09:02 PM #lz8qhzt2mwrup2af4l
[url=http://baidu.com]baidu[/url]
<a href=http://baidu.com>baidu</a>
bpuna2w9tshhx07i4w
— johhnyPhype Jul 16, 09:13 PM #wh0cd516293 [url=http://erythromycin.us.org/]erythromycin to buy[/url]
— Alfreddut Jul 16, 09:57 PM #wh0cd883668 [url=http://clomidonline.us.com/]cheapest clomid[/url] [url=http://zetia.us.org/]zetia[/url]
— Charlesnef Jul 16, 10:26 PM #wh0cd267250 [url=http://doxycyclineacne.us.com/]doxycycline acne[/url]
— KennethBiodo Jul 16, 10:32 PM #wh0cd810191 [url=http://antabusemedication.us.com/]antabuse medication[/url]
— Charlesnef Jul 16, 11:14 PM #wh0cd589766 [url=http://buyvaltrex.us.org/]Buy Valtrex[/url] [url=http://bentyl.us.org/]bentyl[/url]
— Alfreddut Jul 16, 11:56 PM #wh0cd120302 [url=http://zetia.us.org/]Buy Zetia Over The Counter[/url] [url=http://genericadvair.us.com/]advair diskus[/url]
— Bennyboits Jul 17, 01:18 AM #wh0cd267250 [url=http://citalopram.fund/]citalopram[/url] [url=http://revia.systems/]buy revia[/url] [url=http://strattera.fail/]strattera[/url] [url=http://inderal.live/]inderal[/url] [url=http://propranolol.store/]propranolol purchase online[/url]
— Bennyboits Jul 17, 04:33 AM #wh0cd634619 [url=http://sildenafilcitrate.us.org/]buy sildenafil citrate[/url]
— KennethBiodo Jul 17, 05:30 AM #wh0cd267248 [url=http://nexium.us.org/]nexium online[/url]
— Charlesnef Jul 17, 06:37 AM #wh0cd708092 [url=http://medrolpak.us.com/]medrol pak[/url]
— KennethBiodo Jul 17, 06:54 AM #wh0cd120306 [url=http://losartanhydrochlorothiazide.us.com/]losartan hydrochlorothiazide[/url] [url=http://nexium.us.org/]BUY NEXIUM[/url]
— Alfreddut Jul 17, 07:09 AM #wh0cd883660 [url=http://buyavodart.us.com/]Avodart[/url] [url=http://celebrex24.us.org/]celebrex[/url] [url=http://prozac24.us.org/]prozac by mail[/url] [url=http://onlinelasix.us.com/]buy lasix[/url] [url=http://robaxin365.us.com/]robaxin online[/url]
— Alfreddut Jul 17, 07:39 AM #wh0cd781567 [url=http://buyprednisone.us.org/]buy prednisone[/url] [url=http://buypropecia.us.org/]buy propecia cheap[/url]
— KennethBiodo Jul 17, 08:23 AM #wh0cd193779 [url=http://azithromycinonline.us.com/]AZITHROMYCIN ONLINE[/url]
— Alfreddut Jul 17, 09:12 AM #[url=https://a-detective.ru/]частный детектив[/url] – детективное агентство москва, детективные услуги.
— Michaelgox Jul 17, 09:29 AM #[url=https://www.ejenika.ru]косметика guam[/url] – уход телом купить косметику, профессиональная косметика по уходу за лицом
— Jimmiephoft Jul 17, 09:29 AM #wh0cd855040 [url=http://wellbutringeneric.us.com/]wellbutrin generic[/url]
— KennethBiodo Jul 17, 09:45 AM #wh0cd193777 [url=http://triamterene.us.org/]triamterene prices[/url] [url=http://benadryl.us.com/]buy benadryl online[/url]
— Charlesnef Jul 17, 09:49 AM #wh0cd414196 [url=http://genericprozac.us.com/]40 mg prozac[/url]
— Charlesnef Jul 17, 10:27 AM #wh0cd267252 [url=http://buyzithromax.us.org/]zithromax500.com canada[/url]
— Alfreddut Jul 17, 10:55 AM #wh0cd928515 [url=http://genericsynthroid.us.com/]Synthroid No Rx[/url] [url=http://colchicine.us.org/]Colchicine Online Pharmacy[/url]
— KennethBiodo Jul 17, 11:21 AM #wh0cd634620 [url=http://albuterolsulfateinhalationsolution.us.com/]your domain name[/url] [url=http://inderal.us.org/]Inderal[/url]
— Bennyboits Jul 17, 11:59 AM #wh0cd340723 [url=http://cytotec365.us.com/]cytotec online[/url] [url=http://costofcymbalta.us.com/]cost of cymbalta[/url]
— Charlesnef Jul 17, 01:15 PM #wh0cd561142 [url=http://clonidinehcl.us.com/]clonidine 0.2 mg[/url] [url=http://orderdiflucanonline.us.com/]order diflucan online[/url]
— Charlesnef Jul 17, 01:17 PM #wh0cd414200 [url=http://colchicine.us.org/]Colchicine[/url] [url=http://buybentyl.us.org/]bentyl[/url]
— Alfreddut Jul 17, 01:21 PM #wh0cd708095 [url=http://buycymbalta.us.org/]Generic Cymbalta[/url]
— Bennyboits Jul 17, 01:35 PM #wh0cd193780 [url=http://lipitor.us.com/]Lipitor[/url]
— Alfreddut Jul 17, 03:41 PM #wh0cd487671 [url=http://buyzithromax.us.com/]Azithromycin[/url] [url=http://lasix.us.org/]cheap lasix[/url]
— Charlesnef Jul 17, 05:15 PM #wh0cd928522 [url=http://buyrimonabant.us.org/]rimonabant acomplia[/url] [url=http://erythromycin.us.org/]buy erythromycin[/url]
— Bennyboits Jul 17, 05:42 PM #wh0cd634619 [url=http://bentylpills.us.com/]homepage here[/url] [url=http://genericadvair.us.com/]advair[/url]
— Alfreddut Jul 17, 06:16 PM #wh0cd340728 [url=http://medrolpak.us.com/]medrol pak[/url]
— Alfreddut Jul 17, 06:53 PM #google.com – #888888pppqoqwwwwz
— DhuwvkNab Jul 17, 07:25 PM #wh0cd708092 [url=http://vermoxonline.us.com/]vermox 100mg[/url] [url=http://sildenafil100mg.us.com/]Sildenafil Online Prices[/url]
— Alfreddut Jul 17, 08:09 PM #wh0cd91682 [url=http://nexiumprice.us.com/]nexium price[/url] [url=http://yasminbirthcontrol.us.com/]PURCHASE YASMIN ONLINE[/url]
— Bennyboits Jul 17, 09:00 PM #wh0cd708090 [url=http://buycephalexin.us.com/]additional info[/url] [url=http://bentylantispasmodic.us.com/]buy bentyl[/url]
— Charlesnef Jul 17, 09:42 PM #wh0cd855040 [url=http://buydoxycycline.us.org/]doxycycline online prescriptions[/url]
— Alfreddut Jul 17, 11:23 PM #wh0cd561147 [url=http://advairgeneric.us.com/]generic advair diskus[/url]
— Alfreddut Jul 18, 12:08 AM #wh0cd238630 [url=http://zofran.us.com/]generic zofran online[/url] [url=http://valacyclovir.us.com/]valacyclovir[/url]
— Bennyboits Jul 18, 12:44 AM #who is the best essay writing service [url=http://writingservicestop.com/]information security homework help
— Anthonywhapy Jul 18, 12:57 AM #[/url] help writing essay papers <a href=“http://writingservicestop.com/”>assignment helper usa
</a> amoeba research homework help
top custom essay [url=http://writingservicestop.com/]online game addiction essay
— Anthonyenutt Jul 18, 01:22 AM #[/url] dulce et decorum est essay help <a href=“http://writingservicestop.com/”>customer service dissertation
</a> essay writers online
wh0cd855038 [url=http://ivermectin.us.com/]ivermectin[/url] [url=http://seroquelxr.us.com/]buy seroquel[/url] [url=http://toradol30mg.us.com/]toradol[/url] [url=http://elimite365.us.com/]permethrin cost[/url] [url=http://bentyl40mg.us.com/]Bentyl 40 Mg[/url]
— Charlesnef Jul 18, 01:42 AM #wh0cd91680 [url=http://shallaki.reisen/]shallaki[/url] [url=http://zerit.world/]zerit without prescription[/url] [url=http://lasuna.world/]lasuna[/url] [url=http://clozaril.reisen/]clozaril[/url] [url=http://mestinon.reisen/]mestinon[/url]
— Alfreddut Jul 18, 04:07 AM #wh0cd165153 [url=http://cheapcardura.us.com/]cheapest cardura[/url]
— Alfreddut Jul 18, 05:18 AM #wh0cd855041 [url=http://tadacip.news/]tadacip[/url] [url=http://vardenafil.store/]vardenafil[/url] [url=http://crestor.systems/]crestor[/url] [url=http://albuterol.tools/]cost of albuterol[/url] [url=http://prozac.fund/]prozac[/url]
— Alfreddut Jul 18, 07:18 AM #google.com – #000999uuquuqyshshshx
— DrtdcyNab Jul 18, 07:26 AM #wh0cd312105 [url=http://amitriptyline.us.org/]amitriptyline[/url]
— Charlesnef Jul 18, 08:09 AM #wh0cd752952 [url=http://genericsynthroid.us.com/]synthroid lowest prices[/url]
— KennethBiodo Jul 18, 08:37 AM #wh0cd385578 [url=http://tretinoin.us.org/]Where To Buy Tretinoin Cream[/url] [url=http://celebrex200mg.us.com/]where to buy celebrex cheap[/url]
— Charlesnef Jul 18, 09:43 AM #research essay help [url=http://writingservicestop.com/]the power of birth order essay
— Anthonywhapy Jul 18, 09:47 AM #[/url] essay writer for hire <a href=“http://writingservicestop.com/”>ap world history dbq essays online
</a> edexcel english language the writer39s voice past papers
resume and cv writing services [url=http://writingservicestop.com/]ghostwriting services
— Anthonyenutt Jul 18, 10:05 AM #[/url] ancient greek homework helper <a href=“http://writingservicestop.com/”>cheapest professional writing service
</a> www brainfuse com homework help
wh0cd826425 [url=http://cipro500.us.com/]cipro 500[/url]
— KennethBiodo Jul 18, 10:13 AM #wh0cd679470 [url=http://buymotilium.us.org/]Motilium Lowest Cost[/url] [url=http://nexium40mg.us.com/]purplepill com nexium[/url]
— Bennyboits Jul 18, 11:20 AM #wh0cd18207 [url=http://flagyl.us.org/]website here[/url] [url=http://cymbalta30mg.us.com/]Cymbalta 30mg[/url]
— Alfreddut Jul 18, 11:28 AM #wh0cd459053 [url=http://triamterenediuretic.us.com/]triamterene hctz 37.5 25 mg cp[/url]
— Charlesnef Jul 18, 11:44 AM #wh0cd899898 [url=http://lisinopril5mg.us.com/]Lisinopril 15 Mg[/url] [url=http://cymbalta30mg.us.com/]Cymbalta 30mg[/url]
— KennethBiodo Jul 18, 12:05 PM #wh0cd826425 [url=http://cephalexin250mg.us.com/]cephalexin 250 mg[/url]
— Bennyboits Jul 18, 02:08 PM #wh0cd165153 [url=http://proscar.store/]proscar[/url] [url=http://acyclovir.work/]acyclovir[/url] [url=http://ventolin.mba/]ventolin[/url] [url=http://provera.shop/]check out your url[/url] [url=http://vermox.work/]where can i buy vermox[/url]
— Alfreddut Jul 18, 02:31 PM #wh0cd63060 [url=http://celebrex200mg.us.com/]helpful hints[/url]
— KennethBiodo Jul 18, 03:58 PM #wh0cd679482 [url=http://advairdiskus2017.com/]advair diskus online[/url]
— Charlesnef Jul 18, 05:05 PM #wh0cd312102 [url=http://lisinopril5mg.us.com/]lisinopril no prescription[/url]
— Alfreddut Jul 18, 05:39 PM #wh0cd899887 [url=http://buytriamterene.us.org/]full article[/url] [url=http://buycolchicine.us.org/]colchicine for pericardial effusion[/url]
— Alfreddut Jul 18, 05:59 PM #wh0cd136533 [url=http://copegus.reisen/]copegus[/url] [url=http://fmlforte.reisen/]fml forte[/url] [url=http://isoniazid.world/]isoniazid[/url] [url=http://combivir.reisen/]combivir online[/url] [url=http://duricef.reisen/]duricef[/url]
— KennethBiodo Jul 18, 06:00 PM #wh0cd752955 [url=http://bentylpills.us.com/]bentyl otc[/url] [url=http://buyarimidex.us.org/]buy arimidex[/url]
— Charlesnef Jul 18, 06:33 PM #wh0cd210006 [url=http://buyallopurinol.us.org/]buy allopurinol[/url]
— KennethBiodo Jul 18, 07:20 PM #wh0cd973360 [url=http://lisinopril5mg.us.com/]buy lisinopril[/url] [url=http://hydrochlorothiazide.us.org/]Microzide[/url]
— Alfreddut Jul 18, 07:21 PM #wh0cd459054 [url=http://buyvaltrex.us.org/]valtrex valacyclovir[/url] [url=http://buydiflucan.us.org/]generic diflucan fluconazole[/url]
— Alfreddut Jul 18, 09:26 PM #wh0cd899905 [url=http://synthroid.us.org/]Synthroid 0.05 mg[/url]
— Charlesnef Jul 18, 09:47 PM #wh0cd356952 [url=http://hydrochlorothiazide.us.org/]BUY HYDROCHLOROTHIAZIDE ONLINE[/url]
— KennethBiodo Jul 18, 09:58 PM #wh0cd973378 [url=http://generictriamterene.us.com/]triamterene 37.5mg[/url] [url=http://buyrimonabant.us.org/]rimonabant online[/url]
— Charlesnef Jul 18, 11:37 PM #wh0cd283486 [url=http://genericbentyl.us.com/]generic bentyl[/url]
— Alfreddut Jul 19, 01:36 AM #do my anatomy and physiology homework [url=http://writingservicestop.com/]the easy essay writer
— Anthonyenutt Jul 19, 02:26 AM #[/url] taking classes online essay <a href=“http://writingservicestop.com/”>essays for college to buy
</a> my homework helper
wh0cd679475 [url=http://zithromax365.us.com/]zithromax without a prescription[/url] [url=http://bactroban2017.us.com/]Bactroban Visa[/url] [url=http://rimonabant365.us.com/]buy acomplia rimonabant[/url] [url=http://amoxil247.us.org/]buy amoxil[/url] [url=http://buyprovera.us.com/]cheap provera[/url]
— Alfreddut Jul 19, 02:31 AM #essay edit [url=http://writingservicestop.com/]providing online term papers services ethical
— Anthonywhapy Jul 19, 02:36 AM #[/url] research paper company <a href=“http://writingservicestop.com/”>help with writing assignments
</a> foreign service essay scholarship
write a scholarship essay [url=http://writingservicestop.com/]email assignment help
— Anthonyenutt Jul 19, 03:39 AM #[/url] academic writers online <a href=“http://writingservicestop.com/”>singapore essay writing service
</a> research paper outline help
buy a business plans [url=http://writingservicestop.com/]college essay about helping others
— Anthonywhapy Jul 19, 03:46 AM #[/url] what is a good paper writing service <a href=“http://writingservicestop.com/”>my assignment help
</a> best essay titles
wh0cd356964 [url=http://ciprofloxacinhcl500mg.us.com/]cipro buy[/url] [url=http://citalopramhbr20mg.us.com/]citalopram hbr 20 mg[/url]
— Alfreddut Jul 19, 03:49 AM #wh0cd752948 [url=http://genericbentyl.us.com/]generic 10 mg[/url] [url=http://buyrimonabant.us.org/]Buy Rimonabant[/url]
— Alfreddut Jul 19, 04:03 AM #how do i quote a website in my essay [url=http://writingservicestop.com/]help homework school
— Anthonyenutt Jul 19, 04:39 AM #[/url] pay for someone to write your essay <a href=“http://writingservicestop.com/”>essay orderliness
</a> articles on essay writing services
custom essays uk review [url=http://writingservicestop.com/]proofreading editing services
— Anthonywhapy Jul 19, 04:45 AM #[/url] online homework help india <a href=“http://writingservicestop.com/”>individual rights versus public order essay
</a> best professional writing services
wh0cd210004 [url=http://buyazithromycin.us.org/]azithromycin buy online[/url] [url=http://augmentin875mg.us.com/]Augmentin Tablet[/url]
— Charlesnef Jul 19, 04:52 AM #essay helper app [url=http://writingservicestop.com/]dissertation ghostwriter
— Anthonyenutt Jul 19, 05:38 AM #[/url] help on my english homework <a href=“http://writingservicestop.com/”>123 essay help
</a> law essay writing service
buy resumes [url=http://writingservicestop.com/]homework help writing paper
— Anthonywhapy Jul 19, 05:45 AM #[/url] faith academics service essay <a href=“http://writingservicestop.com/”>help me with my essay free
</a> write essay my childhood days
wh0cd283479 [url=http://buyhydrochlorothiazide.us.org/]Buy Hydrochlorothiazide Online[/url]
— Bennyboits Jul 19, 05:45 AM #custom essay meister prices [url=http://writingservicestop.com/]essay making friends online
— Anthonyenutt Jul 19, 06:37 AM #[/url] custom research papers for sale <a href=“http://writingservicestop.com/”>chicago style essay chicago style essay
</a> help with writing a term paper
help writing discursive essay [url=http://writingservicestop.com/]chatting with an anonymous person online essay
— Anthonywhapy Jul 19, 06:43 AM #[/url] write my history research paper for me <a href=“http://writingservicestop.com/”>essay conclusion help
</a> online essays hindi
wh0cd577385 [url=http://synthroidgeneric.us.com/]Synthroid Generic[/url]
— Alfreddut Jul 19, 07:26 AM #wh0cd973369 [url=http://diclofenac75mg.us.com/]diclofenac[/url] [url=http://amoxicillin500mg.us.org/]amoxicillin 500mg[/url]
— Alfreddut Jul 19, 07:37 AM #website homework help [url=http://writingservicestop.com/]essay uk writers
— Anthonyenutt Jul 19, 07:37 AM #[/url] online essays on working ethics <a href=“http://writingservicestop.com/”>essay writing services legal
</a> writing essay services
wh0cd356952 [url=http://advairhfa.us.com/]advair hfa[/url] [url=http://buykamagra.us.org/]buy kamagra[/url]
— Bennyboits Jul 19, 07:38 AM #is it ethical to buy term papers online [url=http://writingservicestop.com/]where to buy a research paper urgently
— Anthonywhapy Jul 19, 07:44 AM #[/url] help me with my history homework <a href=“http://writingservicestop.com/”>custom finance papers
</a> ethics and buying essays online
wh0cd356952 [url=http://retina247.us.org/]retin-a[/url] [url=http://dicyclomine.us.com/]buy bentyl[/url]
— Charlesnef Jul 19, 07:48 AM #wh0cd356957 [url=http://diclofenac50mg.us.com/]diclofenac tablets[/url]
— Charlesnef Jul 19, 08:18 AM #harry potter and the order of the phoenix essay [url=http://writingservicestop.com/]help writing dbq essay
— Anthonyenutt Jul 19, 08:36 AM #[/url] writers workshop personal essay <a href=“http://writingservicestop.com/”>teachers in the library homework help
</a> homework help net present value
dissertations help [url=http://writingservicestop.com/]paper writer app
— Anthonywhapy Jul 19, 08:42 AM #[/url] cancer essay literary magazine manuscript memoir not online submission <a href=“http://writingservicestop.com/”>homework help online net
</a> higher art essay help
wh0cd430430 [url=http://buyabilify.us.org/]Buy Abilify[/url] [url=http://genericplavix.us.com/]Plavix[/url]
— Charlesnef Jul 19, 09:35 AM #role model essay help [url=http://writingservicestop.com/]heart of darkness essay help
— Anthonyenutt Jul 19, 09:35 AM #[/url] where can i do my homework <a href=“http://writingservicestop.com/”>online essays tutorials
</a> proofread essay online
fly pen homework help [url=http://writingservicestop.com/]does music help while doing homework
— Anthonywhapy Jul 19, 09:43 AM #[/url] help on college essay <a href=“http://writingservicestop.com/”>help writing essays for college
</a> alabama homework help tutor
wh0cd430425 [url=http://vermoxonline.us.com/]explained here[/url]
— Charlesnef Jul 19, 09:46 AM #custom watermark paper uk [url=http://writingservicestop.com/]law essay writing service ireland
— Anthonyenutt Jul 19, 10:34 AM #[/url] big y help homework <a href=“http://writingservicestop.com/”>comparison and contrast order essay
</a> do my homework online
1950s homework help [url=http://writingservicestop.com/]writing services essay
— Anthonywhapy Jul 19, 10:41 AM #[/url] homework helpline canada <a href=“http://writingservicestop.com/”>help me do my homework
</a> best medical school essay editing service
wh0cd503902 [url=http://buyinderal.us.org/]buy inderal[/url]
— Bennyboits Jul 19, 11:02 AM #islamic philosophy essay topics [url=http://writingservicestop.com/]term paper writers
— Anthonyenutt Jul 19, 11:34 AM #[/url] world war 1 2 help with history term papers <a href=“http://writingservicestop.com/”>persuasive essays online
</a> online shopping vs retail shopping essays
wh0cd210011 [url=http://diclofenac75mg.us.com/]Diclofenac 75mg[/url]
— Alfreddut Jul 19, 11:40 AM #essay writer online free [url=http://writingservicestop.com/]help write personal statement
— Anthonywhapy Jul 19, 11:40 AM #[/url] i want to write an essay online <a href=“http://writingservicestop.com/”>online custom essay writing service
</a> best essay writing services reviews
oliver twist essay help [url=http://writingservicestop.com/]help on homework
— Anthonywhapy Jul 19, 01:48 PM #[/url] essay writing on my pet dog <a href=“http://writingservicestop.com/”>buy essays for college
</a> i don’t know what to write my paper about
write my physics paper i pay you [url=http://writingservicestop.com/]can t write essays
— Anthonyenutt Jul 19, 01:50 PM #[/url] essay writer reviews <a href=“http://writingservicestop.com/”>content writing company us
</a> buy term papers essays
wh0cd107911 [url=http://astelin.world/]astelin[/url] [url=http://starlix.reisen/]starlix[/url] [url=http://gynelotrimin.world/]gyne-lotrimin[/url] [url=http://retrovir.world/]retrovir[/url] [url=http://amaryl.reisen/]amaryl[/url]
— KennethBiodo Jul 19, 02:58 PM #wh0cd650844 [url=http://orderdiflucanonline.us.com/]buy diflucan[/url] [url=http://buyzithromax.us.org/]Buy Zithromax[/url]
— Charlesnef Jul 19, 03:29 PM #wh0cd724332 [url=http://bentyloral.us.com/]bentyl oral[/url]
— Charlesnef Jul 19, 04:07 PM #wh0cd181384 [url=http://bentyl.us.org/]additional reading[/url] [url=http://sildenafilcitrate.us.org/]sildenafil citrate pills[/url]
— KennethBiodo Jul 19, 04:21 PM #wh0cd944752 [url=http://confido.world/]buy confido[/url] [url=http://clozaril.world/]buy clozaril[/url] [url=http://buyreminyl.reisen/]reminyl[/url] [url=http://indinavir.world/]generic indinavir[/url] [url=http://diovan.reisen/]diovan valsartan[/url]
— Alfreddut Jul 19, 04:31 PM #wh0cd724327 [url=http://anafranil25mg.us.com/]anafranil 25mg[/url] [url=http://inderal.us.org/]inderal[/url]
— Bennyboits Jul 19, 04:45 PM #wh0cd503908 [url=http://amitriptyline.us.org/]elavil generic[/url]
— Alfreddut Jul 19, 05:16 PM #wh0cd577381 [url=http://metformin.us.org/]metformin[/url] [url=http://trazodone.us.org/]Generic Trazodone[/url]
— Alfreddut Jul 19, 06:29 PM #wh0cd181387 [url=http://buyvardenafil.us.org/]buy vardenafil[/url]
— Alfreddut Jul 19, 10:38 PM #wh0cd944741 [url=http://clomidformen.us.com/]clomid fertility drug[/url] [url=http://diflucan150mg.us.com/]cheapest diflucan[/url]
— Charlesnef Jul 19, 10:53 PM #wh0cd622227 [url=http://buyzithromax.us.org/]Zithromax[/url] [url=http://buyhydrochlorothiazide.us.org/]Buy Hydrochlorothiazide[/url]
— KennethBiodo Jul 19, 11:19 PM #your tutor homework help [url=http://writingservicestop.com/]admissionessaywriter
— Anthonywhapy Jul 19, 11:21 PM #[/url] homework to do <a href=“http://writingservicestop.com/”>pay essay online
</a> custom writers
i need help with my homework maplestory [url=http://writingservicestop.com/]diverse voices essays on twentieth century women writers in english
— Anthonyenutt Jul 19, 11:23 PM #[/url] personal essay for graduate school application <a href=“http://writingservicestop.com/”>live homework help online
</a> online essay about writers
wh0cd254867 [url=http://hydrochlorothiazide.us.org/]hydrochlorothiazide tabs[/url] [url=http://colchicine.us.org/]colchicine[/url]
— Alfreddut Jul 20, 12:25 AM #wh0cd34436 [url=http://motrin800.us.com/]MOTRIN ONLINE[/url] [url=http://acyclovir.us.org/]Acyclovir[/url]
— Bennyboits Jul 20, 12:51 AM #wh0cd944748 [url=http://doxycycline.store/]doxycycline[/url] [url=http://flagyl.systems/]flagyl[/url] [url=http://stromectol.mba/]stromectol online[/url] [url=http://baclofen.world/]order baclofen[/url] [url=http://inderal.world/]buy inderal[/url]
— Alfreddut Jul 20, 02:05 AM #wh0cd769177 [url=http://buyvaltrex.us.org/]buy valtrex[/url]
— KennethBiodo Jul 20, 02:29 AM #Ничего-ничего! От счастья не погибают!
[url=https://proimobil.md]Квартиры в Кишиневе[/url]
— ProImMub Jul 20, 03:19 AM #wh0cd401818 [url=http://baclofentablets.us.com/]baclofen tablets[/url] [url=http://celebrex.us.org/]celebrex price[/url]
— Alfreddut Jul 20, 03:45 AM #wh0cd181384 [url=http://stromectol.shop/]stromectol[/url] [url=http://lukol.world/]lukol online[/url] [url=http://valtrex.schule/]buy valtrex on line[/url] [url=http://phenergan.directory/]phenergan[/url] [url=http://antabuse.live/]antabuse[/url]
— Charlesnef Jul 20, 03:48 AM #wh0cd181384 [url=http://cheapcardura.us.com/]generic cardura[/url] [url=http://buypropranolol.us.org/]buy propranolol[/url]
— Charlesnef Jul 20, 04:16 AM #wh0cd254863 [url=http://buycrestor.shop/]crestor[/url] [url=http://sildenafil.store/]sildenafil citrate 100mg pills[/url] [url=http://buyrimonabant.shop/]acomplia 20mg rimonabant[/url] [url=http://buy-flagyl.store/]flagyl 250[/url] [url=http://indocin.systems/]indocin[/url]
— Bennyboits Jul 20, 04:56 AM #wh0cd254857 [url=http://levothroid.reisen/]levothroid weight loss[/url] [url=http://trimox.reisen/]trimox[/url] [url=http://exelon.reisen/]exelon[/url] [url=http://hyzaar.reisen/]hyzaar[/url] [url=http://trental.world/]trental[/url]
— Charlesnef Jul 20, 05:48 AM #wh0cd181387 [url=http://albuterol.live/]where can i buy albuterol online[/url] [url=http://clindamycin.fail/]buy clindamycin[/url] [url=http://periactin.world/]periactin[/url] [url=http://lozol.reisen/]generic lozol[/url] [url=http://flagyl.directory/]flagyl[/url]
— Alfreddut Jul 20, 07:19 AM #professional term paper service [url=http://writingservicestop.com/]buying a puppy to an older dog essay
— Anthonywhapy Jul 20, 07:36 AM #[/url] untraceable essays online <a href=“http://writingservicestop.com/”>cheap term paper writers
</a> essay paper help
where to buy writing paper [url=http://writingservicestop.com/]custom paper custom paper
— Anthonyenutt Jul 20, 07:38 AM #[/url] famous writer of essays <a href=“http://writingservicestop.com/”>essay mail order brides
</a> premium thesis writing services
wh0cd622239 [url=http://tamoxifen24.us.org/]tamoxifen[/url] [url=http://buycytotec.us.com/]cytotec online[/url] [url=http://buyflagyl.us.com/]generic flagyl[/url] [url=http://doxycycline100mg.us.com/]generic doxycycline[/url] [url=http://buypropecia247.us.org/]buy propecia[/url]
— Alfreddut Jul 20, 08:18 AM #wh0cd401809 [url=http://buylipitor.us.org/]lipitor tabs[/url]
— Charlesnef Jul 20, 09:18 AM #wh0cd695714 [url=http://crestorgeneric.us.org/]more bonuses[/url]
— Alfreddut Jul 20, 09:40 AM #wh0cd440755 [url=http://buypropranolol.us.org/]BUY PROPRANOLOL[/url]
— MichaelSoush Jul 20, 10:29 AM #wh0cd440755 [url=http://buyvaltrex.us.org/]Buy Valtrex[/url] [url=http://hydrochlorothiazide25mg.us.com/]Hydrochlorothiazide 25mg[/url]
— MichaelSoush Jul 20, 10:29 AM #wh0cd475279 [url=http://amitriptyline.us.org/]cheap amitriptyline[/url] [url=http://clindamycin300mg.us.com/]CLINDAMYCIN ANTIBIOTIC[/url]
— Charlesnef Jul 20, 10:49 AM #wh0cd328339 [url=http://buyprozac.us.org/]prozac[/url]
— Alfreddut Jul 20, 11:07 AM #wh0cd440755 [url=http://buyclonidine.us.org/]clonidine for smoking cessation[/url] [url=http://amitriptyline.us.org/]home page[/url]
— Charlesnef Jul 20, 01:12 PM #wh0cd622233 [url=http://clindamycin.us.org/]generic cleocin[/url] [url=http://singulair10mg.us.com/]singulair 10 mg[/url]
— Bennyboits Jul 20, 01:43 PM #wh0cd475287 [url=http://cymbaltageneric.us.com/]cymbalta[/url]
— Alfreddut Jul 20, 02:34 PM #wh0cd299708 [url=http://hydrochlorothiazide25mg.us.com/]purchase hydrochlorothiazide[/url] [url=http://prozac.us.org/]buy prozac[/url]
— KennethBiodo Jul 20, 02:50 PM #wh0cd695706 [url=http://lisinopril365.us.com/]zestoretic[/url]
— Charlesnef Jul 20, 04:26 PM #wh0cd989608 [url=http://onlineclonidine.us.com/]online clonidine[/url]
— Alfreddut Jul 20, 04:51 PM #wh0cd842656 [url=http://buytenormin.us.org/]buy tenormin[/url] [url=http://triamterenegeneric.us.com/]triamterene generic[/url]
— Bennyboits Jul 20, 06:11 PM #wh0cd769179 [url=http://buycitalopram.us.org/]citalopram 40mg[/url]
— Charlesnef Jul 20, 06:11 PM #wh0cd769181 [url=http://citalopramhbr20mg.us.org/]citalopram blood pressure[/url]
— Charlesnef Jul 20, 06:17 PM #wh0cd79289 [url=http://cytotec.us.org/]where to get misoprostol[/url] [url=http://anafranilforanxiety.us.com/]anafranil generic[/url]
— Alfreddut Jul 20, 06:25 PM #wh0cd842654 [url=http://propranolol.us.org/]PROPRANOLOL MASTERCARD[/url]
— Charlesnef Jul 20, 07:39 PM #wh0cd152764 [url=http://buy-cephalexin.reisen/]cephalexin 500mg capsule[/url] [url=http://buy-baclofen.store/]buy baclofen[/url] [url=http://wellbutrin.news/]wellbutrin[/url] [url=http://buyzetia.pro/]zetia[/url] [url=http://baclofen.mba/]go here[/url]
— Alfreddut Jul 20, 08:15 PM #wh0cd916129 [url=http://cephalexin500.us.com/]Generic Cephalexin[/url]
— Bennyboits Jul 20, 08:16 PM #wh0cd299712 [url=http://buydiflucan.us.org/]more info[/url] [url=http://lasixnoprescription.us.com/]lasix no prescription[/url]
— Alfreddut Jul 20, 10:26 PM #wh0cd842662 [url=http://coumadin.world/]coumadin[/url] [url=http://clarinex.reisen/]clarinex[/url] [url=http://buycombivent.world/]combivent[/url] [url=http://confido.world/]confido[/url] [url=http://mentax.world/]mentax[/url]
— Alfreddut Jul 20, 11:14 PM #wh0cd5814 [url=http://buyfluoxetine.us.com/]Cheapest Fluoxetine[/url] [url=http://anafranil365.us.com/]anafranil[/url]
— Charlesnef Jul 20, 11:56 PM #wh0cd79289 [url=http://colchicine.us.org/]colchicine[/url]
— Bennyboits Jul 21, 12:37 AM #wh0cd916137 [url=http://buyatarax.us.com/]atarax for sale[/url]
— Alfreddut Jul 21, 12:55 AM #wh0cd667078 [url=http://buycolchicine.us.org/]colchicine online[/url]
— KennethBiodo Jul 21, 12:59 AM #wh0cd79291 [url=http://cardizem.world/]cardizem iv[/url] [url=http://minocycline.world/]minocycline[/url] [url=http://lioresal.reisen/]lioresal[/url] [url=http://namenda.reisen/]namenda[/url] [url=http://indinavir.world/]indinavir[/url]
— Charlesnef Jul 21, 01:47 AM #wh0cd520135 [url=http://buyamoxicillin.us.com/]buy amoxicillin[/url] [url=http://amoxil.us.com/]amoxil[/url]
— Alfreddut Jul 21, 03:14 AM #wh0cd226235 [url=http://triamterenenorx.us.com/]triamterene hctz 75 50 mg tab[/url] [url=http://bactroban247.us.com/]Buy Bactroban[/url]
— Bennyboits Jul 21, 03:39 AM #wh0cd814024 [url=http://desyrel.pro/]desyrel for sleep[/url] [url=http://digoxin.reisen/]digoxin generic[/url] [url=http://himplasia.world/]himplasia[/url] [url=http://avapro.reisen/]avapro hct[/url] [url=http://minocin.reisen/]minocin[/url]
— KennethBiodo Jul 21, 04:15 AM #wh0cd226239 [url=http://buyvaltrex.us.org/]valtrex online[/url]
— Charlesnef Jul 21, 05:11 AM #wh0cd887499 [url=http://celebrex365.us.com/]Celebrex[/url]
— KennethBiodo Jul 21, 05:39 AM #wh0cd373181 [url=http://acyclovir.us.org/]BUY ACYCLOVIR ONLINE[/url]
— Bennyboits Jul 21, 07:01 AM #wh0cd299712 [url=http://cheapdapoxetine.us.com/]full article[/url] [url=http://sildenafilcitrate.us.org/]Sildenafil Citrate[/url]
— Charlesnef Jul 21, 07:41 AM #wh0cd740560 [url=http://trazodonehcl.us.com/]trazodone hcl[/url]
— Alfreddut Jul 21, 08:05 AM #wh0cd887506 [url=http://erythromycin.us.org/]ilosone[/url] [url=http://yasminbirthcontrol.us.com/]yasmin c[/url]
— Alfreddut Jul 21, 11:19 AM #wh0cd593612 [url=http://genericlasix.us.com/]buy lasix cheap[/url]
— Charlesnef Jul 21, 12:01 PM #wh0cd197611 [url=http://colchicine.us.org/]colchicine prescriptions[/url] [url=http://citalopramhbr20mg.us.org/]generic citalopram[/url]
— KennethBiodo Jul 21, 12:24 PM #wh0cd299715 [url=http://lotrisone.world/]lotrisone[/url] [url=http://buy-elimite.store/]elimite cream price[/url] [url=http://buysildenafil.reisen/]sildenafil no prescription[/url] [url=http://doxycycline.tools/]doxycycline[/url] [url=http://buy-bentyl.reisen/]bentyl[/url]
— Alfreddut Jul 21, 02:41 PM #wh0cd373188 [url=http://advairgeneric.us.com/]advair 250[/url]
— Alfreddut Jul 21, 04:56 PM #wh0cd740560 [url=http://disulfiram.us.com/]Disulfiram[/url] [url=http://elimite2.us/]elimite[/url] [url=http://trazodonenorx.us.com/]trazodone[/url] [url=http://sinequan.us.com/]purchase sinequan[/url] [url=http://amitriptyline247.us.org/]amitriptyline[/url]
— Charlesnef Jul 21, 05:08 PM #wh0cd887513 [url=http://buyabilify.us.org/]purchase abilify[/url]
— Charlesnef Jul 21, 05:26 PM #wh0cd446661 [url=http://erythromycin500mg.us.com/]buy erythromycin online[/url]
— Alfreddut Jul 21, 06:52 PM #wh0cd564987 [url=http://genericlasix.us.com/]lasix mail order[/url]
— KennethBiodo Jul 21, 07:58 PM #wh0cd960978 [url=http://cheapdapoxetine.us.com/]dapoxetine hydrochloride[/url]
— Bennyboits Jul 21, 09:45 PM #wh0cd344557 [url=http://avana.us.com/]avana w/o script[/url] [url=http://ventolin365.us.com/]Ventolin[/url]
— Alfreddut Jul 21, 10:39 PM #wh0cd124140 [url=http://citalopram20mg.us.com/]citalopram 20mg[/url] [url=http://prevacid.us.com/]prevacid[/url]
— Charlesnef Jul 21, 10:45 PM #wh0cd711937 [url=http://diflucan.world/]diflucan[/url] [url=http://paxil.news/]paxil[/url] [url=http://acyclovir.tools/]order acyclovir online[/url] [url=http://karela.reisen/]karela powder[/url] [url=http://cephalexin.fail/]cephalexin[/url]
— KennethBiodo Jul 21, 11:24 PM #wh0cd197615 [url=http://effexor.us.org/]effexor er[/url]
— Charlesnef Jul 21, 11:46 PM #wh0cd418030 [url=http://buydiclofenac.us.org/]diclofenac online[/url]
— Alfreddut Jul 22, 12:02 AM #wh0cd271088 [url=http://buyrobaxin.us.org/]BUY ROBAXIN[/url] [url=http://toradolprice.us.com/]Toradol[/url]
— Charlesnef Jul 22, 12:58 AM #wh0cd785414 [url=http://ampicillin2016.us.com/]where can i buy cheap ampicillin[/url]
— KennethBiodo Jul 22, 01:00 AM #wh0cd932360 [url=http://clindamycinhcl.us.com/]clindamycin buy[/url] [url=http://buyatarax.us.org/]atarax[/url]
— KennethBiodo Jul 22, 03:34 AM #wh0cd564982 [url=http://hairlosscream.reisen/]site[/url] [url=http://buyhoodie.world/]hoodia gordonii pure[/url] [url=http://apcalis.reisen/]generic apcalis[/url] [url=http://lopressor.reisen/]more hints[/url] [url=http://aciphex.reisen/]generic for aciphex 20 mg[/url]
— Alfreddut Jul 22, 04:19 AM #wh0cd271091 [url=http://acyclovir800mg.us.com/]acyclovir 800mg[/url]
— Charlesnef Jul 22, 05:01 AM #wh0cd638455 [url=http://bentyl.us.org/]BENTYL[/url]
— Alfreddut Jul 22, 06:12 AM #wh0cd132697 [url=http://crestorgeneric.us.org/]crestor generic[/url] [url=http://yasminbirthcontrol.us.com/]Yasmin Birth Control[/url]
— Tracysporp Jul 22, 06:48 AM #wh0cd960979 [url=http://valtrex.us.org/]Valtrex[/url] [url=http://genericsynthroid.us.com/]synthroid[/url]
— Alfreddut Jul 22, 07:14 AM #wh0cd564982 [url=http://diclofenac75mg.us.com/]diclofenac 75mg[/url] [url=http://buypaxil.us.org/]buy paxil[/url]
— Charlesnef Jul 22, 07:20 AM #wh0cd418038 [url=http://medrol365.us.com/]medrol generic[/url] [url=http://avodart24.us.org/]Avodart[/url] [url=http://suhagra2017.us.com/]Suhagra Without Prescription[/url] [url=http://buyeffexor.us.com/]effexor without a prescription[/url] [url=http://doxycycline.us.com/]doxycycline[/url]
— Bennyboits Jul 22, 07:48 AM #wh0cd418039 [url=http://buy-motilium.shop/]buy motilium[/url] [url=http://buyvermox.store/]mebendazole tablets[/url] [url=http://buy-bentyl.shop/]buy bentyl[/url] [url=http://proveraonline.pro/]provera[/url] [url=http://inderal.zone/]inderal[/url]
— Charlesnef Jul 22, 08:25 AM #wh0cd491513 [url=http://fluoxetine.us.org/]Fluoxetine Tablets[/url] [url=http://cephalexin250mg.us.com/]buy cephalexin[/url]
— Bennyboits Jul 22, 09:22 AM #wh0cd638455 [url=http://sildenafilcitrate.directory/]i found it[/url] [url=http://buy-amoxil.store/]amoxil[/url] [url=http://buyfurosemide.reisen/]100 mg furosemide[/url] [url=http://buykamagra.store/]more about the author[/url] [url=http://euraxonline.pro/]eurax online[/url]
— Charlesnef Jul 22, 09:30 AM #wh0cd206175 [url=http://anafranilgeneric.us.com/]buy anafranil[/url]
— Tracysporp Jul 22, 09:52 AM #wh0cd491514 [url=http://buyavana.us.org/]generic avana[/url]
— Charlesnef Jul 22, 10:05 AM #wh0cd124144 [url=http://dramamine.reisen/]dramamine drug[/url] [url=http://phenergan.mba/]phenergan[/url] [url=http://avodart.systems/]avodart[/url] [url=http://yasmin.shop/]yasmin[/url] [url=http://yasmin.directory/]yasmin birth control pills[/url]
— Alfreddut Jul 22, 11:29 AM #wh0cd711928 [url=http://vgel.reisen/]v-gel[/url] [url=http://imitrex.reisen/]generic imitrex[/url] [url=http://herbolax.world/]herbolax[/url] [url=http://zovirax.pro/]zovirax[/url] [url=http://diarex.reisen/]diarex[/url]
— Charlesnef Jul 22, 11:46 AM #wh0cd785401 [url=http://genericwellbutrin.us.com/]Wellbutrin[/url]
— Charlesnef Jul 22, 12:56 PM #wh0cd197620 [url=http://copegus.reisen/]copegus[/url] [url=http://alesse.reisen/]alesse[/url] [url=http://calan.reisen/]calan[/url] [url=http://roxithromycin.world/]check out your url[/url] [url=http://luvox.reisen/]generic for luvox[/url]
— Alfreddut Jul 22, 01:29 PM #wh0cd389408 [url=http://bentylcost.us.com/]bentyl from india[/url]
— KennethBiodo Jul 22, 02:24 PM #wh0cd462884 [url=http://effexorgeneric.us.com/]purchase effexor[/url] [url=http://nolvadexonline.us.com/]buy nolvadex[/url]
— KennethBiodo Jul 22, 03:30 PM #wh0cd711939 [url=http://doxazosin.reisen/]doxazosin price[/url] [url=http://lanoxin.reisen/]lanoxin[/url] [url=http://nootropil.reisen/]nootropil[/url] [url=http://imitrex.reisen/]imitrex[/url] [url=http://acai.reisen/]acai[/url]
— Charlesnef Jul 22, 03:42 PM #wh0cd491512 [url=http://buy-valtrex.reisen/]valtrex[/url] [url=http://colchicine.fail/]colchicine[/url] [url=http://buyprozac.reisen/]buying prozac online[/url] [url=http://buy-toradol.shop/]toradol[/url] [url=http://buymotilium.reisen/]buy motilium[/url]
— Alfreddut Jul 22, 09:09 PM #wh0cd756780 [url=http://onlinecrestor.us.com/]crestor 10mg[/url] [url=http://buybenicar.us.com/]olmesartan[/url]
— KennethBiodo Jul 22, 09:35 PM #wh0cd242470 [url=http://trazodone.us.org/]trazodone generic[/url] [url=http://clomidonline.us.com/]order clomid online[/url]
— Charlesnef Jul 22, 10:48 PM #wh0cd22043 [url=http://buymetformin.us.org/]metformin[/url] [url=http://anafranilgeneric.us.com/]anafranil generic[/url]
— Charlesnef Jul 22, 10:56 PM #wh0cd389414 [url=http://prozac.us.org/]Buy Prozac Online[/url] [url=http://erythromycin.us.org/]buy erythromycin without prescription[/url]
— Alfreddut Jul 22, 11:26 PM #wh0cd830259 [url=http://buypropecia.us.org/]buy propecia[/url]
— KennethBiodo Jul 22, 11:33 PM #wh0cd95518 [url=http://buyfluoxetine.us.org/]buy fluoxetine[/url]
— Charlesnef Jul 23, 12:25 AM #wh0cd315945 [url=http://benadryl.us.com/]benadryl[/url]
— Charlesnef Jul 23, 12:28 AM #wh0cd903732 [url=http://revia.us.com/]Revia[/url] [url=http://allopurinol.us.com/]allopurinol price[/url] [url=http://phenergannorx.us.com/]phenergan with no rx[/url] [url=http://drug.abilify.us.com/]abilify medication[/url] [url=http://atenolol.us.org/]atenolol no prescription[/url]
— KennethBiodo Jul 23, 01:05 AM #wh0cd462889 [url=http://triamterene.us.org/]triamterene/hctz 37.5[/url]
— Alfreddut Jul 23, 01:15 AM #wh0cd711935 [url=http://prilosecgeneric.us.com/]prilosec generic[/url]
— Alfreddut Jul 23, 02:35 AM #wh0cd95518 [url=http://metformin500mgtablets.us.com/]metformin 850mg[/url] [url=http://amitriptyline.us.org/]Amitriptyline Prices[/url]
— Charlesnef Jul 23, 03:23 AM #wh0cd785410 [url=http://buybaclofen.us.com/]baclofen without a prescription[/url] [url=http://buyavana.us.com/]avana[/url]
— Alfreddut Jul 23, 04:26 AM #wh0cd242464 [url=http://diclofenac.live/]visit website[/url] [url=http://albuterol.live/]albuterol hfa inhaler[/url] [url=http://provera.work/]provera[/url] [url=http://citalopram.fail/]order citalopram online[/url] [url=http://tofranil.reisen/]tofranil[/url]
— Bennyboits Jul 23, 04:37 AM #wh0cd168991 [url=http://nolvadexforsale.us.com/]nolvadex for sale[/url] [url=http://buyprovera.us.org/]buy provera[/url]
— Charlesnef Jul 23, 05:12 AM #wh0cd315937 [url=http://genericbentyl.us.com/]generic bentyl[/url]
— Bennyboits Jul 23, 06:07 AM #wh0cd683310 [url=http://buyallopurinol.us.org/]Allopurinol 300 Mg[/url] [url=http://buyelocon.us.org/]buy elocon[/url]
— Alfreddut Jul 23, 06:56 AM #wh0cd242466 [url=http://advairgeneric.us.com/]generic advair diskus[/url]
— Charlesnef Jul 23, 07:10 AM #wh0cd213845 [url=http://amoxicillin500mg.us.org/]amoxicillin tablets for sale[/url] [url=http://lipitoronline.us.com/]lipator[/url]
— KennethBiodo Jul 23, 07:20 AM #http://allocating.one
— Dorozercede Jul 23, 08:28 AM #wh0cd287320 [url=http://flagyl.us.org/]as an example[/url] [url=http://genericsynthroid.us.com/]synthroid pills[/url]
— KennethBiodo Jul 23, 08:35 AM #wh0cd683321 [url=http://citalopramhbr.us.org/]citalopram by mail[/url] [url=http://buylexapro.us.com/]Cheap Lexapro[/url]
— Charlesnef Jul 23, 08:41 AM #wh0cd756798 [url=http://buyrevia.us.org/]revia tablets online[/url]
— Charlesnef Jul 23, 10:09 AM #wh0cd22043 [url=http://arimidex.us.org/]ARIMIDEX[/url] [url=http://abilifygeneric.us.com/]Abilify Online[/url]
— Alfreddut Jul 23, 10:09 AM #wh0cd360793 [url=http://prozac.us.org/]learn more here[/url] [url=http://lisinopril5mg.us.com/]Lisinopril 5 Mg[/url]
— KennethBiodo Jul 23, 10:10 AM #wh0cd830260 [url=http://trazodonehcl.us.com/]trazodone sale[/url]
— Alfreddut Jul 23, 10:36 AM #wh0cd536358 [url=http://trazodone50mg.us.com/]trazodone 50 mg[/url]
— Bennyboits Jul 23, 11:50 AM #wh0cd830271 [url=http://cordarone.world/]cordarone drip[/url] [url=http://floxin.reisen/]floxin[/url] [url=http://finpecia.reisen/]finpecia[/url] [url=http://shatavari.reisen/]shatavari[/url] [url=http://cyklokapron.reisen/]cyklokapron without prescription[/url]
— Charlesnef Jul 23, 12:08 PM #wh0cd95516 [url=http://buyfluoxetine.us.org/]Buy Fluoxetine[/url]
— Alfreddut Jul 23, 12:09 PM #wh0cd462889 [url=http://buyadalat.us.org/]adalat prescription[/url] [url=http://trazodone50mg.us.com/]trazodone no prescription[/url]
— Charlesnef Jul 23, 12:39 PM #wh0cd977210 [url=http://albendazole2016.us.com/]albendazole[/url] [url=http://suhagra365.us.com/]Suhagra[/url]
— Alfreddut Jul 23, 01:28 PM #wh0cd977222 [url=http://diflucan150mg.pro/]buy fluconazole[/url] [url=http://amitriptyline.shop/]amitriptyline[/url] [url=http://eloconcreamprice.pro/]elocon topical cream[/url] [url=http://buyproscar.shop/]proscar[/url] [url=http://vermox.shop/]vermox[/url]
— Charlesnef Jul 23, 03:00 PM #wh0cd168991 [url=http://yasminbirthcontrol.us.com/]Yasmin Birth Control Pills[/url] [url=http://nexium.us.org/]nexium[/url]
— Alfreddut Jul 23, 03:19 PM #wh0cd66894 [url=http://bupropionsr150mg.us.com/]order bupropion[/url] [url=http://buyrimonabant.us.org/]RIMONABANT ACOMPLIA[/url]
— Alfreddut Jul 23, 03:25 PM #wh0cd581214 [url=http://allopurinol100mg.us.com/]cheapest allopurinol[/url] [url=http://medrolpack.us.com/]resources[/url]
— KennethBiodo Jul 23, 03:36 PM #wh0cd830252 [url=http://albuterol.directory/]albuterol[/url] [url=http://buy-colchicine.reisen/]colchicine[/url] [url=http://buyelocon.shop/]elocon cream 1[/url] [url=http://buy-buspar.shop/]buy buspar[/url] [url=http://allopurinol.schule/]allopurinol online purchase[/url]
— Bennyboits Jul 23, 06:26 PM #wh0cd315939 [url=http://zyprexa.reisen/]zyprexa[/url] [url=http://phenergan.shop/]phenergan[/url] [url=http://clindamycin.mba/]clindamycin[/url] [url=http://toradol.schule/]toradol[/url] [url=http://prozac.tools/]prozac[/url]
— Alfreddut Jul 23, 07:41 PM #wh0cd903725 [url=http://vermox365.us.com/]vermox online[/url]
— Bennyboits Jul 23, 07:48 PM #wh0cd287315 [url=http://synthroidgeneric.us.com/]Synthroid With NO Script[/url] [url=http://cheapcardura.us.com/]cardura 2mg[/url]
— Alfreddut Jul 23, 09:06 PM #wh0cd287313 [url=http://metformin500mg.us.com/]Metformin 500 Mg[/url] [url=http://buycymbalta.us.org/]as explained here[/url]
— Charlesnef Jul 23, 10:16 PM #wh0cd360788 [url=http://buyphenergan.us.com/]Phenergan With No RX[/url] [url=http://buybenicar.us.com/]buy benicar[/url]
— Alfreddut Jul 23, 10:28 PM #wh0cd875110 [url=http://genericadvair.us.com/]BUY ADVAIR[/url] [url=http://buyamoxil.us.org/]Purchase Amoxil[/url]
— KennethBiodo Jul 23, 10:59 PM #wh0cd360786 [url=http://amitriptyline.us.org/]elavil drug[/url] [url=http://yasminbirthcontrol.us.com/]yasmin birth control[/url]
— Charlesnef Jul 24, 12:07 AM #wh0cd903734 [url=http://genericwellbutrin.us.com/]generic wellbutrin[/url]
— Charlesnef Jul 24, 12:34 AM #wh0cd140372 [url=http://sildenafilcitrate.us.org/]sildenafil generic canada[/url]
— Bennyboits Jul 24, 12:36 AM #wh0cd536363 [url=http://buycymbalta.us.org/]cymbalta no rx[/url] [url=http://clonidinehcl.us.com/]Clonidine HCL[/url]
— Alfreddut Jul 24, 01:11 AM #wh0cd38274 [url=http://lipitor.us.org/]website here[/url] [url=http://buyyasmin.us.org/]cheap yasmin[/url]
— KennethBiodo Jul 24, 02:06 AM #wh0cd360794 [url=http://buy-cafergot.store/]buy cafergot[/url] [url=http://allopurinol300mg.pro/]allopurinol 300 mg[/url] [url=http://buy-inderal.reisen/]buy inderal[/url] [url=http://buyatenolol.shop/]atenolol[/url] [url=http://buy-toradol.shop/]toradol 60 mg[/url]
— Bennyboits Jul 24, 04:27 AM #wh0cd185220 [url=http://nexiumprice.us.com/]buy nexium[/url]
— KennethBiodo Jul 24, 05:46 AM #wh0cd140367 [url=http://celebrex200mg.us.com/]celebrex 200mg[/url] [url=http://buyflagyl.us.org/]buy flagyl online[/url]
— Charlesnef Jul 24, 06:40 AM #wh0cd507744 [url=http://buydiflucan.us.org/]order diflucan[/url]
— Bennyboits Jul 24, 07:44 AM #wh0cd213840 [url=http://cheapcardura.us.com/]cardura 8 mg[/url]
— Charlesnef Jul 24, 08:06 AM #wh0cd728160 [url=http://medrolpak.us.com/]neo medrol[/url]
— Charlesnef Jul 24, 09:47 AM #wh0cd581217 [url=http://buymethotrexate.us.org/]methotrexate tablets[/url] [url=http://genericsingulair.us.com/]Singulair[/url]
— Bennyboits Jul 24, 09:54 AM #wh0cd875103 [url=http://buyerythromycin.us.com/]Erythromycin Without Prescription[/url] [url=http://clindamycin365.us.com/]clindamycin[/url]
— Alfreddut Jul 24, 11:06 AM #wh0cd903732 [url=http://buystrattera.us.org/]buy strattera[/url]
— Alfreddut Jul 24, 12:00 PM #wh0cd552596 [url=http://cafergot.us.org/]cafergot[/url]
— KennethBiodo Jul 24, 01:39 PM #wh0cd977208 [url=http://tretinoincream01.us.com/]tretinoin cream 0.1[/url] [url=http://bentyl.us.org/]bentyl[/url]
— Alfreddut Jul 24, 01:45 PM #wh0cd626069 [url=http://trazodone2017.us.com/]TRAZODONE[/url] [url=http://diflucanpill.us.com/]cheap diflucan[/url]
— KennethBiodo Jul 24, 02:42 PM #wh0cd507739 [url=http://cephalexin250mg.us.com/]keflex drug[/url] [url=http://buyretina.us.org/]buy retin-a[/url]
— Charlesnef Jul 24, 03:07 PM #wh0cd66896 [url=http://citalopramhbr20mg.us.org/]citalopram tablets[/url] [url=http://buyfluoxetine.us.org/]Buy Fluoxetine[/url]
— Alfreddut Jul 24, 03:16 PM #wh0cd111747 [url=http://buyinderal.us.org/]buy inderal[/url]
— Alfreddut Jul 24, 04:32 PM #wh0cd38272 [url=http://orderdiflucanonline.us.com/]diflucan 150 mg[/url] [url=http://genericlasix.us.com/]buying lasix[/url]
— Alfreddut Jul 24, 05:33 PM #wh0cd773017 [url=http://eurax365.us.com/]eurax by mail[/url]
— KennethBiodo Jul 24, 05:33 PM #wh0cd654685 [url=http://triamterene.us.org/]triamterene[/url] [url=http://buyrevia.us.org/]Revia[/url]
— Charlesnef Jul 24, 06:36 PM #fh89×4dbkq6u4ju410
[url=http://google.us]google[/url]
<a href=http://google.us>google</a>
em89exip2xwl7ktm3v
— Mkaaemibe Jul 24, 07:48 PM #wh0cd185222 [url=http://cephalexin.work/]buy keflex[/url] [url=http://buy-crestor.shop/]buy crestor[/url] [url=http://valtrexonline.pro/]valtrex[/url] [url=http://tadalafil.store/]tadalafil[/url] [url=http://wellbutrin.news/]more[/url]
— Alfreddut Jul 24, 07:59 PM #wh0cd177551 [url=http://flagyl500mg.us.com/]FLAGYL 500 MG[/url] [url=http://lipitor24.us.org/]Lipitor[/url]
— Tracysporp Jul 24, 11:40 PM #wh0cd185222 [url=http://genericnexium.us.com/]generic nexium[/url] [url=http://buyyasmin.us.org/]Buy Yasmin[/url]
— Bennyboits Jul 25, 12:50 AM #wh0cd440755 [url=http://bentylcost.us.com/]bentyl tablets[/url]
— MichaelSoush Jul 25, 01:52 AM #wh0cd38274 [url=http://abilifygeneric.us.com/]abilify generic[/url] [url=http://valtrexgeneric.us.com/]valtrex generic[/url]
— Charlesnef Jul 25, 03:02 AM #wh0cd332172 [url=http://erythromycin.us.org/]erythromycin[/url] [url=http://amitriptyline.us.org/]Buy Amitriptyline Online[/url]
— Bennyboits Jul 25, 03:36 AM #wh0cd111747 [url=http://trazodonehcl.us.com/]trazodone 100 mg[/url] [url=http://motrin800.us.com/]motrin 800[/url]
— Charlesnef Jul 25, 04:23 AM #wh0cd251024 [url=http://buyrimonabant.us.org/]acomplia rimonabant[/url]
— Tracysporp Jul 25, 04:24 AM #wh0cd405647 [url=http://buyrevia.us.org/]revia cost[/url] [url=http://genericsynthroid.us.com/]generic synthroid[/url]
— Bennyboits Jul 25, 05:05 AM #wh0cd479119 [url=http://ciprofloxacinhcl500mg.us.com/]ciprofloxacin prices[/url]
— Charlesnef Jul 25, 05:20 AM #wh0cd875107 [url=http://levofloxacin.us.com/]levaquin 500 mg[/url]
— Alfreddut Jul 25, 06:52 AM #wh0cd552592 [url=http://advair.us.org/]Advair 50[/url] [url=http://bentyl.us.org/]bentyl online[/url]
— Charlesnef Jul 25, 07:32 AM #wh0cd948582 [url=http://tetracycline.us.org/]tetracycline online[/url]
— Alfreddut Jul 25, 08:51 AM #wh0cd324497 [url=http://genericforcymbalta.us.com/]generic for cymbalta[/url]
— Tracysporp Jul 25, 09:03 AM #[url=http://j-health.ru/]капли для глаз rohto купить[/url] – магазин японских товаров в спб, японские товары интернет-магазин.
— JosephOxype Jul 25, 10:15 AM #wh0cd626070 [url=http://zocor.world/]zocor[/url] [url=http://cytotec.zone/]cytotec[/url] [url=http://citalopram.world/]citalopram[/url] [url=http://paxil.directory/]paxil 10 mg[/url] [url=http://avodart.shop/]generic for avodart 0.5 mg[/url]
— Bennyboits Jul 25, 10:46 AM #wh0cd699545 [url=http://colchicine.us.org/]colchicine prescriptions[/url] [url=http://genericlasix.us.com/]Generic Lasix[/url]
— Bennyboits Jul 25, 12:10 PM #wh0cd993446 [url=http://celebrex.us.org/]celebrex pfizer[/url] [url=http://nolvadex.us.org/]nolvadex[/url]
— Alfreddut Jul 25, 01:20 PM #wh0cd185218 [url=http://buyflagyl.us.org/]buy flagyl online[/url]
— Alfreddut Jul 25, 01:24 PM #wh0cd479128 [url=http://valtrexgeneric.us.com/]valtrex generic cost[/url]
— Charlesnef Jul 25, 01:31 PM #wh0cd9650 [url=http://arimidex.us.com/]arimidex[/url]
— Alfreddut Jul 25, 01:49 PM #wh0cd846488 [url=http://colchicine.us.org/]generic colchicine[/url] [url=http://hydrochlorothiazide25mg.us.com/]cheap hydrochlorothiazide[/url]
— Charlesnef Jul 25, 02:42 PM #wh0cd597436 [url=http://nolvadex.us.org/]gynecomastia nolvadex[/url] [url=http://celebrex.us.org/]buy celebrex[/url]
— KennethBiodo Jul 25, 02:48 PM #wh0cd258696 [url=http://hydrochlorothiazide25mg.us.com/]Hydrochlorothiazide For Sale[/url]
— Alfreddut Jul 25, 02:50 PM #wh0cd83129 [url=http://buyprednisone.us.org/]apo prednisone[/url]
— Alfreddut Jul 25, 03:17 PM #wh0cd919961 [url=http://furosemide365.us.com/]furosemide by mail[/url] [url=http://prozac24.us.org/]Prozac[/url]
— Charlesnef Jul 25, 04:11 PM #wh0cd670909 [url=http://bentyl.us.org/]bentyl prescriptions[/url]
— KennethBiodo Jul 25, 04:21 PM #wh0cd626078 [url=http://avapro.world/]avapro[/url] [url=http://xeloda.reisen/]xeloda breast cancer[/url] [url=http://precose.world/]buy precose[/url] [url=http://hairlosscream.reisen/]buy hair loss cream[/url] [url=http://diarex.world/]as example[/url]
— Charlesnef Jul 25, 04:35 PM #wh0cd993436 [url=http://buydiflucan.us.org/]Buy Diflucan[/url] [url=http://diclofenac50mg.us.com/]for more info[/url]
— Charlesnef Jul 25, 05:52 PM #wh0cd993437 [url=http://confido.world/]generic confido[/url] [url=http://buyclaritin.reisen/]generic for claritin[/url] [url=http://endep.reisen/]endep[/url] [url=http://trecatorsc.reisen/]generic trecator sc[/url] [url=http://himplasia.reisen/]himplasia[/url]
— Bennyboits Jul 25, 06:20 PM #wh0cd817855 [url=http://amoxicillin500mg.us.org/]500 mg amoxicillin[/url]
— KennethBiodo Jul 25, 07:21 PM #wh0cd83127 [url=http://buyclonidine.us.org/]buy clonidine[/url]
— Bennyboits Jul 25, 08:05 PM #wh0cd471447 [url=http://lamisil.reisen/]lamisil[/url] [url=http://buynizoral.world/]nizoral[/url] [url=http://grifulvinv.world/]grifulvin v[/url] [url=http://styplon.world/]styplon without prescription[/url] [url=http://buyzyrtec.world/]buy zyrtec[/url]
— Tracysporp Jul 25, 08:23 PM #wh0cd156602 [url=http://bupropionsr150mg.us.com/]Bupropion SR 150 Mg[/url]
— Alfreddut Jul 25, 08:41 PM #wh0cd552597 [url=http://buyzithromax.us.org/]Generic Zithromax[/url]
— Alfreddut Jul 25, 09:16 PM #wh0cd919977 [url=http://sinequan.reisen/]sinequan[/url] [url=http://phenergan.directory/]buy phenergan online[/url] [url=http://amoxil.work/]amoxil 500[/url] [url=http://elocon.live/]elocon[/url] [url=http://sildenafil.directory/]sildenafil[/url]
— Charlesnef Jul 25, 11:37 PM #wh0cd156602 [url=http://nexiumprice.us.com/]Cheapest Nexium[/url]
— Bennyboits Jul 26, 01:13 AM #wh0cd54501 [url=http://genericcelexa.us.com/]generic celexa[/url] [url=http://celebrex200mg.us.com/]celebrex 200mg[/url]
— KennethBiodo Jul 26, 01:25 AM #wh0cd9650 [url=http://buycymbalta.us.com/]buy cymbalta[/url]
— Charlesnef Jul 26, 02:04 AM #wh0cd544922 [url=http://buycitalopram.us.org/]Buy Citalopram[/url] [url=http://buyantabuse.us.org/]buy antabuse[/url]
— Tracysporp Jul 26, 02:11 AM #wh0cd450500 [url=http://clonidineadhd.us.com/]clonidine adhd[/url] [url=http://triamterenegeneric.us.com/]triamterene generic[/url]
— Alfreddut Jul 26, 02:16 AM #wh0cd377021 [url=http://buyfluoxetine.us.org/]FLUOXETINE[/url] [url=http://lasixnoprescription.us.com/]lasix no prescription[/url]
— Charlesnef Jul 26, 02:50 AM #wh0cd523969 [url=http://losartanhydrochlorothiazide.us.com/]hydrochlorothiazide[/url] [url=http://lasixnoprescription.us.com/]generic lasix[/url]
— Charlesnef Jul 26, 05:47 AM #wh0cd377030 [url=http://celexa.us.org/]celexa[/url]
— Bennyboits Jul 26, 05:54 AM #nf33pmg4qm9hl2egl9
[url=http://baidu.com/]baidu[/url]
<a href=http://baidu.com/>baidu</a>
06b9cf5lvunh8e6vdy
— JasonSouby Jul 26, 06:18 AM #wh0cd670923 [url=http://nexium40mg.us.com/]check this out[/url]
— Alfreddut Jul 26, 06:40 AM #wh0cd597444 [url=http://advair.us.org/]Advair Online[/url] [url=http://synthroidgeneric.us.com/]synthroid generic[/url]
— Charlesnef Jul 26, 07:27 AM #wh0cd744398 [url=http://amoxicillin500mg.us.org/]i found it[/url] [url=http://effexor.us.org/]effexor over the counter[/url]
— Alfreddut Jul 26, 08:11 AM #wh0cd201447 [url=http://buyzetia.us.org/]zetia weight loss[/url]
— KennethBiodo Jul 26, 08:21 AM #wh0cd691870 [url=http://buyacyclovir.us.org/]herpes acyclovir[/url]
— Tracysporp Jul 26, 08:42 AM #wh0cd670917 [url=http://toradolonline.us.com/]Buy Toradol Online[/url] [url=http://flagyl.us.org/]flagyl w/o rx[/url]
— Charlesnef Jul 26, 09:29 AM #wh0cd83123 [url=http://seroquelgeneric.us.com/]seroquel bipolar depression[/url]
— Alfreddut Jul 26, 09:42 AM #wh0cd817873 [url=http://orderdiflucanonline.us.com/]Order Diflucan Online[/url]
— Alfreddut Jul 26, 10:08 AM #wh0cd377022 [url=http://genericwellbutrin.us.com/]generic wellbutrin[/url] [url=http://effexor.us.org/]effexor 150mg[/url]
— Charlesnef Jul 26, 11:20 AM #wh0cd765343 [url=http://carafate.reisen/]carafate[/url] [url=http://hydrea.world/]hydrea[/url] [url=http://triphala.reisen/]triphala[/url] [url=http://hairlosscream.reisen/]hair loss cream[/url] [url=http://tegretol.reisen/]check out your url[/url]
— Tracysporp Jul 26, 11:44 AM #wh0cd348398 [url=http://buyeffexor.us.org/]go here[/url]
— KennethBiodo Jul 26, 11:52 AM #wh0cd421878 [url=http://buyaugmentin.us.org/]augmentin online[/url] [url=http://genericforcymbalta.us.com/]order cymbalta[/url]
— KennethBiodo Jul 26, 01:20 PM #k3m2ilwqgx45gibrby
[url=http://baidu.com/]baidu[/url]
<a href=http://baidu.com/>baidu</a>
rwt6tqdmbveb16xc2a
— JasonSouby Jul 26, 02:18 PM #wh0cd891342 [url=http://buypropranolol.us.org/]related site[/url]
— Charlesnef Jul 26, 02:38 PM #wh0cd54503 [url=http://clomid24.us.org/]clomid[/url]
— Alfreddut Jul 26, 03:13 PM #wh0cd495351 [url=http://buyfluoxetine.us.org/]buy fluoxetine[/url] [url=http://metformin500mg.us.com/]generic metformin[/url]
— KennethBiodo Jul 26, 03:17 PM #wh0cd964817 [url=http://diclofenac50mg.us.com/]cheap diclofenac[/url] [url=http://buydiflucan.us.org/]buy diflucan[/url]
— Charlesnef Jul 26, 03:56 PM #wh0cd377021 [url=http://buyvaltrex.us.org/]valtrex discount[/url] [url=http://tretinoin.us.org/]tretinoin[/url]
— Alfreddut Jul 26, 04:01 PM #wh0cd127981 [url=http://amoxicillin500mg.us.org/]amoxicillin 500mg[/url] [url=http://prozac.us.org/]BUY PROZAC[/url]
— Alfreddut Jul 26, 04:20 PM #wh0cd450496 [url=http://calan.world/]calan sr 120 mg[/url] [url=http://actos.reisen/]actos[/url] [url=http://feldene.world/]feldene 20 mg[/url] [url=http://septilin.reisen/]septilin online[/url] [url=http://precose.reisen/]precose[/url]
— Alfreddut Jul 26, 05:13 PM #wh0cd568824 [url=http://eurax365.us.com/]Eurax[/url] [url=http://ventolin365.us.com/]ventolin by mail order[/url]
— KennethBiodo Jul 26, 05:14 PM #wh0cd912292 [url=http://premarin.world/]buy premarin cream online[/url] [url=http://alesse.reisen/]alesse[/url] [url=http://lynoral.reisen/]lynoral without prescription[/url] [url=http://ponstel.reisen/]ponstel[/url] [url=http://imitrex.world/]imitrex[/url]
— Tracysporp Jul 26, 05:54 PM #wh0cd642297 [url=http://nexium.us.org/]order nexium online[/url]
— KennethBiodo Jul 26, 07:25 PM #wh0cd597446 [url=http://genericretina.us.com/]generic retin a[/url]
— Alfreddut Jul 26, 08:13 PM #wh0cd127976 [url=http://cheapcardura.us.com/]cardura 2mg[/url]
— Bennyboits Jul 26, 08:52 PM #wh0cd421882 [url=http://nexium40mg.us.com/]Nexium[/url] [url=http://buypropecia.us.org/]buy propecia[/url]
— Alfreddut Jul 26, 09:28 PM #wh0cd495355 [url=http://acyclovir247.us.org/]Acyclovir 800 Mg[/url]
— Alfreddut Jul 26, 10:28 PM #wh0cd201449 [url=http://buyacyclovir.us.org/]buy acyclovir[/url]
— Bennyboits Jul 26, 10:35 PM #wh0cd789245 [url=http://cheapcardura.us.com/]buy cardura[/url]
— KennethBiodo Jul 26, 10:58 PM #wh0cd891337 [url=http://hydrochlorothiazide25mg.us.com/]Hydrochlorothiazide 25mg[/url] [url=http://buyflagyl.us.org/]more[/url]
— Charlesnef Jul 26, 11:54 PM #wh0cd744394 [url=http://cheapcardura.us.com/]CHEAP CARDURA[/url]
— Alfreddut Jul 27, 12:04 AM #wh0cd568830 [url=http://buyvardenafil.us.org/]vardenafil hcl 20mg[/url]
— Alfreddut Jul 27, 12:17 AM #wh0cd862718 [url=http://albuterol.tools/]albuterol[/url] [url=http://vermox.live/]vermox mebendazole[/url] [url=http://lukol.world/]lukol[/url] [url=http://phenergan.store/]buy phenergan online[/url] [url=http://metformin.fail/]metformin[/url]
— KennethBiodo Jul 27, 12:20 AM #wh0cd274922 [url=http://nolvadexonline.us.com/]cheap nolvadex[/url]
— Bennyboits Jul 27, 12:31 AM #wh0cd936191 [url=http://himcolin.world/]generic himcolin[/url] [url=http://actonel.world/]actonel[/url] [url=http://buydulcolax.world/]dulcolax[/url] [url=http://clozaril.reisen/]clozaril[/url] [url=http://avapro.reisen/]avapro[/url]
— KennethBiodo Jul 27, 01:44 AM #wh0cd348395 [url=http://amitriptyline.directory/]amitriptyline[/url] [url=http://overthecounterbentyl.pro/]bentyl[/url] [url=http://neurontin.zone/]buy neurontin online[/url] [url=http://diflucan.fund/]diflucan[/url] [url=http://buyclonidine.shop/]clonidine for pain[/url]
— Bennyboits Jul 27, 02:24 AM #wh0cd348403 [url=http://colchicine.us.org/]colchicine[/url] [url=http://buyinderal.us.org/]Buy Inderal[/url]
— Charlesnef Jul 27, 02:54 AM #wh0cd715784 [url=http://advairgeneric.us.com/]advair generic[/url]
— Alfreddut Jul 27, 03:23 AM #wh0cd148926 [url=http://buyvaltrex.us.org/]buy valtrex[/url]
— Tracysporp Jul 27, 04:06 AM #wh0cd127976 [url=http://amoxil.us.org/]amoxil[/url] [url=http://genericseroquel.us.com/]buy seroquel online[/url]
— Charlesnef Jul 27, 04:40 AM #wh0cd789257 [url=http://cheapcardura.us.com/]cardura[/url]
— Alfreddut Jul 27, 05:17 AM #wh0cd495354 [url=http://pilex.reisen/]pilex without prescription[/url] [url=http://desyrel.reisen/]buy desyrel[/url] [url=http://buyclaritin.world/]buy claritin-d online[/url] [url=http://lotensin.reisen/]lotensin hct[/url] [url=http://prilosec.world/]prilosec[/url]
— Charlesnef Jul 27, 06:54 AM #wh0cd862730 [url=http://tetracyclineantibiotics.us.com/]online tetracycline prescription[/url] [url=http://buyvardenafil.us.org/]vardenafil tablets[/url]
— Alfreddut Jul 27, 06:59 AM #wh0cd274924 [url=http://bactroban.us.com/]buy bactroban[/url] [url=http://lasix24h.us.org/]lasix online[/url]
— Charlesnef Jul 27, 07:25 AM #wh0cd936203 [url=http://antabuse.live/]antabuse[/url] [url=http://indocin.fail/]indocin[/url] [url=http://premarin.reisen/]premarin[/url] [url=http://elimite.fail/]get the facts[/url] [url=http://buymicardis.reisen/]buy micardis[/url]
— Alfreddut Jul 27, 08:40 AM #wh0cd348397 [url=http://proveraonline.pro/]provera cost[/url] [url=http://augmentin.systems/]augmentin 875 mg tablet[/url] [url=http://buy-tamoxifen.store/]tamoxifen[/url] [url=http://buy-tenormin.shop/]buy tenormin[/url] [url=http://provera.world/]provera 10 mg[/url]
— Charlesnef Jul 27, 09:08 AM #wh0cd127978 [url=http://albuterol.news/]albuterol[/url] [url=http://cipro.work/]cipro[/url] [url=http://albendazole.world/]albendazole[/url] [url=http://abilify.fund/]abilify[/url] [url=http://compazine.reisen/]compazine 10 mg[/url]
— Alfreddut Jul 27, 09:38 AM #wh0cd222399 [url=http://prevacid.world/]prevacid[/url] [url=http://imdur.world/]imdur[/url] [url=http://compazine.world/]compazine[/url] [url=http://cytoxan.world/]cytoxan for lupus[/url] [url=http://hytrin.reisen/]hytrin[/url]
— Tracysporp Jul 27, 10:02 AM #wh0cd319777 [url=http://generictriamterene.us.com/]generic triamterene[/url]
— KennethBiodo Jul 27, 10:25 AM #wh0cd25881 [url=http://prilosec.us.com/]omeprazole[/url] [url=http://buyacyclovir.us.org/]buy acyclovir[/url]
— Alfreddut Jul 27, 10:51 AM #wh0cd466725 [url=http://effexorgeneric.us.com/]purchase effexor xr[/url]
— KennethBiodo Jul 27, 01:24 PM #wh0cd172827 [url=http://aciclovir.us.com/]aciclovir[/url] [url=http://buyanafranil.us.org/]anafranil online[/url]
— Alfreddut Jul 27, 02:36 PM #wh0cd936200 [url=http://tetracycline.us.org/]Tetracycline[/url] [url=http://motrin800.us.com/]generic motrin[/url]
— Bennyboits Jul 27, 02:38 PM #wh0cd246302 [url=http://cephalexin500.us.com/]cephalexin for sale[/url] [url=http://diclofenac75mg.us.com/]diclofenac gel[/url]
— Alfreddut Jul 27, 04:14 PM #wh0cd642289 [url=http://crestor.zone/]crestor[/url] [url=http://clonidine.live/]clonidine for adhd in adults[/url] [url=http://elocon.store/]elocon[/url] [url=http://phenergan.directory/]buy phenergan[/url] [url=http://atenolol.live/]atenolol 50 mg[/url]
— Charlesnef Jul 27, 04:16 PM #wh0cd25881 [url=http://tretinoin.us.org/]generic tretinoin cream[/url]
— Bennyboits Jul 27, 04:43 PM #wh0cd862723 [url=http://toradolonline.us.com/]Toradol Over Counter[/url] [url=http://buymotilium.us.org/]motilium otc[/url]
— Charlesnef Jul 27, 04:47 PM #wh0cd319778 [url=http://buynexium.us.org/]NEXIUM[/url]
— Alfreddut Jul 27, 05:34 PM #wh0cd715764 [url=http://buydoxycycline.us.org/]buy doxycycline[/url] [url=http://lisinopril20mg.us.com/]price of lisinopril[/url]
— Charlesnef Jul 27, 06:03 PM #wh0cd687146 [url=http://propecia.us.org/]Proscar[/url]
— KennethBiodo Jul 27, 06:54 PM #wh0cd568825 [url=http://citalopramhbr20mg.us.org/]citalopram tablets[/url]
— Alfreddut Jul 27, 08:54 PM #wh0cd981038 [url=http://precose.us.com/]Precose Online[/url]
— KennethBiodo Jul 28, 01:25 AM #wh0cd319771 [url=http://buy-eurax.shop/]eurax[/url] [url=http://sildenafil100mg.pro/]sildenafil 100 mg[/url] [url=http://baclofen.reisen/]baclofen[/url] [url=http://amitriptyline25mg.pro/]amitriptyline[/url] [url=http://buy-tadalafil.shop/]tadalafil[/url]
— Charlesnef Jul 28, 02:17 AM #wh0cd516293 [url=http://nexium.us.org/]nexium sale[/url] [url=http://bupropionsr150mg.us.com/]bupropion sr 150 mg[/url]
— Tracysporp Jul 28, 02:17 AM #wh0cd789246 [url=http://buypropranolol.us.org/]inderal propranolol[/url] [url=http://nolvadexonline.us.com/]Buy Cheap Nolvadex Online[/url]
— Alfreddut Jul 28, 02:49 AM #wh0cd70732 [url=http://celebrex.us.org/]celebrex 200mg[/url]
— KennethBiodo Jul 28, 03:08 AM #wh0cd393246 [url=http://buspar4you.us.com/]buspar online[/url] [url=http://seroquel.us.com/]seroquel[/url]
— Charlesnef Jul 28, 03:34 AM #wh0cd172830 [url=http://motrin800.us.com/]motrin online[/url]
— Charlesnef Jul 28, 04:43 AM #wh0cd540198 [url=http://crestor.reisen/]crestor[/url] [url=http://albendazole.world/]albendazole[/url] [url=http://amoxicillin.shop/]amoxicillin 875[/url] [url=http://tadacip.reisen/]tadacip[/url] [url=http://tamoxifen.store/]tamoxifen[/url]
— Bennyboits Jul 28, 05:05 AM #wh0cd246303 [url=http://diclofenac.us.org/]diclofenac[/url]
— Charlesnef Jul 28, 06:08 AM #wh0cd217682 [url=http://eurax.us.com/]buy eurax[/url] [url=http://acyclovironline.us.com/]acyclovir pharmacy[/url]
— KennethBiodo Jul 28, 06:14 AM #wh0cd936194 [url=http://lipitor.live/]lipitor[/url] [url=http://propranolol.live/]propranolol[/url] [url=http://toradol.zone/]toradol[/url] [url=http://amitriptyline.systems/]elavil 25 mg[/url] [url=http://erythromycin.mba/]erythromycin[/url]
— Alfreddut Jul 28, 06:49 AM #wh0cd613673 [url=http://onlinecipro.us.com/]Ciprofloxacin 500mg[/url]
— Bennyboits Jul 28, 06:56 AM #wh0cd319778 [url=http://vardenafil.fund/]vardenafil[/url] [url=http://diflucan150mg.pro/]diflucan without a prescription[/url] [url=http://phenergan.reisen/]phenergan[/url] [url=http://buy-bupropion.reisen/]buy bupropion[/url] [url=http://amoxicillin500mg.pro/]amoxicillin 500mg[/url]
— Charlesnef Jul 28, 07:33 AM #wh0cd613667 [url=http://buyprovera.us.org/]buy provera[/url]
— Charlesnef Jul 28, 08:34 AM #[url=http://xn—80afglc1ahgeiu5n.xn—80adxhks]Лучшие гипнологи[/url] – Лечение депрессии гипнозом, лечение аноргазмии.
— Walterswish Jul 28, 09:03 AM #[url=http://multiki-online24.ru/po-zhanru-multfilma/multserialy/]Мультсериалы онлайн[/url] – Мультфильмы для малышей, Аниме онлайн.
— GlennPlews Jul 28, 09:03 AM #wh0cd466724 [url=http://cytotec.us.org/]cytotec pills[/url] [url=http://elimite.us.org/]order elimite[/url]
— Charlesnef Jul 28, 09:45 AM #wh0cd438103 [url=http://triamterene.us.org/]Triamterene Hctz[/url]
— KennethBiodo Jul 28, 11:37 AM #wh0cd25881 [url=http://nexiumprice.us.com/]recommended site[/url] [url=http://lisinopril5mg.us.com/]lisinopril no prescription[/url]
— Alfreddut Jul 28, 12:10 PM #wh0cd834099 [url=http://buycafergot.us.org/]Cafergot[/url] [url=http://triamterenegeneric.us.com/]Order Triamterene Generic[/url]
— Bennyboits Jul 28, 12:11 PM #wh0cd687147 [url=http://citalopramhbr20mg.us.org/]citalopram hbr 20 mg[/url] [url=http://cheapdapoxetine.us.com/]cheap dapoxetine[/url]
— Charlesnef Jul 28, 01:45 PM #wh0cd585051 [url=http://buypropranolol.us.org/]propranolol pills[/url]
— KennethBiodo Jul 28, 03:16 PM #wh0cd760620 [url=http://oxytrol.world/]oxytrol[/url] [url=http://plendil.world/]plendil[/url] [url=http://retrovir.world/]retrovir[/url] [url=http://keppra.reisen/]keppra[/url] [url=http://imuran.reisen/]imuran[/url]
— Charlesnef Jul 28, 03:16 PM #wh0cd736721 [url=http://cordarone.world/]cordarone iv[/url] [url=http://urispas.reisen/]urispas[/url] [url=http://shatavari.world/]shatavari[/url] [url=http://confido.world/]confido[/url] [url=http://lukol.reisen/]lukol online[/url]
— Tracysporp Jul 28, 03:57 PM #wh0cd144203 [url=http://proventil.us.com/]Proventil Tablets[/url] [url=http://effexorxr.us.com/]effexor generic cost[/url]
— Bennyboits Jul 28, 06:07 PM #wh0cd70730 [url=http://genericlipitor.us.com/]Lipitor Zocor[/url]
— Charlesnef Jul 28, 06:10 PM #wh0cd319780 [url=http://buyavana.us.org/]cheap avana online[/url]
— Alfreddut Jul 28, 06:27 PM #[url=http://spetsinform.ru/contacts/]Поиск людей [/url] – Пересечение границы, Движение средств (полное) по счетам ЮЛ.
— Larrylisee Jul 28, 07:26 PM #wh0cd981041 [url=http://cymbalta30mg.pro/]cymbalta[/url] [url=http://nolvadex.news/]buy nolvadex cheap[/url] [url=http://buylevaquin.work/]buy levaquin online[/url] [url=http://buypropecia.shop/]online propecia prescription[/url] [url=http://buy-flagyl.store/]flagyl[/url]
— Charlesnef Jul 28, 07:31 PM #wh0cd466732 [url=http://indocin.fail/]indocin generic[/url] [url=http://bentyl.store/]bentyl generic[/url] [url=http://methotrexate.zone/]methotrexate[/url] [url=http://vermox.reisen/]where to buy vermox[/url] [url=http://protonix.world/]buy protonix[/url]
— Alfreddut Jul 28, 09:47 PM #wh0cd144205 [url=http://nexiumprice.us.com/]buy nexium[/url]
— Charlesnef Jul 28, 11:15 PM #wh0cd115581 [url=http://buyflagyl.us.org/]order flagyl[/url] [url=http://flagyl.us.org/]flagyl[/url]
— KennethBiodo Jul 29, 01:45 AM #wh0cd291153 [url=http://oxytrol.world/]where to buy oxytrol patch[/url] [url=http://naprosyn.world/]naprosyn[/url] [url=http://buylithium.world/]lithium[/url] [url=http://viramune.world/]viramune[/url] [url=http://finpecia.world/]finpecia online[/url]
— Charlesnef Jul 29, 02:55 AM #wh0cd732016 [url=http://diclofenac75mg.us.com/]diclofenac sod[/url]
— Alfreddut Jul 29, 03:28 AM #wh0cd732004 [url=http://prilosecgeneric.us.com/]prilosec generic[/url] [url=http://anafranilprice.us.com/]anafranil online[/url]
— Bennyboits Jul 29, 05:05 AM #wh0cd262529 [url=http://buymotilium.us.org/]buy motilium[/url] [url=http://buycymbalta.us.org/]cymbalta no rx[/url]
— KennethBiodo Jul 29, 05:27 AM #wh0cd805492 [url=http://buymotilium.us.org/]home page[/url] [url=http://hydrochlorothiazide25mg.us.com/]hydrochlorothiazide for sale[/url]
— Alfreddut Jul 29, 05:32 AM #wh0cd805477 [url=http://buyflagyl.us.org/]buy flagyl online[/url] [url=http://colchicine.us.org/]colchicine epocrates[/url]
— Bennyboits Jul 29, 06:22 AM #wh0cd409480 [url=http://clomidonline.us.com/]order clomid online[/url]
— KennethBiodo Jul 29, 08:10 AM #wh0cd70730 [url=http://triamterene.us.org/]Triamterene[/url] [url=http://nolvadexforsale.us.com/]tamoxifen citrate[/url]
— Alfreddut Jul 29, 10:04 AM #wh0cd658522 [url=http://buyrimonabant.us.org/]buy rimonabant[/url]
— Charlesnef Jul 29, 10:23 AM #wh0cd585049 [url=http://effexorgeneric.us.com/]effexor generic[/url]
— Charlesnef Jul 29, 10:44 AM #правильный ресурс http://mgbaltic.net/
— Augustomicy Jul 29, 11:05 AM #wh0cd144205 [url=http://gabapentin.us.com/]Order Neurontin[/url]
— Alfreddut Jul 29, 11:09 AM #wh0cd703374 [url=http://doxycyclineacne.us.com/]Doxycycline 100mg[/url]
— KennethBiodo Jul 29, 12:41 PM #wh0cd42110 [url=http://proveraonline.pro/]provera online[/url] [url=http://genericwellbutrin.pro/]generic wellbutrin[/url] [url=http://doxycyclinemonohydrate.pro/]buy doxycycline monohydrate[/url] [url=http://eloconcreamgeneric.pro/]elocon[/url] [url=http://flagyl.work/]flagyl tablet[/url]
— Bennyboits Jul 29, 01:59 PM #wh0cd776849 [url=http://wellbutrin.work/]wellbutrin[/url] [url=http://estrace.reisen/]estrace[/url] [url=http://vardenafil.directory/]vardenafil[/url] [url=http://effexor.fail/]generic effexor cost[/url] [url=http://sildenafil.directory/]sildenafil[/url]
— KennethBiodo Jul 29, 02:10 PM #wh0cd291156 [url=http://lisinopril5mg.us.com/]lisinopril 5 mg[/url] [url=http://buypropranolol.us.org/]propranolol[/url]
— Alfreddut Jul 29, 02:24 PM #wh0cd364629 [url=http://cheapdapoxetine.us.com/]dapoxetine online purchase[/url]
— Alfreddut Jul 29, 03:53 PM #wh0cd850322 [url=http://cheapdapoxetine.us.com/]dapoxetine approval[/url] [url=http://losartanhydrochlorothiazide.us.com/]Losartan Hydrochlorothiazide[/url]
— KennethBiodo Jul 29, 04:04 PM #wh0cd189058 [url=http://buyprednisone.us.org/]buy prednisone[/url]
— Bennyboits Jul 29, 04:17 PM #wh0cd805473 [url=http://namenda.reisen/]namenda[/url] [url=http://minocycline.reisen/]minocycline[/url] [url=http://finpecia.reisen/]finpecia[/url] [url=http://ranitidine.world/]ranitidine[/url] [url=http://dipyridamole.world/]dipyridamole[/url]
— Charlesnef Jul 29, 04:40 PM #wh0cd46829 [url=http://genericbentyl.us.com/]Generic Bentyl[/url] [url=http://clindamycin300mg.us.com/]clindamycin 300 mg[/url]
— Tracysporp Jul 29, 05:00 PM #wh0cd438102 [url=http://bentylcost.us.com/]Bentyl Tabs[/url] [url=http://celexa.us.org/]celexa tablets[/url]
— Alfreddut Jul 29, 05:28 PM #wh0cd262531 [url=http://motrin800.us.com/]Motrin 800[/url] [url=http://valtrex.us.org/]Valtrex Generic[/url]
— Bennyboits Jul 29, 05:32 PM #wh0cd923800 [url=http://buyflagyl.us.org/]Buy Flagyl Online[/url]
— KennethBiodo Jul 29, 06:06 PM #wh0cd878946 [url=http://buyzithromax.us.org/]zithromax 500mg[/url]
— Charlesnef Jul 29, 06:18 PM #wh0cd952421 [url=http://buypropecia.us.org/]buy propecia[/url] [url=http://nexium40mg.us.com/]nexium capsules[/url]
— Charlesnef Jul 29, 07:40 PM #wh0cd997273 [url=http://amoxicillin500mg.us.org/]purchase amoxicillin[/url] [url=http://buytadacip.us.org/]Tadacip 20 Mg[/url]
— KennethBiodo Jul 29, 07:57 PM #wh0cd13486 [url=http://toradolgeneric.us.com/]buy toradol with no prescription[/url]
— KennethBiodo Jul 29, 08:38 PM #wh0cd409481 [url=http://wellbutringeneric.us.com/]wellbutrin generic[/url]
— Bennyboits Jul 29, 09:11 PM #wh0cd482958 [url=http://cafergot.us.org/]cafergot[/url] [url=http://genericelocon.us.com/]generic elocon[/url]
— Alfreddut Jul 29, 09:54 PM #wh0cd42108 [url=http://medrolpak.us.com/]medrol generic[/url] [url=http://buyclonidine.us.org/]clonidine hcl 0.1mg[/url]
— Charlesnef Jul 29, 10:00 PM #wh0cd658533 [url=http://tretinoin.us.org/]tretinoin[/url] [url=http://hydrochlorothiazide25mg.us.com/]hydrochlorothiazide tablets[/url]
— Alfreddut Jul 29, 10:04 PM #wh0cd482954 [url=http://cheapdapoxetine.us.com/]cheap dapoxetine[/url] [url=http://metformin500mgtablets.us.com/]Metformin 500 Mg Tablets[/url]
— Bennyboits Jul 29, 11:04 PM #wh0cd160434 [url=http://buypaxil.us.org/]Paxil Headaches[/url] [url=http://flagyl.us.org/]buy flagyl[/url]
— KennethBiodo Jul 29, 11:30 PM #wh0cd42110 [url=http://genericlexapro.us.com/]generic lexapro[/url]
— Charlesnef Jul 30, 12:11 AM #wh0cd556427 [url=http://acyclovir.us.org/]acyclovir with no prescription[/url] [url=http://buyavana.us.org/]buy avana[/url]
— Bennyboits Jul 30, 01:00 AM #wh0cd805481 [url=http://diclofenac75mg.us.com/]diclofenac 75mg[/url]
— Alfreddut Jul 30, 01:22 AM #wh0cd115585 [url=http://buyinderal.us.org/]Inderal 10 Mg[/url] [url=http://metformin500mg.us.com/]metformin 500 mg[/url]
— Charlesnef Jul 30, 02:30 AM #wh0cd307382 [url=http://augmentin875mg.us.com/]augmentin tablet[/url]
— KennethBiodo Jul 30, 03:07 AM #wh0cd262535 [url=http://amitriptyline10mg.us.com/]amitriptyline tablets[/url] [url=http://valtrex2016.us.com/]Valtrex[/url]
— Charlesnef Jul 30, 03:15 AM #wh0cd703375 [url=http://buypaxil.us.org/]purchase paxil[/url] [url=http://advair.us.org/]advair online[/url]
— Bennyboits Jul 30, 03:50 AM #wh0cd13486 [url=http://metformin500mg.us.com/]buy cheap metformin online[/url]
— Alfreddut Jul 30, 07:19 AM #wh0cd42110 [url=http://advairgeneric.us.com/]Generic Advair Diskus[/url]
— Alfreddut Jul 30, 07:54 AM #wh0cd13486 [url=http://antabuse24.us.org/]buy antabuse[/url] [url=http://augmentin365.us.com/]generic augmentin[/url] [url=http://baclofen24.us.org/]baclofen[/url] [url=http://drospirenone.us.com/]Cheapest Drospirenone[/url] [url=http://stromectol365.us.com/]Stromectol Online[/url]
— Charlesnef Jul 30, 08:16 AM #wh0cd86961 [url=http://trazodonehcl.us.com/]trazodone 300 mg[/url] [url=http://tretinoincream01.us.com/]Tretinoin Online[/url]
— Charlesnef Jul 30, 09:46 AM #wh0cd189056 [url=http://diclofenac75mg.us.com/]diclofenac gel 3[/url]
— Alfreddut Jul 30, 10:09 AM #wh0cd18207 [url=http://cephalexin500.us.com/]cephalexin 500[/url]
— Tracysporp Jul 30, 10:33 AM #wh0cd86961 [url=http://toradolonline.us.com/]toradol online[/url]
— Charlesnef Jul 30, 11:29 AM #wh0cd131810 [url=http://buytadacip.us.org/]buy tadacip[/url]
— KennethBiodo Jul 30, 12:08 PM #wh0cd233909 [url=http://omnicef.world/]omnicef for ear infection[/url] [url=http://triphala.world/]where to buy triphala[/url] [url=http://retrovir.world/]retrovir[/url] [url=http://levothroid.reisen/]levothroid[/url] [url=http://confido.world/]confido[/url]
— Bennyboits Jul 30, 12:35 PM #wh0cd307383 [url=http://colchicine.us.org/]COLCHICINE[/url]
— Alfreddut Jul 30, 01:55 PM #wh0cd380855 [url=http://effexor.us.org/]effexor[/url]
— Bennyboits Jul 30, 03:15 PM #wh0cd454329 [url=http://effexorgeneric.us.com/]visit website[/url] [url=http://cheapcardura.us.com/]buy cheap cardura[/url]
— Alfreddut Jul 30, 05:12 PM #wh0cd629906 [url=http://ventolin.live/]buy ventolin online[/url] [url=http://effexor.reisen/]effexor[/url] [url=http://atenolol.live/]atenolol[/url] [url=http://toradol.schule/]toradol[/url] [url=http://prozac.work/]prozac[/url]
— Alfreddut Jul 30, 06:05 PM #wh0cd527805 [url=http://toradolonline.us.com/]toradol online[/url]
— Charlesnef Jul 30, 06:38 PM #wh0cd527803 [url=http://doxycyclineprice.us.com/]doxycycline 100mg cap[/url]
— Bennyboits Jul 30, 06:45 PM #wh0cd527802 [url=http://triamterene.us.org/]triamterene hctz 37.5[/url] [url=http://effexorgeneric.us.com/]Effexor Generic[/url]
— Alfreddut Jul 30, 07:07 PM #wh0cd238633 [url=http://furosemide40mg.us.com/]Furosemide 20 mg[/url]
— Tracysporp Jul 30, 07:54 PM #wh0cd601276 [url=http://buytadacip.us.org/]Tadacip 20 mg[/url] [url=http://tretinoin.us.org/]tretinoin[/url]
— Bennyboits Jul 30, 08:21 PM #wh0cd601278 [url=http://augmentin875mg.us.com/]augmentin lowest prices[/url]
— Charlesnef Jul 30, 08:36 PM #wh0cd601277 [url=http://oxytrol.reisen/]where can i buy oxytrol[/url] [url=http://zestril.reisen/]buy zestril[/url] [url=http://benzac.world/]benzac online[/url] [url=http://vytorin.reisen/]vytorin 10-20[/url] [url=http://singulairgeneric.reisen/]singulair otc equivalent[/url]
— Alfreddut Jul 30, 08:36 PM #wh0cd454328 [url=http://advair.us.org/]order advair online[/url] [url=http://lipitoronline.us.com/]lipitor online[/url]
— Charlesnef Jul 30, 09:38 PM #wh0cd312108 [url=http://doxycyclineacne.us.com/]doxycycline acne[/url] [url=http://buyamoxil.us.org/]Amoxil Generic[/url]
— Tracysporp Jul 30, 10:33 PM #wh0cd674750 [url=http://buysildenafil.us.org/]sildenafil citrate[/url]
— Alfreddut Jul 30, 10:38 PM #wh0cd748226 [url=http://diclofenacgel.us.com/]diclofenac gel[/url]
— Charlesnef Jul 30, 11:27 PM #wh0cd923801 [url=http://cipro.fund/]cipro[/url] [url=http://prinivil.world/]prinivil tabs[/url] [url=http://medrol.shop/]click here[/url] [url=http://femcare.reisen/]femcare[/url] [url=http://valtrex.schule/]buy valtrex on line[/url]
— Alfreddut Jul 30, 11:40 PM #wh0cd646123 [url=http://proscar.reisen/]proscar[/url] [url=http://buyatrovent.reisen/]atrovent hfa generic[/url] [url=http://wellbutrin.work/]wellbutrin[/url] [url=http://cafergot.fund/]cafergot[/url] [url=http://amoxil.mba/]generic amoxil online[/url]
— KennethBiodo Jul 30, 11:58 PM #wh0cd821699 [url=http://trazodonehcl.us.com/]trazodone 150 mg[/url]
— Charlesnef Jul 31, 12:56 AM #wh0cd13486 [url=http://cheapcardura.us.com/]generic cardura[/url]
— Alfreddut Jul 31, 01:57 AM #wh0cd601276 [url=http://bupropionsr150mg.us.com/]Bupropion SR[/url]
— Charlesnef Jul 31, 02:08 AM #wh0cd86959 [url=http://trazodonehcl.us.com/]Trazodone HCL[/url] [url=http://amoxicillin500mg.us.org/]Amoxicillin 500mg[/url]
— Alfreddut Jul 31, 03:39 AM #wh0cd895169 [url=http://epivir.reisen/]epivir[/url] [url=http://clonidine.schule/]clonidine[/url] [url=http://ilosone.world/]ilosone[/url] [url=http://cephalexin.live/]keflex medication[/url] [url=http://vasodilan.reisen/]generic vasodilan[/url]
— Alfreddut Jul 31, 03:52 AM #wh0cd895178 [url=http://metformin500mg.us.com/]Metformin Online[/url]
— Bennyboits Jul 31, 04:07 AM #wh0cd968653 [url=http://nexium40mg.us.com/]nexium over the counter[/url]
— Bennyboits Jul 31, 05:15 AM #wh0cd160434 [url=http://eldepryl.world/]eldepryl[/url] [url=http://clarinex.world/]clarinex d[/url] [url=http://lozol.world/]lozol[/url] [url=http://keppra.reisen/]keppra[/url] [url=http://imitrex.world/]imitrex[/url]
— Alfreddut Jul 31, 05:27 AM #wh0cd748227 [url=http://lisinopril5mg.us.com/]lisinopril 5 mg[/url] [url=http://buyrevia.us.org/]buy revia[/url]
— Charlesnef Jul 31, 05:39 AM #wh0cd968644 [url=http://amoxil247.us.org/]buy amoxil[/url]
— Alfreddut Jul 31, 05:42 AM #wh0cd58337 [url=http://cephalexin500.us.com/]cephalexin for sale[/url]
— Charlesnef Jul 31, 06:40 AM #wh0cd940017 [url=http://mentax.reisen/]mentax vitamin[/url] [url=http://dipyridamole.world/]generic dipyridamole[/url] [url=http://buyreminyl.reisen/]buy reminyl[/url] [url=http://omnicef.reisen/]omnicef[/url] [url=http://zaditor.world/]zaditor for pink eye[/url]
— KennethBiodo Jul 31, 07:05 AM #wh0cd821700 [url=http://buybentyl.us.org/]source[/url] [url=http://clindamycin300mg.us.com/]Generic Cleocin[/url]
— Charlesnef Jul 31, 07:37 AM #wh0cd459056 [url=http://genericbentyl.us.com/]Bentyl[/url] [url=http://tretinoin.us.org/]tretinoin no prescription[/url]
— Tracysporp Jul 31, 08:04 AM #wh0cd131810 [url=http://buymotilium.us.org/]Motilium[/url]
— Charlesnef Jul 31, 08:25 AM #wh0cd205287 [url=http://triamterenenorx.us.com/]cheap triamterene[/url]
— Bennyboits Jul 31, 09:16 AM #wh0cd29717 [url=http://triamterene.shop/]triamterene[/url] [url=http://buycheapnolvadex.pro/]buy cheap nolvadex[/url] [url=http://eloconcreamoverthecounter.pro/]elocon[/url] [url=http://buyprozac.store/]buy prozac[/url] [url=http://buyanafranil.store/]buy anafranil[/url]
— KennethBiodo Jul 31, 09:19 AM #wh0cd895173 [url=http://buytoradol.us.org/]buy toradol[/url] [url=http://buylasix.us.org/]order lasix[/url]
— Charlesnef Jul 31, 09:58 AM #wh0cd352235 [url=http://buydiflucan.us.org/]homepage here[/url] [url=http://effexor.us.org/]effexor 75 mg[/url]
— Bennyboits Jul 31, 12:04 PM #wh0cd527809 [url=http://buypropecia.us.org/]propecia sale[/url]
— Alfreddut Jul 31, 01:10 PM #wh0cd352240 [url=http://cymbalta30mg.us.com/]cymbalta 30mg[/url] [url=http://lipitoronline.us.com/]lipitor online[/url]
— Alfreddut Jul 31, 02:08 PM #wh0cd250140 [url=http://genericlipitor.us.com/]Generic Lipitor[/url]
— KennethBiodo Jul 31, 02:16 PM #wh0cd425706 [url=http://rogaine.us.com/]cheap rogaine[/url]
— Charlesnef Jul 31, 03:16 PM #wh0cd425713 [url=http://diflucan24.us.org/]visit website[/url]
— Alfreddut Jul 31, 03:39 PM #wh0cd323613 [url=http://prilosec.us.com/]prilosec[/url]
— KennethBiodo Jul 31, 04:02 PM #wh0cd58337 [url=http://azithromycinonline.us.com/]azithromycin 250 mg price[/url] [url=http://buyproscar.us.com/]buy proscar[/url]
— Charlesnef Jul 31, 05:10 PM #wh0cd499186 [url=http://buyprednisone.us.org/]Buy Prednisone[/url] [url=http://buyclonidine.us.org/]clonidine rosacea[/url]
— Alfreddut Jul 31, 05:27 PM #wh0cd397086 [url=http://buyrevia.us.org/]discover more[/url] [url=http://effexorgeneric.us.com/]effexor generic[/url]
— KennethBiodo Jul 31, 05:52 PM #wh0cd572658 [url=http://bupropion.us.org/]info[/url] [url=http://buyseroquel.us.org/]buy seroquel online[/url]
— Charlesnef Jul 31, 06:45 PM #wh0cd646133 [url=http://buytadacip.us.org/]Tadacip 20 Mg[/url]
— Charlesnef Jul 31, 08:40 PM #wh0cd646139 [url=http://trazodonehcl.us.com/]Trazodone HCL[/url]
— Alfreddut Jul 31, 08:41 PM #wh0cd793084 [url=http://prozac.us.com/]prozac[/url]
— Bennyboits Jul 31, 09:45 PM #wh0cd719608 [url=http://acyclovircream.us.com/]zovirax[/url] [url=http://abilifygeneric.us.com/]here i found it[/url]
— Charlesnef Jul 31, 10:04 PM #wh0cd278758 [url=http://motrin800.us.com/]advil/motrin[/url]
— Charlesnef Jul 31, 10:59 PM #wh0cd895177 [url=http://buyrimonabant.us.org/]rimonabant acomplia[/url]
— Alfreddut Jul 31, 11:13 PM #wh0cd968650 [url=http://acticin.us.com/]Buy Acticin[/url] [url=http://retinanorx.us.com/]Retin-A No RX[/url] [url=http://zithromax24.us.org/]zithromax[/url] [url=http://trazodone24.us.org/]trazodone cost[/url] [url=http://genericprilosec.us.com/]order prilosec[/url]
— Alfreddut Aug 1, 01:10 AM #wh0cd940033 [url=http://sertraline.us.com/]order sertraline[/url] [url=http://disulfiram.us.com/]disulfiram[/url] [url=http://sildenafilnorx.us.com/]Sildenafil No Rx[/url] [url=http://mebendazole.us.com/]Mebendazole[/url] [url=http://glucophage.us.com/]Glucophage[/url]
— Bennyboits Aug 1, 01:34 AM #wh0cd679481 [url=http://buydiflucan.us.org/]generic diflucan[/url]
— Tracysporp Aug 1, 01:55 AM #wh0cd940029 [url=http://cheapdapoxetine.us.com/]cheap dapoxetine[/url]
— Charlesnef Aug 1, 02:11 AM #wh0cd866564 [url=http://metformin.us.org/]metformin over the counter[/url] [url=http://doxycyclineprice.us.com/]doxycycline price[/url]
— Alfreddut Aug 1, 02:30 AM #wh0cd837933 [url=http://buyvaltrex.us.org/]buy valtrex[/url] [url=http://genericlasix.us.com/]Buying Lasix[/url]
— KennethBiodo Aug 1, 02:32 AM #wh0cd940037 [url=http://buyinderal.store/]inderal propranolol[/url] [url=http://tretinoin.mba/]tretinoin[/url] [url=http://buytoradol.shop/]buy toradol[/url] [url=http://fluoxetine.reisen/]fluoxetine[/url] [url=http://lotrisone.world/]buy lotrisone[/url]
— Alfreddut Aug 1, 04:09 AM #wh0cd29717 [url=http://buyseroquel.us.org/]generic seroquel[/url]
— Charlesnef Aug 1, 04:34 AM #wh0cd646127 [url=http://reglan.reisen/]reglan for milk supply[/url] [url=http://zaditor.reisen/]zaditor[/url] [url=http://rhinocort.world/]rhinocort[/url] [url=http://cozaar.world/]cozaar[/url] [url=http://keppra.world/]generic keppra xr[/url]
— Charlesnef Aug 1, 05:41 AM #wh0cd752954 [url=http://arimidex.us.org/]buy arimidex[/url]
— Tracysporp Aug 1, 06:51 AM #wh0cd176663 [url=http://medrolpak.us.com/]medrol pak[/url] [url=http://generictriamterene.us.com/]generic triamterene[/url]
— Bennyboits Aug 1, 07:57 AM #wh0cd250138 [url=http://serevent.reisen/]serevent diskus 50 mcg[/url] [url=http://lithium.reisen/]lithium[/url] [url=http://flovent.world/]flovent[/url] [url=http://revatio.world/]revatio[/url] [url=http://metoclopramide.world/]metoclopramide[/url]
— Charlesnef Aug 1, 08:38 AM #wh0cd148041 [url=http://diclofenac50mg.us.com/]buying diclofenac[/url] [url=http://cheapcardura.us.com/]cheap cardura[/url]
— KennethBiodo Aug 1, 09:14 AM #wh0cd323613 [url=http://crestor24.us.org/]bonuses[/url] [url=http://reviacost.us.com/]buy revia[/url]
— Charlesnef Aug 1, 10:12 AM #wh0cd103190 [url=http://cymbalta247.us.org/]cymbalta[/url]
— Alfreddut Aug 1, 11:07 AM #wh0cd221514 [url=http://flovent.world/]flovent[/url] [url=http://azulfidine.world/]azulfidine 500 mg[/url] [url=http://herbolax.world/]herbolax[/url] [url=http://lasuna.reisen/]buy lasuna[/url] [url=http://retrovir.world/]check out your url[/url]
— KennethBiodo Aug 1, 11:10 AM #wh0cd352237 [url=http://diclofenac75mg.us.com/]Diclofenac 75mg[/url] [url=http://buycymbalta.us.org/]Buy Cymbalta[/url]
— Alfreddut Aug 1, 11:48 AM #wh0cd176663 [url=http://tadacip.us.org/]tadacip[/url]
— Alfreddut Aug 1, 12:18 PM #wh0cd294991 [url=http://buy-levaquin.store/]levaquin tablets[/url] [url=http://buy-albuterol.reisen/]buy albuterol[/url] [url=http://buy-bentyl.reisen/]buy bentyl[/url] [url=http://effexorxr.store/]effexor[/url] [url=http://fluoxetine.live/]fluoxetine hcl 20 mg[/url]
— KennethBiodo Aug 1, 01:03 PM #wh0cd826427 [url=http://tamoxifen24.us.org/]buy tamoxifen[/url] [url=http://glucophage.us.com/]glucophage xr 500[/url]
— Tracysporp Aug 1, 01:24 PM #wh0cd470559 [url=http://genericforlipitor.us.com/]Generic For Lipitor[/url]
— Charlesnef Aug 1, 01:57 PM #wh0cd368464 [url=http://synthroidgeneric.us.com/]synthroid generic[/url] [url=http://effexor.us.org/]Effexor 150mg[/url]
— KennethBiodo Aug 1, 02:27 PM #wh0cd250136 [url=http://albuterol.tools/]albuterol[/url] [url=http://atenolol.reisen/]tenormin 50mg[/url] [url=http://sinequan.world/]generic sinequan[/url] [url=http://bentyl.tools/]bentyl 20[/url] [url=http://zestril.world/]generic zestril[/url]
— Alfreddut Aug 1, 02:27 PM #wh0cd544032 [url=http://carafate.world/]carafate[/url] [url=http://vasodilan.world/]generic vasodilan[/url] [url=http://propecia.tools/]get the facts[/url] [url=http://starlix.world/]starlix[/url] [url=http://clonidine.work/]clonidine[/url]
— Charlesnef Aug 1, 03:15 PM #wh0cd29715 [url=http://buyprednisone.us.org/]buy prednisone online[/url]
— Charlesnef Aug 1, 03:21 PM #wh0cd323609 [url=http://genericelocon.us.com/]elocon ointment for sale[/url]
— Alfreddut Aug 1, 03:59 PM #wh0cd499183 [url=http://clozaril.reisen/]clozaril[/url] [url=http://entocort.world/]entocort ec[/url] [url=http://capoten.reisen/]capoten[/url] [url=http://combivir.reisen/]combivir[/url] [url=http://plaquenil.reisen/]plaquenil[/url]
— Alfreddut Aug 1, 04:29 PM #wh0cd617505 [url=http://buyfluoxetine.us.org/]Fluoxetine[/url] [url=http://cheapcardura.us.com/]as example[/url]
— Charlesnef Aug 1, 04:59 PM #wh0cd397082 [url=http://colchicineonline.us.com/]order colchicine[/url]
— Alfreddut Aug 1, 05:21 PM #Добрый день друзья!
— delmetmmr Aug 1, 05:59 PM #ООО «Деловой металл» предлагает изготовленные на собственном оборудовании металлические (стальные) двери. Производство полностью ориентированно на Клиента — мы учитываем все рекомендации, чтобы результат не только соответствовал ожиданиям, но и превосходил их. Независимо от того, каким образом Вы сделали заказ, Вам предоставляется консультация специалиста и делается предварительный расчет стоимости.
1)[url=https://delmet.by]металлические двери в минске[/url] -Можно заказать в нашей компании ООО «Деловой металл». Мы сформировали крупную организацию с четким направлением деятельности, заключающейся в изготовлении, реализации, установке металлических дверей.
2)[url=https://delmet.by]установка входных дверей в минске[/url] – Имея широкий ассортимент продукции, мы составили каталог, чтобы облегчить такую сложную задачу, как выбор двери для дома, квартиры, общественного здания. Мы предлагаем вам только прочные, надежные металлоконструкции. Исходя из практики, многие клиенты подтвердят, что белорусские металлические входные двери Минске служат долго, без претензий в процессе эксплуатации.
3)[url=https://delmet.by]стальные двери минск[/url] -Мы используем для производства новейшее оборудование. Такой подход дает возможность изготавливать высококачественные двери. Наличие своей технической базы является необходимым условием для процветания такого ответственного производства, как изготовление стальных дверей.
4)[url=https://delmet.by]металлические двери под заказ минск[/url] – Мы заботимся о том, чтобы предоставляемый нами сервис был высокого уровня. В этом нам помогает наличие главного офиса, складов для готовой продукции, сети дилеров. Кроме того, мы дорожим своей репутацией и несем ответственность за качество каждой изготовленной единицы товара.
5)[url=https://delmet.by]металлические двери[/url] – Качество нашей продукции прошло испытание и проверку временем.Приемлемые цены для наших заказчиков.
6)[url=https://delmet.by]противопожарные двери[/url] – Наши противопожарные двери можно устанавливать в жилых и нежилых помещениях. Техника безопасности обязывает оборудование такими дверями складских помещений, в которых хранятся легковоспламеняющиеся вещества или проходит производство определенной группы химической продукции.
[url=https://delmet.by/]входная металлическая дверь дом фото[/url]
[url=https://delmet.by/]купить металлическую дверь с установкой недорого[/url]
[url=https://delmet.by/]зазоры металлической двери[/url]
[url=https://delmet.by/]двери металлические входные с стеклом[/url]
[url=https://delmet.by/]стальные двери недорого с установкой минск цена[/url]
wh0cd572658 [url=http://celebrex200mg.us.com/]celebrex 200mg[/url]
— Alfreddut Aug 1, 06:13 PM #wh0cd646131 [url=http://flonase.reisen/]flonase generic cost[/url] [url=http://lotensin.reisen/]lotensin[/url] [url=http://decadron.world/]decadron for nausea[/url] [url=http://gasex.reisen/]gasex without prescription[/url] [url=http://eulexin.world/]eulexin without prescription[/url]
— Alfreddut Aug 1, 08:13 PM #wh0cd764453 [url=http://citalopram20mg.us.com/]citalopram tab[/url]
— Charlesnef Aug 1, 08:43 PM #wh0cd250136 [url=http://lasix.schule/]lasix[/url] [url=http://trileptal.reisen/]trileptal[/url] [url=http://tadacip.zone/]tadacip[/url] [url=http://femcare.world/]femcare[/url] [url=http://wellbutrin.work/]wellbutrin[/url]
— Charlesnef Aug 1, 08:55 PM #wh0cd617503 [url=http://buyrevia.us.org/]buy revia[/url]
— Alfreddut Aug 1, 09:30 PM #wh0cd719606 [url=http://diabecon.reisen/]diabecon online[/url] [url=http://exelon.reisen/]exelon[/url] [url=http://dramamine.world/]dramamine[/url] [url=http://zyvox.reisen/]zyvox[/url] [url=http://lukol.reisen/]lukol[/url]
— Alfreddut Aug 1, 10:02 PM #wh0cd735836 [url=http://myambutol.reisen/]myambutol[/url] [url=http://tentexroyal.world/]tentex royal[/url] [url=http://alesse.world/]alesse[/url] [url=http://detrol.world/]view[/url] [url=http://artane.reisen/]artane[/url]
— KennethBiodo Aug 1, 10:29 PM #wh0cd837926 [url=http://acyclovir.us.org/]Acyclovir[/url]
— Charlesnef Aug 1, 10:38 PM #wh0cd690976 [url=http://motrin800.us.com/]motrin price[/url]
— Alfreddut Aug 1, 11:10 PM #wh0cd793079 [url=http://buypropecia.us.org/]propecia .5 mg[/url] [url=http://buyprovera.us.org/]Provera Pills[/url]
— Alfreddut Aug 2, 12:17 AM #wh0cd973373 [url=http://genericlipitor.us.com/]generic lipitor[/url] [url=http://cheapcardura.us.com/]generic cardura[/url]
— Tracysporp Aug 2, 12:54 AM #wh0cd397085 [url=http://triamterene.us.org/]triamterene hctz[/url]
— Charlesnef Aug 2, 12:58 AM #wh0cd764451 [url=http://augmentin875mg.us.com/]AUGMENTIN TABS[/url] [url=http://stromectol.us.org/]Buy Stromectol Online[/url]
— Alfreddut Aug 2, 01:10 AM #wh0cd866552 [url=http://abilifygeneric.us.com/]abilify[/url]
— Alfreddut Aug 2, 01:57 AM #wh0cd1093 [url=http://clindamycin300mg.us.com/]order clindamycin[/url] [url=http://buyclonidine.us.org/]buy clonidine[/url]
— Charlesnef Aug 2, 02:44 AM #wh0cd1093 [url=http://generictriamterene.us.com/]generic triamterene[/url]
— Bennyboits Aug 2, 03:07 AM #wh0cd956255 [url=http://toradol.shop/]toradol[/url] [url=http://cystone.reisen/]cystone[/url] [url=http://sildenafil.live/]sildenafil[/url] [url=http://diflucan.reisen/]diflucan[/url] [url=http://revia.shop/]revia drug[/url]
— KennethBiodo Aug 2, 04:22 AM #wh0cd911397 [url=http://advairgeneric.us.com/]price of advair[/url]
— Alfreddut Aug 2, 04:24 AM #wh0cd544033 [url=http://arimidex.mba/]arimidex[/url] [url=http://doxycycline.fail/]vibramycin[/url] [url=http://buytrazodone.store/]trazodone generic[/url] [url=http://buybuspar.store/]buy buspar[/url] [url=http://buy-wellbutrin.shop/]wellbutrin for sale[/url]
— Charlesnef Aug 2, 04:49 AM #wh0cd74568 [url=http://effexorgeneric.us.com/]effexor generic[/url]
— Bennyboits Aug 2, 04:52 AM #wh0cd1093 [url=http://buyprednisolone.us.org/]Prednisolone Price[/url]
— Alfreddut Aug 2, 06:28 AM #wh0cd148043 [url=http://prozac.us.org/]Buy Prozac[/url] [url=http://buyflagyl.us.org/]Buy Flagyl Online[/url]
— Bennyboits Aug 2, 06:41 AM #wh0cd221520 [url=http://cafergot.world/]cafergot[/url] [url=http://buyvermox.reisen/]buy vermox[/url] [url=http://euraxwithoutprescription.pro/]generic eurax[/url] [url=http://ciprofloxacin500mg.store/]cipro[/url] [url=http://buy-cafergot.reisen/]cafergot pills[/url]
— Charlesnef Aug 2, 07:12 AM #wh0cd74566 [url=http://buymotilium.us.org/]buy motilium[/url] [url=http://clindamycin300mg.us.com/]Clindamycin 300 Mg[/url]
— Alfreddut Aug 2, 08:00 AM #wh0cd294993 [url=http://yasminbirthcontrol.us.com/]yasmin c[/url]
— Charlesnef Aug 2, 08:39 AM #wh0cd368468 [url=http://effexor.us.org/]Effexor Tablets[/url] [url=http://yasminbirthcontrol.us.com/]yasmin birth control[/url]
— Charlesnef Aug 2, 10:48 AM #wh0cd368468 [url=http://orderdiflucanonline.us.com/]diflucan men[/url]
— Bennyboits Aug 2, 10:58 AM #wh0cd837927 [url=http://diclofenac75mg.us.com/]diclofenac 75mg[/url]
— Charlesnef Aug 2, 11:16 AM #wh0cd323614 [url=http://buynexium.us.com/]Order Nexium[/url] [url=http://valtrex2016.us.com/]buy valtrex[/url] [url=http://stromectolnorx.us.com/]buy stromectol[/url] [url=http://zovirax.us.com/]buy zovirax online[/url] [url=http://tamoxifen.us.com/]tamoxifen[/url]
— Alfreddut Aug 2, 11:16 AM #wh0cd266366 [url=http://ciprofloxacinhcl500mg.us.com/]ciprofloxacin no prescription[/url] [url=http://cipro500mg.us.com/]generic cipro online[/url]
— KennethBiodo Aug 2, 12:00 PM #wh0cd339841 [url=http://buyvaltrex.us.org/]How Do I Get Valtrex[/url] [url=http://cheapdapoxetine.us.com/]dapoxetine[/url]
— KennethBiodo Aug 2, 01:26 PM #wh0cd911400 [url=http://nolvadex.us.org/]nolvadex d[/url] [url=http://clindamycin.us.org/]clindamycin[/url]
— Charlesnef Aug 2, 01:41 PM #wh0cd515416 [url=http://prilosec.us.com/]prilosec from india[/url]
— Bennyboits Aug 2, 02:05 PM #wh0cd588887 [url=http://eloconointment.us.com/]buy elocon ointment[/url]
— Charlesnef Aug 2, 03:34 PM #wh0cd588889 [url=http://buyindocin.us.org/]Indocin 50 Mg[/url]
— Bennyboits Aug 2, 03:49 PM #wh0cd544040 [url=http://buyprednisone.us.org/]prednisone 5mg[/url]
— Alfreddut Aug 2, 04:07 PM #wh0cd662360 [url=http://keflex.reisen/]keflex[/url] [url=http://feldene.reisen/]feldene 20 mg[/url] [url=http://precose.world/]precose[/url] [url=http://purim.world/]purim[/url] [url=http://apcalis.reisen/]generic apcalis[/url]
— Charlesnef Aug 2, 04:42 PM #wh0cd1093 [url=http://erythromycin.us.org/]buy erythromycin without script[/url]
— Charlesnef Aug 2, 04:43 PM #wh0cd662362 [url=http://lozol.world/]buy lozol[/url] [url=http://luvox.world/]luvox[/url] [url=http://ginseng.reisen/]for more info[/url] [url=http://nootropil.reisen/]generic nootropil[/url] [url=http://malegrafxt.reisen/]malegra fxt[/url]
— Bennyboits Aug 2, 05:33 PM #wh0cd617513 [url=http://augmentin2.us/]augmentin no prescription[/url]
— Alfreddut Aug 2, 06:07 PM #wh0cd515414 [url=http://metformin.zone/]metformin[/url] [url=http://proscar.reisen/]proscar online[/url] [url=http://vermox.schule/]vermox[/url] [url=http://ponstel.world/]ponstel[/url] [url=http://cymbalta.work/]cymbalta pills[/url]
— Alfreddut Aug 2, 06:15 PM #wh0cd148042 [url=http://cephalexin500mg.us.org/]cephalexin 500mg[/url] [url=http://prozac24.us.org/]prozac generic[/url]
— Charlesnef Aug 2, 07:24 PM #wh0cd809306 [url=http://hydrochlorothiazide.us.org/]Buy Hydrochlorothiazide[/url] [url=http://genericlasix.us.com/]lasix 100mg[/url]
— Charlesnef Aug 2, 07:53 PM #wh0cd690986 [url=http://amitriptyline.us.org/]buy amitriptyline online[/url]
— Alfreddut Aug 2, 08:06 PM #wh0cd809308 [url=http://periactin.world/]periactin 4mg[/url] [url=http://flagyl.directory/]flagyl[/url] [url=http://methotrexate.systems/]methotrexate[/url] [url=http://citalopram.fail/]citalopram[/url] [url=http://zithromax.live/]buy cheap zithromax[/url]
— Bennyboits Aug 2, 08:23 PM #wh0cd882779 [url=http://prilosec.us.com/]Cheapest Prilosec[/url]
— Charlesnef Aug 2, 09:19 PM #wh0cd662363 [url=http://trazodone50mg.us.com/]trazodone mail order[/url] [url=http://allopurinol100mg.us.com/]this site[/url]
— Alfreddut Aug 2, 09:47 PM #wh0cd283484 [url=http://prometrium.us.com/]prometrium[/url]
— Tracysporp Aug 3, 12:08 AM #wh0cd809311 [url=http://citalopram20mg.us.com/]next page[/url]
— Alfreddut Aug 3, 01:43 AM #wh0cd882787 [url=http://acyclovir.us.org/]aciclovir 5[/url]
— Alfreddut Aug 3, 02:55 AM #wh0cd17322 [url=http://methotrexate.us.org/]METHOTREXATE[/url] [url=http://retina.us.org/]retin-a online[/url]
— KennethBiodo Aug 3, 04:17 AM #wh0cd192894 [url=http://hydrochlorothiazide365.us.com/]Hydrochlorothiazide Hctz[/url]
— Bennyboits Aug 3, 05:08 AM #wh0cd984884 [url=http://cephalexin500mg.us.com/]cephalexin 500mg[/url]
— Alfreddut Aug 3, 05:33 AM #wh0cd356957 [url=http://tretinoin.us.org/]tretinoin[/url]
— Tracysporp Aug 3, 05:34 AM #wh0cd1093 [url=http://lisinopril5mg.us.com/]Lisinopril 5 Mg[/url] [url=http://buytadacip.us.org/]Tadacip[/url]
— Alfreddut Aug 3, 06:03 AM #wh0cd74566 [url=http://buyfluoxetine.us.org/]buy fluoxetine[/url] [url=http://genericsynthroid.us.com/]Synthroid Lowest Prices[/url]
— Alfreddut Aug 3, 07:35 AM #wh0cd339842 [url=http://buytadacip.us.org/]tadacip pills[/url]
— Charlesnef Aug 3, 08:14 AM #wh0cd148039 [url=http://buyprednisone.us.org/]PREDNISONE 5MG[/url]
— Alfreddut Aug 3, 09:21 AM #wh0cd413317 [url=http://toradolonline.us.com/]toradol pills[/url] [url=http://acyclovir800mg.us.com/]acyclovir 800mg[/url]
— Bennyboits Aug 3, 10:09 AM #wh0cd486795 [url=http://flagyl.us.org/]flagyl[/url]
— Charlesnef Aug 3, 11:14 AM #wh0cd486792 [url=http://buyavana.us.org/]super avana[/url]
— Bennyboits Aug 3, 11:46 AM #wh0cd560271 [url=http://toradol.us.com/]toradol iv[/url]
— Charlesnef Aug 3, 01:05 PM #wh0cd413309 [url=http://prozac.us.org/]Buy Prozac[/url]
— Alfreddut Aug 3, 02:43 PM #wh0cd560255 [url=http://prilosecgeneric.us.com/]prilosec online pharmacy[/url]
— Alfreddut Aug 3, 05:05 PM #wh0cd707219 [url=http://buypaxil.us.org/]Paxil Over The Counter[/url] [url=http://bupropionsr150mg.us.com/]bupropion tablet[/url]
— Charlesnef Aug 3, 05:14 PM #wh0cd633728 [url=http://benadryl.us.com/]Benadryl[/url]
— Alfreddut Aug 3, 06:05 PM #wh0cd780692 [url=http://nolvadexforsale.us.com/]nolvadex for sale[/url] [url=http://buyzithromax.us.org/]where to buy zithromax online[/url]
— Charlesnef Aug 3, 06:43 PM #wh0cd192892 [url=http://nolvadex365.us.com/]purchase nolvadex[/url] [url=http://buyabilify.us.com/]Abilify Price[/url]
— Charlesnef Aug 3, 07:31 PM #wh0cd854169 [url=http://effexorgeneric.us.com/]effexor[/url] [url=http://buytadacip.us.org/]tadacip 20 mg[/url]
— Charlesnef Aug 3, 07:43 PM #wh0cd927644 [url=http://albuterolipratropium.pro/]albuterol ipratropium[/url] [url=http://tadalafilgeneric.pro/]tadalafil – generic[/url] [url=http://pyridium.reisen/]pyridium[/url] [url=http://revia.store/]buy revia[/url] [url=http://amoxicillinonline.pro/]amoxicillin[/url]
— Charlesnef Aug 3, 08:46 PM #wh0cd927632 [url=http://buylipitor.us.org/]lipitor[/url] [url=http://doxycyclineprice.us.com/]doxycycline price[/url]
— Bennyboits Aug 3, 10:02 PM #wh0cd854147 [url=http://diclofenac50mg.us.com/]buying diclofenac[/url] [url=http://motrin800.us.com/]motrin 800[/url]
— Alfreddut Aug 3, 10:38 PM #wh0cd752064 [url=http://toradol.zone/]toradol online[/url] [url=http://diclofenac.tools/]diclofenac[/url] [url=http://atenolol.store/]tenormin 50mg[/url] [url=http://nimotop.world/]nimotop[/url] [url=http://diclofenac.live/]diclofenac[/url]
— KennethBiodo Aug 3, 11:25 PM #wh0cd339838 [url=http://azithromycin.us.org/]buying azithromycin[/url]
— Charlesnef Aug 4, 12:10 AM #wh0cd17322 [url=http://lasixnoprescription.us.com/]Purchase Lasix[/url]
— Alfreddut Aug 4, 02:28 AM #wh0cd90795 [url=http://medrolpack.us.com/]medrol pack[/url]
— Bennyboits Aug 4, 02:35 AM #wh0cd486786 [url=http://citalopramhbr20mg.us.com/]Citalopram Over The Counter[/url]
— Charlesnef Aug 4, 03:16 AM #wh0cd237741 [url=http://prozac.us.org/]buy prozac[/url] [url=http://toradolonline.us.com/]toradol for kidney stones[/url]
— Bennyboits Aug 4, 05:57 AM #wh0cd311216 [url=http://amitriptyline25mg.pro/]amitriptyline 25 mg[/url] [url=http://buy-strattera.store/]strattera online[/url] [url=http://buy-bentyl.reisen/]bentyl[/url] [url=http://methotrexate.reisen/]methotrexate generic[/url] [url=http://buyerythromycin.work/]erythromycin prescription[/url]
— Bennyboits Aug 4, 06:59 AM #wh0cd237746 [url=http://citalopramhbr20mg.us.org/]citalopram hbr 20 mg[/url]
— Alfreddut Aug 4, 07:39 AM #wh0cd458166 [url=http://indocin.work/]indocin 50 mg tablets[/url] [url=http://buy-propecia.store/]buy propecia[/url] [url=http://amitriptyline25mg.pro/]check out your url[/url] [url=http://buy-advair.shop/]advair[/url] [url=http://buyvermox.reisen/]buy vermox[/url]
— Charlesnef Aug 4, 08:32 AM #wh0cd311219 [url=http://isoniazid.world/]isoniazid[/url] [url=http://plaquenil.world/]plaquenil[/url] [url=http://clarinex.reisen/]clarinex[/url] [url=http://rumalaya.world/]rumalaya[/url] [url=http://namenda.reisen/]namenda 10 mg[/url]
— Alfreddut Aug 4, 09:34 AM #wh0cd458164 [url=http://buycytotec.us.org/]BUY CYTOTEC[/url] [url=http://albuterolsulfateinhalationsolution.us.com/]proventil albuterol[/url]
— Bennyboits Aug 4, 10:06 AM #wh0cd531639 [url=http://synthroid.us.org/]buy generic synthroid[/url] [url=http://clindamycinhcl.us.com/]clindamycin hcl[/url]
— Charlesnef Aug 4, 10:19 AM #wh0cd282599 [url=http://albuterolsulfateinhalationsolution.us.com/]albuterol sulfate inhalation solution[/url]
— KennethBiodo Aug 4, 10:46 AM #wh0cd384692 [url=http://buypaxil.us.org/]Paxil Online[/url] [url=http://genericcelexa.us.com/]generic celexa[/url]
— Alfreddut Aug 4, 11:19 AM #wh0cd871270 [url=http://cheapcardura.us.com/]buy cheap cardura[/url] [url=http://clonidinehcl.us.com/]buy clonidine hcl[/url]
— Tracysporp Aug 4, 11:35 AM #wh0cd605112 [url=http://bupropionsr150mg.us.com/]view[/url]
— Charlesnef Aug 4, 12:11 PM #wh0cd854158 [url=http://lasix365.us.com/]lasix[/url] [url=http://baclofen.us.org/]baclofen medication[/url]
— Charlesnef Aug 4, 12:16 PM #wh0cd429545 [url=http://buynexium.us.org/]buy nexium[/url]
— KennethBiodo Aug 4, 01:03 PM #wh0cd413315 [url=http://genericlipitor.us.com/]generic lipitor[/url] [url=http://hydrochlorothiazide25mg.us.com/]hydrochlorothiazide 25mg[/url]
— Alfreddut Aug 4, 01:41 PM #wh0cd752058 [url=http://meclizine.reisen/]meclizine hcl 12.5mg tab[/url] [url=http://capoten.reisen/]capoten[/url] [url=http://azulfidine.reisen/]azulfidine generic[/url] [url=http://buynizoral.reisen/]buy nizoral[/url] [url=http://luvox.reisen/]generic for luvox[/url]
— Charlesnef Aug 4, 03:09 PM #wh0cd486788 [url=http://buyprednisone.us.org/]apo prednisone[/url] [url=http://prilosec.us.com/]prilosec[/url]
— Alfreddut Aug 4, 03:37 PM #wh0cd825531 [url=http://crestorgeneric.us.org/]crestor generic[/url] [url=http://advairgeneric.us.com/]ADVAIR GENERIC[/url]
— Charlesnef Aug 4, 04:19 PM #wh0cd605113 [url=http://triamterene.shop/]triamterene[/url] [url=http://buyavodart.work/]avodart 0.5 mg[/url] [url=http://buyacyclovir.work/]buy acyclovir[/url] [url=http://buy-elocon.store/]generic elocon[/url] [url=http://buy-tadacip.shop/]buy tadacip[/url]
— Alfreddut Aug 4, 05:21 PM #wh0cd752060 [url=http://buytadacip.us.org/]Buy Tadacip[/url]
— Bennyboits Aug 4, 05:59 PM #wh0cd90795 [url=http://prilosec.us.com/]prilosec[/url]
— Charlesnef Aug 4, 06:27 PM #wh0cd678586 [url=http://metformin500mgtablets.us.com/]metformin 500 mg tablets[/url]
— Alfreddut Aug 4, 07:08 PM #wh0cd723448 [url=http://celebrex200mg.us.com/]celebrex online[/url]
— KennethBiodo Aug 4, 08:23 PM #wh0cd62175 [url=http://lasixnoprescription.us.com/]lasix no prescription[/url]
— Charlesnef Aug 4, 08:50 PM #wh0cd34438 [url=http://trazodonehcl.us.com/]trazodone hcl[/url]
— Tracysporp Aug 4, 09:04 PM #wh0cd825534 [url=http://motilium.us.org/]motilium[/url] [url=http://buyphenergan.us.org/]Phenergan Pharmacy[/url]
— Alfreddut Aug 4, 10:17 PM #wh0cd209125 [url=http://claritingeneric.us.com/]Claritin Generic[/url]
— Charlesnef Aug 4, 11:21 PM #wh0cd780685 [url=http://buyclindamycin.us.com/]clindamycin gel[/url]
— Alfreddut Aug 4, 11:32 PM #wh0cd311220 [url=http://furosemide40mg.us.com/]furosemide 40mg[/url]
— Charlesnef Aug 4, 11:35 PM #wh0cd972481 [url=http://hydrochlorothiazide25mg.us.com/]hydrochlorothiazide 25mg[/url]
— Bennyboits Aug 4, 11:48 PM #wh0cd854158 [url=http://amoxicillin.us.org/]amoxicillin[/url] [url=http://buyretina.us.org/]buy retin-a[/url]
— Alfreddut Aug 5, 01:04 AM #wh0cd458166 [url=http://buydoxycycline.us.org/]buy doxycycline[/url]
— Charlesnef Aug 5, 02:26 AM #wh0cd429549 [url=http://erythromycin.systems/]more hints[/url] [url=http://medrol.reisen/]medrol[/url] [url=http://phenergan.systems/]phenergan[/url] [url=http://effexor.tools/]effexor[/url] [url=http://lynoral.world/]buy lynoral[/url]
— Charlesnef Aug 5, 03:24 AM #wh0cd33551 [url=http://onlinediflucan.us.com/]online diflucan[/url] [url=http://baclofen.us.org/]baclofen[/url] [url=http://tretinoin2016.us.com/]tretinoin online[/url] [url=http://buycafergot.us.com/]buy cafergot[/url] [url=http://tetracycline.us.com/]Tetracycline Without A Prescription[/url]
— KennethBiodo Aug 5, 04:22 AM #wh0cd503022 [url=http://albuterolsulfateinhalationsolution.us.com/]Generic Albuterol[/url]
— Charlesnef Aug 5, 04:55 AM #wh0cd17322 [url=http://hoodia.world/]where to buy hoodia[/url] [url=http://amaryl.reisen/]amaryl 4 mg[/url] [url=http://zaditor.world/]where to buy zaditor[/url] [url=http://emsam.world/]emsam patch cost[/url] [url=http://emsam.reisen/]emsam generic[/url]
— Alfreddut Aug 5, 05:02 AM #wh0cd62175 [url=http://diclofenac50mg.us.com/]diclofenac 50 mg[/url] [url=http://toradolonline.us.com/]toradol[/url]
— Alfreddut Aug 5, 05:04 AM #wh0cd107026 [url=http://generictriamterene.us.com/]order triamterene[/url]
— KennethBiodo Aug 5, 06:15 AM #wh0cd90800 [url=http://advair.us.org/]advair by mail order[/url] [url=http://buyhydrochlorothiazide.us.org/]hydrochlorothiazide[/url]
— Alfreddut Aug 5, 06:45 AM #wh0cd209121 [url=http://trazodonehcl.us.com/]trazodone hcl[/url]
— Bennyboits Aug 5, 08:34 AM #wh0cd723441 [url=http://amoxil2.us/]amoxil 250 mg[/url]
— Charlesnef Aug 5, 09:36 AM #wh0cd796914 [url=http://silvitra.reisen/]generic silvitra[/url] [url=http://speman.world/]speman[/url] [url=http://trileptal.world/]trileptal[/url] [url=http://lamisil.reisen/]lamisil price[/url] [url=http://azulfidine.reisen/]generic azulfidine[/url]
— Charlesnef Aug 5, 10:47 AM #wh0cd870389 [url=http://advairgeneric.us.com/]ADVAIR GENERIC[/url]
— Charlesnef Aug 5, 12:02 PM #wh0cd311221 [url=http://methotrexate.us.org/]methotrexate[/url] [url=http://genericprozac.us.com/]prozac pills[/url]
— Alfreddut Aug 5, 12:26 PM #wh0cd356067 [url=http://diclofenac75mg.us.com/]diclofenac 75mg[/url] [url=http://clindamycin300mg.us.com/]clindamycin 300 mg[/url]
— Bennyboits Aug 5, 12:31 PM #wh0cd356073 [url=http://genericcelexa.us.com/]Generic Celexa[/url]
— Alfreddut Aug 5, 12:35 PM #wh0cd899008 [url=http://arimidex.us.org/]buy arimidex[/url] [url=http://trazodone50mg.us.com/]trazodone online[/url]
— Charlesnef Aug 5, 01:30 PM #wh0cd943862 [url=http://casodex.world/]buy casodex[/url] [url=http://exelon.reisen/]exelon patch 4.6 mg[/url] [url=http://menosan.world/]menosan[/url] [url=http://buyacai.world/]buy acai[/url] [url=http://floxin.reisen/]generic floxin[/url]
— Charlesnef Aug 5, 01:34 PM #wh0cd429540 [url=http://avodart.fail/]avodart[/url] [url=http://lipitor.work/]cost of generic lipitor[/url] [url=http://albuterol.live/]albuterol[/url] [url=http://crestor.systems/]crestor 10mg[/url] [url=http://sustiva.world/]sustiva[/url]
— Bennyboits Aug 5, 01:48 PM #wh0cd429551 [url=http://actos.us.com/]cheap actos[/url]
— Alfreddut Aug 5, 02:26 PM #wh0cd474395 [url=http://genericforlipitor.us.com/]generic for lipitor[/url] [url=http://celebrex.us.org/]buy celebrex[/url]
— KennethBiodo Aug 5, 02:56 PM #wh0cd503013 [url=http://bupropionsr150mg.us.com/]bupropion sr 150 mg[/url]
— Bennyboits Aug 5, 03:16 PM #wh0cd503024 [url=http://hydrochlorothiazide.us.org/]hydrochlorothiazide[/url] [url=http://motrin800.us.com/]motrin[/url]
— Alfreddut Aug 5, 04:07 PM #wh0cd547868 [url=http://buytrazodone.us.org/]trazodone[/url]
— KennethBiodo Aug 5, 04:15 PM #wh0cd531642 [url=http://prozac.us.org/]prozac forsale[/url]
— Alfreddut Aug 5, 05:10 PM #wh0cd107024 [url=http://orderdiflucanonline.us.com/]generic diflucan[/url]
— Charlesnef Aug 5, 05:33 PM #wh0cd621341 [url=http://buyarimidex.us.org/]buy arimidex[/url]
— KennethBiodo Aug 5, 06:01 PM #wh0cd605120 [url=http://benadryl.us.com/]Benadryl Online[/url]
— Alfreddut Aug 5, 06:56 PM #wh0cd649961 [url=http://wellbutringeneric.us.com/]Wellbutrin Generic Price[/url] [url=http://toradolcost.us.com/]toradol cost[/url]
— Bennyboits Aug 5, 07:01 PM #wh0cd649972 [url=http://clonidinehcl.us.com/]clonidine hcl 0.2 mg[/url]
— Alfreddut Aug 5, 07:12 PM #wh0cd796920 [url=http://cheapdiflucan.us.com/]where to buy duflicon pills[/url] [url=http://zithromaxantibiotic.us.com/]generic zithromax[/url] [url=http://flagyl.us.com/]flagyl 400mg[/url] [url=http://buyclindamycin.us.com/]clindamycin capsule[/url] [url=http://proventil.us.com/]proventil pills[/url]
— Alfreddut Aug 5, 09:55 PM #wh0cd475285 [url=http://buytadacip.us.org/]buy tadacip online[/url]
— Tracysporp Aug 5, 10:22 PM #wh0cd796909 [url=http://buyprovera.us.org/]BUY PROVERA ONLINE[/url] [url=http://toradolonline.us.com/]toradol over counter[/url]
— Bennyboits Aug 5, 10:34 PM #wh0cd825541 [url=http://nexiumgeneric.store/]nexium[/url] [url=http://buy-neurontin.store/]neurontin[/url] [url=http://strattera.work/]atomoxetine cost[/url] [url=http://advair.tools/]advair[/url] [url=http://phenerganonline.pro/]phenergan[/url]
— Alfreddut Aug 5, 11:18 PM #wh0cd841762 [url=http://toradolonline.us.com/]Toradol Online[/url] [url=http://genericretina.us.com/]where can i buy retin a cream[/url]
— KennethBiodo Aug 5, 11:34 PM #wh0cd870393 [url=http://amitriptyline.us.org/]amitriptyline[/url]
— Alfreddut Aug 5, 11:47 PM #wh0cd870387 [url=http://buybentyl.us.org/]look at this[/url]
— Bennyboits Aug 6, 12:55 AM #wh0cd548764 [url=http://genericcelexa.us.com/]celexa cost[/url]
— Tracysporp Aug 6, 01:37 AM #wh0cd943860 [url=http://buydiflucan.us.org/]diflucan 1[/url] [url=http://buyacyclovir.us.org/]Acyclovir Tablets[/url]
— Bennyboits Aug 6, 02:39 AM #wh0cd547871 [url=http://colchicineonline.us.com/]Buy Colchicine[/url] [url=http://ciprofloxacin.us.com/]generic cipro[/url]
— Charlesnef Aug 6, 03:08 AM #wh0cd33551 [url=http://florinef.world/]florinef for hypotension[/url] [url=http://lamisil.world/]lamisil[/url] [url=http://imuran.world/]imuran[/url] [url=http://benzac.reisen/]benzac[/url] [url=http://shallaki.reisen/]shallaki[/url]
— Alfreddut Aug 6, 03:25 AM #wh0cd503015 [url=http://buypaxil.us.org/]buy paxil[/url] [url=http://effexorgeneric.us.com/]Effexor XR 300 mg[/url]
— Charlesnef Aug 6, 03:25 AM #wh0cd33551 [url=http://valtrex.us.org/]cheapest valtrex[/url]
— Bennyboits Aug 6, 04:53 AM #wh0cd78404 [url=http://buyabilify.us.org/]your domain name[/url]
— KennethBiodo Aug 6, 05:20 AM #wh0cd151879 [url=http://bentylcost.us.com/]buy bentyl[/url] [url=http://prilosecgeneric.us.com/]prilosec pharmacy[/url]
— KennethBiodo Aug 6, 07:07 AM #wh0cd649965 [url=http://acyclovir800mg.us.com/]acyclovir 800mg[/url] [url=http://cheapdapoxetine.us.com/]Dapoxetine Online[/url]
— Charlesnef Aug 6, 07:12 AM #wh0cd180497 [url=http://lasixwaterpill.us.com/]lasix water pill[/url]
— Bennyboits Aug 6, 08:24 AM #wh0cd253972 [url=http://advairgeneric.us.com/]price of advair diskus[/url]
— Alfreddut Aug 6, 08:40 AM #wh0cd796911 [url=http://sildenafilforyou.us.com/]sildenafil[/url]
— Charlesnef Aug 6, 10:25 AM #wh0cd356074 [url=http://buypaxil.us.org/]paxil headaches[/url]
— Alfreddut Aug 6, 11:55 AM #Анечка, восхитительная, с днем рождения!
— MatthewJibly Aug 6, 12:34 PM #И пускай великолепная осень награждает ценным золотом счастья, вдохновляющая весна – чудом нереального возрождения,
пышная зима – нежностью волшебной любви и долгожданное лето – невероятной жарой удивительной страсти!
wh0cd400918 [url=http://furosemide.tools/]buy furosemide[/url] [url=http://zetia.reisen/]zetia[/url] [url=http://abana.world/]abana[/url] [url=http://zanaflex.world/]zanaflex[/url] [url=http://ventolin.fund/]ventolin[/url]
— Alfreddut Aug 6, 12:37 PM #wh0cd372304 [url=http://buy-arimidex.shop/]arimidex[/url] [url=http://crestorgeneric.pro/]crestor[/url] [url=http://clonidine.systems/]clonidine for autism[/url] [url=http://elocon.directory/]elocon[/url] [url=http://furosemide20mgtab.reisen/]furosemide 20 mg tab cost[/url]
— KennethBiodo Aug 6, 12:54 PM #wh0cd429550 [url=http://buycelexa.us.org/]Celexa Prescriptions[/url]
— Alfreddut Aug 6, 01:43 PM #wh0cd943859 [url=http://prednisone5mg.us.com/]Prednisone By Mail Order[/url] [url=http://buyaugmentin.us.com/]buy augmentin[/url]
— Charlesnef Aug 6, 02:08 PM #wh0cd503025 [url=http://losartanhydrochlorothiazide.us.com/]losartan hydrochlorothiazide[/url]
— Alfreddut Aug 6, 03:50 PM #wh0cd33551 [url=http://cheapcardura.us.com/]Cheap Cardura[/url]
— Charlesnef Aug 6, 04:46 PM #wh0cd769183 [url=http://esomeprazole.us.com/]Esomeprazole[/url]
— Tracysporp Aug 6, 06:35 PM #wh0cd298827 [url=http://acyclovir800mg.us.com/]acyclovir 800mg[/url] [url=http://tretinoincream01.us.com/]tretinoin cream 0.1[/url]
— Charlesnef Aug 6, 07:20 PM #wh0cd739672 [url=http://buypaxil.us.org/]buy paxil[/url]
— KennethBiodo Aug 6, 08:45 PM #wh0cd768295 [url=http://furosemide40mg.us.com/]furosemide[/url] [url=http://cheapdapoxetine.us.com/]cheap dapoxetine[/url]
— Alfreddut Aug 6, 09:21 PM #wh0cd253970 [url=http://digoxin.world/]digoxin[/url] [url=http://prozac.work/]example here[/url] [url=http://revia.mba/]revia[/url] [url=http://doxycycline.store/]vibramycin 100 mg[/url] [url=http://flomax.world/]flomax generic[/url]
— Charlesnef Aug 6, 10:45 PM #wh0cd841768 [url=http://buymotilium.us.org/]Buy Motilium[/url] [url=http://colchicine.us.org/]buy colchicine[/url]
— Alfreddut Aug 6, 10:48 PM #wh0cd445780 [url=http://diarex.reisen/]get the facts[/url] [url=http://avapro.reisen/]avapro[/url] [url=http://mentat.reisen/]generic mentat[/url] [url=http://shuddhaguggulu.world/]shuddha guggulu[/url] [url=http://diovan.world/]diovan[/url]
— Charlesnef Aug 6, 10:49 PM #wh0cd796923 [url=http://buytadacip.us.org/]Buy Tadacip[/url] [url=http://bupropionsr150mg.us.com/]Bupropion SR 150 Mg[/url]
— Alfreddut Aug 6, 11:25 PM #wh0cd841778 [url=http://sildenafilgeneric.us.com/]sildenafil generic canada[/url]
— Bennyboits Aug 6, 11:42 PM #rqcit5efgavd8jjuv7
[url=http://baidu.com/]baidu[/url]
jtia7v67o4loe5ves1
— JaonRargy Aug 7, 12:03 AM #wh0cd519258 [url=http://precose.world/]generic precose[/url] [url=http://purim.reisen/]home page[/url] [url=http://zebeta.world/]zebeta[/url] [url=http://buyreminyl.reisen/]reminyl online[/url] [url=http://actos.reisen/]actos[/url]
— Charlesnef Aug 7, 12:09 AM #wh0cd327445 [url=http://cheapdapoxetine.us.com/]dapoxetine hcl[/url]
— Charlesnef Aug 7, 12:34 AM #wh0cd870396 [url=http://anafranilforanxiety.us.com/]buy anafranil online[/url] [url=http://stromectol.us.org/]generic stromectol[/url]
— Alfreddut Aug 7, 01:24 AM #wh0cd400923 [url=http://metformin2016.us.com/]Buy Metformin[/url]
— Charlesnef Aug 7, 02:05 AM #wh0cd988724 [url=http://toradolpills.us.com/]toradol 15 mg[/url]
— Alfreddut Aug 7, 02:13 AM #wh0cd960097 [url=http://buyamoxicillin.us.org/]buy amoxicillin online[/url]
— KennethBiodo Aug 7, 02:59 AM #wh0cd943871 [url=http://lasixmedication.us.com/]Buy Lasix[/url]
— Alfreddut Aug 7, 03:17 AM #wh0cd474398 [url=http://genericretina.us.com/]Generic Retin A[/url]
— Charlesnef Aug 7, 03:30 AM #wh0cd988728 [url=http://motrin800.us.com/]motrin online[/url]
— Bennyboits Aug 7, 03:34 AM #wh0cd739677 [url=http://colchicine.us.org/]colchicine online pharmacy[/url] [url=http://buyhydrochlorothiazide.us.org/]hydrochlorothiazide[/url]
— Charlesnef Aug 7, 04:37 AM #wh0cd49782 [url=http://buyrimonabant.us.org/]rimonabant acomplia[/url] [url=http://motrin800.us.com/]motrin ib[/url]
— KennethBiodo Aug 7, 05:16 AM #wh0cd33553 [url=http://diclofenac.us.org/]Diclofenac By Mail[/url] [url=http://buyampicillin.us.org/]buy ampicillian[/url]
— Alfreddut Aug 7, 05:46 AM #wh0cd621348 [url=http://metformin.us.org/]metformin[/url]
— Charlesnef Aug 7, 06:20 AM #wh0cd123257 [url=http://flagyl.us.org/]flagyl[/url] [url=http://triamterene.us.org/]Buy Triamterene Online[/url]
— KennethBiodo Aug 7, 07:15 AM #wh0cd225354 [url=http://avanaonline.us.com/]Avana Price Comparison[/url]
— Alfreddut Aug 7, 07:46 AM #u0lj9fnfaii5ylcdc0
[url=http://baidu.com/]baidu[/url]
j93bbaa6zdzyon3o9a
— JaonRargy Aug 7, 07:49 AM #wh0cd107026 [url=http://genericelocon.us.com/]elocon[/url] [url=http://phenergan.us.org/]Phenergan[/url]
— Alfreddut Aug 7, 07:50 AM #wh0cd196730 [url=http://zyvox.world/]zyvox[/url] [url=http://buyatrovent.world/]generic atrovent[/url] [url=http://buyacai.world/]where to buy acai[/url] [url=http://exelon.reisen/]exelon patch 4.6 mg[/url] [url=http://femara.world/]femara[/url]
— KennethBiodo Aug 7, 08:56 AM #wh0cd298833 [url=http://tetracycline.us.org/]Buy Tetracycline[/url]
— Bennyboits Aug 7, 10:42 AM #wh0cd372303 [url=http://prednisone.us.org/]prednisone[/url]
— Alfreddut Aug 7, 11:21 AM #wh0cd49782 [url=http://albuterol.us.org/]albuterol[/url]
— Charlesnef Aug 7, 11:44 AM #wh0cd253974 [url=http://citalopramhbr20mg.us.org/]for more[/url] [url=http://clindamycin300mg.us.com/]order clindamycin[/url]
— Alfreddut Aug 7, 11:50 AM #wh0cd417158 [url=http://domperidone.us.com/]domperidone[/url]
— KennethBiodo Aug 7, 01:37 PM #wh0cd490633 [url=http://citalopram.shop/]citalopram[/url] [url=http://styplon.reisen/]styplon[/url] [url=http://carafate.world/]carafate[/url] [url=http://fluoxetine.fund/]fluoxetine hcl[/url] [url=http://clindamycin.world/]recommended site[/url]
— KennethBiodo Aug 7, 02:53 PM #wh0cd400925 [url=http://buytadacip.us.org/]tadacip without prescription[/url]
— Alfreddut Aug 7, 03:31 PM #wh0cd592726 [url=http://hydrochlorothiazide25mg.us.com/]hydrochlorothiazide sale[/url]
— Alfreddut Aug 7, 05:14 PM #wh0cd343674 [url=http://buybenicar.reisen/]benicar[/url] [url=http://buy-cephalexin.reisen/]buy cephalexin[/url] [url=http://buyelocon.shop/]elocon[/url] [url=http://buycephalexin.shop/]cephalexin[/url] [url=http://eurax.work/]buy eurax[/url]
— Charlesnef Aug 7, 05:50 PM #wh0cd637581 [url=http://buylasix.us.org/]buy lasix[/url]
— KennethBiodo Aug 7, 06:32 PM #wh0cd666201 [url=http://trazodone50mg.us.com/]Trazodone 50 Mg[/url]
— Alfreddut Aug 7, 07:06 PM #wh0cd666207 [url=http://buyrevia.us.org/]BUY REVIA ONLINE[/url] [url=http://yasminbirthcontrol.us.com/]Yasmin Ocp[/url]
— Bennyboits Aug 7, 07:30 PM #wh0cd621352 [url=http://motrin800.us.com/]Motrin 800 mg[/url] [url=http://buyprednisone.us.org/]Buy Prednisone[/url]
— Alfreddut Aug 7, 08:27 PM #wh0cd711054 [url=http://buytenormin.us.org/]generic tenormin[/url] [url=http://genericnexium.us.com/]generic nexium[/url]
— KennethBiodo Aug 7, 08:30 PM #wh0cd225350 [url=http://mestinon.world/]pyridostigmine mestinon[/url] [url=http://levothroid.reisen/]levothroid[/url] [url=http://florinef.world/]florinef[/url] [url=http://mentax.world/]mentax[/url] [url=http://shuddhaguggulu.reisen/]shuddha guggulu[/url]
— Charlesnef Aug 7, 08:53 PM #wh0cd813151 [url=http://arimidex.us.org/]arimidex[/url] [url=http://buyadalat.us.org/]Adalat[/url]
— Alfreddut Aug 7, 10:21 PM #wh0cd813157 [url=http://benadryl.us.com/]benadryl[/url] [url=http://buyhydrochlorothiazide.us.org/]hydrochlorothiazide[/url]
— Bennyboits Aug 7, 11:28 PM #wh0cd637568 [url=http://motrin800.us.com/]buy motrin[/url]
— Charlesnef Aug 7, 11:35 PM #wh0cd858004 [url=http://crestor.us.org/]Crestor Tablets[/url] [url=http://elocontopicalcream.us.com/]elocon pharmacy[/url] [url=http://atenololchlorthalidone.us.com/]buy atenolol[/url] [url=http://effexor3.us/]effexor[/url] [url=http://nolvadexnorx.us.com/]tamoxifen citrate[/url]
— KennethBiodo Aug 8, 12:02 AM #wh0cd440755 [url=http://amoxil.directory/]amoxil 875 mg[/url] [url=http://prednisolone.world/]prednisolone[/url] [url=http://methotrexate.work/]methotrexate[/url] [url=http://revia.fail/]revia[/url] [url=http://proscar.live/]source[/url]
— MichaelSoush Aug 8, 12:06 AM #wh0cd960097 [url=http://tadacip.news/]tadacip 20 mg[/url] [url=http://metformin.schule/]metformin[/url] [url=http://fluoxetine.zone/]fluoxetine 40 mg capsules[/url] [url=http://triamterene.work/]i found it[/url] [url=http://citalopram.world/]citalopram for anxiety[/url]
— Alfreddut Aug 8, 02:21 AM #wh0cd445771 [url=http://buyclomid.shop/]clomid[/url] [url=http://benicar.fail/]benicar hct[/url] [url=http://buy-valtrex.shop/]valtrex[/url] [url=http://zetia.pro/]zetia 10 mg tablets[/url] [url=http://buy-avana.reisen/]buy avana[/url]
— Charlesnef Aug 8, 02:51 AM #wh0cd784517 [url=http://buyhydrochlorothiazide.us.org/]hydrochlorothiazide online[/url] [url=http://genericbentyl.us.com/]generic bentyl[/url]
— Charlesnef Aug 8, 03:21 AM #wh0cd21158 [url=http://tadalafilnorx.us.com/]Generic Tadalafil[/url] [url=http://advair24.us.org/]advair[/url] [url=http://buytamoxifen.us.com/]buy tamoxifen[/url] [url=http://celexaonline.us.com/]celexa online[/url] [url=http://neurontin2017.us.com/]generic neurontin[/url]
— KennethBiodo Aug 8, 03:43 AM #wh0cd519244 [url=http://genericadvair.us.com/]Generic Advair[/url]
— Charlesnef Aug 8, 04:27 AM #wh0cd915257 [url=http://metformin500mgtablets.us.com/]metformin 500 mg tablets[/url] [url=http://effexor.us.org/]Effexor Tablets[/url]
— Alfreddut Aug 8, 04:48 AM #wh0cd49780 [url=http://advairdiskus.us.org/]advair diskus without prescription[/url]
— Alfreddut Aug 8, 04:53 AM #wh0cd196728 [url=http://buyvermox.us.org/]vermox mebendazole[/url]
— Bennyboits Aug 8, 07:17 AM #wh0cd168110 [url=http://buycymbalta.us.org/]purchase cymbalta[/url]
— KennethBiodo Aug 8, 07:39 AM #wh0cd196730 [url=http://triamterenehctz.us.com/]Triamterene Hctz[/url] [url=http://propecia.us.com/]propecia[/url]
— Alfreddut Aug 8, 08:16 AM #wh0cd78402 [url=http://cymbaltacost.us.com/]Cymbalta Cost[/url]
— Alfreddut Aug 8, 08:38 AM #wh0cd270201 [url=http://acyclovir.us.org/]acyclovir[/url] [url=http://bupropionsr150mg.us.com/]Bupropion SR 150 Mg[/url]
— Bennyboits Aug 8, 09:15 AM #wh0cd241585 [url=http://actos.us.com/]GENERIC ACTOS[/url] [url=http://sildenafilgeneric.us.com/]sildenafil without prescription[/url]
— KennethBiodo Aug 8, 09:30 AM #wh0cd739665 [url=http://buyrobaxin.us.org/]robaxin by mail[/url] [url=http://lisinoprilgeneric.us.com/]lisinopril generic[/url]
— Charlesnef Aug 8, 10:04 AM #wh0cd417151 [url=http://nexium.us.org/]nexium sale[/url] [url=http://flagyl.us.org/]flagyl[/url]
— Alfreddut Aug 8, 12:43 PM #wh0cd168104 [url=http://nexium.us.org/]nexium online pharmacy[/url] [url=http://orderdiflucanonline.us.com/]order diflucan[/url]
— Charlesnef Aug 8, 12:50 PM #wh0cd490629 [url=http://hydrochlorothiazide25mg.us.com/]hydrochlorothiazide 25mg[/url] [url=http://valtrex.us.org/]valtrex[/url]
— Alfreddut Aug 8, 01:54 PM #wh0cd490624 [url=http://eurax.news/]eurax[/url] [url=http://fluoxetinehcl.pro/]fluoxetine[/url] [url=http://arimidex.mba/]arimidex for pct[/url] [url=http://buy-ventolin.store/]buy ventolin inhaler online[/url] [url=http://doxycycline100mg.reisen/]doxycycline 100mg tablet[/url]
— Bennyboits Aug 8, 02:09 PM #wh0cd241577 [url=http://hydrochlorothiazide25mg.us.com/]buying hydrochlorothiazide[/url]
— Charlesnef Aug 8, 02:39 PM #wh0cd462006 [url=http://diclofenac75mg.us.com/]diclofenac[/url] [url=http://triamterene.us.org/]triamterene hctz 37.5[/url]
— KennethBiodo Aug 8, 03:33 PM #wh0cd445773 [url=http://bentylcost.us.com/]bentyl tabs[/url] [url=http://medrolpack.us.com/]medrol pack[/url]
— Alfreddut Aug 8, 05:19 PM #bj3a3k1izjmxrotbf2
[url=http://baidu.com/]baidu[/url]
mto6dqxqfr9haiewqp
— JaonRargy Aug 8, 05:28 PM #wh0cd711045 [url=http://motrin.us.com/]motrin[/url] [url=http://advairdiskus.us.com/]ADVAIR DISKUS[/url] [url=http://onlinevermox.us.com/]online vermox[/url] [url=http://buyindocin.us.com/]buy indocin[/url] [url=http://propranolol24.us.org/]propranolol lowest price[/url]
— Bennyboits Aug 8, 06:45 PM #wh0cd123255 [url=http://clindamycin.us.org/]clindamycin[/url]
— Charlesnef Aug 8, 07:39 PM #wh0cd784520 [url=http://buy-avodart.work/]avodart[/url] [url=http://anafranil25mg.pro/]anafranil[/url] [url=http://buy-zithromax.shop/]buy zithromax[/url] [url=http://buytadalissx.pro/]generic tadalis sx[/url] [url=http://buy-benicar.shop/]cost of benicar[/url]
— Bennyboits Aug 8, 08:17 PM #wh0cd857993 [url=http://nexiumprice.us.com/]nexium online[/url] [url=http://tetracycline.us.org/]Tetracycline Online[/url]
— Bennyboits Aug 8, 09:29 PM #wh0cd666192 [url=http://buyventolin.us.com/]Buy Ventolin[/url] [url=http://crestor365.us.com/]as an example[/url]
— Alfreddut Aug 8, 09:48 PM #wh0cd608948 [url=http://mentat.world/]mentat[/url] [url=http://wellbutrin.fund/]wellbutrin[/url] [url=http://cytotec.shop/]where can i get cytotec over the counter[/url] [url=http://stromectol.news/]cheap stromectol[/url] [url=http://terramycin.reisen/]terramycin[/url]
— Charlesnef Aug 8, 11:15 PM #wh0cd931475 [url=http://lasixnoprescription.us.com/]Lasix Price[/url] [url=http://toradolonline.us.com/]toradol for headaches[/url]
— Alfreddut Aug 9, 12:06 AM #wh0cd682421 [url=http://prednisonenorx.us.com/]Prednisone Online[/url] [url=http://isotretinoin.us.com/]visit this link[/url]
— Charlesnef Aug 9, 12:40 AM #wh0cd813147 [url=http://trazodonehcl.us.com/]Trazodone Sale[/url]
— Alfreddut Aug 9, 12:52 AM #wh0cd343683 [url=http://famvir.reisen/]famvir[/url] [url=http://zocor.reisen/]zocor[/url] [url=http://retina.fail/]retin a cream 1 % for wrinkles no prescription[/url] [url=http://fluoxetine.schule/]fluoxetine buy online[/url] [url=http://celebrex.schule/]celebrex from canada[/url]
— Charlesnef Aug 9, 01:36 AM #wh0cd417156 [url=http://buydiclofenac.us.com/]buy diclofenac[/url] [url=http://cafergot2017.us.com/]cafergot online[/url] [url=http://azithromycin247.us.org/]zithromycin 500 mg[/url] [url=http://bupropion2016.us.com/]Buy Bupropion[/url] [url=http://crestor.us.com/]CRESTOR ONLINE[/url]
— Charlesnef Aug 9, 03:26 AM #wh0cd829370 [url=http://cymbalta30mg.us.com/]Cymbalta 30mg[/url]
— Charlesnef Aug 9, 03:38 AM #wh0cd440755 [url=http://lasixnoprescription.us.com/]lasix[/url]
— Charlesnef Aug 9, 03:57 AM #wh0cd960093 [url=http://kemadrin.reisen/]buy kemadrin[/url] [url=http://floxin.world/]floxin[/url] [url=http://zerit.world/]zerit[/url] [url=http://lopressor.world/]lopressor[/url] [url=http://roxithromycin.reisen/]roxithromycin[/url]
— Alfreddut Aug 9, 04:01 AM #wh0cd94631 [url=http://buyvaltrex.us.org/]buy valtrex[/url]
— Alfreddut Aug 9, 04:07 AM #wh0cd168112 [url=http://rimonabantnorx.us.com/]Rimonabant[/url] [url=http://tadacipnorx.us.com/]tadacip 20mg[/url] [url=http://acomplia.us.com/]Acomplia[/url] [url=http://nexiumnorx.us.com/]discount nexium[/url] [url=http://celebrex2016.us.com/]celebrex[/url]
— Bennyboits Aug 9, 04:35 AM #wh0cd168106 [url=http://trazodone50mg.us.com/]trazodone mail order[/url]
— Alfreddut Aug 9, 05:23 AM #wh0cd49780 [url=http://buypropranolol.us.org/]view site[/url]
— Alfreddut Aug 9, 06:10 AM #wh0cd241585 [url=http://clonidinehcl.us.com/]clonidine 0.2mg[/url]
— Bennyboits Aug 9, 06:24 AM #wh0cd564102 [url=http://norvasc.us.com/]Norvasc Tablets[/url] [url=http://nexium24.us.org/]generic nexium[/url]
— Charlesnef Aug 9, 07:25 AM #wh0cd315060 [url=http://cymbalta30mg.us.com/]cymbalta 30mg[/url] [url=http://genericsynthroid.us.com/]cheap synthroid pills[/url]
— Bennyboits Aug 9, 08:06 AM #wh0cd123253 [url=http://doxycyclineacne.us.com/]where to buy doxycycline[/url] [url=http://metformin.us.org/]metformin[/url]
— Alfreddut Aug 9, 08:08 AM #wh0cd139486 [url=http://buyrevia.us.org/]Buy Revia[/url]
— KennethBiodo Aug 9, 08:18 AM #wh0cd637575 [url=http://advair.us.org/]advair[/url] [url=http://buypropecia.us.org/]buy propecia cheap[/url]
— Charlesnef Aug 9, 09:16 AM #wh0cd66009 [url=http://periactin.world/]periactin[/url] [url=http://augmentin.tools/]augmentin 875mg[/url] [url=http://crestor.reisen/]crestor[/url] [url=http://albenza.world/]albenza[/url] [url=http://endep.world/]endep without prescription[/url]
— Charlesnef Aug 9, 09:26 AM #wh0cd212959 [url=http://purim.reisen/]purim mitzvot[/url] [url=http://buydulcolax.reisen/]dulcolax[/url] [url=http://lozol.world/]buy lozol[/url] [url=http://mentax.world/]mentax cream[/url] [url=http://rulide.reisen/]rulide online[/url]
— KennethBiodo Aug 9, 09:45 AM #wh0cd388535 [url=http://buyrimonabant.us.org/]buy rimonabant[/url] [url=http://furosemide40mg.us.com/]check out your url[/url]
— Bennyboits Aug 9, 09:53 AM #wh0cd196726 [url=http://cymbalta30mg.us.com/]Cymbalta Wellbutrin[/url]
— Alfreddut Aug 9, 09:54 AM #wh0cd740561 [url=http://cymbaltacost.us.com/]Cymbalta Cost[/url]
— Tracysporp Aug 9, 10:05 AM #wh0cd139484 [url=http://cymbaltacost.us.com/]Cymbalta[/url] [url=http://citalopramhbr20mg.us.org/]citalopram tablets[/url]
— Charlesnef Aug 9, 10:55 AM #wh0cd270199 [url=http://crestorgeneric.us.org/]crestor 20mg[/url] [url=http://buyinderal.us.org/]Buy Inderal[/url]
— Alfreddut Aug 9, 11:37 AM #wh0cd212959 [url=http://orderdiflucanonline.us.com/]order diflucan online[/url]
— Charlesnef Aug 9, 12:25 PM #wh0cd784523 [url=http://hydrochlorothiazide25mg.us.com/]Purchase Hydrochlorothiazide Online[/url] [url=http://effexorgeneric.us.com/]purchase effexor xr[/url]
— Charlesnef Aug 9, 12:38 PM #wh0cd359912 [url=http://buylasix.us.org/]Lasix Water Pill[/url] [url=http://citalopram20mg.us.com/]Citalopram 20mg[/url]
— KennethBiodo Aug 9, 12:41 PM #wh0cd343672 [url=http://buyrimonabant.us.org/]rimonabant acomplia[/url]
— Alfreddut Aug 9, 01:15 PM #wh0cd535483 [url=http://toradol20mg.us.com/]toradol 20 mg[/url]
— Bennyboits Aug 9, 01:59 PM #wh0cd286435 [url=http://metformin500mg.us.com/]generic metformin[/url] [url=http://generictriamterene.us.com/]triamterene diuretic[/url]
— Charlesnef Aug 9, 01:59 PM #wh0cd433385 [url=http://toradolonline.us.com/]toradol online[/url] [url=http://benadryl.us.com/]BEST PLACE TO BUY BENADRYL[/url]
— KennethBiodo Aug 9, 02:12 PM #wh0cd857998 [url=http://buypaxil.us.org/]Buy Paxil[/url]
— Charlesnef Aug 9, 02:38 PM #wh0cd359908 [url=http://trazodonehcl.pro/]trazodone hcl[/url] [url=http://levaquin.world/]levaquin[/url] [url=http://sildenafilgeneric.pro/]sildenafil products[/url] [url=http://allopurinol.fund/]look at this[/url] [url=http://buy-metformin.reisen/]buy metformin[/url]
— Charlesnef Aug 9, 03:26 PM #wh0cd506860 [url=http://buytoradol.us.org/]buy toradol[/url]
— KennethBiodo Aug 9, 03:43 PM #wh0cd608956 [url=http://buyprovera.us.org/]provera medicine[/url]
— Bennyboits Aug 9, 03:52 PM #wh0cd608948 [url=http://differin.world/]differin[/url] [url=http://alavert.reisen/]alavert[/url] [url=http://crestor.directory/]crestor 5mg price[/url] [url=http://amitriptyline.fund/]elavil 25mg[/url] [url=http://elimite.fail/]elimite cream for sale[/url]
— Alfreddut Aug 9, 04:35 PM #wh0cd931473 [url=http://sildenafilcitrate.us.org/]buy sildenafil[/url]
— Charlesnef Aug 9, 04:54 PM #wh0cd814034 [url=http://cymbalta60mg.us.com/]cymbalta 60 mg[/url] [url=http://ciprofloxacinhcl500mg.us.com/]Ciprofloxacin HCL 500 Mg[/url]
— Tracysporp Aug 9, 04:58 PM #wh0cd580335 [url=http://acyclovir800mg.us.com/]ACYCLOVIR 800MG[/url]
— KennethBiodo Aug 9, 05:08 PM #Доброго дня!
Вот здесь [url=http://ofarma.ru/]дешовую виагру где купить[/url]
Супер способ оттопыриться!) Всего хорошего!
=============
Официальный сайт http://ofarma.ru
— заказать виагру дешево оптом Aug 10, 01:25 AM #http://revia.phartesdomusa.org generic naltrexone hydrochloride
— Darinlap Aug 10, 04:15 PM #[url=https://essaywritingservices.us.com/]writing an argument essay[/url]
— Mikeben Aug 11, 05:38 PM #[url=https://bestpaydayloansonline.us.com/]click here[/url]
— Mikeben Aug 11, 07:18 PM #Ламинин и работа от LPGN в Армении, Грузии, Азербайджане 15-28 usd
— DanielLed Aug 13, 01:54 PM #[url=http://edsliferx.org/]buy amoxil online no prescription [/url]
— Irvingbaipt Aug 14, 05:09 PM #buy amoxicillin 500mg
<a href=” http://edsliferx.org/ “>amoxicillin to buy online </a>
amoxicillin buy over counter
[url=http://ketpesand.org/]where to buy cytotec pills[/url]
— Ralphswits Aug 14, 06:02 PM #where can i buy cytotec
<a href=” http://ketpesand.org/ “>where to buy cytotec pills</a>
where can i buy cytotec in the philippines
[url=http://andheckhec.org/]buy motilium online[/url]
— Thomasver Aug 14, 07:52 PM #buy motilium online canada
<a href=” http://andheckhec.org/ “>motilium where to buy</a>
buy motilium boots
[url=http://edsliferx.org/]buy amoxil online [/url]
— Irvinginges Aug 15, 03:27 AM #where to buy amoxicillin
<a href=” http://edsliferx.org/ “>buy amoxicillin online </a>
amoxicillin for sale
[url=http://ketpesand.org/]cytotec buy online usa[/url]
— RalphMaf Aug 15, 04:10 AM #can i buy cytotec at walmart
<a href=” http://ketpesand.org/ “>cytotec buy online usa</a>
where can i buy cytotec over the counter
[url=http://andheckhec.org/]where to buy motilium meltabs online no prescription[/url]
— Thomasutexy Aug 15, 08:11 AM #buy motilium online
<a href=” http://andheckhec.org/ “>motilium where to buy</a>
motilium buy
[url=https://bestpaydayloansonline.us.com/]online payday loans[/url]
— Mikeben Aug 15, 04:26 PM #[url=http://lobijus.org/]where to buy sildenafil over the counter[/url]
— Frankvef Aug 16, 07:17 AM #buy sildenafil
<a href=” http://lobijus.org “>buy sildenafil over the counter</a>
buy sildenafil 20mg online with an online prescription canada
[url=http://lobijus.org/]sildenafil citrate buy[/url]
— Franknox Aug 16, 07:19 AM #buy sildenafil citrate generic
<a href=” http://lobijus.org “>buy sildenafil 50mg</a>
where to buy sildenafil
[url=http://galighsa.org/]prednisone buy online[/url]
— CraigVitty Aug 16, 07:21 AM #order prednisone without a prescription
<a href=” http://galighsa.org/ “>buy prednisone online for humans</a>
buy prednisone no prescription needed
[url=http://galighsa.org/]where to buy prednisone[/url]
— CraigGom Aug 16, 07:22 AM #prednisone 5mg buy
<a href=” http://galighsa.org/ “>buy prednisone 20mg</a>
where can i buy prednisone without a prescription
[url=http://lobijus.org/]sildenafil generic buy[/url]
— Frankvef Aug 16, 08:53 AM #buy sildenafil citrate online
<a href=” http://lobijus.org “>where can i buy sildenafil citrate over the counter</a>
do you need a prescription to buy sildenafil
[url=http://lobijus.org/]buy sildenafil citrate[/url]
— Franknox Aug 16, 08:55 AM #buy sildenafil citrate online
<a href=” http://lobijus.org “>buy sildenafil citrate 50mg</a>
buy sildenafil citrate 100mg
[url=http://lobijus.org/]buy sildenafil citrate[/url]
— Frankvef Aug 16, 09:17 AM #sildenafil 100mg buy online
<a href=” http://lobijus.org “>where can i buy sildenafil citrate over the counter</a>
buy cheap sildenafil citrate 100mg
[url=http://lobijus.org/]buy sildenafil online[/url]
— Franknox Aug 16, 09:18 AM #sildenafil where to buy
<a href=” http://lobijus.org “>buy generic sildenafil online</a>
where can i buy sildenafil
[url=http://galighsa.org/]prednisone buy no prescription[/url]
— CraigVitty Aug 16, 09:26 AM #order prednisone online
<a href=” http://galighsa.org/ “>buy prednisone overnight delivery</a>
buy generic prednisone online
[url=http://galighsa.org/]prednisone for dogs where to buy[/url]
— CraigGom Aug 16, 09:28 AM #buy prednisone dogs
<a href=” http://galighsa.org/ “>prednisone 5mg buy online</a>
where can i buy prednisone for my dog
[url=http://galighsa.org/]buy prednisone 20mg[/url]
— CraigVitty Aug 16, 09:49 AM #order prednisone
<a href=” http://galighsa.org/ “>order prednisone online</a>
where can i buy prednisone for dogs
[url=http://galighsa.org/]where can i buy prednisone[/url]
— CraigGom Aug 16, 09:50 AM #is it safe to buy prednisone online
<a href=” http://galighsa.org/ “>buy prednisone 20mg</a>
buy prednisone online without prescription
[url=http://lobijus.org/]buy sildenafil citrate powder[/url]
— Frankvef Aug 16, 12:59 PM #can you buy sildenafil citrate
<a href=” http://lobijus.org “>buy sildenafil citrate online</a>
buy sildenafil citrate research chemicals
[url=http://galighsa.org/]buy prednisone for dogs[/url]
— CraigVitty Aug 16, 01:00 PM #buy prednisone overnight with no pre
<a href=” http://galighsa.org/ “>can i order prednisone online</a>
buy prednisone online without prescription
[url=http://lobijus.org/]why to buy sildenafil without prescription[/url]
— Franknox Aug 16, 01:00 PM #buy sildenafil citrate 100mg online
<a href=” http://lobijus.org “>sildenafil citrate buy online</a>
buy online sildenafil citrate
[url=http://galighsa.org/]prednisone buy online uk[/url]
— CraigGom Aug 16, 01:02 PM #buy prednisone 20mg
<a href=” http://galighsa.org/ “>prednisone for dogs buy online uk</a>
mail order prednisone
[url=http://lobijus.org/]can you buy sildenafil citrate[/url]
— Frankvef Aug 16, 02:33 PM #can you buy sildenafil citrate
<a href=” http://lobijus.org “>buy sildenafil 50mg</a>
where to buy sildenafil citrate in canada
[url=http://lobijus.org/]buy sildenafil citrate online[/url]
— Frankvef Aug 16, 02:56 PM #buy sildenafil 100mg online
<a href=” http://lobijus.org “>buy sildenafil citrate</a>
where can i buy sildenafil citrate over the counter
[url=http://lobijus.org/]buy sildenafil citrate powder[/url]
— Franknox Aug 16, 02:56 PM #buy sildenafil citrate online
<a href=” http://lobijus.org “>buy sildenafil online</a>
buy generic sildenafil
[url=http://galighsa.org/]buy prednisone for cheap without prescription 100mgs[/url]
— CraigVitty Aug 16, 03:06 PM #buy prednisone 1 mg
<a href=” http://galighsa.org/ “>prednisone buy</a>
prednisone for dogs where to buy
[url=http://galighsa.org/]order prednisone for dogs[/url]
— CraigGom Aug 16, 03:07 PM #buy prednisone online
<a href=” http://galighsa.org/ “>order prednisone from canada</a>
where to buy prednisone
[url=http://galighsa.org/]buy prednisone online cheap[/url]
— CraigVitty Aug 16, 03:29 PM #buy prednisone for dogs online
<a href=” http://galighsa.org/ “>prednisone for dogs where to buy</a>
buy prednisone 20mg
[url=http://galighsa.org/]buy prednisone 5mg[/url]
— CraigGom Aug 16, 03:30 PM #order prednisone online canada
<a href=” http://galighsa.org/ “>buy prednisone overnight delivery</a>
where can i buy prednisone
florida state school of medicine [url=http://ritalin.guildomatic.com]buy ritalin usa[/url] united healthcare provider forms
— JerrySap Aug 18, 01:52 AM #[url=http://betonlinereviewx.org/]betonline poker payout review[/url]
— MatthewSpurn Aug 18, 12:40 PM #betonline review payout
<a href=” http://betonlinereviewx.org/ “>betonline review</a>
betonline review gambler ask
wh0cd490618 [url=http://phenergan.us.org/]read this[/url]
— Alfreddut Aug 19, 09:03 AM #wh0cd653808 [url=http://nexium.us.org/]nexium[/url]
— KennethBiodo Aug 19, 10:29 AM #wh0cd21158 [url=http://buyazithromycin.us.org/]purchase azithromycin online[/url]
— Charlesnef Aug 19, 11:03 AM #wh0cd755896 [url=http://effexorgeneric.us.com/]effexor xr 150 mg[/url] [url=http://metformin500mg.us.com/]Metformin 500 Mg[/url]
— Alfreddut Aug 19, 11:37 AM #wh0cd637571 [url=http://bentyltablets.us.com/]Bentyl Tablets[/url] [url=http://buyabilify.us.org/]abilify[/url]
— Alfreddut Aug 19, 11:55 AM #wh0cd755906 [url=http://triphala.reisen/]triphala parasites[/url] [url=http://tentexroyal.world/]tentex royal[/url] [url=http://plaquenil.world/]plaquenil[/url] [url=http://himplasia.world/]source[/url] [url=http://keppra.world/]keppra[/url]
— Bennyboits Aug 19, 12:24 PM #wh0cd94631 [url=http://cephalexin500.us.com/]cephalexin[/url] [url=http://tretinoin.us.org/]tretinoin cream[/url]
— Charlesnef Aug 19, 12:42 PM #wh0cd829369 [url=http://cipro500mg.us.com/]CIPRO 500 MG[/url]
— Alfreddut Aug 19, 12:58 PM #Всем привет! В этом году училась снимать видео сделала ютуб канал. И вот это случилось, есть канал делаю видео, но его никто не смотрит. Долгое время мучилась, потратила много денег, для раскрутки канала, а толку мало и вот сейчас получилось, нашла хороший способ.У меня классное настроение, хочу показать этот метод вам. Очень хочу, чтобы у вас всё было хорошо.
— MarianaCix Aug 19, 01:21 PM #————————————
Всем пока пока от Марианы
Если найду что-нибудь интересное обязательно скину.
wh0cd711044 [url=http://claritin.us.com/]BUY CLARITIN[/url]
— Alfreddut Aug 19, 01:58 PM #wh0cd168106 [url=http://elimite2.us/]generic elimite[/url] [url=http://doxycycline365.us.com/]doxycycline[/url]
— Charlesnef Aug 19, 02:16 PM #wh0cd800759 [url=http://prozac.us.org/]site[/url] [url=http://nolvadexforsale.us.com/]Nolvadex For Sale[/url]
— KennethBiodo Aug 19, 02:23 PM #wh0cd800761 [url=http://lipitoronline.us.com/]Lipitor Online[/url] [url=http://tetracycline.us.org/]tetracycline 500 mg[/url]
— Charlesnef Aug 19, 04:38 PM #wh0cd857994 [url=http://genericlipitor.us.com/]Cheapest Lipitor[/url]
— Alfreddut Aug 19, 05:48 PM #wh0cd976333 [url=http://azithromycin.us.org/]azithromycin prescriptions[/url]
— Bennyboits Aug 19, 06:14 PM #wh0cd931470 [url=http://prednisolone.us.org/]prednisolone[/url]
— Alfreddut Aug 19, 07:33 PM #wh0cd66009 [url=http://retina.us.org/]retin a[/url]
— Bennyboits Aug 19, 08:01 PM #wh0cd212959 [url=http://bupropionsr150mg.us.com/]Bupropion SR 150 Mg[/url]
— Alfreddut Aug 19, 08:43 PM #wh0cd21158 [url=http://celexageneric.us.com/]Celexa Generic[/url] [url=http://arimidex24.us.org/]order arimidex[/url] [url=http://buyrevia.us.com/]buy revia[/url] [url=http://retinanorx.us.com/]retin-a no rx[/url] [url=http://torsemide.us.com/]torsemide 5 mg[/url]
— Alfreddut Aug 19, 09:30 PM #wh0cd50665 [url=http://buystrattera.us.org/]buy strattera[/url] [url=http://augmentin875mg.us.com/]buy augmentin[/url]
— Tracysporp Aug 19, 11:37 PM #wh0cd184335 [url=http://buyfurosemide.us.org/]furosemide online[/url] [url=http://buyseroquel.us.org/]buy seroquel[/url]
— KennethBiodo Aug 19, 11:45 PM #wh0cd608950 [url=http://buybupropion.us.org/]BUPROPION WITHOUT A PRESCRIPTION[/url]
— Charlesnef Aug 20, 12:50 AM #wh0cd286432 [url=http://amitriptyline.us.org/]Buy Cheap Amitriptyline Online[/url]
— Bennyboits Aug 20, 12:58 AM #wh0cd359905 [url=http://buytenormin.us.org/]tenormin generic[/url]
— Bennyboits Aug 20, 02:13 AM #wh0cd241577 [url=http://amoxicillin500mg.us.org/]amoxicillin 500mg[/url]
— Alfreddut Aug 20, 02:27 AM #wh0cd315050 [url=http://genericlasix.us.com/]Lasix Sale[/url] [url=http://cymbalta30mg.us.com/]here i found it[/url]
— Alfreddut Aug 20, 04:08 AM #wh0cd404754 [url=http://buyphenergan.us.org/]phenergan dm[/url]
— KennethBiodo Aug 20, 05:19 AM #wh0cd388525 [url=http://clomid.live/]clomid[/url] [url=http://gasex.world/]gasex[/url] [url=http://propecia.world/]finasteride prescription[/url] [url=http://lipitor.fail/]lipitor[/url] [url=http://aciphex.world/]generic for aciphex[/url]
— Alfreddut Aug 20, 05:26 AM #wh0cd653799 [url=http://cheapcardura.us.com/]cheap cardura[/url] [url=http://hydrochlorothiazide25mg.us.com/]hydrochlorothiazide 25mg[/url]
— Alfreddut Aug 20, 05:43 AM #wh0cd506853 [url=http://buybentyl.us.org/]Buy Bentyl[/url] [url=http://buydiflucan.us.org/]home[/url]
— Bennyboits Aug 20, 05:45 AM #wh0cd271086 [url=http://buyantabuse.us.org/]Buy Antabuse[/url]
— Tracysporp Aug 20, 07:03 AM #wh0cd580326 [url=http://buyclonidine.us.org/]clonidine erectile dysfunction[/url] [url=http://tretinoincream01.us.com/]Avita Tretinoin[/url]
— Bennyboits Aug 20, 07:05 AM #wh0cd478231 [url=http://nizoral.us.com/]as explained here[/url] [url=http://prednisone247.us.org/]prednisone[/url] [url=http://lexapro2016.us/]how to order lexapro online[/url] [url=http://buymethotrexate.us.com/]Buy Methotrexate[/url] [url=http://tadalafil365.us.com/]tadalafil[/url]
— KennethBiodo Aug 20, 07:14 AM #wh0cd404770 [url=http://genericwellbutrin.us.com/]generic wellbutrin[/url]
— Charlesnef Aug 20, 08:07 AM #wh0cd478245 [url=http://medrol.us.com/]cheap medrol[/url]
— Charlesnef Aug 20, 09:53 AM #wh0cd800745 [url=http://hydrochlorothiazide.us.org/]hydrochlorothiazide triamterene[/url] [url=http://acyclovir.us.org/]acyclovir with no prescription[/url]
— Bennyboits Aug 20, 11:46 AM #wh0cd682421 [url=http://wellbutrin.us.com/]cost of wellbutrin[/url]
— Alfreddut Aug 20, 11:56 AM #wh0cd698650 [url=http://medrolpack.us.com/]medrol online[/url] [url=http://buymedrol.us.org/]medrol without prescription[/url]
— KennethBiodo Aug 20, 12:39 PM #wh0cd66012 [url=http://bentylpills.us.com/]bentyl tabs[/url]
— Charlesnef Aug 20, 01:00 PM #wh0cd418037 [url=http://fluoxetine.shop/]fluoxetine[/url] [url=http://buy-stromectol.reisen/]cheap stromectol[/url] [url=http://buy-provera.work/]provera medication[/url] [url=http://amoxicillinonline.pro/]amoxicillin online[/url] [url=http://abilify.schule/]abilify[/url]
— Tracysporp Aug 20, 01:26 PM #wh0cd698673 [url=http://yasmin.reisen/]yasmin[/url] [url=http://celebrex.systems/]celebrex[/url] [url=http://provera.live/]provera[/url] [url=http://alavert.reisen/]alavert[/url] [url=http://avodart.directory/]avodart[/url]
— Charlesnef Aug 20, 02:12 PM #wh0cd139485 [url=http://buyfluoxetine.us.org/]buy fluoxetine[/url] [url=http://nolvadexonline.us.com/]nolvadex online[/url]
— Charlesnef Aug 20, 02:50 PM #wh0cd772146 [url=http://buyfluoxetine.us.org/]purchase fluoxetine online[/url]
— Charlesnef Aug 20, 03:40 PM #wh0cd845598 [url=http://buyadvair.us.org/]buy advair[/url] [url=http://arimidex.us.org/]Arimidex[/url]
— KennethBiodo Aug 20, 04:23 PM #wh0cd491510 [url=http://hoodia.us.com/]order hoodia[/url] [url=http://amoxil365.us.com/]amoxil[/url]
— Tracysporp Aug 20, 04:50 PM #wh0cd919073 [url=http://genericwellbutrin.us.com/]wellbutrin sr[/url]
— KennethBiodo Aug 20, 06:17 PM #wh0cd257812 [url=http://buspar4you.us.com/]BUSPAR ONLINE[/url] [url=http://nexium2016.us.com/]Nexium[/url]
— Alfreddut Aug 20, 06:40 PM #wh0cd992567 [url=http://buyvaltrex.us.org/]Buy Valtrex[/url] [url=http://triamterene.us.org/]triamterene hctz[/url]
— Charlesnef Aug 20, 08:12 PM #wh0cd8765 [url=http://genericlasix.us.com/]lasix order[/url]
— Charlesnef Aug 20, 08:40 PM #wh0cd359906 [url=http://clonidinehcl.us.com/]Clonidine[/url] [url=http://buyprovera.us.org/]Buy Provera[/url]
— Charlesnef Aug 20, 09:12 PM #wh0cd184335 [url=http://paxil247.us.org/]paxil[/url]
— Bennyboits Aug 20, 09:55 PM #wh0cd82238 [url=http://tetracycline.us.org/]tetracycline[/url] [url=http://acyclovir.us.org/]Price Of Zovirax[/url]
— Charlesnef Aug 20, 10:12 PM #wh0cd82238 [url=http://cephalexin500.us.com/]Cephalexin Prices[/url] [url=http://buyclonidine.us.org/]order clonidine online[/url]
— KennethBiodo Aug 20, 10:44 PM #wh0cd433379 [url=http://moduretic.us.com/]moduretic[/url] [url=http://celebrex2016.us/]Celebrex[/url]
— Charlesnef Aug 20, 11:15 PM #wh0cd155711 [url=http://mometasone.us.com/]mometasone[/url]
— KennethBiodo Aug 21, 12:08 AM #wh0cd212960 [url=http://metformin500mgtablets.us.com/]Metformin Prescriptions[/url] [url=http://buyavana.us.org/]super avana[/url]
— Alfreddut Aug 21, 01:44 AM #wh0cd302659 [url=http://diclofenacgel.us.com/]diclofenac gel[/url]
— KennethBiodo Aug 21, 02:43 AM #wh0cd580325 [url=http://triamterene.us.org/]Triamterene Prices[/url]
— Charlesnef Aug 21, 03:23 AM #wh0cd698654 [url=http://genericbentyl.us.com/]generic bentyl[/url] [url=http://erythromycin.us.org/]learn more[/url]
— Alfreddut Aug 21, 04:31 AM #wh0cd376141 [url=http://buspar.us.org/]buspar[/url] [url=http://buyfurosemide.us.org/]buy furosemide[/url]
— Charlesnef Aug 21, 05:06 AM #wh0cd478230 [url=http://metformin500mgtablets.us.com/]Metformin 500 Mg Tablets[/url]
— Bennyboits Aug 21, 05:50 AM #wh0cd772127 [url=http://bupropionsr150mg.us.com/]Bupropion[/url] [url=http://flagyl.us.org/]FLAGYL[/url]
— Alfreddut Aug 21, 06:20 AM #wh0cd449605 [url=http://allopurinol24.us.org/]allopurinol 300[/url] [url=http://zofran.us.com/]Zofran[/url]
— KennethBiodo Aug 21, 06:22 AM #wh0cd785406 [url=http://acyclovir.store/]resources[/url] [url=http://celebrex.reisen/]celebrex[/url] [url=http://nimotop.world/]nimotop[/url] [url=http://himcolin.reisen/]himcolin[/url] [url=http://periactin.reisen/]periactin 4mg tablets[/url]
— Tracysporp Aug 21, 07:39 AM #wh0cd625180 [url=http://citalopramhbr20mg.us.org/]citalopram hbr 20 mg[/url]
— Bennyboits Aug 21, 09:05 AM #wh0cd858881 [url=http://buyimodium.world/]where to buy imodium ad[/url] [url=http://buypepcid.world/]pepcid prescription[/url] [url=http://confido.world/]confido without prescription[/url] [url=http://diabecon.world/]diabecon[/url] [url=http://aleve.world/]aleve[/url]
— Tracysporp Aug 21, 11:40 AM #wh0cd653811 [url=http://amitriptyline.world/]elavil[/url] [url=http://motilium.shop/]buy motilium[/url] [url=http://retina.schule/]retin-a[/url] [url=http://cipro.store/]cipro[/url] [url=http://synthroid.schule/]synthroid 150 mcg[/url]
— Alfreddut Aug 21, 11:59 AM #wh0cd82238 [url=http://medrolpak.us.com/]medrol pills[/url] [url=http://amitriptyline.us.org/]amitriptyline[/url]
— Alfreddut Aug 21, 01:27 PM #wh0cd743511 [url=http://lipitor.fail/]lipitor online[/url] [url=http://celebrex.mba/]celebrex generic[/url] [url=http://ventolin.store/]ventolin[/url] [url=http://triamterene.work/]triamterene 37.5mg hctz 25mg[/url] [url=http://prednisolone.world/]prednisolone cost[/url]
— Charlesnef Aug 21, 02:26 PM #wh0cd932356 [url=http://buymethotrexate.us.com/]Buy Methotrexate[/url] [url=http://provera24h.us.org/]provera pills[/url]
— Tracysporp Aug 21, 03:16 PM #wh0cd919074 [url=http://hydrochlorothiazide.work/]hydrochlorothiazide[/url] [url=http://danazol.world/]danazol for endometriosis[/url] [url=http://cymbalta.directory/]cymbalta[/url] [url=http://azithromycin.mba/]azithromycin[/url] [url=http://buspar.reisen/]buspar[/url]
— Bennyboits Aug 21, 03:57 PM #wh0cd816984 [url=http://ventolinhfa.us.com/]ventolin hfa[/url] [url=http://buyampicillin.us.com/]Buy Ampicillin[/url]
— Charlesnef Aug 21, 04:04 PM #wh0cd890453 [url=http://trazodonehcl.us.com/]cheap trazodone[/url] [url=http://buyvaltrex.us.org/]valtrex online[/url]
— KennethBiodo Aug 21, 04:29 PM #wh0cd992547 [url=http://sildenafil100mg.us.com/]where to buy sildenafil citrate[/url]
— Bennyboits Aug 21, 05:21 PM #wh0cd184337 [url=http://clomid247.us.org/]here[/url] [url=http://prozac2016.us.com/]buy prozac[/url]
— Charlesnef Aug 21, 07:42 PM #wh0cd155713 [url=http://buy-celebrex.shop/]buy celebrex[/url] [url=http://buy-neurontin.store/]neurontin[/url] [url=http://generictoradol.pro/]generic toradol[/url] [url=http://eloconointmentforsale.pro/]elocon[/url] [url=http://allopurinol.fund/]allopurinol[/url]
— Bennyboits Aug 21, 08:45 PM #wh0cd53616 [url=http://buyavana.us.org/]Buy Avana[/url] [url=http://buyrimonabant.us.org/]buy rimonabant[/url]
— KennethBiodo Aug 21, 08:55 PM #wh0cd229195 [url=http://buyclonidine.us.org/]Buy Clonidine[/url]
— Bennyboits Aug 21, 10:36 PM #wh0cd127096 [url=http://buyneurontin.store/]neurontin[/url] [url=http://methylprednisolone.pro/]methylprednisolone[/url] [url=http://amitriptylineonline.pro/]elavil medication[/url] [url=http://prednisone.news/]prednisone[/url] [url=http://crestor.news/]generic crestor[/url]
— KennethBiodo Aug 21, 10:45 PM #wh0cd523085 [url=http://hyzaar.us.com/]how to buy hyzaar online[/url] [url=http://citalopram2017.us.com/]Generic Citalopram[/url]
— Alfreddut Aug 21, 10:47 PM #wh0cd110860 [url=http://genericcelexa.us.com/]celexa over the counter[/url]
— Alfreddut Aug 21, 11:46 PM #wh0cd302668 [url=http://buyallopurinol.us.org/]buy allopurinol online[/url] [url=http://ciprofloxacin500mg.us.org/]ciprofloxacin cheap[/url]
— Bennyboits Aug 21, 11:58 PM #wh0cd200569 [url=http://buyvaltrex.us.org/]buy valtrex[/url]
— KennethBiodo Aug 22, 12:27 AM #wh0cd200565 [url=http://buyelocon.us.org/]website[/url]
— Charlesnef Aug 22, 12:29 AM #wh0cd184333 [url=http://cipro500mg.us.com/]cipro cheap[/url]
— Alfreddut Aug 22, 01:21 AM #wh0cd404766 [url=http://hydrochlorothiazide25mg.us.com/]Hydrochlorothiazide 25mg[/url] [url=http://toradolonline.us.com/]toradol online[/url]
— Charlesnef Aug 22, 01:49 AM #wh0cd274042 [url=http://toradolonline.us.com/]toradol nasal spray[/url]
— KennethBiodo Aug 22, 02:03 AM #wh0cd420990 [url=http://motrin800.us.com/]generic motrin[/url]
— KennethBiodo Aug 22, 04:36 AM #wh0cd551712 [url=http://buyallopurinol.us.com/]buy allopurinol[/url] [url=http://drugtoradol.us.com/]Toradol Tabs[/url] [url=http://acyclovir247.us.org/]acyclovir 800 mg[/url] [url=http://avanaonline.us.com/]Avana Tablets[/url] [url=http://triamterene.us.com/]Buy Triamterene[/url]
— Charlesnef Aug 22, 05:44 AM #wh0cd596567 [url=http://prozac.us.org/]Buy Prozac[/url]
— Bennyboits Aug 22, 07:27 AM #wh0cd315935 [url=http://effexorgeneric.us.com/]effexor[/url]
— Tracysporp Aug 22, 08:17 AM #wh0cd641413 [url=http://diclofenac75mg.us.com/]diclofenac[/url] [url=http://buyprovera.us.org/]Provera[/url]
— KennethBiodo Aug 22, 09:18 AM #wh0cd698660 [url=http://sildenafilcitrate.us.org/]Buy Sildenafil[/url] [url=http://furosemide40mg.us.com/]furosemide 40mg[/url]
— Charlesnef Aug 22, 09:23 AM #wh0cd625175 [url=http://celebrex200mg.us.com/]more hints[/url]
— Alfreddut Aug 22, 10:32 AM #wh0cd963925 [url=http://toradol.live/]toradol[/url] [url=http://starlix.world/]view website[/url] [url=http://elimite.tools/]elimite[/url] [url=http://avodart.directory/]avodart[/url] [url=http://gasex.world/]gasex[/url]
— Alfreddut Aug 22, 10:33 AM #wh0cd389408 [url=http://buyhydrochlorothiazide.us.org/]hydrochlorothiazide 12.5 mg[/url]
— Tracysporp Aug 22, 11:12 AM #wh0cd816994 [url=http://celexaonline.us.com/]celexa online[/url]
— Bennyboits Aug 22, 12:02 PM #wh0cd714878 [url=http://buytadacip.us.com/]tadacip best price[/url]
— Charlesnef Aug 22, 12:18 PM #wh0cd53618 [url=http://elocon.live/]elocon 0.1 cream[/url] [url=http://phenergan.store/]phenergan[/url] [url=http://ditropan.world/]ditropan[/url] [url=http://asacol.world/]asacol 800 mg[/url] [url=http://atenolol.live/]atenolol[/url]
— Alfreddut Aug 22, 12:22 PM #wh0cd788351 [url=http://genericretina.us.com/]Generic Retin A[/url] [url=http://advair.us.org/]order advair online[/url]
— Charlesnef Aug 22, 01:47 PM #wh0cd861824 [url=http://genericlipitor.us.com/]lipitor price[/url] [url=http://cymbalta30mg.us.com/]buy cymbalta[/url]
— Charlesnef Aug 22, 03:12 PM #wh0cd274039 [url=http://cheapdapoxetine.us.com/]CHEAP DAPOXETINE[/url] [url=http://lipitoronline.us.com/]Order Lipitor Online[/url]
— Alfreddut Aug 22, 04:43 PM #wh0cd919069 [url=http://buydiflucan.reisen/]diflucan fluconazole[/url] [url=http://amoxil.store/]amoxil[/url] [url=http://buy-synthroid.work/]synthroid[/url] [url=http://buyyasmin.reisen/]buy yasmin[/url] [url=http://arimidexformen.pro/]arimidex for men[/url]
— Alfreddut Aug 22, 05:00 PM #wh0cd347516 [url=http://inderal.us.org/]Inderal Pills[/url]
— Alfreddut Aug 22, 06:14 PM #wh0cd992544 [url=http://buyatarax.us.org/]Atarax Tablets[/url]
— Alfreddut Aug 22, 06:56 PM #wh0cd420989 [url=http://ipratropiumalbuterol.us.com/]Generics Albuterol[/url]
— Alfreddut Aug 22, 07:41 PM #wh0cd127089 [url=http://genericforlipitor.us.com/]Generic For Lipitor[/url] [url=http://buycelexa.us.org/]Buy Celexa[/url]
— Bennyboits Aug 22, 08:22 PM #wh0cd229184 [url=http://toradolprice.us.com/]toradol[/url]
— Charlesnef Aug 22, 10:37 PM #wh0cd567937 [url=http://allopurinol100mg.us.com/]ALLOPURINOL 100 MG[/url]
— Alfreddut Aug 22, 11:25 PM #wh0cd347510 [url=http://amoxicillin247.us.org/]amoxicillin where to buy[/url] [url=http://tamoxifen.us.com/]Buy Tamoxifen[/url] [url=http://baclofen2017.us.com/]baclofen[/url] [url=http://ventolin.us.org/]ventolin evohaler[/url] [url=http://avanaonline.us.com/]avana tablets[/url]
— Bennyboits Aug 23, 01:18 AM #wh0cd714886 [url=http://bentyloverthecounter.us.com/]bentyl over the counter[/url]
— Alfreddut Aug 23, 02:26 AM #wh0cd302663 [url=http://furosemide40mg.us.com/]Generic Furosemide[/url]
— Alfreddut Aug 23, 02:57 AM #wh0cd392367 [url=http://genericprozac.us.com/]buy prozac[/url] [url=http://buyindocin.us.org/]buy indocin[/url]
— KennethBiodo Aug 23, 03:14 AM #wh0cd420985 [url=http://buyindocin.us.org/]Indocin Discounted[/url] [url=http://actos.us.com/]actos[/url]
— Bennyboits Aug 23, 03:18 AM #wh0cd788359 [url=http://cheapcardura.us.com/]cheap cardura[/url]
— Alfreddut Aug 23, 04:28 AM #wh0cd494458 [url=http://propecianorx.us.com/]cheapest propecia[/url]
— Bennyboits Aug 23, 05:21 AM #wh0cd539315 [url=http://buyseroquel.us.org/]get more information[/url]
— KennethBiodo Aug 23, 05:36 AM #wh0cd392366 [url=http://hydrochlorothiazide25mg.us.com/]hydrochlorothiazide 25mg[/url] [url=http://trazodonehcl.us.com/]trazodone hcl[/url]
— Charlesnef Aug 23, 06:10 AM #wh0cd861832 [url=http://buyprovera.us.org/]Provera Pills[/url]
— Alfreddut Aug 23, 06:31 AM #wh0cd756778 [url=http://inderal247.us.com/]Buy Inderal[/url] [url=http://celebrex200mg.us.org/]celebrex 200 mg[/url]
— Tracysporp Aug 23, 08:35 AM #wh0cd612788 [url=http://levaquin500mg.us.org/]LEVAQUIN 500 MG[/url]
— KennethBiodo Aug 23, 08:55 AM #wh0cd449613 [url=http://clomid50mg.us.org/]Clomid 50 Mg[/url]
— Alfreddut Aug 23, 09:15 AM #wh0cd465841 [url=http://celebrex200mg.us.org/]view website[/url] [url=http://celexageneric.us.org/]celexa prices comparison[/url]
— Charlesnef Aug 23, 09:49 AM #wh0cd641410 [url=http://clomid50mg.us.org/]clomid generic[/url]
— Bennyboits Aug 23, 10:45 AM #wh0cd686261 [url=http://diclofenac50mg.us.org/]Diclofenac Medicine[/url]
— KennethBiodo Aug 23, 11:01 AM #wh0cd523090 [url=http://celebrex200mg.us.org/]generic for celebrex[/url] [url=http://inderal247.us.com/]inderal la 60mg[/url]
— Alfreddut Aug 23, 11:19 AM #wh0cd539314 [url=http://torsemide247.us.com/]Torsemide Online[/url] [url=http://levaquin500mg.us.org/]order levaquin online[/url]
— Charlesnef Aug 23, 11:34 AM #wh0cd830257 [url=http://inderal247.us.com/]buy inderal[/url]
— Tracysporp Aug 23, 11:46 AM #wh0cd714885 [url=http://celebrex200mg.us.org/]buy celebrex[/url] [url=http://tamoxifen247.us.com/]buy nolvadex[/url]
— Bennyboits Aug 23, 12:14 PM #wh0cd759737 [url=http://augmentin875mg.us.org/]purchase augmentin online[/url]
— KennethBiodo Aug 23, 01:07 PM #wh0cd612789 [url=http://motrin800.us.org/]motrin 800[/url]
— Charlesnef Aug 23, 01:17 PM #wh0cd743500 [url=http://tamoxifen247.us.com/]tamoxifen medication[/url]
— Charlesnef Aug 23, 01:18 PM #wh0cd596568 [url=http://diclofenac50mg.us.org/]bonuses[/url]
— Alfreddut Aug 23, 01:33 PM #wh0cd903736 [url=http://augmentin875mg.us.org/]augmentin no prescription[/url]
— Tracysporp Aug 23, 01:46 PM #wh0cd98469 [url=http://celebrex200mg.us.org/]celebrex 200 mg[/url]
— Alfreddut Aug 23, 02:14 PM #wh0cd977215 [url=http://augmentin875mg.us.org/]Augmentin Tablet[/url]
— Tracysporp Aug 23, 03:10 PM #wh0cd861836 [url=http://celebrex200mg.us.org/]visit this link[/url]
— Bennyboits Aug 23, 03:24 PM #wh0cd670043 [url=http://motrin800.us.org/]motrin 800[/url] [url=http://celexageneric.us.org/]celexa generic[/url]
— Alfreddut Aug 23, 03:28 PM #wh0cd816973 [url=http://diclofenac50mg.us.org/]Diclofenac 50 Mg[/url]
— Charlesnef Aug 23, 03:31 PM #wh0cd171942 [url=http://levaquin500mg.us.org/]levaquin 500 mg[/url]
— Alfreddut Aug 23, 04:01 PM #wh0cd906683 [url=http://augmentin875mg.us.org/]augmentin[/url] [url=http://celexageneric.us.org/]Celexa Generic[/url]
— KennethBiodo Aug 23, 04:23 PM #wh0cd890446 [url=http://inderal247.us.com/]buy inderal online[/url] [url=http://torsemide247.us.com/]buy torsemide online[/url]
— Charlesnef Aug 23, 04:49 PM #wh0cd66896 [url=http://celexageneric.us.org/]celexa prices comparison[/url] [url=http://torsemide247.us.com/]torsemide 20 mg[/url]
— Tracysporp Aug 23, 05:04 PM #wh0cd743516 [url=http://inderal247.us.com/]buy inderal[/url] [url=http://augmentin875mg.us.org/]found it[/url]
— Alfreddut Aug 23, 05:17 PM #wh0cd980156 [url=http://augmentin875mg.us.org/]Augmentin 875 Mg[/url] [url=http://inderal247.us.com/]article source[/url]
— KennethBiodo Aug 23, 05:52 PM #wh0cd245417 [url=http://diclofenac50mg.us.org/]diclofenac 50 mg[/url] [url=http://celebrex200mg.us.org/]celebrex by mail[/url]
— Alfreddut Aug 23, 05:57 PM #wh0cd833210 [url=http://celebrex200mg.us.org/]celebrex[/url] [url=http://inderal247.us.com/]buy inderal[/url]
— Charlesnef Aug 23, 06:27 PM #wh0cd318890 [url=http://celexageneric.us.org/]celexa generic[/url]
— Alfreddut Aug 23, 07:34 PM #wh0cd69845 [url=http://celebrex200mg.us.org/]Generic For Celebrex[/url] [url=http://motrin800.us.org/]GENERIC MOTRIN[/url]
— KennethBiodo Aug 23, 08:08 PM #wh0cd890473 [url=http://levaquin500mg.us.org/]order levaquin[/url]
— Alfreddut Aug 23, 08:12 PM #wh0cd213847 [url=http://augmentin875mg.us.org/]augmentin tablets[/url] [url=http://celebrex200mg.us.org/]CELEBREX 200 MG[/url]
— Tracysporp Aug 23, 08:41 PM #wh0cd906683 [url=http://inderal247.us.com/]buy inderal[/url]
— Charlesnef Aug 23, 08:45 PM #wh0cd53620 [url=http://motrin800.us.org/]purchase motrin online[/url]
— Charlesnef Aug 23, 09:13 PM #wh0cd98467 [url=http://tamoxifen247.us.com/]buy tamoxifen[/url] [url=http://clomid50mg.us.org/]clomid[/url]
— Bennyboits Aug 23, 09:25 PM #wh0cd143318 [url=http://celebrex200mg.us.org/]celebrex pill[/url] [url=http://diclofenac50mg.us.org/]diclofenac sodium 75[/url]
— KennethBiodo Aug 23, 09:47 PM #wh0cd980156 [url=http://clomid50mg.us.org/]buy clomid for men[/url] [url=http://motrin800.us.org/]motrin 800 mg[/url]
— Charlesnef Aug 23, 10:24 PM #Наш сервис предоставляет настоящие лайки на фото заказчиков, которые готовы платить за качество.
Именно для этого мы и набираем удалённых сотрудников, которые будут выполнять работу, то есть ставить лайки и зарабатывать за это деньги.
Чтобы стать нашим удалённым сотрудником и начать ставить лайки, зарабатывая при этом 45 рублей за 1 поставленный лайк,
Вам достаточно просто зарегистрироваться на нашем сервисе. > oplata-vklike.tk <
Вывод заработанных средств ежедневно в течении нескольких минут.
— tElenaneef Aug 24, 01:15 AM #wh0cd127093 [url=http://tamoxifen247.us.com/]TAMOXIFEN TABLETS[/url]
— Charlesnef Aug 24, 01:41 AM #wh0cd171940 [url=http://inderal247.us.com/]buy inderal[/url]
— Bennyboits Aug 24, 01:50 AM #wh0cd53618 [url=http://clomid50mg.us.org/]read full report[/url]
— Alfreddut Aug 24, 02:52 AM #wh0cd290266 [url=http://motrin800.us.org/]motrin 800[/url] [url=http://celexageneric.us.org/]Buy Celexa[/url]
— KennethBiodo Aug 24, 03:47 AM #wh0cd245413 [url=http://augmentin875mg.us.org/]augmentin pill[/url]
— Bennyboits Aug 24, 03:47 AM #Здравствуйте модераторы и форумчане! Давно мечтала научиться делать видео и иметь свой канал ютубе. Мечта сбылась, делаю видео, создала канад ютубе, а просмотров нет. Долгое время мучилась, потратила много денег, для раскрутки канала, а толку мало и вот сейчас получилось, нашла хороший способ.У меня классное настроение, хочу показать этот метод вам. Хочу просто, чтобы вам, кто делает видео было легче.
— KarinaCix Aug 24, 03:56 AM #————————————
Чмоки, чмоки от Карины
Будет что-то стоящее поделюсь.
wh0cd143318 [url=http://motrin800.us.org/]Purchase Motrin[/url] [url=http://inderal247.us.com/]BUY INDERAL[/url]
— Charlesnef Aug 24, 04:38 AM #wh0cd9650 [url=http://inderal247.us.com/]buy inderal online[/url] [url=http://levaquin500mg.us.org/]levaquin 500 mg[/url]
— AaronUttet Aug 24, 04:41 AM #wh0cd612794 [url=http://motrin800.us.org/]motrin 800[/url]
— Alfreddut Aug 24, 04:55 AM #wh0cd318888 [url=http://augmentin875mg.us.org/]augmentin tablets[/url] [url=http://clomid50mg.us.org/]clomid at lowest cost[/url]
— Bennyboits Aug 24, 06:12 AM #wh0cd686267 [url=http://levaquin500mg.us.org/]Levaquin[/url] [url=http://clomid50mg.us.org/]clomid 50 mg[/url]
— Alfreddut Aug 24, 06:51 AM #wh0cd216791 [url=http://levaquin500mg.us.org/]Levaquin 500 Mg[/url] [url=http://torsemide247.us.com/]torsemide online[/url]
— Charlesnef Aug 24, 06:59 AM #wh0cd437216 [url=http://celexageneric.us.org/]Celexa Generic[/url] [url=http://augmentin875mg.us.org/]augmentin 875 mg[/url]
— KennethBiodo Aug 24, 08:12 AM #wh0cd392361 [url=http://torsemide247.us.com/]torsemide online[/url]
— Bennyboits Aug 24, 08:34 AM #wh0cd759742 [url=http://celexageneric.us.org/]celexa generic[/url] [url=http://inderal247.us.com/]Inderal Online[/url]
— Alfreddut Aug 24, 08:41 AM #wh0cd83125 [url=http://inderal247.us.com/]buy inderal[/url]
— AaronUttet Aug 24, 08:49 AM #wh0cd290264 [url=http://tamoxifen247.us.com/]tamoxifen online[/url] [url=http://motrin800.us.org/]motrin[/url]
— Charlesnef Aug 24, 09:13 AM #wh0cd833215 [url=http://levaquin500mg.us.org/]levaquin 500 mg[/url] [url=http://celexageneric.us.org/]Celexa Generic[/url]
— Alfreddut Aug 24, 10:40 AM #wh0cd465834 [url=http://motrin800.us.org/]motrin 800[/url]
— Bennyboits Aug 24, 10:59 AM #wh0cd274041 [url=http://torsemide247.us.com/]torsemide 20 mg[/url]
— Alfreddut Aug 24, 12:50 PM #wh0cd437212 [url=http://buyfluoxetine.reisen/]fluoxetine generic[/url]
— Charlesnef Aug 24, 01:01 PM #wh0cd156600 [url=http://citalopram.brussels/]buy citalopram 20 mg[/url] [url=http://voltaren.world/]generic diclofenac[/url]
— AaronUttet Aug 24, 01:02 PM #wh0cd584164 [url=http://genericcymbalta.us.org/]Cymbalta Pills[/url] [url=http://costofcymbalta.us.org/]cost of cymbalta[/url]
— KennethBiodo Aug 24, 01:08 PM #wh0cd347514 [url=http://neurontin.store/]neurontin[/url] [url=http://buyamoxil.store/]amoxil buy[/url]
— Charlesnef Aug 24, 01:23 PM #wh0cd230075 [url=http://genericpropecia365.us.com/]generic propecia[/url]
— AaronUttet Aug 24, 03:20 PM #wh0cd980165 [url=http://nexium40mg.us.org/]purchase nexium online[/url] [url=http://clomidonline.us.org/]clomiphene citrate clomid[/url]
— Alfreddut Aug 24, 03:21 PM #wh0cd657637 [url=http://lexapro247.us.com/]cipralex generic best price[/url] [url=http://costofcymbalta.us.org/]cost of cymbalta[/url]
— KennethBiodo Aug 24, 03:21 PM #wh0cd347516 [url=http://metforminer.us.org/]metformin er[/url] [url=http://genericcymbalta.us.org/]purchase cymbalta[/url]
— Alfreddut Aug 24, 03:22 PM #wh0cd420987 [url=http://propecia247.us.com/]Buy Generic Propecia[/url]
— Charlesnef Aug 24, 04:41 PM #wh0cd584158 [url=http://buy-tadalafil.store/]tadalafil[/url]
— Charlesnef Aug 24, 04:45 PM #wh0cd69845 [url=http://metformin500mgtablets.us.org/]metformin 500mg tablets[/url]
— Alfreddut Aug 24, 05:47 PM #wh0cd420991 [url=http://strattera247.us.com/]strattera mastercard[/url]
— Alfreddut Aug 24, 05:49 PM #wh0cd686257 [url=http://buy-sildenafil.work/]sildenafil citrate canada[/url]
— Bennyboits Aug 24, 05:51 PM #wh0cd143318 [url=http://sildenafil247.us.com/]buy sildenafil online[/url]
— Alfreddut Aug 24, 07:36 PM #wh0cd804587 [url=http://metformin500mgtablets.us.org/]metformin 500mg tablets[/url]
— KennethBiodo Aug 24, 07:55 PM #wh0cd759732 [url=http://effexorgeneric.us.org/]effexor generic[/url] [url=http://alli247.us.com/]order alli online[/url]
— Bennyboits Aug 24, 08:06 PM #wh0cd494466 [url=http://strattera247.us.com/]straterra order[/url]
— Alfreddut Aug 24, 08:47 PM #wh0cd216791 [url=http://buyflagyl.work/]buy flagyl[/url]
— Alfreddut Aug 24, 09:27 PM #wh0cd450499 [url=http://prednisone10mg.pro/]prednisone medication[/url] [url=http://celexa.fund/]celexa[/url]
— AaronUttet Aug 24, 09:57 PM #wh0cd878060 [url=http://crestorgeneric.reisen/]crestor generic[/url]
— KennethBiodo Aug 24, 10:12 PM #wh0cd833207 [url=http://genericnexium.us.org/]GENERIC NEXIUM[/url] [url=http://celebrexgeneric.us.org/]CELEBREX[/url]
— Bennyboits Aug 24, 10:16 PM #wh0cd804583 [url=http://vermox.tools/]vermox[/url]
— Charlesnef Aug 24, 11:30 PM #wh0cd523974 [url=http://sildenafil247.us.com/]sildenafil citrate tablet[/url]
— AaronUttet Aug 24, 11:51 PM #wh0cd567941 [url=http://lisinoprilgeneric.us.org/]Lisinopril At Lowest Cost[/url] [url=http://cheapkamagra365.us.com/]Cheap Kamagra[/url]
— Alfreddut Aug 25, 12:11 AM #wh0cd951535 [url=http://cheaptadalafil365.us.com/]cheapest tadalafil[/url]
— KennethBiodo Aug 25, 12:25 AM #wh0cd641414 [url=http://furosemide40mg.us.org/]furosemide without prescription[/url]
— Charlesnef Aug 25, 01:42 AM #wh0cd363739 [url=http://furosemide40mg.store/]furosemide 40mg tab[/url]
— Alfreddut Aug 25, 01:46 AM #wh0cd597453 [url=http://tretinoin.shop/]tretinoin cream coupon[/url]
— AaronUttet Aug 25, 02:04 AM #wh0cd41223 [url=http://buy-antabuse.store/]antabuse[/url]
— KennethBiodo Aug 25, 03:11 AM #wh0cd641414 [url=http://buy-nexium.reisen/]buy nexium[/url] [url=http://buytoradol.work/]buy toradol[/url]
— Alfreddut Aug 25, 03:23 AM #wh0cd437217 [url=http://buymethotrexate.store/]methotrexate without a prescription[/url] [url=http://zetia.store/]is there a generic drug for zetia[/url]
— Alfreddut Aug 25, 03:38 AM #wh0cd951533 [url=http://lisinoprilgeneric.us.org/]LISINOPRIL GENERIC[/url]
— Charlesnef Aug 25, 03:41 AM #wh0cd69845 [url=http://genericseroquel.us.org/]seroquel[/url] [url=http://propranolol247.us.com/]propranolol er 60mg[/url]
— Bennyboits Aug 25, 05:09 AM #wh0cd510690 [url=http://metforminer.us.org/]metformin er[/url]
— Alfreddut Aug 25, 05:44 AM #wh0cd41225 [url=http://celebrexgeneric.us.org/]celebrex generic[/url]
— Charlesnef Aug 25, 06:08 AM #wh0cd714889 [url=http://tadalafil247.us.com/]tadalafil 40 mg[/url]
— Alfreddut Aug 25, 06:33 AM #wh0cd143318 [url=http://buy-antabuse.store/]antabuse[/url] [url=http://crestoronline.pro/]crestor[/url]
— Bennyboits Aug 25, 07:10 AM #wh0cd188169 [url=http://proscar.systems/]proscar buy[/url]
— KennethBiodo Aug 25, 07:34 AM #wh0cd584165 [url=http://celebrexgeneric.us.org/]celebrex generic[/url]
— Alfreddut Aug 25, 07:54 AM #wh0cd788360 [url=http://genericwellbutrin.us.org/]generic wellbutrin[/url] [url=http://amoxicillin875mg.us.org/]amoxicillin no prescipion[/url]
— Charlesnef Aug 25, 08:06 AM #wh0cd114703 [url=http://advair.shop/]advair[/url] [url=http://tretinoin.shop/]tretinoin cream[/url]
— Charlesnef Aug 25, 08:12 AM #wh0cd216791 [url=http://benicar.mba/]benicar hct[/url] [url=http://prednisone10mg.pro/]where to buy prednisone online without a script[/url]
— Bennyboits Aug 25, 09:12 AM #wh0cd261642 [url=http://zetia247.us.com/]Zetia Pills[/url]
— KennethBiodo Aug 25, 09:41 AM #wh0cd891349 [url=http://lexapro247.us.com/]cipralex[/url]
— AaronUttet Aug 25, 10:54 AM #wh0cd290264 [url=http://buy-albendazole.shop/]buy albendazole online[/url] [url=http://buy-albuterol.store/]albuterol[/url]
— Bennyboits Aug 25, 11:18 AM #wh0cd261651 [url=http://genericlexapro.us.org/]generic lexapro[/url]
— Charlesnef Aug 25, 12:13 PM #wh0cd363737 [url=http://motilium247.us.com/]buy motilium online[/url]
— Bennyboits Aug 25, 01:24 PM #wh0cd861835 [url=http://buymethotrexate.store/]methotrexate[/url]
— Alfreddut Aug 25, 01:35 PM #wh0cd804587 [url=http://buyclomid.store/]buy clomid[/url] [url=http://cytotec.tools/]buy cytotec online usa[/url]
— Alfreddut Aug 25, 02:00 PM #wh0cd335124 [url=http://amitriptyline.zone/]elavil medicine[/url]
— Charlesnef Aug 25, 02:23 PM #wh0cd437221 [url=http://augmentingeneric.us.org/]AugmentinOver The Counter[/url]
— Bennyboits Aug 25, 03:41 PM #wh0cd482066 [url=http://cymbaltacost.us.org/]Cymbalta[/url]
— KennethBiodo Aug 25, 03:44 PM #wh0cd878060 [url=http://genericcrestor.us.org/]Generic Crestor[/url] [url=http://motilium247.us.com/]motilium w/o prescription[/url]
— Alfreddut Aug 25, 03:57 PM #wh0cd555541 [url=http://reviacost.pro/]buy revia[/url]
— KennethBiodo Aug 25, 05:37 PM #wh0cd510694 [url=http://citalopram20mg.us.org/]citalopram generic[/url] [url=http://amoxicillin875mg.us.org/]Buy Amoxicillin[/url]
— Bennyboits Aug 25, 05:59 PM #wh0cd24996 [url=http://buytoradol.work/]buy toradol online[/url] [url=http://buytadalafil.reisen/]more information[/url]
— Charlesnef Aug 25, 06:22 PM #wh0cd584167 [url=http://buyamitriptyline.shop/]check out your url[/url]
— Bennyboits Aug 25, 08:13 PM #wh0cd24994 [url=http://motilium247.us.com/]buy motilium[/url] [url=http://genericlasix.us.org/]purchase lasix[/url]
— Alfreddut Aug 25, 08:36 PM #wh0cd657640 [url=http://buy-vardenafil.store/]vardenafil[/url]
— Bennyboits Aug 25, 10:28 PM #wh0cd114696 [url=http://genericwellbutrin.us.org/]wellbutrin 150 mg[/url] [url=http://genericcymbalta.us.org/]generic cymbalta[/url]
— Alfreddut Aug 25, 10:53 PM #wh0cd629018 [url=http://motilium247.us.com/]buy motilium online[/url] [url=http://genericcelebrex.us.org/]celebrex online[/url]
— Charlesnef Aug 25, 11:18 PM #wh0cd98467 [url=http://triamterene.zone/]triamterene[/url]
— Alfreddut Aug 25, 11:38 PM #wh0cd171942 [url=http://synthroid247.us.com/]Levothyroxine Online[/url] [url=http://motilium247.us.com/]buy motilium online[/url]
— Charlesnef Aug 26, 12:12 AM #wh0cd702491 [url=http://synthroid247.us.com/]synthroid 88 mcg[/url] [url=http://lexapro247.us.com/]buy lexapro online[/url]
— Charlesnef Aug 26, 01:32 AM #wh0cd495348 [url=http://strattera247.us.com/]generic strattera[/url] [url=http://genericcymbalta.us.org/]generic cymbalta[/url]
— AaronUttet Aug 26, 02:37 AM #wh0cd261645 [url=http://proscar.systems/]proscar[/url]
— Alfreddut Aug 26, 02:42 AM #wh0cd804590 [url=http://genericprozac.us.org/]prozac forsale[/url] [url=http://bupropionsr.us.org/]cheap bupropion[/url]
— Bennyboits Aug 26, 02:56 AM #wh0cd245415 [url=http://genericcymbalta.us.org/]discount cymbalta[/url]
— Charlesnef Aug 26, 03:26 AM #wh0cd775964 [url=http://cipro.brussels/]buy ciprofloxacin online cheap without a prescription[/url] [url=http://zetia.directory/]zetia[/url]
— Charlesnef Aug 26, 03:46 AM #wh0cd922909 [url=http://crestorgeneric.reisen/]crestor[/url] [url=http://buy-abilify.shop/]abilify[/url]
— KennethBiodo Aug 26, 04:22 AM #wh0cd568821 [url=http://cymbalta30mg.us.org/]cymbalta pills[/url] [url=http://costofcymbalta.us.org/]cymbalta 60 mg capsule[/url]
— AaronUttet Aug 26, 04:38 AM #wh0cd878065 [url=http://genericlexapro.us.org/]Lexapro Escitalopram[/url] [url=http://acomplia247.us.com/]Acomplia[/url]
— Bennyboits Aug 26, 05:00 AM #wh0cd245413 [url=http://anafranil.store/]anafranil[/url] [url=http://lipitorgeneric.work/]cheap lipitor generic[/url]
— Alfreddut Aug 26, 05:10 AM #wh0cd849444 [url=http://cipro.brussels/]cipro[/url] [url=http://buy-nexium.reisen/]buy nexium[/url]
— Charlesnef Aug 26, 05:48 AM #wh0cd318892 [url=http://genericwellbutrin.us.org/]generic wellbutrin[/url]
— Charlesnef Aug 26, 06:46 AM #wh0cd951538 [url=http://atenolol50mg.us.org/]atenolol 50 mg[/url]
— Bennyboits Aug 26, 06:58 AM #wh0cd642294 [url=http://buspar247.us.com/]found it[/url] [url=http://lisinopril5mg.us.org/]lisinopril 5 mg[/url]
— AaronUttet Aug 26, 07:01 AM #wh0cd922919 [url=http://genericnexium.us.org/]nexium capsules[/url] [url=http://motilium247.us.com/]buy motilium[/url]
— Charlesnef Aug 26, 07:51 AM #wh0cd318886 [url=http://prednisone10mg.pro/]prednisone[/url] [url=http://flagyl.world/]article source[/url]
— Alfreddut Aug 26, 08:00 AM #wh0cd715767 [url=http://buy-atarax.reisen/]atarax[/url]
— AaronUttet Aug 26, 08:58 AM #wh0cd86074 [url=http://celebrexgeneric.us.org/]celebrex[/url] [url=http://citalopram20mg.us.org/]cheapest citalopram[/url]
— KennethBiodo Aug 26, 09:19 AM #wh0cd41225 [url=http://albuterolsulfateinhalationsolution.us.org/]albuterol inhaler[/url] [url=http://cytotec247.us.com/]cytotec[/url]
— Bennyboits Aug 26, 09:42 AM #wh0cd996392 [url=http://buy-revia.shop/]revia[/url]
— Charlesnef Aug 26, 09:59 AM #wh0cd12601 [url=http://buy-antabuse.store/]buy antabuse[/url]
— Charlesnef Aug 26, 10:37 AM #wh0cd392359 [url=http://robaxin247.us.com/]buy robaxin online[/url]
— Alfreddut Aug 26, 10:45 AM #wh0cd789242 [url=http://zetia247.us.com/]zetia online[/url] [url=http://azithromycin500mgtablets.us.org/]azithromycin without prescription[/url]
— AaronUttet Aug 26, 10:49 AM #wh0cd555545 [url=http://costofcymbalta.us.org/]cymbalta 30 mg[/url] [url=http://metformin500mgtablets.us.org/]metformin tabs[/url]
— Alfreddut Aug 26, 10:56 AM #wh0cd86078 [url=http://zetia.store/]zetia[/url]
— Charlesnef Aug 26, 12:57 PM #wh0cd936188 [url=http://diclofenac75mg.us.org/]diclofenac 75 mg[/url]
— AaronUttet Aug 26, 02:34 PM #wh0cd702494 [url=http://genericlipitor365.us.com/]generic lipitor[/url] [url=http://costofcymbalta.us.org/]cymbalta 30 mg[/url]
— Alfreddut Aug 26, 02:55 PM #wh0cd261646 [url=http://singulair247.us.com/]singulair from canada[/url]
— Bennyboits Aug 26, 04:31 PM #wh0cd775967 [url=http://lexapro247.us.com/]where can i buy cipralex[/url] [url=http://zithromax247.us.com/]order zithromax[/url]
— Alfreddut Aug 26, 05:02 PM #wh0cd25881 [url=http://valtrex.work/]valtrex[/url]
— AaronUttet Aug 26, 05:20 PM #wh0cd379968 [url=http://triamterene.mba/]triamterene-hctz 37.5-25 mg capsule[/url]
— KennethBiodo Aug 26, 06:14 PM #wh0cd849440 [url=http://tenormin247.us.com/]tenormin anxiety[/url] [url=http://glucophage247.us.com/]Glucophage[/url]
— Alfreddut Aug 26, 07:03 PM #wh0cd306505 [url=http://genericsynthroid.us.org/]Cheap Synthroid[/url]
— Charlesnef Aug 26, 07:13 PM #wh0cd99356 [url=http://zithromax247.us.com/]Cheap Zithromax[/url]
— AaronUttet Aug 26, 07:40 PM #wh0cd408594 [url=http://buy-nexium.reisen/]nexium[/url] [url=http://buyamoxil.store/]generic amoxil[/url]
— Bennyboits Aug 26, 08:50 PM #wh0cd379980 [url=http://lipitorgeneric.us.org/]recommended site[/url] [url=http://genericsynthroid.us.org/]cheap synthroid[/url]
— Charlesnef Aug 26, 09:13 PM #wh0cd172831 [url=http://lexapro247.us.com/]lexapro by mail order[/url] [url=http://genericcymbalta.us.org/]generic cymbalta[/url]
— AaronUttet Aug 26, 09:54 PM #wh0cd526916 [url=http://sildenafilcitrate.work/]sildenafil[/url]
— KennethBiodo Aug 26, 10:20 PM #wh0cd453453 [url=http://serpina247.us.com/]serpina[/url] [url=http://lipitorgeneric.us.org/]drug lipitor[/url]
— Charlesnef Aug 26, 11:08 PM #wh0cd996388 [url=http://buyelocon.store/]buy elocon[/url] [url=http://buy-effexor.shop/]75 mg effexor[/url]
— Alfreddut Aug 26, 11:27 PM #wh0cd12601 [url=http://lexapro247.us.com/]Buy Lexapro Online[/url]
— Alfreddut Aug 27, 12:02 AM #wh0cd600389 [url=http://citalopram20.us.org/]citalopram[/url]
— KennethBiodo Aug 27, 12:35 AM #wh0cd555548 [url=http://cafergot.brussels/]cafergot[/url]
— Bennyboits Aug 27, 01:17 AM #wh0cd759730 [url=http://azithromycin.world/]azithromycin[/url] [url=http://seroquel.reisen/]seroquel[/url]
— Alfreddut Aug 27, 01:33 AM #wh0cd59222 [url=http://motrin247.us.com/]order motrin online[/url]
— KennethBiodo Aug 27, 01:54 AM #wh0cd319783 [url=http://motilium247.us.com/]MOTILIUM ONLINE[/url]
— AaronUttet Aug 27, 02:08 AM #wh0cd600399 [url=http://prednisolone.brussels/]prednisolone[/url] [url=http://buyindocin.reisen/]indocin[/url]
— Charlesnef Aug 27, 03:19 AM #wh0cd629021 [url=http://cymbaltacost.pro/]cymbalta cost[/url] [url=http://buymethotrexate.store/]buy methotrexate[/url]
— Bennyboits Aug 27, 03:28 AM #wh0cd833209 [url=http://genericsingulair.us.org/]Generic Singulair[/url] [url=http://zofran247.us.com/]zofran over the counter[/url]
— Charlesnef Aug 27, 04:00 AM #wh0cd393256 [url=http://buy-albendazole.shop/]albenza generic[/url]
— AaronUttet Aug 27, 04:13 AM #wh0cd833203 [url=http://indocin.news/]indocin[/url] [url=http://hydrochlorothiazide.brussels/]hydrochlorothiazide[/url]
— Alfreddut Aug 27, 05:01 AM #wh0cd702494 [url=http://motrin247.us.com/]motrin 600[/url]
— Bennyboits Aug 27, 05:38 AM #wh0cd466731 [url=http://costofcymbalta.us.org/]cymbalta 60[/url] [url=http://celebrexgeneric.us.org/]Celebrex Generic[/url]
— AaronUttet Aug 27, 06:07 AM #wh0cd233022 [url=http://hydrochlorothiazide.brussels/]hydrochlorothiazide[/url] [url=http://buy-tamoxifen.shop/]tamoxifen citrate[/url]
— Alfreddut Aug 27, 06:38 AM #wh0cd820808 [url=http://lexapro247.us.com/]lexapro online[/url]
— KennethBiodo Aug 27, 06:42 AM #wh0cd906682 [url=http://bupropionsr.us.org/]bupropion sr[/url] [url=http://effexorgeneric.us.org/]effexor generic[/url]
— Charlesnef Aug 27, 06:56 AM #wh0cd747349 [url=http://zithromax247.us.com/]buy zithromax online cheap[/url] [url=http://augmentingeneric.us.org/]augmentin generic price[/url]
— Charlesnef Aug 27, 07:27 AM #wh0cd540208 [url=http://advair.live/]advair[/url] [url=http://buyarimidex.store/]buy arimidex online[/url]
— AaronUttet Aug 27, 08:22 AM #wh0cd206170 [url=http://genericnexium.us.org/]nexium 20mg no prescription per pill[/url] [url=http://genericcrestor.us.org/]Crestor[/url]
— KennethBiodo Aug 27, 08:30 AM #wh0cd894281 [url=http://provera.systems/]provera[/url]
— KennethBiodo Aug 27, 08:43 AM #wh0cd306495 [url=http://genericnexium.us.org/]site here[/url] [url=http://celebrexgeneric.us.org/]celebrex generic[/url]
— Alfreddut Aug 27, 09:00 AM #wh0cd613685 [url=http://cipro500mg.us.org/]cipro 250[/url] [url=http://genericcelebrex.us.org/]home page[/url]
— AaronUttet Aug 27, 10:16 AM #wh0cd967754 [url=http://cheapkamagra365.us.com/]kamagra lowest prices[/url] [url=http://genericsynthroid.us.org/]generic synthroid[/url]
— KennethBiodo Aug 27, 10:33 AM #wh0cd894297 [url=http://cephalexin.systems/]cephalexin[/url]
— Charlesnef Aug 27, 11:27 AM #wh0cd922917 [url=http://acomplia247.us.com/]RIMONABANT[/url] [url=http://cafergot247.us.com/]buy cafergot online[/url]
— Bennyboits Aug 27, 11:56 AM #wh0cd379968 [url=http://serpina247.us.com/]serpina prices[/url] [url=http://vpxl247.us.com/]vpxl[/url]
— Alfreddut Aug 27, 12:22 PM #wh0cd453443 [url=http://lexapro247.us.com/]cipralex[/url]
— Alfreddut Aug 27, 02:28 PM #wh0cd760633 [url=http://levaquin.news/]levaquin 750mg[/url] [url=http://toradol10mg.pro/]toradol[/url]
— AaronUttet Aug 27, 02:29 PM #wh0cd12601 [url=http://cytotec247.us.com/]cytotec[/url] [url=http://bupropionsr.us.org/]Bupropion SR[/url]
— Bennyboits Aug 27, 02:45 PM #wh0cd353118 [url=http://buy-yasmin.reisen/]yasmin[/url]
— KennethBiodo Aug 27, 03:00 PM #wh0cd130928 [url=http://citalopram20mg.us.org/]Purchase Citalopram[/url] [url=http://metformin500mgtablets.us.org/]metformin 500mg[/url]
— KennethBiodo Aug 27, 03:05 PM #wh0cd143326 [url=http://furosemide247.us.com/]Buy Furosemide Online[/url] [url=http://cipro500.us.org/]Cipro 500 Mg[/url]
— Charlesnef Aug 27, 04:15 PM #wh0cd526916 [url=http://amoxicillin875mg.us.org/]amoxicillin 125 mg[/url] [url=http://genericcymbalta.us.org/]generic cymbalta online[/url]
— Alfreddut Aug 27, 04:28 PM #wh0cd143318 [url=http://celebrexgeneric.us.org/]view website[/url] [url=http://genericnexium.us.org/]nexium[/url]
— Alfreddut Aug 27, 06:44 PM #wh0cd159555 [url=http://albendazole.reisen/]albendazole[/url] [url=http://provera.mba/]provera[/url]
— Bennyboits Aug 27, 07:06 PM #wh0cd277883 [url=http://cymbalta30mg.us.org/]Cost Of Cymbalta[/url]
— KennethBiodo Aug 27, 07:17 PM #wh0cd204404 [url=http://tadalafil247.us.com/]tadalafil 20 mg[/url] [url=http://lexapro247.us.com/]Lexapro By Mail Order[/url]
— Charlesnef Aug 27, 08:37 PM #wh0cd981056 [url=http://genericlipitor365.us.com/]generic lipitor[/url]
— AaronUttet Aug 27, 08:44 PM #wh0cd673864 [url=http://genericwellbutrin.us.org/]Generic Wellbutrin[/url] [url=http://metforminer.us.org/]Medication Metformin[/url]
— Alfreddut Aug 27, 08:49 PM #wh0cd233031 [url=http://tretinoin.shop/]go here[/url] [url=http://diclofenac.zone/]diclofenac[/url]
— Bennyboits Aug 27, 09:18 PM #wh0cd351356 [url=http://furosemide40mg.us.org/]furosemide 40 mg[/url] [url=http://genericsynthroid.us.org/]Buy Synthroid[/url]
— KennethBiodo Aug 27, 09:25 PM #wh0cd216793 [url=http://buy-sildenafil.work/]sildenafil[/url] [url=http://buyamitriptyline.shop/]buy amitriptyline[/url]
— Alfreddut Aug 27, 09:43 PM #wh0cd290272 [url=http://buy-antabuse.store/]antabuse[/url] [url=http://buytoradol.work/]buy toradol online[/url]
— Charlesnef Aug 27, 10:02 PM #wh0cd277877 [url=http://diclofenac.zone/]diclofenac gel[/url] [url=http://buy-albuterol.store/]cost of albuterol[/url]
— Charlesnef Aug 27, 11:00 PM #wh0cd424829 [url=http://cymbaltacost.us.org/]cymbalta 30 mg price[/url] [url=http://genericvaltrex.us.org/]Generic Valtrex[/url]
— KennethBiodo Aug 27, 11:10 PM #wh0cd573537 [url=http://cipro500mg.us.org/]cipro 500 mg[/url]
— KennethBiodo Aug 28, 12:42 AM #wh0cd363745 [url=http://colchicine.store/]colchicine[/url] [url=http://advair.live/]advair[/url]
— Charlesnef Aug 28, 12:53 AM #wh0cd498302 [url=http://genericnexium.us.org/]nexium buy online[/url]
— KennethBiodo Aug 28, 12:59 AM #wh0cd820815 [url=http://lexapro247.us.com/]buy lexapro online[/url] [url=http://genericcymbalta.us.org/]cymbalta pills[/url]
— Alfreddut Aug 28, 01:28 AM #wh0cd144205 [url=http://acomplia247.us.com/]Acomplia[/url] [url=http://lisinoprilgeneric.us.org/]Lisinopril[/url]
— AaronUttet Aug 28, 01:30 AM #wh0cd571777 [url=http://buyflagyl.work/]buy flagyl[/url]
— KennethBiodo Aug 28, 02:52 AM #wh0cd647010 [url=http://augmentinantibiotic.us.org/]Augmentin Antibiotic[/url] [url=http://zofran247.us.com/]buy zofran[/url]
— KennethBiodo Aug 28, 03:43 AM #wh0cd363743 [url=http://alli247.us.com/]is alli for sale[/url]
— Alfreddut Aug 28, 04:25 AM #wh0cd645250 [url=http://prozac247.us.com/]PROZAC ONLINE[/url]
— KennethBiodo Aug 28, 05:01 AM #wh0cd291151 [url=http://amoxicillin.tools/]amoxicillin[/url]
— AaronUttet Aug 28, 05:13 AM #wh0cd967763 [url=http://strattera247.us.com/]Generic Strattera[/url] [url=http://costofcymbalta.us.org/]cost of cymbalta[/url]
— Alfreddut Aug 28, 05:43 AM #wh0cd498309 [url=http://clindamycin.schule/]clindamycin[/url] [url=http://buyamoxil.store/]buy amoxil[/url]
— Charlesnef Aug 28, 05:58 AM #wh0cd526925 [url=http://lexapro247.us.com/]cipralex[/url]
— Bennyboits Aug 28, 06:28 AM #wh0cd720487 [url=http://bupropionsr.us.org/]bupropion[/url]
— KennethBiodo Aug 28, 07:12 AM #wh0cd57452 [url=http://cheapsildenafil365.us.com/]sildenafil by mail[/url] [url=http://albuterolsulfateinhalationsolution.us.org/]Albuterol Sulfate Inhalation Solution[/url]
— Alfreddut Aug 28, 08:28 AM #wh0cd600400 [url=http://genericamoxil365.us.com/]amoxil tablets[/url] [url=http://diclofenac75mg.us.org/]diclofenac 75 mg[/url]
— Bennyboits Aug 28, 08:42 AM #wh0cd792198 [url=http://genericadvair.us.org/]generic advair[/url] [url=http://genericnexium.us.org/]nexium online[/url]
— KennethBiodo Aug 28, 09:07 AM #wh0cd438097 [url=http://diflucan150mg.us.org/]diflucan 150mg[/url] [url=http://genericsynthroid.us.org/]generic synthroid[/url]
— AaronUttet Aug 28, 09:40 AM #wh0cd645257 [url=http://clindamycin300mg.us.org/]Clindamycin Cost[/url]
— Charlesnef Aug 28, 10:31 AM #wh0cd865671 [url=http://neurontin.store/]neurontin[/url] [url=http://buy-motilium.work/]motilium[/url]
— KennethBiodo Aug 28, 11:11 AM #wh0cd204398 [url=http://sildalis247.us.com/]Buy Sildalis[/url] [url=http://genericeffexor.us.org/]generic effexor[/url]
— Alfreddut Aug 28, 12:30 PM #wh0cd718732 [url=http://buytoradol.work/]additional info[/url]
— Charlesnef Aug 28, 12:35 PM #wh0cd747348 [url=http://synthroid247.us.com/]synthroid without prescription[/url]
— Bennyboits Aug 28, 12:57 PM #wh0cd30600 [url=http://furosemide247.us.com/]furosemide without script[/url] [url=http://nexium40mg.us.org/]nexium 40mg[/url]
— KennethBiodo Aug 28, 01:58 PM #wh0cd585049 [url=http://amoxicillin875mg.us.org/]Amoxicillin Azithromycin[/url]
— AaronUttet Aug 28, 02:04 PM #wh0cd820823 [url=http://citalopram20.us.org/]citalopram over counter[/url]
— Bennyboits Aug 28, 02:54 PM #wh0cd658522 [url=http://lexapro247.us.com/]BUY LEXAPRO ONLINE[/url] [url=http://genericlasix.us.org/]generic lasix[/url]
— AaronUttet Aug 28, 04:09 PM #wh0cd894298 [url=http://genericadvair.us.org/]advair online[/url]
— Bennyboits Aug 28, 05:03 PM #wh0cd657641 [url=http://trazodone.directory/]trazodone[/url]
— Alfreddut Aug 28, 05:07 PM #wh0cd731995 [url=http://furosemide40mg.store/]generic furosemide[/url]
— AaronUttet Aug 28, 06:33 PM #wh0cd967773 [url=http://allopurinolonline.pro/]allopurinol[/url]
— Bennyboits Aug 28, 07:11 PM #wh0cd177557 [url=http://metformin500mgtablets.us.org/]buy metformin[/url]
— KennethBiodo Aug 28, 08:01 PM #wh0cd175778 [url=http://genericadvair.us.org/]advair inhaler[/url]
— KennethBiodo Aug 28, 08:19 PM #wh0cd805468 [url=http://strattera247.us.com/]straterra[/url]
— AaronUttet Aug 28, 08:46 PM #wh0cd804600 [url=http://cipro500mg.us.org/]Cipro 500 Mg[/url]
— Charlesnef Aug 28, 08:52 PM #wh0cd498292 [url=http://amoxicillin.tools/]amoxicillin[/url]
— Alfreddut Aug 28, 09:02 PM #wh0cd28832 [url=http://avodart.tools/]avodart[/url]
— Charlesnef Aug 28, 09:47 PM #wh0cd878941 [url=http://buyamoxil.store/]amoxil[/url]
— AaronUttet Aug 28, 10:39 PM #wh0cd571765 [url=http://nexium40mg.us.org/]Omeprazole[/url]
— Alfreddut Aug 28, 11:00 PM #wh0cd130927 [url=http://motrin247.us.com/]motrin 600[/url] [url=http://buspar247.us.com/]buspar[/url]
— Bennyboits Aug 28, 11:52 PM #wh0cd102307 [url=http://colchicine.store/]colchicine[/url]
— Charlesnef Aug 29, 12:00 AM #wh0cd322726 [url=http://cipro500mg.us.org/]cipro by mail[/url] [url=http://motilium247.us.com/]buy motilium online[/url]
— KennethBiodo Aug 29, 12:53 AM #wh0cd645238 [url=http://lipitorgeneric.work/]lipitor generics[/url]
— Alfreddut Aug 29, 01:01 AM #wh0cd324512 [url=http://propranolol247.us.com/]propranolol[/url] [url=http://serpina247.us.com/]buy serpina[/url]
— KennethBiodo Aug 29, 02:24 AM #wh0cd396199 [url=http://sildenafilonline.pro/]sildenafil[/url]
— KennethBiodo Aug 29, 03:11 AM #wh0cd951553 [url=http://genericadvair.pro/]generic advair diskus[/url]
— Charlesnef Aug 29, 03:16 AM #wh0cd42108 [url=http://zithromax247.us.com/]ORDER ZITHROMAX ONLINE[/url] [url=http://costofcymbalta.us.org/]Cymbalta Pills[/url]
— AaronUttet Aug 29, 03:20 AM #wh0cd277877 [url=http://finasteride.pro/]propecia[/url] [url=http://buyindocin.reisen/]buy indocin[/url]
— Bennyboits Aug 29, 03:50 AM #wh0cd249261 [url=http://genericnexium.us.org/]buying nexium online[/url]
— Charlesnef Aug 29, 04:33 AM #wh0cd469672 [url=http://buy-benicar.store/]benicar[/url] [url=http://lipitor.brussels/]lipitor[/url]
— KennethBiodo Aug 29, 05:22 AM #wh0cd792186 [url=http://buy-effexor.shop/]buy effexor xr 150mg[/url]
— Alfreddut Aug 29, 05:32 AM #wh0cd115583 [url=http://lisinoprilgeneric.us.org/]lisinopril 20mg[/url]
— AaronUttet Aug 29, 05:32 AM #wh0cd543147 [url=http://bupropionsr.us.org/]bupropion sr[/url]
— KennethBiodo Aug 29, 07:33 AM #wh0cd189056 [url=http://costofcymbalta.us.org/]Buy Cymbalta[/url]
— AaronUttet Aug 29, 07:45 AM #wh0cd424823 [url=http://cheaptadalafil365.us.com/]cheap tadalafil[/url] [url=http://rogaine365.us.com/]buy rogaine[/url]
— Bennyboits Aug 29, 07:48 AM #wh0cd471467 [url=http://propranolol.schule/]propranolol[/url] [url=http://lipitor.mba/]lipitor[/url]
— KennethBiodo Aug 29, 08:33 AM #wh0cd396209 [url=http://buspar247.us.com/]buspirone 10 mg[/url] [url=http://lasixwaterpill.us.org/]lasix 40mg[/url]
— Charlesnef Aug 29, 08:58 AM #wh0cd498296 [url=http://buyclomid.store/]buy clomid[/url]
— Bennyboits Aug 29, 09:45 AM #wh0cd469684 [url=http://cymbalta60mg.us.org/]cymbalta 60mg[/url] [url=http://bupropionsr.us.org/]Bupropion SR[/url]
— Charlesnef Aug 29, 11:05 AM #wh0cd571769 [url=http://celexa.systems/]celexa 40 mg[/url]
— Bennyboits Aug 29, 11:50 AM #wh0cd188171 [url=http://tadalafil247.us.com/]tadalafil 40 mg[/url] [url=http://genericlipitor365.us.com/]cheap lipitor[/url]
— Charlesnef Aug 29, 01:50 PM #wh0cd409479 [url=http://benicar.mba/]how much does benicar cost[/url] [url=http://buy-albendazole.shop/]albendazole cost[/url]
— AaronUttet Aug 29, 01:50 PM #wh0cd618416 [url=http://robaxin247.us.com/]buy robaxin[/url]
— KennethBiodo Aug 29, 03:08 PM #wh0cd188173 [url=http://cymbalta60mg.us.org/]cymbalta 60mg[/url]
— Alfreddut Aug 29, 03:31 PM #wh0cd616632 [url=http://genericwellbutrin.us.org/]order wellbutrin[/url] [url=http://robaxin247.us.com/]buy robaxin online[/url]
— Charlesnef Aug 29, 03:44 PM #[url=http://bit.ly/2v1PlgM]Глобальная криптовалютная биржа[/url] с низкими комиссиями
— Thomasemiva Aug 29, 03:47 PM #Надоели накладные расходы по биржевым операциям?
[url=http://bit.ly/2v1PlgM]WCX[/url] даст Вам все то-же, что и другие, но при меньших в 10 раз комиссиях.
wh0cd837041 [url=http://buybenicar.shop/]buy benicar[/url] [url=http://buyflagyl.work/]cheap flagyl online[/url]
— KennethBiodo Aug 29, 03:49 PM #wh0cd718719 [url=http://furosemide20mgtab.us.org/]FUROSEMIDE 20 MG TAB[/url] [url=http://zofran247.us.com/]zofran over the counter[/url]
— Bennyboits Aug 29, 03:59 PM #wh0cd482958 [url=http://furosemide247.us.com/]Purchase Furosemide[/url]
— AaronUttet Aug 29, 04:00 PM #[url=http://bit.ly/21LrAQb]НАРУЧНЫЕ ЧАСЫ «Socany»[/url]
— Randallhoult Aug 29, 04:00 PM #wh0cd175784 [url=http://buytadalafil.work/]tadalafil[/url]
— Alfreddut Aug 29, 04:50 PM #wh0cd910516 [url=http://furosemide40mg.store/]furosemide buy[/url]
— KennethBiodo Aug 29, 05:44 PM #wh0cd983989 [url=http://acomplia247.us.com/]generic acomplia[/url]
— KennethBiodo Aug 29, 07:34 PM #wh0cd865665 [url=http://amoxicillin875mg.us.org/]buy amoxicillin[/url]
— Bennyboits Aug 29, 08:15 PM #wh0cd765362 [url=http://cytotec.tools/]cytotec[/url] [url=http://diclofenac.zone/]buy diclofenac[/url]
— KennethBiodo Aug 29, 09:00 PM #wh0cd335121 [url=http://effexor.world/]effexor xr[/url] [url=http://cipro.brussels/]cipro[/url]
— Alfreddut Aug 29, 09:22 PM #[url=http://acheterclomidenlignefrance.com/]ou acheter clomid sans ordonnance[/url]
— Colinbow Aug 29, 09:23 PM #acheter du clomid sur internet
<a href=” http://acheterclomidenlignefrance.com/ “>ou acheter du clomid sans ordonnance</a>
acheter du clomid
[url=http://sildenafil100mgprixenpharmacieenfrance.com/]achat sildenafil 100mg[/url]
— Clarkgliny Aug 29, 09:23 PM #sildГ©nafil 100mg
<a href=” http://sildenafil100mgprixenpharmacieenfrance.com/ “>sildenafil 100mg pas cher</a>
prix sildenafil 100mg
[url=http://acheterzithromaxsurinternetenfrance.club/]zithromax sans ordonnance en pharmacie[/url]
— RamonNig Aug 29, 09:23 PM #zithromax sans ordonnance
<a href=” http://acheterzithromaxsurinternetenfrance.club/ “>zithromax sans ordonnance en pharmacie</a>
acheter zithromax sans ordonnance
[url=http://acheterazithromycinesansordonnance.club/]acheter azithromycine[/url]
— FrankDem Aug 29, 09:23 PM #acheter azithromycine
<a href=” http://acheterazithromycinesansordonnance.club/ “>acheter azithromycine</a>
azithromycine 250 sans ordonnance
wh0cd322732 [url=http://metforminer.us.org/]metformin er[/url]
— Alfreddut Aug 29, 09:26 PM #[url=http://tadalafil20mgpaschereninde.com/]generique tadalafil 20mg prix[/url]
— JuliusSpins Aug 29, 09:28 PM #generique tadalafil 20mg prix
<a href=” http://tadalafil20mgpaschereninde.com/ “>generic tadalafil 20mg</a>
tadalafil 20mg for sale
[url=http://acheterpropeciasansordonnance.com/]acheter propecia sur internet[/url]
— Charlierof Aug 29, 09:30 PM #propecia side effects
<a href=” http://acheterpropeciasansordonnance.com/ “>finasteride propecia prix</a>
propecia effectiveness
[url=http://acheteramoxicilline500enligne.com/]amoxicilline sandoz 500 mg 5 ml[/url]
— Samuelvaf Aug 29, 09:30 PM #amoxicilline 500
<a href=” http://acheteramoxicilline500enligne.com/ “>amoxicilline 500 effets secondaires</a>
amoxicilline arrow 500
[url=http://acheteramoxicillinesansordonnance.com/]amoxicilline sans ordonnace[/url]
— TimothyFless Aug 29, 09:30 PM #amoxicilline angine sans ordonnance
<a href=” http://acheteramoxicillinesansordonnance.com/ “>amoxicilline mylan sans ordonnance</a>
antibiotique sans amoxicilline
[url=http://vardenafilprixenpharmacieacaen.com/]acheter vardenafil france[/url]
— CharlesVor Aug 29, 09:32 PM #vardenafil prix
<a href=” http://vardenafilprixenpharmacieacaen.com/ “>prix du vardenafil</a>
acheter vardenafil generique
[url=http://acheteramoxicillinepascherenfrance.com/]acheter amoxicilline sans ordonnance[/url]
— JamesSwiva Aug 29, 09:40 PM #acheter amoxicilline
<a href=” http://acheteramoxicillinepascherenfrance.com/ “>acheter amoxicilline 1g</a>
acheter amoxicilline sans ordonnance
wh0cd73684 [url=http://zofran247.us.com/]zofran by mail[/url]
— KennethBiodo Aug 29, 10:18 PM #wh0cd837055 [url=http://toradol10mg.pro/]toradol[/url]
— Charlesnef Aug 29, 10:23 PM #wh0cd703379 [url=http://genericprozac.us.org/]prozac pills[/url]
— AaronUttet Aug 29, 10:29 PM #wh0cd939140 [url=http://zithromax247.us.com/]cheap zithromax[/url]
— Bennyboits Aug 29, 10:32 PM #wh0cd147159 [url=http://cymbalta30mg.us.org/]CYMBALTA 30 MG[/url]
— KennethBiodo Aug 30, 12:26 AM #wh0cd408596 [url=http://genericcelebrex.us.org/]generic celebrex[/url] [url=http://robaxin247.us.com/]robaxin by mail order[/url]
— Alfreddut Aug 30, 12:27 AM #wh0cd910531 [url=http://augmentinantibiotic.us.org/]augmentin no prescription[/url]
— Charlesnef Aug 30, 12:31 AM #wh0cd469678 [url=http://genericcymbalta.us.org/]discount cymbalta[/url] [url=http://lexapro247.us.com/]buy lexapro online[/url]
— Alfreddut Aug 30, 01:35 AM #wh0cd220634 [url=http://paxil.brussels/]learn more here[/url]
— KennethBiodo Aug 30, 02:32 AM #wh0cd482069 [url=http://propecia247.us.com/]buy generic propecia[/url]
— Alfreddut Aug 30, 03:12 AM #wh0cd208 [url=http://buy-vardenafil.store/]buy vardenafil[/url]
— Charlesnef Aug 30, 03:20 AM #wh0cd102305 [url=http://genericretina.us.org/]GENERIC RETIN A[/url]
— Bennyboits Aug 30, 03:22 AM #wh0cd543151 [url=http://metforminer.us.org/]Metformin Online Pharmacy[/url]
— Alfreddut Aug 30, 03:48 AM #wh0cd59222 [url=http://buyhydrochlorothiazide.store/]hydrochlorothiazide[/url]
— Bennyboits Aug 30, 04:55 AM #wh0cd923806 [url=http://valtrex.work/]valtrex[/url]
— AaronUttet Aug 30, 05:15 AM #wh0cd555540 [url=http://cytotec.tools/]cytotec[/url] [url=http://voltaren.world/]buy diclofenac sod ec 75 mg[/url]
— Charlesnef Aug 30, 05:28 AM #wh0cd175778 [url=http://synthroid247.us.com/]cheap synthroid online[/url]
— Bennyboits Aug 30, 05:29 AM #wh0cd73681 [url=http://bupropionsr.us.org/]visit this link[/url] [url=http://nexium40mg.us.org/]purchase nexium online[/url]
— Charlesnef Aug 30, 05:29 AM #wh0cd616627 [url=http://cymbalta30mg.us.org/]60 mg cymbalta[/url]
— Alfreddut Aug 30, 05:56 AM #wh0cd367583 [url=http://singulair247.us.com/]singulair 10 mg[/url]
— KennethBiodo Aug 30, 06:36 AM #wh0cd985786 [url=http://buyelocon.store/]buy elocon[/url] [url=http://buy-erythromycin.store/]erythromycin[/url]
— KennethBiodo Aug 30, 06:37 AM #wh0cd249253 [url=http://neurontin.fail/]neurontin[/url] [url=http://buyflagyl.work/]purchase flagyl online[/url]
— Bennyboits Aug 30, 07:35 AM #wh0cd1978 [url=http://buyindocin.reisen/]indocin[/url] [url=http://cymbaltacost.pro/]cymbalta[/url]
— KennethBiodo Aug 30, 07:40 AM #wh0cd690102 [url=http://ampicillin500mg.us.org/]Ampicillin 500mg[/url]
— Alfreddut Aug 30, 08:14 AM #wh0cd132695 [url=http://buy-tamoxifen.shop/]tamoxifen citrate[/url]
— Bennyboits Aug 30, 08:46 AM #wh0cd441056 [url=http://genericwellbutrin.us.org/]wellbutrin 150 mg[/url]
— KennethBiodo Aug 30, 08:48 AM #wh0cd629015 [url=http://lexapro247.us.com/]buy lexapro online[/url]
— Charlesnef Aug 30, 09:14 AM #wh0cd322726 [url=http://citalopram20mg.us.org/]citalopram 20mg[/url] [url=http://cymbalta30mg.us.org/]cymbalta online[/url]
— Bennyboits Aug 30, 09:44 AM #wh0cd514529 [url=http://amitriptyline10mg.us.org/]Amitriptyline[/url]
— KennethBiodo Aug 30, 10:42 AM #wh0cd160432 [url=http://metformin500mgtablets.us.org/]metformin 500mg tablets[/url]
— AaronUttet Aug 30, 11:26 AM #wh0cd206168 [url=http://genericnexium.us.org/]Nexium[/url] [url=http://cipro500mg.us.org/]cipro by mail[/url]
— Bennyboits Aug 30, 11:41 AM #wh0cd588002 [url=http://genericvaltrex.us.org/]valtrex[/url]
— KennethBiodo Aug 30, 12:38 PM #wh0cd702493 [url=http://nexium.news/]nexium[/url] [url=http://citalopram.brussels/]citalopram[/url]
— Alfreddut Aug 30, 01:15 PM #wh0cd233907 [url=http://cytotec247.us.com/]buy cytotec[/url]
— AaronUttet Aug 30, 01:24 PM #wh0cd367583 [url=http://cheapkamagra365.us.com/]discover more here[/url] [url=http://vpxl247.us.com/]buy vpxl[/url]
— Charlesnef Aug 30, 01:40 PM #wh0cd148924 [url=http://genericseroquel.us.org/]seroquel[/url] [url=http://diclofenac75mg.us.org/]more[/url]
— KennethBiodo Aug 30, 02:01 PM #wh0cd910525 [url=http://furosemide40mg.us.org/]furosemide online[/url]
— Alfreddut Aug 30, 03:06 PM #wh0cd307380 [url=http://citalopram.brussels/]citalopram[/url]
— AaronUttet Aug 30, 03:13 PM #wh0cd441058 [url=http://cipro.brussels/]cipro[/url] [url=http://diflucanonline.pro/]diflucan[/url]
— Charlesnef Aug 30, 03:39 PM #wh0cd514531 [url=http://buy-atarax.reisen/]atarax[/url]
— Charlesnef Aug 30, 05:42 PM #wh0cd849444 [url=http://lexapro247.us.com/]additional info[/url] [url=http://amoxicillin875mg.us.org/]amoxicillin 875 mg[/url]
— Alfreddut Aug 30, 06:54 PM #wh0cd353116 [url=http://citalopram20mg.us.org/]citalopram 20mg[/url] [url=http://metformin500mgtablets.us.org/]metformin online[/url]
— Bennyboits Aug 30, 06:54 PM #wh0cd808425 [url=http://proscaronline.pro/]proscar[/url]
— KennethBiodo Aug 30, 07:10 PM #wh0cd454329 [url=http://lisinoprilgeneric.us.org/]lisinopril generic[/url] [url=http://genericsingulair.us.org/]website[/url]
— AaronUttet Aug 30, 07:23 PM #wh0cd73683 [url=http://augmentingeneric.us.org/]augmentin tabs[/url]
— Alfreddut Aug 30, 08:08 PM #wh0cd690093 [url=http://synthroid247.us.com/]synthroid[/url] [url=http://zithromax247.us.com/]cheap zithromax[/url]
— Bennyboits Aug 30, 08:25 PM #wh0cd527804 [url=http://buy-antabuse.store/]buy antabuse[/url]
— AaronUttet Aug 30, 09:37 PM #wh0cd426589 [url=http://alli247.us.com/]alli without prescription[/url] [url=http://cymbaltacost.us.org/]CYMBALTA COST[/url]
— Bennyboits Aug 30, 09:56 PM #wh0cd147158 [url=http://metforminer.us.org/]buy metformin[/url]
— Alfreddut Aug 30, 10:05 PM #wh0cd763568 [url=http://strattera247.us.com/]atomoxetine[/url]
— Bennyboits Aug 30, 10:35 PM #wh0cd922909 [url=http://nexium.news/]nexium[/url] [url=http://buytoradol.work/]buy toradol[/url]
— Charlesnef Aug 30, 11:23 PM #wh0cd369345 [url=http://tretinoin.shop/]tretinoin[/url] [url=http://clonidine.reisen/]clonidine[/url]
— KennethBiodo Aug 30, 11:49 PM #wh0cd220634 [url=http://motilium247.us.com/]buy motilium online[/url] [url=http://genericwellbutrin.us.org/]wellbutrin[/url]
— Alfreddut Aug 31, 12:04 AM #wh0cd808427 [url=http://diclofenac75mg.us.org/]diclofenac online[/url] [url=http://kamagra247.us.com/]Buy Kamagra[/url]
— Charlesnef Aug 31, 01:38 AM #wh0cd996392 [url=http://genericcelebrex.us.org/]Generic Celebrex[/url] [url=http://cipro500mg.us.org/]CIPRO 250[/url]
— Alfreddut Aug 31, 01:50 AM #wh0cd996384 [url=http://augmentingeneric.us.org/]Augmentin Generic Price[/url] [url=http://cipro500mg.us.org/]order cipro[/url]
— Charlesnef Aug 31, 02:06 AM #wh0cd45061 [url=http://lexapro247.us.com/]buy lexapro[/url] [url=http://tadalafil247.us.com/]buying tadalafil online[/url]
— KennethBiodo Aug 31, 02:23 AM #wh0cd442820 [url=http://celebrexgeneric.us.org/]buy celebrex online[/url]
— KennethBiodo Aug 31, 02:32 AM #wh0cd910523 [url=http://clomidonline.pro/]get clomid online[/url]
— Bennyboits Aug 31, 02:55 AM #wh0cd748223 [url=http://sildenafil247.us.com/]Sildenafil Visa[/url] [url=http://phenergan247.us.com/]phenergan online[/url]
— AaronUttet Aug 31, 03:27 AM #wh0cd118534 [url=http://genericcelebrex.us.org/]generic celebrex[/url]
— KennethBiodo Aug 31, 04:22 AM #wh0cd367580 [url=http://furosemide247.us.com/]buy furosemide online[/url]
— Alfreddut Aug 31, 04:24 AM #wh0cd983998 [url=http://augmentingeneric.us.org/]AUGMENTIN GENERIC[/url]
— Bennyboits Aug 31, 05:04 AM #wh0cd516293 [url=http://antabuse.world/]antabuse[/url]
— KennethBiodo Aug 31, 05:46 AM #wh0cd955375 [url=http://citalopram20mg.us.org/]citalopram 20mg[/url]
— Charlesnef Aug 31, 06:00 AM #wh0cd647012 [url=http://metforminer.us.org/]metformin 1000 mg[/url]
— Bennyboits Aug 31, 07:51 AM #wh0cd265480 [url=http://genericcymbalta.us.org/]generic cymbalta[/url] [url=http://augmentingeneric.us.org/]augmentinover the counter[/url]
— KennethBiodo Aug 31, 08:36 AM #wh0cd968642 [url=http://genericwellbutrin.us.org/]full report[/url] [url=http://metforminer.us.org/]metformin er[/url]
— AaronUttet Aug 31, 09:53 AM #wh0cd147154 [url=http://buy-albuterol.store/]buy albuterol[/url]
— Bennyboits Aug 31, 10:08 AM #wh0cd588006 [url=http://serpina247.us.com/]serpina at lowest prices[/url]
— Alfreddut Aug 31, 10:35 AM #wh0cd338955 [url=http://glucophage247.us.com/]glucophage xr 500[/url] [url=http://genericvaltrex.us.org/]valtrex without prescription com[/url]
— KennethBiodo Aug 31, 10:40 AM #wh0cd118532 [url=http://cytotec.live/]cytotec[/url]
— Charlesnef Aug 31, 10:41 AM #wh0cd220629 [url=http://augmentin.fail/]clicking here[/url]
— Bennyboits Aug 31, 12:06 PM #wh0cd192005 [url=http://prednisone10mg.pro/]prednisone buy online[/url] [url=http://colchicine.store/]colchicine[/url]
— Charlesnef Aug 31, 01:17 PM #Hello friends!
— CeciliaSkerm Aug 31, 06:56 PM #I am an official representative of private company which deals with all kinds of written work (essay, coursework, dissertation, presentation, report, etc) in short time.
We are ready to offer a free accomplishment of written work hoping for further cooperation and honest feedback about our service.
Send your work topics to our email: discount@edu-paper.com. This offer has limited quantities!!!
[url=http://bit.ly/2aKk97Z]специалист по seo продвижению обязанности[/url]
— Ruzanavax Sep 1, 05:26 AM #wh0cd26177 [url=http://vibramycin.pro/]vibramycin[/url] [url=http://buy-ventolin.reisen/]ventolin[/url]
— AaronUttet Sep 1, 02:55 PM #wh0cd22339 [url=http://buy-levaquin.shop/]buy levaquin[/url]
— Charlesnef Sep 1, 03:00 PM #wh0cd18503 [url=http://buy-albendazole.store/]buy albendazole[/url] [url=http://buy-cephalexin.store/]cephalexin[/url]
— MichaelSoush Sep 1, 03:00 PM #wh0cd26175 [url=http://buylipitor.store/]lipitor[/url]
— MichaelSoush Sep 1, 03:11 PM #wh0cd26175 [url=http://tenormin.store/]tenormin[/url] [url=http://buytamoxifen.shop/]buy tamoxifen[/url]
— MichaelSoush Sep 1, 03:19 PM #wh0cd95812 [url=http://buyrimonabant.reisen/]buy acomplia rimonabant[/url]
— Charlesnef Sep 1, 04:36 PM #wh0cd99652 [url=http://cephalexin500.reisen/]cephalexin[/url]
— AaronUttet Sep 1, 04:38 PM #wh0cd99650 [url=http://acyclovir.us.com/]Acyclovir No Prescription[/url]
— Brettsoync Sep 1, 05:11 PM #wh0cd99648 [url=http://medrol.work/]medrol[/url]
— MichaelSoush Sep 1, 05:12 PM #wh0cd99648 [url=http://avodart.reisen/]avodart[/url] [url=http://fluoxetine.tools/]buy fluoxetine[/url]
— Charlesnef Sep 1, 05:16 PM #wh0cd99650 [url=http://advair.us.com/]advair[/url]
— MichaelSoush Sep 1, 05:40 PM #wh0cd169285 [url=http://acyclovir.us.com/]acyclovir[/url]
— Charlesnef Sep 1, 06:13 PM #wh0cd173123 [url=http://buy-vermox.shop/]where to buy vermox[/url]
— Brettsoync Sep 1, 07:21 PM #wh0cd165451 [url=http://buylipitor.store/]lipitor[/url]
— MichaelSoush Sep 1, 07:23 PM #wh0cd173125 [url=http://buy-albendazole.work/]albenza generic[/url] [url=http://metforminonline.pro/]metformin[/url]
— MichaelSoush Sep 1, 07:39 PM #wh0cd173123 [url=http://nolvadex.directory/]pct nolvadex[/url]
— Charlesnef Sep 1, 07:45 PM #wh0cd242761 [url=http://cephalexin500mg.shop/]cephalexin 500mg[/url]
— Charlesnef Sep 1, 07:49 PM #wh0cd246603 [url=http://effexor.zone/]effexor[/url] [url=http://buy-strattera.work/]our website[/url]
— AaronUttet Sep 1, 08:01 PM #wh0cd246598 [url=http://buy-albendazole.store/]albendazole[/url] [url=http://lasix.systems/]lasix[/url]
— Brettsoync Sep 1, 09:12 PM #wh0cd316234 [url=http://buy-albendazole.work/]albenza over the counter[/url]
— Charlesnef Sep 1, 09:25 PM #wh0cd320076 [url=http://prednisoloneonline.pro/]prednisolone 5 mg[/url] [url=http://buy-kamagra.store/]buy kamagra[/url]
— AaronUttet Sep 1, 09:38 PM #wh0cd246596 [url=http://buy-anafranil.store/]anafranil for ocd[/url] [url=http://buyavana.shop/]generic avana[/url]
— MichaelSoush Sep 1, 09:46 PM #wh0cd246599 [url=http://propecia.us.com/]generic propecia without prescription[/url]
— MichaelSoush Sep 1, 09:46 PM #wh0cd246596 [url=http://propecia.systems/]propecia[/url]
— Charlesnef Sep 1, 10:09 PM #wh0cd389707 [url=http://cymbalta.tools/]cymbalta[/url] [url=http://buybuspar.shop/]buy buspar[/url]
— Charlesnef Sep 1, 11:00 PM #wh0cd393552 [url=http://buy-effexor.work/]view[/url]
— AaronUttet Sep 1, 11:15 PM #wh0cd320071 [url=http://sildenafil.us.com/]where to buy sildenafil citrate online[/url]
— MichaelSoush Sep 1, 11:49 PM #wh0cd320071 [url=http://buybentyl.reisen/]bentyl[/url]
— MichaelSoush Sep 2, 12:01 AM #wh0cd463182 [url=http://sildenafil.us.com/sildenafil-citrate-100-mg.html]sildenafil citrate 100 mg[/url]
— Charlesnef Sep 2, 12:37 AM #wh0cd393550 [url=http://buy-seroquel.reisen/]seroquel[/url] [url=http://prednisoloneonline.pro/]prednisolone online[/url]
— Brettsoync Sep 2, 12:37 AM #wh0cd467025 [url=http://ampicillinonline.pro/]buy ampicillin online[/url]
— AaronUttet Sep 2, 12:54 AM #wh0cd393544 [url=http://lasix.live/]lasix 40 mg iv[/url] [url=http://buyretina.shop/]retin-a price[/url]
— MichaelSoush Sep 2, 01:34 AM #wh0cd385879 [url=http://sildenafil.us.com/sildenafil-citrate-100-mg.html]sildenafil citrate 100mg[/url]
— MichaelSoush Sep 2, 01:51 AM #wh0cd467025 [url=http://buy-seroquel.reisen/]seroquel[/url] [url=http://ciprofloxacinhcl500mg.reisen/]cipro[/url]
— Brettsoync Sep 2, 02:23 AM #wh0cd18503 [url=http://prednisoneonline.pro/]prednisone steroids[/url] [url=http://vibramycin.pro/]doxycycline cheap[/url]
— Bennyboits Sep 2, 02:56 AM #wh0cd18503 [url=http://cephalexin500.reisen/]order cephalexin online[/url]
— Alfreddut Sep 2, 03:04 AM #wh0cd18503 [url=http://sildenafil.us.com/sildenafil-citrate-100mg-pills.html]sildenafil citrate 100mg pills[/url]
— KennethBiodo Sep 2, 03:08 AM #wh0cd467021 [url=http://zithromax.systems/]zithromax[/url]
— MichaelSoush Sep 2, 04:08 AM #wh0cd613975 [url=http://buyamoxicillin.reisen/]buy amoxicillin[/url] [url=http://cephalexin500mg.shop/]link[/url]
— AaronUttet Sep 2, 04:11 AM #wh0cd459354 [url=http://genericadalat.pro/]generic adalat[/url]
— MichaelSoush Sep 2, 04:12 AM #wh0cd610132 [url=http://wellbutrin150mg.pro/]wellbutrin[/url] [url=http://medrol.work/]medrol[/url]
— Charlesnef Sep 2, 04:23 AM #wh0cd467019 [url=http://buyrimonabant.reisen/]acomplia rimonabant[/url] [url=http://fluoxetine.tools/]fluoxetine[/url]
— MichaelSoush Sep 2, 04:39 AM #wh0cd467017 [url=http://tenormin.store/]tenormin 50mg[/url]
— Charlesnef Sep 2, 05:00 AM #wh0cd91976 [url=http://buybuspar.shop/]buy buspar[/url]
— Alfreddut Sep 2, 05:54 AM #wh0cd540490 [url=http://acyclovir.us.com/]Buy Acyclovir[/url]
— MichaelSoush Sep 2, 05:59 AM #wh0cd687450 [url=http://buy-flagyl.shop/]buy flagyl[/url] [url=http://buyamoxicillin.reisen/]buy amoxicillin[/url]
— AaronUttet Sep 2, 06:17 AM #wh0cd532827 [url=http://stromectol.zone/]buy stromectol online[/url] [url=http://zithromax.news/]zithromax[/url]
— MichaelSoush Sep 2, 06:30 AM #wh0cd165451 [url=http://avodart.zone/]generic dutasteride[/url]
— Bennyboits Sep 2, 07:33 AM #wh0cd760923 [url=http://levaquin500mg.pro/]levaquin[/url]
— AaronUttet Sep 2, 07:55 AM #wh0cd165451 [url=http://buyprednisone.reisen/]prednisone[/url]
— KennethBiodo Sep 2, 08:05 AM #wh0cd613963 [url=http://sildenafil.us.com/sildenafil-citrate-100-mg.html]sildenafil citrate 100 mg[/url]
— MichaelSoush Sep 2, 08:05 AM #wh0cd606300 [url=http://diflucan.systems/]diflucan[/url]
— MichaelSoush Sep 2, 08:35 AM #wh0cd540492 [url=http://stromectol.zone/]stromectol[/url]
— Charlesnef Sep 2, 08:58 AM #wh0cd613965 [url=http://vardenafil.world/]vardenafil hcl 20mg[/url] [url=http://tretinoin.fail/]tretinoin[/url]
— MichaelSoush Sep 2, 08:59 AM #wh0cd757078 [url=http://buycafergot.store/]cafergot & internet pharmacy[/url] [url=http://buy-azithromycin.store/]azithromycin[/url]
— Charlesnef Sep 2, 09:09 AM #wh0cd238922 [url=http://elimite.schule/]buy elimite[/url]
— Alfreddut Sep 2, 09:28 AM #wh0cd834398 [url=http://buycelexa.reisen/]celexa 20 mg[/url] [url=http://fluoxetine20mg.pro/]fluoxetine[/url]
— AaronUttet Sep 2, 09:30 AM #wh0cd238924 [url=http://cephalexin500.reisen/]cephalexin[/url] [url=http://trazodone100mg.pro/]trazodone[/url]
— Bennyboits Sep 2, 09:50 AM #wh0cd687440 [url=http://buyavana.shop/]buy avana[/url] [url=http://abilifycost.pro/]abilify[/url]
— MichaelSoush Sep 2, 10:15 AM #wh0cd687436 [url=http://propecia365.us.com/]propecia[/url]
— MichaelSoush Sep 2, 10:16 AM #wh0cd238926 [url=http://sildenafil.us.com/sildenafil-citrate-100mg-pills.html]sildenafil pfizer[/url]
— KennethBiodo Sep 2, 10:23 AM #wh0cd687448 [url=http://abilifycost.pro/]abilify[/url]
— Brettsoync Sep 2, 10:36 AM #wh0cd679773 [url=http://triamterene.systems/]triamterene generic[/url] [url=http://trazodone100mg.pro/]trazodone 100mg[/url]
— MichaelSoush Sep 2, 10:42 AM #wh0cd907873 [url=http://prozac.zone/]generic prozac cost[/url] [url=http://buyabilify.shop/]abilify[/url]
— AaronUttet Sep 2, 11:04 AM #wh0cd312395 [url=http://buy-anafranil.store/]anafranil[/url] [url=http://trazodone.tools/]order trazodone online[/url]
— Alfreddut Sep 2, 11:12 AM #wh0cd687444 [url=http://buy-azithromycin.shop/]azithromycin for sale[/url]
— MichaelSoush Sep 2, 11:17 AM #wh0cd613965 [url=http://advaironline.pro/]generic advair online[/url]
— Charlesnef Sep 2, 12:02 PM #wh0cd312399 [url=http://effexor.zone/]effexor[/url] [url=http://cephalexin500mg.shop/]cephalexin[/url]
— Bennyboits Sep 2, 12:08 PM #wh0cd760909 [url=http://sildenafil.us.com/sildenafil-soft-tabs.html]sildenafil soft tabs[/url]
— MichaelSoush Sep 2, 12:15 PM #wh0cd760915 [url=http://wellbutrinonline.pro/]wellbutrin prescription[/url] [url=http://elimite.directory/]how much does permethrin cost[/url]
— MichaelSoush Sep 2, 12:28 PM #wh0cd50963 [url=http://buy-avana.store/]buy avana[/url] [url=http://buy-flagyl.shop/]flagyl[/url]
— Charlesnef Sep 2, 12:32 PM #wh0cd26175 [url=http://avodart.zone/]avodart generic[/url] [url=http://eurax.zone/]eurax[/url]
— KennethBiodo Sep 2, 12:34 PM #wh0cd760921 [url=http://buy-atarax.shop/]buy atarax[/url]
— Brettsoync Sep 2, 12:52 PM #wh0cd753248 [url=http://buy-cephalexin.store/]buy cephalexin online[/url] [url=http://effexor.zone/]effexor[/url]
— MichaelSoush Sep 2, 12:55 PM #wh0cd26175
— KennethBiodo Sep 2, 01:08 PM #wh0cd26175 [url=http://sildenafil.us.com/sildenafil-citrate-100-mg.html]sildenafil citrate tablets 100 mg[/url]
— Bennyboits Sep 2, 01:08 PM #wh0cd834382 [url=http://suhagraonline.pro/]suhagra[/url] [url=http://cephalexin500mg.shop/]cephalexin 500mg[/url]
— MichaelSoush Sep 2, 02:00 PM #wh0cd124443 [url=http://tenormin.store/]tenormin[/url] [url=http://lasixonline.pro/]buy lasix online no prescription[/url]
— Charlesnef Sep 2, 02:10 PM #[url=https://loansforbadcredit.us.com/]loans for bad credit[/url] [url=https://essayonline.us.com/]buy papers online[/url]
— Mikeben Sep 2, 02:25 PM #wh0cd385872 [url=http://prozac.zone/]prozac[/url]
— Bennyboits Sep 2, 02:29 PM #wh0cd834388 [url=http://propecia.us.com/]propecia[/url]
— MichaelSoush Sep 2, 02:41 PM #wh0cd1054825 [url=http://buy-seroquel.reisen/]continue reading[/url] [url=http://cephalexin500.reisen/]cephalexin 500 mg capsule[/url]
— AaronUttet Sep 2, 02:47 PM #wh0cd834394 [url=http://tretinoin.store/]tretinoin[/url] [url=http://buy-ventolin.reisen/]buy ventolin inhaler[/url]
— Brettsoync Sep 2, 02:52 PM #wh0cd385878 [url=http://tretinoin.fail/]tretinoin[/url]
— KennethBiodo Sep 2, 03:06 PM #wh0cd99650 [url=http://buy-methotrexate.work/]methotrexate[/url] [url=http://genericseroquel.pro/]seroquel for children[/url]
— Alfreddut Sep 2, 03:15 PM #wh0cd834392 [url=http://dapoxetine.reisen/]dapoxetine[/url]
— MichaelSoush Sep 2, 03:21 PM #wh0cd459343 [url=http://buyrimonabant.reisen/]buy rimonabant[/url]
— Alfreddut Sep 2, 03:29 PM #[url=https://loansforbadcredit.us.com/]payday loans for bad credit[/url] [url=https://essayonline.us.com/]online essay writing service[/url]
— Mikeben Sep 2, 04:06 PM #wh0cd197918 [url=http://buydiflucan.store/]where can i buy diflucan without a prescription[/url]
— Charlesnef Sep 2, 04:07 PM #wh0cd99648
— KennethBiodo Sep 2, 04:10 PM #wh0cd907855 [url=http://triamterene.systems/]triamterene[/url]
— MichaelSoush Sep 2, 04:10 PM #wh0cd99648 [url=http://buyneurontin.reisen/]neurontin capsules[/url] [url=http://clonidineonline.pro/]clonidine 2 mg[/url]
— Bennyboits Sep 2, 04:11 PM #wh0cd459345 [url=http://zithromax.systems/]zithromax[/url] [url=http://cymbaltageneric.reisen/]cymbalta 60mg[/url]
— Bennyboits Sep 2, 04:34 PM #wh0cd907867 [url=http://tadalafil.fail/]tadalafil[/url]
— Brettsoync Sep 2, 04:40 PM #[url=https://vest-best.vsemaykishop.ru]Создай майку[/url]
[url=https://vest-best.vsemaykishop.ru]купить футболку bape[/url]
#…
— Jeffreyisoms Sep 2, 04:42 PM #wh0cd1128301 [url=http://methotrexate.tools/]methotrexate[/url]
— AaronUttet Sep 2, 04:55 PM #wh0cd99648 [url=http://buy-levaquin.shop/]levaquin 500 mg tablet[/url] [url=http://buy-vpxl.reisen/]vpxl[/url]
— Charlesnef Sep 2, 05:03 PM #wh0cd907863 [url=http://amoxicillin.us.com/]where can i buy amoxocillin[/url]
— MichaelSoush Sep 2, 05:03 PM #wh0cd907865 [url=http://trazodone100mg.pro/]trazodone 100mg[/url]
— MichaelSoush Sep 2, 05:06 PM #wh0cd760913 [url=http://buybentyl.reisen/]bentyl[/url] [url=http://buycymbalta.reisen/]link[/url]
— Charlesnef Sep 2, 05:25 PM #wh0cd900194 [url=http://buy-albendazole.work/]albenza generic[/url] [url=http://diflucan.systems/]where to buy duflicon pills[/url]
— MichaelSoush Sep 2, 05:27 PM #wh0cd459353 [url=http://methotrexate.tools/]methotrexate[/url] [url=http://levaquin500mg.pro/]levaquin 250mg[/url]
— KennethBiodo Sep 2, 05:30 PM #[url=https://essayonline.us.com/]Read This[/url] [url=https://loansforbadcredit.us.com/]payday loans bad credit[/url]
— Mikeben Sep 2, 05:45 PM #wh0cd981330 [url=http://tenormin.store/]tenormin[/url]
— MichaelSoush Sep 2, 06:25 PM #wh0cd532818 [url=http://clonidineonline.pro/]clonidine online[/url]
— Bennyboits Sep 2, 06:34 PM #wh0cd173123
— KennethBiodo Sep 2, 06:39 PM #wh0cd173125 [url=http://buyseroquel.work/]seroquel[/url] [url=http://fluoxetine.tools/]fluoxetine[/url]
— Alfreddut Sep 2, 06:55 PM #wh0cd173121 [url=http://suhagraonline.pro/]suhagra online[/url] [url=http://buy-flagyl.shop/]buy flagyl[/url]
— Bennyboits Sep 2, 07:08 PM #wh0cd981338 [url=http://buy-ventolin.shop/]buy ventolin inhaler online[/url] [url=http://prednisone.tools/]prednisone[/url]
— MichaelSoush Sep 2, 07:18 PM #wh0cd981338 [url=http://elimite.directory/]elimite[/url]
— MichaelSoush Sep 2, 07:18 PM #[url=https://essayonline.us.com/]essay online[/url] [url=https://onlineloans.us.com/]payday loans online[/url]
— Mikeben Sep 2, 07:25 PM #wh0cd532826 [url=http://toradolprice.pro/]toradol[/url] [url=http://nexiumgeneric.pro/]nexium[/url]
— KennethBiodo Sep 2, 07:32 PM #wh0cd606293 [url=http://buyrimonabant.reisen/]buy rimonabant[/url] [url=http://zithromax.systems/]buying zithromax[/url]
— Alfreddut Sep 2, 07:51 PM #wh0cd344864 [url=http://prednisoloneonline.pro/]prednisolone price[/url]
— Charlesnef Sep 2, 07:56 PM #wh0cd1054803 [url=http://buy-ventolin.reisen/]buy ventolin[/url] [url=http://toradolprice.pro/]generic toradol[/url]
— MichaelSoush Sep 2, 08:27 PM #wh0cd173121 [url=http://buyabilify.shop/]buy abilify online[/url]
— Charlesnef Sep 2, 08:37 PM #[url=https://bestpaydayloansonline.us.com/]payday loans online direct lenders only[/url] [url=https://essaywritingservices.us.com/]best essay writing service reviews[/url]
— Mikeben Sep 2, 09:01 PM #wh0cd1054813 [url=http://dapoxetine.reisen/]dapoxetine[/url] [url=http://zetia.fail/]zetia 10 mg tablets[/url]
— MichaelSoush Sep 2, 09:07 PM #wh0cd1054811 [url=http://buy-flagyl.shop/]flagyl[/url]
— MichaelSoush Sep 2, 09:08 PM #wh0cd246596 [url=http://buycelexa.shop/]celexa[/url]
— KennethBiodo Sep 2, 09:23 PM #wh0cd246596
— KennethBiodo Sep 2, 09:26 PM #wh0cd606299 [url=http://prednisoloneonline.pro/]prednisolone[/url]
— KennethBiodo Sep 2, 09:41 PM #wh0cd418337 [url=http://sildenafil.us.com/sildenafil-citrate-100-mg.html]sildenafil citrate 100 mg[/url]
— Charlesnef Sep 2, 09:53 PM #wh0cd246598 [url=http://advair.us.com/]advair diskus 250 50[/url]
— Alfreddut Sep 2, 09:55 PM #wh0cd907865 [url=http://sildenafil.us.com/sildenafil-soft-tabs.html]sildenafil soft tabs[/url]
— Charlesnef Sep 2, 09:57 PM #wh0cd1128279 [url=http://baclofen.work/]baclofen[/url] [url=http://cymbaltageneric.reisen/]this site[/url]
— MichaelSoush Sep 2, 10:14 PM #[url=https://writemyessay.us.com/]write my essay[/url]
— Mikeben Sep 2, 10:38 PM #wh0cd246594 [url=http://buy-tretinoin.store/]non prescription tretinoin[/url] [url=http://buy-methotrexate.work/]methotrexate[/url]
— Bennyboits Sep 2, 10:43 PM #wh0cd1348726 [url=http://buycymbalta.reisen/]buy cymbalta[/url] [url=http://buyavana.shop/]super avana[/url]
— AaronUttet Sep 2, 10:44 PM #wh0cd1128286 [url=http://propecia365.us.com/]Buy Propecia Online[/url]
— MichaelSoush Sep 2, 10:48 PM #wh0cd679766 [url=http://effexorgeneric.pro/]effexor generic[/url]
— Bennyboits Sep 2, 10:51 PM #wh0cd1128288 [url=http://genericseroquel.pro/]generic seroquel[/url]
— Brettsoync Sep 2, 11:03 PM #wh0cd491812 [url=http://buyclindamycin.work/]buy clindamycin[/url]
— Charlesnef Sep 2, 11:45 PM #wh0cd981338 [url=http://lasix.systems/]lasix[/url]
— Charlesnef Sep 2, 11:51 PM #wh0cd679772 [url=http://buy-clomid.shop/]buying clomid[/url] [url=http://genericadalat.pro/]adalat[/url]
— KennethBiodo Sep 2, 11:52 PM #wh0cd1201752 [url=http://buy-azithromycin.store/]azithromycin[/url]
— MichaelSoush Sep 2, 11:57 PM #wh0cd320069
— KennethBiodo Sep 3, 12:25 AM #[url=https://loansforbadcredit.us.com/]payday[/url]
— Mikeben Sep 3, 12:27 AM #wh0cd1201759 [url=http://acyclovir.us.com/]Buy Acyclovir[/url]
— MichaelSoush Sep 3, 12:36 AM #wh0cd1201768 [url=http://buycafergot.store/]cafergot[/url] [url=http://eurax.zone/]eurax[/url]
— MichaelSoush Sep 3, 12:39 AM #wh0cd1422199 [url=http://sildenafil.us.com/sildenafil-soft-tabs.html]sildenafil citrate over the counter[/url]
— AaronUttet Sep 3, 12:45 AM #wh0cd826714 [url=http://diflucan.systems/]diflucan[/url] [url=http://eloconsteroidcream.pro/]elocon[/url]
— Alfreddut Sep 3, 01:45 AM #[url=https://loansforbadcredit.us.com/]loans online bad credit[/url] [url=https://onlineloans.us.com/]payday loans online[/url]
— Mikeben Sep 3, 02:09 AM #wh0cd1275234 [url=http://diflucan.systems/]diflucan[/url]
— MichaelSoush Sep 3, 02:22 AM #wh0cd393544
— KennethBiodo Sep 3, 02:39 AM #wh0cd1495672 [url=http://propecia.us.com/]propecia[/url]
— AaronUttet Sep 3, 02:46 AM #wh0cd320069 [url=http://buy-levaquin.shop/]levaquin[/url] [url=http://elimite.directory/]permethrin cost[/url]
— Charlesnef Sep 3, 02:46 AM #wh0cd826714 [url=http://buy-tretinoin.reisen/]tretinoin pills[/url]
— Bennyboits Sep 3, 03:13 AM #wh0cd1128286 [url=http://retinaa.pro/]retin-a[/url] [url=http://clonidineonline.pro/]clonidine .3 mg[/url]
— Charlesnef Sep 3, 03:31 AM #wh0cd638763 [url=http://buy-clomid.shop/]clomid[/url] [url=http://buyneurontin.reisen/]buy neurontin[/url]
— Charlesnef Sep 3, 03:45 AM #[url=https://essayonline.us.com/]online essay writing service[/url]
— Mikeben Sep 3, 03:50 AM #wh0cd1348714 [url=http://fluoxetine20mg.pro/]fluoxetine 20mg cap[/url] [url=http://buytenormin.reisen/]buy tenormin[/url]
— MichaelSoush Sep 3, 04:09 AM #wh0cd1348707 [url=http://misoprostol.pro/]misoprostol[/url] [url=http://methotrexate.tools/]discover more here[/url]
— MichaelSoush Sep 3, 04:09 AM #wh0cd826718 [url=http://genericseroquel.pro/]seroquel coupons[/url] [url=http://eloconsteroidcream.pro/]elocon steroid cream[/url]
— KennethBiodo Sep 3, 04:12 AM #wh0cd393544 [url=http://elimite.news/]elimite[/url]
— KennethBiodo Sep 3, 04:16 AM #wh0cd1422175 [url=http://valtrex.zone/]valtex without a prescription[/url]
— MichaelSoush Sep 3, 05:12 AM #wh0cd900189 [url=http://eloconoverthecounter.pro/]elocon[/url]
— Bennyboits Sep 3, 05:18 AM #wh0cd1201759 [url=http://buybentyl.reisen/]bentyl[/url] [url=http://buspar.news/]buspirone pill[/url]
— Charlesnef Sep 3, 05:22 AM #[url=https://essayonline.us.com/]pay for essay online[/url] [url=https://loansforbadcredit.us.com/]loans[/url]
— Mikeben Sep 3, 05:34 AM #wh0cd393542 [url=http://stromectol.zone/]stromectol[/url]
— Bennyboits Sep 3, 05:37 AM #wh0cd973660 [url=http://vibramycin.pro/]doxylin[/url]
— Alfreddut Sep 3, 05:40 AM #wh0cd712236 [url=http://buy-vermox.shop/]buy vermox[/url]
— Charlesnef Sep 3, 05:42 AM #wh0cd467020
— KennethBiodo Sep 3, 05:48 AM #wh0cd1422180 [url=http://acyclovir.us.com/]acyclovir[/url]
— MichaelSoush Sep 3, 05:55 AM #wh0cd1275234 [url=http://buyavana.shop/]buy avana[/url] [url=http://abilifycost.pro/]abilify[/url]
— Brettsoync Sep 3, 06:04 AM #wh0cd900195 [url=http://prednisoneonline.pro/]prednisone[/url] [url=http://buy-arimidex.reisen/]arimidex[/url]
— KennethBiodo Sep 3, 06:22 AM #wh0cd1495650 [url=http://propecia.us.com/]finasteride[/url]
— MichaelSoush Sep 3, 06:54 AM #wh0cd467020 [url=http://vibramycin.pro/]vibramycin[/url]
— KennethBiodo Sep 3, 07:00 AM #[url=https://writemyessay.us.com/]write my paper[/url] [url=https://onlineloans.us.com/]online payday loan[/url]
— Mikeben Sep 3, 07:15 AM #wh0cd1495655 [url=http://yasmin.work/]yasmin[/url]
— MichaelSoush Sep 3, 07:40 AM #wh0cd973668 [url=http://acyclovir.us.com/]acyclovir[/url]
— KennethBiodo Sep 3, 08:07 AM #wh0cd1348709 [url=http://buy-methotrexate.work/]buy methotrexate online[/url] [url=http://buy-vermox.shop/]buy vermox[/url]
— Brettsoync Sep 3, 08:23 AM #[url=https://loansforbadcredit.us.com/]direct payday lenders bad credit[/url] [url=https://writemyessay.us.com/]write my essay for me cheap[/url]
— Mikeben Sep 3, 08:55 AM #wh0cd467022 [url=http://fluoxetine20mg.pro/]fluoxetine 20mg cap[/url] [url=http://metformin.reisen/]metformin er[/url]
— Charlesnef Sep 3, 09:25 AM #wh0cd540495
— KennethBiodo Sep 3, 09:26 AM #wh0cd1569135 [url=http://trazodone100mg.pro/]trazodone 100mg[/url]
— MichaelSoush Sep 3, 09:27 AM #wh0cd540493 [url=http://genericadalat.pro/]generic adalat[/url]
— KennethBiodo Sep 3, 09:32 AM #wh0cd1789568 [url=http://buy-arimidex.reisen/]arimidex steroids[/url]
— AaronUttet Sep 3, 09:50 AM #wh0cd1422182 [url=http://buytadalafil.store/]tadalafil[/url]
— Brettsoync Sep 3, 10:09 AM #wh0cd1642596 [url=http://buyadvair.shop/]buy advair[/url] [url=http://ciprofloxacinhcl500mg.reisen/]cipro[/url]
— MichaelSoush Sep 3, 10:15 AM #[url=https://essayonline.us.com/]write my essay online[/url] [url=https://loansforbadcredit.us.com/]bad credit[/url]
— Mikeben Sep 3, 10:35 AM #wh0cd932665 [url=http://buyyasmin.shop/]yasmin birth control pills[/url] [url=http://buy-ventolin.shop/]buy ventolin inhaler[/url]
— Charlesnef Sep 3, 10:40 AM #wh0cd1422182 [url=http://buy-ventolin.reisen/]ventolin inhalador[/url]
— Charlesnef Sep 3, 10:56 AM #wh0cd540495 [url=http://sildenafil.us.com/]seldenafil[/url]
— Bennyboits Sep 3, 11:00 AM #wh0cd540496 [url=http://buy-flagyl.shop/]where to buy flagyl online[/url]
— Alfreddut Sep 3, 11:12 AM #wh0cd6110 [url=http://advair.us.com/]Advair With No Prescription[/url]
— Charlesnef Sep 3, 11:41 AM #wh0cd1863041 [url=http://zithromax.systems/]buy zithromax 500mg[/url]
— AaronUttet Sep 3, 11:52 AM #wh0cd1495655 [url=http://buyretina.shop/]buy retin a[/url] [url=http://amoxil.schule/]amoxil[/url]
— Brettsoync Sep 3, 11:56 AM #[url=https://onlineloans.us.com/]HTTP://ONLINELOANS.US.COM[/url]
— Mikeben Sep 3, 12:14 PM #wh0cd26175 [url=http://buyabilify.shop/]abilify[/url] [url=http://citalopramhbr.reisen/]cheap citalopram[/url]
— MichaelSoush Sep 3, 12:25 PM #wh0cd613968
— KennethBiodo Sep 3, 12:43 PM #wh0cd540495 [url=http://nexiumgeneric.pro/]nexium generics[/url] [url=http://tretinoincream025.pro/]tretinoin cream .025[/url]
— Charlesnef Sep 3, 12:46 PM #wh0cd1495657 [url=http://propecia.us.com/]5mg propecia[/url]
— Charlesnef Sep 3, 01:10 PM #wh0cd1716085 [url=http://buy-tretinoin.reisen/]tretinoin gel over the counter[/url] [url=http://tretinoin.store/]tretinoin gel 0.05[/url]
— MichaelSoush Sep 3, 01:23 PM #wh0cd63354 [url=http://buytamoxifen.shop/]buy tamoxifen citrate[/url]
— KennethBiodo Sep 3, 01:24 PM #wh0cd1936514 [url=http://acyclovir.us.com/]zovirax for sale[/url]
— AaronUttet Sep 3, 01:32 PM #wh0cd79583 [url=http://buy-effexor.work/]buy effexor xr[/url] [url=http://buy-strattera.work/]buy strattera[/url]
— Charlesnef Sep 3, 01:49 PM #[url=https://onlineloans.us.com/]payday loans online[/url] [url=https://loansforbadcredit.us.com/]loansforbadcredit.us.com[/url]
— Mikeben Sep 3, 01:52 PM #wh0cd1569128 [url=http://metforminhydrochloride.pro/]metformin hydrochloride 500 mg[/url] [url=http://eloconoverthecounter.pro/]buy elocon cream[/url]
— Brettsoync Sep 3, 02:10 PM #wh0cd1789546 [url=http://citalopramhbr.reisen/]citalopram benzodiazepine[/url] [url=http://buy-vpxl.reisen/]vpxl[/url]
— MichaelSoush Sep 3, 02:18 PM #wh0cd99648 [url=http://propecia365.us.com/]Propecia[/url]
— MichaelSoush Sep 3, 02:37 PM #wh0cd1789549 [url=http://buy-vpxl.reisen/]buy vpxl[/url] [url=http://buy-methotrexate.work/]buy methotrexate[/url]
— MichaelSoush Sep 3, 02:38 PM #wh0cd136829 [url=http://buy-vermox.shop/]mebendazole tablets[/url]
— KennethBiodo Sep 3, 03:24 PM #wh0cd1789560 [url=http://buy-kamagra.store/]kamagra[/url]
— MichaelSoush Sep 3, 03:32 PM #[url=https://onlineloans.us.com/]online loans[/url]
— Mikeben Sep 3, 03:33 PM #wh0cd687441
— KennethBiodo Sep 3, 03:40 PM #wh0cd1569135 [url=http://buy-flagyl.shop/]flagyl[/url]
— Charlesnef Sep 3, 03:43 PM #wh0cd613968 [url=http://triamterene.systems/]generic triamterene[/url]
— Charlesnef Sep 3, 03:44 PM #wh0cd687441 [url=http://cymbalta.tools/]buy cymbalta from canada[/url] [url=http://trazodone100mg.pro/]trazodone 100mg[/url]
— Bennyboits Sep 3, 04:21 PM #wh0cd153056 [url=http://genericadalat.pro/]adalat[/url]
— Charlesnef Sep 3, 04:22 PM #wh0cd1863019 [url=http://citalopramhbr20mg.shop/]citalopram[/url] [url=http://ciprofloxacinhcl500mg.reisen/]more info[/url]
— MichaelSoush Sep 3, 04:28 PM #wh0cd1642601 [url=http://elimite.schule/]elimite[/url] [url=http://buy-clomid.shop/]buy clomid[/url]
— Brettsoync Sep 3, 04:33 PM #wh0cd687439 [url=http://buy-effexor.work/]venlafaxine effexor[/url]
— KennethBiodo Sep 3, 04:39 PM #wh0cd173121 [url=http://fluoxetine.tools/]fluoxetine[/url]
— MichaelSoush Sep 3, 04:49 PM #wh0cd210304 [url=http://acyclovir.us.com/]acyclovir[/url]
— Bennyboits Sep 3, 04:57 PM #wh0cd210302 [url=http://buy-synthroid.shop/]buy synthroid[/url] [url=http://wellbutrinonline.pro/]wellbutrin online[/url]
— KennethBiodo Sep 3, 05:06 PM #[url=https://writemyessay.us.com/]write my essay[/url] [url=https://essayonline.us.com/]write my essay online[/url]
— Mikeben Sep 3, 05:12 PM #wh0cd687447 [url=http://medrol.work/]medrol[/url] [url=http://buycytotec.shop/]where can i buy cytotec over the counter[/url]
— Alfreddut Sep 3, 06:09 PM #wh0cd226529 [url=http://buy-methotrexate.reisen/]methotrexate[/url] [url=http://buytadacip.shop/]tadacip online[/url]
— Charlesnef Sep 3, 06:29 PM #[url=https://essayonline.us.com/]buy essay online[/url]
— Mikeben Sep 3, 06:52 PM #wh0cd246605 [url=http://eloconoverthecounter.pro/]elocon over the counter[/url]
— MichaelSoush Sep 3, 07:00 PM #wh0cd760916 [url=http://citalopramhbr.reisen/]citalopram[/url]
— Bennyboits Sep 3, 07:00 PM #wh0cd1936500 [url=http://abilifycost.pro/]abilify[/url]
— MichaelSoush Sep 3, 07:01 PM #wh0cd283780 [url=http://zetia.fail/]more information[/url] [url=http://lasix.live/]lasix[/url]
— KennethBiodo Sep 3, 07:02 PM #wh0cd760916
— KennethBiodo Sep 3, 07:10 PM #wh0cd1936508 [url=http://buy-levaquin.shop/]levaquin[/url]
— MichaelSoush Sep 3, 07:49 PM #wh0cd283779 [url=http://wellbutrin150mg.pro/]150 mg wellbutrin[/url]
— Alfreddut Sep 3, 07:55 PM #Сайт для заработка http://zarabotok—doma.ru
Бинарные опционы https://goo.gl/8CEB5C
Стать партнером https://goo.gl/RqnkoX
Видео заработка https://www.youtube.com/watch?v=6gOf9zXufDY
<a href=http://zarabotok—doma.ru>Бинарные Опционы</a>
— NigerrMycle Sep 3, 08:04 PM #wh0cd300002 [url=http://effexor.zone/]effexor 150 mg[/url] [url=http://buyseroquel.work/]buy seroquel online with mastercard[/url]
— Charlesnef Sep 3, 08:29 PM #[url=https://loansforbadcredit.us.com/]payday loans for bad credit[/url]
— Mikeben Sep 3, 08:33 PM #wh0cd2009967 [url=http://buyamoxicillin.reisen/]buy amoxicillin[/url] [url=http://metforminhydrochloride.pro/]metformin hydrochloride[/url]
— MichaelSoush Sep 3, 08:38 PM #wh0cd357253 [url=http://cymbaltageneric.reisen/]cymbalta generic brand[/url]
— KennethBiodo Sep 3, 08:56 PM #wh0cd2009979 [url=http://advaironline.pro/]advair[/url] [url=http://ciprofloxacinhcl500mg.reisen/]ciprofloxacin hcl 500 mg[/url]
— MichaelSoush Sep 3, 09:14 PM #wh0cd357256 [url=http://cymbalta.tools/]cymbalta pills[/url]
— Bennyboits Sep 3, 09:25 PM #wh0cd834389 [url=http://citalopramhbr.reisen/]citalopram hbr tabs 40mg[/url]
— Bennyboits Sep 3, 09:39 PM #wh0cd2230408 [url=http://toradolprice.pro/]toradol[/url]
— AaronUttet Sep 3, 10:00 PM #wh0cd2009981 [url=http://tretinoin.fail/]buy tretinoin cream online[/url] [url=http://tretinoincream025.pro/]tretinoin cream[/url]
— MichaelSoush Sep 3, 10:04 PM #[url=https://onlineloans.us.com/]payday loan online[/url]
— Mikeben Sep 3, 10:13 PM #wh0cd2083440 [url=http://levaquin500mg.pro/]levaquin[/url] [url=http://buy-tretinoin.store/]tretinoin cream[/url]
— MichaelSoush Sep 3, 10:21 PM #wh0cd834389
— KennethBiodo Sep 3, 10:29 PM #wh0cd373481 [url=http://wellbutrin150mg.pro/]wellbutrin[/url]
— Charlesnef Sep 3, 10:46 PM #wh0cd430731 [url=http://sildenafil.us.com/sildenafil-citrate-100mg-pills.html]sildenafil citrate 100mg pills[/url]
— Bennyboits Sep 3, 11:25 PM #wh0cd393558 [url=http://advaironline.pro/]advair online[/url]
— MichaelSoush Sep 3, 11:25 PM #wh0cd2083452 [url=http://metforminhydrochloride.pro/]metformin 500 mg price[/url] [url=http://buyprednisone.reisen/]buy prednisone[/url]
— MichaelSoush Sep 3, 11:26 PM #wh0cd907864 [url=http://amoxicillin.us.com/]amoxicillin tablets for sale[/url]
— Bennyboits Sep 4, 12:06 AM #wh0cd2303883 [url=http://buy-methotrexate.work/]medication methotrexate[/url] [url=http://neurontinonline.pro/]neurontin online[/url]
— AaronUttet Sep 4, 12:13 AM #wh0cd2083454 [url=http://zithromax.news/]buy zithromax pfizer[/url] [url=http://cephalexin500.reisen/]cephalexin medicine[/url]
— MichaelSoush Sep 4, 12:16 AM #wh0cd834393 [url=http://albuterol.store/]albuterol inhalers for sale[/url] [url=http://metforminonline.pro/]metformin[/url]
— Alfreddut Sep 4, 01:03 AM #wh0cd467033 [url=http://advair.us.com/]buy advair[/url]
— MichaelSoush Sep 4, 01:39 AM #wh0cd2156925 [url=http://buycytotec.store/]cytotec online purchase[/url] [url=http://buybuspar.shop/]buy buspar[/url]
— MichaelSoush Sep 4, 01:40 AM #wh0cd907864
— KennethBiodo Sep 4, 02:13 AM #wh0cd834394 [url=http://wellbutrinonline.pro/]buy wellbutrin online[/url] [url=http://buybentyl.reisen/]bentyl cost[/url]
— Charlesnef Sep 4, 02:16 AM #wh0cd2377356 [url=http://suhagraonline.pro/]suhagra online[/url]
— AaronUttet Sep 4, 02:23 AM #wh0cd2156927 [url=http://prednisoloneonline.pro/]prednisolone tablet[/url]
— MichaelSoush Sep 4, 02:26 AM #wh0cd2230390 [url=http://eloconoverthecounter.pro/]elocon for eczema[/url]
— MichaelSoush Sep 4, 02:26 AM #wh0cd504198 [url=http://wellbutrin150mg.pro/]wellbutrin generic price[/url]
— Alfreddut Sep 4, 02:27 AM #wh0cd1936502 [url=http://baclofen.work/]baclofen tablets[/url]
— Charlesnef Sep 4, 02:40 AM #wh0cd577679 [url=http://dapoxetine.reisen/]buy dapoxetine[/url] [url=http://buy-anafranil.store/]anafranil[/url]
— Bennyboits Sep 4, 03:41 AM #wh0cd2230398 [url=http://sildenafil.us.com/]where to buy sildenafil citrate online[/url]
— MichaelSoush Sep 4, 03:51 AM #wh0cd577671 [url=http://sildenafil.us.com/]generic sildenafil citrate 100mg[/url]
— Alfreddut Sep 4, 04:23 AM #wh0cd2009978 [url=http://valtrex.zone/]valtrex[/url] [url=http://buycelexa.shop/]buy celexa[/url]
— Charlesnef Sep 4, 04:25 AM #wh0cd907866 [url=http://acyclovircream.pro/]acyclovir[/url] [url=http://elimite.directory/]elimite[/url]
— Alfreddut Sep 4, 04:28 AM #wh0cd2450834 [url=http://elimite.schule/]elimite[/url]
— AaronUttet Sep 4, 04:29 AM #wh0cd2303863 [url=http://sildenafil.us.com/sildenafil-soft-tabs.html]sildenafil citrate 50mg tab[/url]
— MichaelSoush Sep 4, 04:34 AM #wh0cd2230402 [url=http://sildenafil.us.com/sildenafil-citrate-100-mg.html]sildenafil citrate 100 mg[/url]
— MichaelSoush Sep 4, 04:34 AM #wh0cd651151 [url=http://buy-effexor.work/]effexor[/url] [url=http://atenolol.systems/]buy atenolol online[/url]
— KennethBiodo Sep 4, 05:02 AM #wh0cd981339
— KennethBiodo Sep 4, 05:20 AM #wh0cd907869 [url=http://sildenafil.us.com/]seldenafil[/url]
— Charlesnef Sep 4, 05:24 AM #wh0cd651154 [url=http://genericseroquel.pro/]seroquel[/url]
— Bennyboits Sep 4, 05:51 AM #wh0cd613981 [url=http://buybentyl.reisen/]check out your url[/url] [url=http://atenolol.systems/]atenolol[/url]
— MichaelSoush Sep 4, 06:00 AM #wh0cd2083453 [url=http://vardenafil.world/]cheap vardenafil online[/url] [url=http://cephalexin500.reisen/]learn more here[/url]
— Charlesnef Sep 4, 06:12 AM #wh0cd651144 [url=http://buy-ventolin.shop/]ventolin[/url]
— Alfreddut Sep 4, 06:20 AM #wh0cd2377336 [url=http://kamagra.live/]buy kamagra oral jelly[/url]
— MichaelSoush Sep 4, 06:20 AM #wh0cd981333 [url=http://advair.us.com/]advair[/url]
— KennethBiodo Sep 4, 06:21 AM #wh0cd2524310 [url=http://advaironline.pro/]generic advair online[/url] [url=http://buyavana.shop/]avana[/url]
— AaronUttet Sep 4, 06:35 AM #wh0cd2303875 [url=http://advair.us.com/]advair[/url]
— MichaelSoush Sep 4, 06:48 AM #wh0cd667373 [url=http://clonidineonline.pro/]clonidine[/url]
— Charlesnef Sep 4, 06:49 AM #wh0cd724626 [url=http://prednisone.tools/]sterapred ds[/url] [url=http://prednisoloneonline.pro/]prednisolone[/url]
— KennethBiodo Sep 4, 07:06 AM #wh0cd981339 [url=http://lasix.store/]lasix 40[/url]
— Alfreddut Sep 4, 07:53 AM #wh0cd1128289 [url=http://acyclovircream.pro/]acyclovir cream[/url]
— Bennyboits Sep 4, 07:55 AM #wh0cd2156926 [url=http://medrol.zone/]medrol[/url] [url=http://lasixonline.pro/]bonuses[/url]
— Charlesnef Sep 4, 08:00 AM #wh0cd724629 [url=http://buy-cephalexin.store/]cephalexin keflex[/url]
— Bennyboits Sep 4, 08:04 AM #wh0cd2450811 [url=http://buy-tretinoin.store/]tretinoin cream[/url]
— MichaelSoush Sep 4, 08:05 AM #wh0cd687456 [url=http://propecia.systems/]propecia[/url] [url=http://wellbutrinonline.pro/]wellbutrin online[/url]
— MichaelSoush Sep 4, 08:12 AM #wh0cd2377346 [url=http://buy-cephalexin.store/]buy cephalexin[/url] [url=http://genericadalat.pro/]generic adalat[/url]
— MichaelSoush Sep 4, 08:15 AM #wh0cd2156916 [url=http://buyseroquel.work/]buy seroquel[/url]
— Brettsoync Sep 4, 08:25 AM #wh0cd724617 [url=http://baclofen.work/]baclofen tablets 10mg[/url]
— Alfreddut Sep 4, 08:33 AM #wh0cd1054816
— KennethBiodo Sep 4, 08:47 AM #wh0cd981342 [url=http://buytadalafil.store/]tadalafil[/url] [url=http://eloconoverthecounter.pro/]buy elocon cream[/url]
— Charlesnef Sep 4, 08:55 AM #wh0cd2377348 [url=http://medrol.zone/]medrol pak[/url] [url=http://propecia.news/]finasteride no prescription[/url]
— MichaelSoush Sep 4, 08:56 AM #wh0cd740848 [url=http://elimite.news/]elimite[/url]
— Charlesnef Sep 4, 09:03 AM #wh0cd798102 [url=http://lasix.live/]lasix[/url]
— KennethBiodo Sep 4, 09:19 AM #wh0cd2230401 [url=http://medrol.zone/]medrol[/url]
— Charlesnef Sep 4, 09:51 AM #wh0cd2450821 [url=http://nolvadex.directory/]click for source[/url] [url=http://lasix.live/]buy lasix online canada[/url]
— MichaelSoush Sep 4, 10:15 AM #wh0cd798090 [url=http://buy-tretinoin.reisen/]tretinoin cream purchase[/url] [url=http://avodart.reisen/]avodart[/url]
— Alfreddut Sep 4, 10:18 AM #wh0cd798102 [url=http://stromectol.zone/]stromectol[/url]
— Bennyboits Sep 4, 10:21 AM #wh0cd1201762 [url=http://cymbaltageneric.reisen/]cymbalta capsules[/url] [url=http://suhagraonline.pro/]suhagra[/url]
— Bennyboits Sep 4, 10:22 AM #wh0cd760931 [url=http://acyclovir.us.com/]acyclovir[/url]
— MichaelSoush Sep 4, 10:26 AM #wh0cd2230396 [url=http://sildenafil.us.com/sildenafil-citrate-100mg-pills.html]sildenafil citrate 100mg pills[/url]
— Brettsoync Sep 4, 10:45 AM #wh0cd2450821 [url=http://ciprofloxacinhcl500mg.reisen/]cipro safe[/url]
— MichaelSoush Sep 4, 10:56 AM #wh0cd2671260 [url=http://propecia.news/]propecia[/url] [url=http://wellbutrin150mg.pro/]wellbutrin sr 150 mg[/url]
— AaronUttet Sep 4, 11:11 AM #wh0cd1054814 [url=http://effexor.zone/]effexor xr 75[/url]
— Alfreddut Sep 4, 11:24 AM #wh0cd871575 [url=http://buy-effexor.work/]effexor[/url]
— KennethBiodo Sep 4, 11:32 AM #wh0cd2303876 [url=http://metformin.reisen/]metformin 850 mg[/url]
— Charlesnef Sep 4, 11:36 AM #wh0cd1128291
— KennethBiodo Sep 4, 12:16 PM #wh0cd2597759 [url=http://buy-cephalexin.store/]keflex drug[/url]
— MichaelSoush Sep 4, 12:24 PM #wh0cd1054817 [url=http://buyrimonabant.reisen/]buy rimonabant[/url]
— Charlesnef Sep 4, 12:29 PM #wh0cd871575 [url=http://prednisoneonline.pro/]prednisone steroids[/url]
— Bennyboits Sep 4, 12:39 PM #wh0cd2744735 [url=http://advair.us.com/]advair[/url]
— AaronUttet Sep 4, 01:22 PM #wh0cd2377354 [url=http://buy-ventolin.reisen/]ventolin[/url] [url=http://elimite.schule/]elimite online[/url]
— Charlesnef Sep 4, 01:23 PM #wh0cd1275237 [url=http://clonidineonline.pro/]your domain name[/url] [url=http://buy-albendazole.store/]buy albendazole[/url]
— Bennyboits Sep 4, 01:24 PM #wh0cd945048 [url=http://buycafergot.store/]cafergot tablets[/url] [url=http://buyseroquel.work/]buy seroquel[/url]
— KennethBiodo Sep 4, 01:29 PM #wh0cd2671234 [url=http://fluoxetine20mg.pro/]fluoxetine[/url]
— MichaelSoush Sep 4, 02:24 PM #wh0cd945050 [url=http://fluoxetine20mg.pro/]fluoxetine[/url]
— Bennyboits Sep 4, 02:25 PM #wh0cd945040 [url=http://sildenafil.us.com/sildenafil-citrate-100mg-pills.html]sildenafil tablets 100 mg[/url]
— Alfreddut Sep 4, 02:29 PM #wh0cd2597769 [url=http://tenormin.store/]tenormin[/url] [url=http://buyamoxicillin.reisen/]continue[/url]
— MichaelSoush Sep 4, 02:36 PM #wh0cd1128289 [url=http://lasix.store/]lasix no prescription[/url]
— Alfreddut Sep 4, 02:40 PM #wh0cd907881 [url=http://advair.us.com/]advair[/url]
— MichaelSoush Sep 4, 02:42 PM #wh0cd2597771 [url=http://buytadalissx.reisen/]tadalis sx[/url]
— MichaelSoush Sep 4, 03:18 PM #wh0cd2818210 [url=http://buy-methotrexate.work/]buy methotrexate[/url]
— AaronUttet Sep 4, 03:32 PM #wh0cd1201764
— KennethBiodo Sep 4, 03:38 PM #wh0cd2450829 [url=http://sildenafil.us.com/]sildenafil[/url]
— Charlesnef Sep 4, 03:40 PM #wh0cd1348710 [url=http://sildenafil.us.com/sildenafil-soft-tabs.html]sildenafil from india[/url]
— Bennyboits Sep 4, 03:49 PM #wh0cd981354 [url=http://propecia365.us.com/]propecia without prescription[/url]
— MichaelSoush Sep 4, 04:54 PM #wh0cd2450818 [url=http://zithromax.news/]zithromax[/url] [url=http://retinaa.pro/]retin a buy online[/url]
— Brettsoync Sep 4, 05:15 PM #wh0cd2671244 [url=http://buyneurontin.reisen/]neurontin[/url] [url=http://buy-nexium.shop/]buy nexium[/url]
— MichaelSoush Sep 4, 05:33 PM #wh0cd2524302 [url=http://buyneurontin.reisen/]neurontin[/url] [url=http://buyrimonabant.reisen/]rimonabant[/url]
— Charlesnef Sep 4, 06:02 PM #wh0cd1201764 [url=http://amoxicillin.us.com/]amoxicillin[/url]
— Alfreddut Sep 4, 06:09 PM #wh0cd1422183 [url=http://amoxicillin.us.com/]amoxicillin[/url]
— Bennyboits Sep 4, 06:19 PM #wh0cd2818184 [url=http://propecia.news/]propecia[/url] [url=http://buytamoxifen.shop/]buy tamaxophen[/url]
— MichaelSoush Sep 4, 06:25 PM #wh0cd1275237
— KennethBiodo Sep 4, 06:59 PM #wh0cd2744715 [url=http://buycytotec.shop/]full article[/url] [url=http://toradolprice.pro/]toradol cost[/url]
— MichaelSoush Sep 4, 07:04 PM #wh0cd2524291 [url=http://buspar.news/]buspar[/url]
— Brettsoync Sep 4, 07:21 PM #wh0cd1201767 [url=http://buy-seroquel.reisen/]seroquel[/url]
— Charlesnef Sep 4, 07:28 PM #wh0cd2597780 [url=http://amoxil.schule/]view website[/url] [url=http://buy-vpxl.reisen/]vpxl[/url]
— Charlesnef Sep 4, 08:08 PM #wh0cd1495664 [url=http://ciprofloxacinhcl500mg.reisen/]ciprofloxacin hcl 500 mg[/url] [url=http://buycafergot.store/]buy cafergot[/url]
— Bennyboits Sep 4, 08:31 PM #wh0cd1275230 [url=http://zithromax.news/]zithromax[/url] [url=http://toradolprice.pro/]toradol[/url]
— KennethBiodo Sep 4, 08:32 PM #wh0cd2891659 [url=http://genericseroquel.pro/]seroquel for children[/url] [url=http://eloconoverthecounter.pro/]elocon cream over the counter[/url]
— MichaelSoush Sep 4, 08:37 PM #wh0cd1128302 [url=http://buy-tretinoin.store/]tretinoin cream 0.1 price[/url]
— MichaelSoush Sep 4, 09:45 PM #wh0cd2597766 [url=http://buy-strattera.work/]strattera[/url]
— Brettsoync Sep 4, 09:48 PM #wh0cd1348712
— KennethBiodo Sep 4, 10:30 PM #wh0cd2891665 [url=http://sildenafil.us.com/sildenafil-citrate-100mg-pills.html]sildenafil citrate tablets 100 mg[/url]
— MichaelSoush Sep 4, 11:17 PM #wh0cd1348706 [url=http://sildenafil.us.com/sildenafil-soft-tabs.html]sildenafil citrate 100mg pills[/url]
— KennethBiodo Sep 4, 11:25 PM #wh0cd1422187
— KennethBiodo Sep 5, 12:41 AM #wh0cd1275251 [url=http://kamagra.live/]kamagra[/url] [url=http://buy-nexium.shop/]buy nexium[/url]
— MichaelSoush Sep 5, 01:00 AM #wh0cd2744712 [url=http://advair.us.com/]Advair Diskus[/url]
— Brettsoync Sep 5, 01:02 AM #wh0cd1642612 [url=http://amoxicillin.us.com/]can you buy amoxicillin over the counter[/url]
— Bennyboits Sep 5, 01:12 AM #wh0cd3185581 [url=http://acyclovir.us.com/]acyclovir[/url]
— AaronUttet Sep 5, 01:42 AM #wh0cd2818206 [url=http://amoxicillin.us.com/]continue[/url]
— Charlesnef Sep 5, 01:50 AM #wh0cd2818185 [url=http://atenolol.systems/]buy atenolol[/url] [url=http://tretinoincream025.pro/]tretinoin cream[/url]
— Brettsoync Sep 5, 02:52 AM #wh0cd2965132 [url=http://buycelexa.shop/]celexa online[/url]
— MichaelSoush Sep 5, 02:54 AM #wh0cd34732 [url=http://tretinoin.fail/]tretinoin cream[/url]
— Alfreddut Sep 5, 03:09 AM #wh0cd1275240 [url=http://buylipitor.store/]order lipitor online[/url]
— Charlesnef Sep 5, 03:11 AM #wh0cd1495660
— KennethBiodo Sep 5, 03:30 AM #wh0cd3259056 [url=http://buy-atarax.shop/]atarax 25mg[/url] [url=http://propecia.systems/]propecia[/url]
— AaronUttet Sep 5, 03:31 AM #wh0cd2891665 [url=http://buy-strattera.work/]buy strattera[/url]
— MichaelSoush Sep 5, 04:03 AM #wh0cd2891681 [url=http://medrol.zone/]medrol pak[/url]
— Charlesnef Sep 5, 04:20 AM #wh0cd2891662 [url=http://buy-albendazole.store/]where to buy albendazole[/url] [url=http://tenormin.store/]buy tenormin[/url]
— Brettsoync Sep 5, 04:41 AM #wh0cd1495657 [url=http://buy-avana.store/]avana[/url]
— KennethBiodo Sep 5, 04:58 AM #wh0cd3038605 [url=http://tretinoincream005.pro/]tretinoin gel over the counter[/url] [url=http://buy-vermox.shop/]vermox[/url]
— MichaelSoush Sep 5, 05:01 AM #wh0cd1422199 [url=http://wellbutrinonline.pro/]wellbutrin 150 xl[/url] [url=http://buy-synthroid.shop/]buy synthroid online[/url]
— MichaelSoush Sep 5, 05:11 AM #wh0cd108207 [url=http://eloconsteroidcream.pro/]elocon ointment 0.1[/url] [url=http://fluoxetine.tools/]fluoxetine[/url]
— Charlesnef Sep 5, 05:30 AM #wh0cd1348710 [url=http://levaquin500mg.pro/]levaquin buy[/url] [url=http://eloconoverthecounter.pro/]elocon over the counter[/url]
— Alfreddut Sep 5, 05:32 AM #By dealing together, two of you can address problems of self-esteem and mutual trust. He is content, as well as the opposite of what we think later years has in store for us.
— ATeannaCheetle Sep 5, 05:40 AM #wh0cd2965138 [url=http://buy-azithromycin.store/]z pack azithromycin[/url]
— MichaelSoush Sep 5, 06:10 AM #wh0cd2965135 [url=http://buy-flagyl.shop/]flagyl[/url]
— Brettsoync Sep 5, 06:32 AM #wh0cd1569133
— KennethBiodo Sep 5, 06:38 AM #wh0cd3112080 [url=http://buyyasmin.shop/]more help[/url]
— MichaelSoush Sep 5, 07:01 AM #wh0cd181681 [url=http://buyamoxicillin.reisen/]amoxicillin[/url] [url=http://buy-cephalexin.store/]i found it[/url]
— Alfreddut Sep 5, 07:10 AM #wh0cd3185568 [url=http://buybuspar.shop/]buy buspar[/url]
— MichaelSoush Sep 5, 07:20 AM #wh0cd181678 [url=http://elimite.news/]elimite[/url]
— KennethBiodo Sep 5, 07:44 AM #wh0cd181680 [url=http://buy-vpxl.reisen/]buy vpxl[/url] [url=http://buy-arimidex.reisen/]arimidex generic[/url]
— Bennyboits Sep 5, 07:53 AM #wh0cd3038611 [url=http://propecia.news/]purchase finasteride without a prescription[/url]
— MichaelSoush Sep 5, 08:20 AM #wh0cd1569130 [url=http://sildenafil.us.com/sildenafil-citrate-100mg-pills.html]sildenafil 100 mg[/url]
— KennethBiodo Sep 5, 08:42 AM #wh0cd3185553 [url=http://propecia365.us.com/]propecia 5 mg for sale[/url]
— MichaelSoush Sep 5, 09:10 AM #wh0cd1642606
— KennethBiodo Sep 5, 09:20 AM #wh0cd3259041 [url=http://buy-synthroid.shop/]synthroid pills[/url]
— MichaelSoush Sep 5, 09:27 AM #wh0cd255155 [url=http://acyclovir.us.com/]Buy Acyclovir[/url]
— Charlesnef Sep 5, 09:35 AM #wh0cd255153 [url=http://nolvadex.directory/]buy cheap nolvadex online without prescription[/url]
— Bennyboits Sep 5, 10:06 AM #wh0cd3112086 [url=http://propecia.us.com/]finasteride for women[/url]
— MichaelSoush Sep 5, 10:13 AM #wh0cd3479477 [url=http://buyrimonabant.reisen/]rimonabant[/url]
— AaronUttet Sep 5, 10:17 AM #wh0cd1863035 [url=http://effexor.zone/]price of effexor[/url] [url=http://levaquin500mg.pro/]continue reading[/url]
— Bennyboits Sep 5, 10:54 AM #wh0cd3112087 [url=http://buy-tretinoin.store/]tretinoin cream[/url]
— Brettsoync Sep 5, 11:04 AM #wh0cd328629 [url=http://buyrimonabant.reisen/]buy acomplia rimonabant[/url]
— Alfreddut Sep 5, 11:10 AM #wh0cd3259028 [url=http://metforminhydrochloride.pro/]metformin hydrochloride[/url]
— MichaelSoush Sep 5, 11:20 AM #wh0cd1642620 [url=http://acyclovir.us.com/]acyclovir[/url]
— MichaelSoush Sep 5, 11:24 AM #wh0cd328628 [url=http://baclofen.work/]baclofen tablets 10mg[/url]
— Charlesnef Sep 5, 11:48 AM #wh0cd3112103 [url=http://buy-atarax.shop/]buy atarax online[/url]
— Charlesnef Sep 5, 11:59 AM #wh0cd328626 [url=http://amoxicillin.us.com/]amoxicillin[/url]
— KennethBiodo Sep 5, 12:04 PM #wh0cd328631 [url=http://buy-nexium.shop/]generic for nexium[/url]
— Bennyboits Sep 5, 12:13 PM #wh0cd1495663 [url=http://suhagraonline.pro/]suhagra online[/url]
— Charlesnef Sep 5, 12:16 PM #wh0cd1716079
— KennethBiodo Sep 5, 12:35 PM #wh0cd402106 [url=http://lasix.store/]lasix 100mg[/url]
— Alfreddut Sep 5, 01:03 PM #wh0cd3185560 [url=http://metforminonline.pro/]metformin[/url]
— Brettsoync Sep 5, 01:09 PM #wh0cd3332501 [url=http://genericadalat.pro/]generic adalat[/url] [url=http://cipro.directory/]cipro[/url]
— MichaelSoush Sep 5, 01:32 PM #wh0cd1716097 [url=http://tadalafil.fail/]tadalafil citrate[/url]
— MichaelSoush Sep 5, 01:39 PM #wh0cd1936508 [url=http://lasix.systems/]lasix[/url]
— Bennyboits Sep 5, 02:08 PM #wh0cd3259034 [url=http://tenormin.store/]tenormin[/url] [url=http://wellbutrin150mg.pro/]150 mg wellbutrin[/url]
— MichaelSoush Sep 5, 02:16 PM #wh0cd402104 [url=http://eloconoverthecounter.pro/]buy elocon cream[/url]
— Bennyboits Sep 5, 02:21 PM #wh0cd402101 [url=http://sildenafil.us.com/]where to buy sildenafil citrate[/url]
— KennethBiodo Sep 5, 02:26 PM #wh0cd1716076 [url=http://tenormin.store/]buy tenormin[/url] [url=http://dapoxetine.reisen/]dapoxetine buy online[/url]
— KennethBiodo Sep 5, 02:43 PM #wh0cd3185578 [url=http://acyclovir.us.com/]Buy Acyclovir[/url]
— Charlesnef Sep 5, 02:44 PM #wh0cd3626423 [url=http://sildenafil.us.com/sildenafil-citrate-100mg-pills.html]sildenafil citrate 100mg pills[/url]
— AaronUttet Sep 5, 02:46 PM #wh0cd1569142 [url=http://lasixonline.pro/]lasix 10 mg[/url]
— Alfreddut Sep 5, 03:08 PM #wh0cd475581 [url=http://amoxil.schule/]amoxil buy[/url] [url=http://buy-clomid.shop/]clomiphene for sale[/url]
— Alfreddut Sep 5, 03:10 PM #wh0cd1569138 [url=http://buybentyl.reisen/]bentyl[/url] [url=http://prozac.zone/]prozac[/url]
— Charlesnef Sep 5, 03:12 PM #wh0cd3259035 [url=http://genericadalat.pro/]generic adalat[/url] [url=http://buspar.news/]cost of buspar[/url]
— Brettsoync Sep 5, 03:22 PM #wh0cd475578 [url=http://advaironline.pro/]advair generic[/url]
— Charlesnef Sep 5, 03:55 PM #wh0cd1789554
— KennethBiodo Sep 5, 04:12 PM #wh0cd475579 [url=http://buytenormin.reisen/]tenormin[/url]
— Bennyboits Sep 5, 04:38 PM #wh0cd3332507 [url=http://levaquin500mg.pro/]levaquin 500 mg[/url] [url=http://eloconoverthecounter.pro/]elocon[/url]
— MichaelSoush Sep 5, 04:40 PM #wh0cd3699898 [url=http://lasix.systems/]lasix buy[/url]
— AaronUttet Sep 5, 04:49 PM #wh0cd3259053 [url=http://buy-tretinoin.reisen/]tretinoin cream[/url] [url=http://cephalexin500.reisen/]cephalexin[/url]
— Charlesnef Sep 5, 05:00 PM #wh0cd549056 [url=http://cymbalta.tools/]cymbalta[/url]
— Alfreddut Sep 5, 05:25 PM #wh0cd1789549 [url=http://sildenafil.us.com/sildenafil-citrate-100-mg.html]sildenafil citrate 100 mg[/url]
— KennethBiodo Sep 5, 05:27 PM #wh0cd2009983 [url=http://buy-strattera.work/]strattera[/url]
— Bennyboits Sep 5, 05:27 PM #wh0cd549051 [url=http://buyprovera.reisen/]provera[/url] [url=http://buylipitor.store/]lipitor buy[/url]
— Charlesnef Sep 5, 06:10 PM #wh0cd1863045 [url=http://suhagraonline.pro/]suhagra online[/url] [url=http://prednisoloneonline.pro/]prednisolone[/url]
— MichaelSoush Sep 5, 06:19 PM #wh0cd1642611 [url=http://buy-ventolin.shop/]buy ventolin inhaler[/url] [url=http://lisinopril.store/]zestril[/url]
— Charlesnef Sep 5, 06:31 PM #wh0cd1642615 [url=http://buy-ventolin.reisen/]buy ventolin inhaler[/url] [url=http://valtrex.zone/]valtrex prescription[/url]
— Alfreddut Sep 5, 06:39 PM #wh0cd3773376 [url=http://buy-ventolin.shop/]ventolin[/url] [url=http://tetracycline.news/]tetracycline[/url]
— AaronUttet Sep 5, 07:09 PM #wh0cd3552929 [url=http://buyyasmin.shop/]yasmin[/url] [url=http://acyclovircream.pro/]acyclovir[/url]
— MichaelSoush Sep 5, 07:31 PM #wh0cd1863030
— KennethBiodo Sep 5, 07:35 PM #wh0cd3479456 [url=http://abilifycost.pro/]generic abilify canada[/url] [url=http://zithromax.systems/]zithromax tablet[/url]
— MichaelSoush Sep 5, 08:12 PM #wh0cd622520 [url=http://kamagra.live/]kamagra[/url] [url=http://buyprednisone.reisen/]prednisone[/url]
— KennethBiodo Sep 5, 08:15 PM #wh0cd2083456 [url=http://buy-effexor.work/]buy effexor xr[/url]
— Bennyboits Sep 5, 08:22 PM #wh0cd1936520 [url=http://citalopramhbr20mg.shop/]citalopram hydrobromide 20 mg[/url]
— MichaelSoush Sep 5, 08:34 PM #wh0cd1936503
— KennethBiodo Sep 5, 09:55 PM #wh0cd696002 [url=http://buy-effexor.work/]buy effexor xr[/url]
— Alfreddut Sep 5, 09:55 PM #wh0cd3552933 [url=http://buy-ventolin.shop/]ventolin[/url]
— MichaelSoush Sep 5, 10:12 PM #wh0cd3479460 [url=http://valtrex.zone/]valtrex prescription online[/url]
— Brettsoync Sep 5, 10:13 PM #wh0cd695993 [url=http://buy-kamagra.store/]kamagra[/url] [url=http://buycafergot.store/]cafergot[/url]
— KennethBiodo Sep 5, 10:14 PM #wh0cd1716084 [url=http://buytadalissx.reisen/]buy tadalis sx[/url] [url=http://buy-kamagra.store/]kamagra[/url]
— Charlesnef Sep 5, 10:22 PM #wh0cd3699883 [url=http://propecia.systems/]where to buy propecia[/url] [url=http://revia.reisen/]generic revia[/url]
— MichaelSoush Sep 5, 10:24 PM #wh0cd2009999 [url=http://zithromax.news/]where to buy zithromax online[/url]
— MichaelSoush Sep 5, 10:40 PM #wh0cd696003 [url=http://buy-tretinoin.store/]buy tretinoin[/url]
— Charlesnef Sep 5, 10:40 PM #wh0cd3699879 [url=http://buyavana.shop/]avana[/url] [url=http://buy-tretinoin.store/]buy tretinoin[/url]
— MichaelSoush Sep 6, 12:02 AM #wh0cd3552933 [url=http://levaquin500mg.pro/]levaquin[/url]
— Brettsoync Sep 6, 12:22 AM #wh0cd3626406 [url=http://buyneurontin.reisen/]neurontin[/url] [url=http://buyamoxicillin.reisen/]amoxicillin online canada[/url]
— MichaelSoush Sep 6, 12:23 AM #wh0cd769466 [url=http://buy-arimidex.reisen/]buy arimidex online[/url]
— KennethBiodo Sep 6, 12:28 AM #wh0cd3773356 [url=http://buyamoxicillin.reisen/]amoxicillin 30 capsules[/url]
— MichaelSoush Sep 6, 12:29 AM #wh0cd769476 [url=http://fluoxetine20mg.pro/]fluoxetine[/url] [url=http://buybuspar.shop/]buspar[/url]
— Charlesnef Sep 6, 12:40 AM #wh0cd2083472 [url=http://buybentyl.reisen/]bentyl[/url] [url=http://elimite.news/]elimite[/url]
— MichaelSoush Sep 6, 12:49 AM #wh0cd1789559 [url=http://buyseroquel.work/]buy seroquel[/url] [url=http://buyadvair.shop/]advair[/url]
— Charlesnef Sep 6, 01:08 AM #wh0cd769478 [url=http://sildenafil.us.com/]sildenafil[/url]
— Bennyboits Sep 6, 01:14 AM #wh0cd2009976
— KennethBiodo Sep 6, 01:21 AM #wh0cd1789565 [url=http://lasix.systems/]lasix[/url]
— Alfreddut Sep 6, 01:51 AM #[url=https://bestpaydayloansonline.us.com/]payday loans online[/url] [url=https://freesexchat.us.com/]webcam sluts[/url]
— Johnben Sep 6, 02:02 AM #wh0cd2009970 [url=http://buyabilify.shop/]buy abilify online[/url] [url=http://effexor.zone/]effexor 75[/url]
— KennethBiodo Sep 6, 02:21 AM #wh0cd3846831 [url=http://buycymbalta.reisen/]cymbalta 60 mg capsule[/url]
— MichaelSoush Sep 6, 02:26 AM #wh0cd3699879 [url=http://elimite.directory/]elimite[/url] [url=http://dapoxetine.reisen/]dapoxetine[/url]
— MichaelSoush Sep 6, 02:33 AM #wh0cd842941 [url=http://cymbaltageneric.reisen/]cymbalta[/url]
— KennethBiodo Sep 6, 02:58 AM #wh0cd2156947 [url=http://cephalexin500mg.shop/]cephalexin tablets[/url] [url=http://buycytotec.store/]cytotec[/url]
— MichaelSoush Sep 6, 03:04 AM #wh0cd4067279 [url=http://buy-tretinoin.reisen/]buy tretinoin[/url]
— AaronUttet Sep 6, 03:56 AM #wh0cd3626424 [url=http://cephalexin500mg.work/]cephalexin 500mg[/url] [url=http://ampicillinonline.pro/]ampicillin online[/url]
— Charlesnef Sep 6, 03:56 AM #wh0cd2083456
— KennethBiodo Sep 6, 04:15 AM #wh0cd1863038 [url=http://avodart.reisen/]avodart[/url]
— Alfreddut Sep 6, 04:41 AM #wh0cd1863032 [url=http://buylipitor.store/]buy lipitor[/url] [url=http://buy-kamagra.store/]buy kamagra[/url]
— Charlesnef Sep 6, 04:42 AM #wh0cd2230423 [url=http://neurontinonline.pro/]neurontin[/url]
— MichaelSoush Sep 6, 05:04 AM #wh0cd2303878 [url=http://trazodone.tools/]trazodone[/url]
— Bennyboits Sep 6, 05:35 AM #wh0cd2083443 [url=http://acyclovir.us.com/]acyclovir[/url]
— KennethBiodo Sep 6, 05:47 AM #wh0cd916424 [url=http://elimite.schule/]elimite[/url]
— Bennyboits Sep 6, 05:55 AM #wh0cd3993779 [url=http://tadalafil.fail/]tadalafil[/url] [url=http://buy-albendazole.work/]albendazole[/url]
— MichaelSoush Sep 6, 06:32 AM #wh0cd3773357 [url=http://buyadvair.shop/]advair 500[/url]
— Brettsoync Sep 6, 06:47 AM #wh0cd989897 [url=http://clonidineonline.pro/]clonidine[/url] [url=http://suhagraonline.pro/]suhagra online[/url]
— Charlesnef Sep 6, 06:53 AM #wh0cd989896 [url=http://acyclovircream.pro/]where can i buy zovirax[/url]
— Alfreddut Sep 6, 06:55 AM #wh0cd989889 [url=http://propranolol.zone/]propranolol medication[/url] [url=http://levaquin500mg.pro/]levaquin 500 mg tablets[/url]
— KennethBiodo Sep 6, 07:13 AM #wh0cd2156929
— KennethBiodo Sep 6, 07:25 AM #wh0cd989897 [url=http://buy-clomid.shop/]buy clomid[/url] [url=http://buytadacip.shop/]buy tadacip[/url]
— Bennyboits Sep 6, 07:47 AM #wh0cd3773370 [url=http://buyprednisone.reisen/]where to buy prednisone online without a script[/url] [url=http://buycelexa.shop/]celexa[/url]
— Charlesnef Sep 6, 07:48 AM #wh0cd1936513 [url=http://buyprednisone.reisen/]online prednisone[/url] [url=http://tretinoin.fail/]buy tretinoin gel[/url]
— Alfreddut Sep 6, 08:11 AM #wh0cd1936507 [url=http://buy-cephalexin.store/]keflex antibiotic[/url]
— Charlesnef Sep 6, 08:11 AM #wh0cd4214229 [url=http://cephalexin500mg.shop/]cephalexin 500 mg capsule[/url]
— AaronUttet Sep 6, 08:17 AM #wh0cd4067252 [url=http://buy-strattera.work/]strattera[/url]
— MichaelSoush Sep 6, 08:21 AM #wh0cd3993786 [url=http://sildenafil.us.com/]sildenafil[/url]
— MichaelSoush Sep 6, 08:27 AM #wh0cd3846831 [url=http://vibramycin.pro/]doxycycline cheap[/url]
— MichaelSoush Sep 6, 08:58 AM #wh0cd3846832 [url=http://buycelexa.reisen/]buy celexa[/url] [url=http://buy-anafranil.store/]buy anafranil[/url]
— Brettsoync Sep 6, 09:03 AM #wh0cd2230404
— KennethBiodo Sep 6, 10:03 AM #wh0cd3846843 [url=http://buy-arimidex.reisen/]arimidex[/url] [url=http://buytadalissx.reisen/]tadalis sx online[/url]
— Charlesnef Sep 6, 10:18 AM #wh0cd4140725 [url=http://buy-seroquel.reisen/]seroquel[/url]
— MichaelSoush Sep 6, 10:22 AM #wh0cd4287704 [url=http://cymbaltageneric.reisen/]cymbalta[/url] [url=http://albuterol.store/]albuterol sulfate inhaler[/url]
— AaronUttet Sep 6, 10:26 AM #wh0cd3920304 [url=http://buy-atarax.shop/]buy atarax online[/url]
— MichaelSoush Sep 6, 11:01 AM #wh0cd2450851 [url=http://citalopramhbr20mg.shop/]citalopram hbr 20mg[/url] [url=http://cymbaltageneric.reisen/]cymbalta generic[/url]
— MichaelSoush Sep 6, 11:05 AM #wh0cd6110 [url=http://buyprednisone.reisen/]buy prednisone[/url]
— Bennyboits Sep 6, 11:05 AM #wh0cd6110 [url=http://eloconsteroidcream.pro/]elocon steroid cream[/url] [url=http://prednisoneonline.pro/]prednisone[/url]
— Alfreddut Sep 6, 11:05 AM #wh0cd6110 [url=http://lasixonline.pro/]lasix[/url]
— Charlesnef Sep 6, 11:06 AM #wh0cd3920307 [url=http://buycafergot.store/]buy cafergot[/url] [url=http://buy-strattera.work/]strattera[/url]
— Brettsoync Sep 6, 11:09 AM #wh0cd2009982 [url=http://metforminhydrochloride.pro/]metformin hydrochloride[/url]
— Charlesnef Sep 6, 11:53 AM #wh0cd2009986 [url=http://buy-cephalexin.store/]keflex antibiotic[/url]
— Alfreddut Sep 6, 11:56 AM #wh0cd2230389 [url=http://avodart.reisen/]generic dutasteride[/url]
— KennethBiodo Sep 6, 12:23 PM #wh0cd2303877
— KennethBiodo Sep 6, 12:32 PM #wh0cd4361180 [url=http://buytadacip.shop/]buy tadacip[/url]
— AaronUttet Sep 6, 12:35 PM #wh0cd4140734 [url=http://buy-avana.store/]avana[/url]
— MichaelSoush Sep 6, 12:42 PM #wh0cd79583 [url=http://buy-nexium.shop/]buy nexium[/url] [url=http://avodart.zone/]avodart generic[/url]
— Bennyboits Sep 6, 01:06 PM #wh0cd79583 [url=http://eurax.zone/]eurax[/url]
— Charlesnef Sep 6, 01:07 PM #wh0cd3993779 [url=http://buspar.news/]buspirone 5 mg[/url] [url=http://tadalafil.fail/]tadalafil[/url]
— MichaelSoush Sep 6, 01:10 PM #wh0cd79583 [url=http://trazodone.tools/]trazodone[/url] [url=http://acyclovircream.pro/]go here[/url]
— Alfreddut Sep 6, 01:11 PM #wh0cd2524324 [url=http://buydiflucan.store/]our site[/url] [url=http://suhagraonline.pro/]generic suhagra[/url]
— MichaelSoush Sep 6, 01:14 PM #wh0cd79583 [url=http://sildenafil.us.com/sildenafil-soft-tabs.html]helpful hints[/url]
— KennethBiodo Sep 6, 01:17 PM #Компания “Ваншида-Украина” реализует запчасти и комплектующие для китайского оборудования по ценам завода-производителя. В наличии гидравлические насосы, комплекты уплотнителей, гидравлические распределители, штоки, гидравлические цилиндры.
Так же мы производим оборудование для переработки металлолома. Самые низкие цены на пакетировочные пресса, пресс-ножницы. Работаем без посредников. Цены завода-производителя.
Аллигаторные ножницы Q43 -1600 Wanshida
http://wanshida.com.ua/p62703463-alligatornye-nozhnitsy-q43.html
Звоните, пишите!
— mum Sep 6, 01:51 PM #wh0cd2524301 [url=http://sildenafil.us.com/]sildenafil[/url]
— Bennyboits Sep 6, 01:56 PM #wh0cd4287675 [url=http://buycelexa.reisen/]celexa[/url] [url=http://baclofen.work/]baclofen[/url]
— MichaelSoush Sep 6, 02:07 PM #wh0cd4214207 [url=http://propecia365.us.com/]buy propecia online[/url]
— MichaelSoush Sep 6, 02:49 PM #wh0cd153056 [url=http://buy-kamagra.store/]kamagra usa[/url] [url=http://buytadalissx.reisen/]tadalis sx[/url]
— Bennyboits Sep 6, 03:15 PM #wh0cd2083455 [url=http://advair.us.com/]advair diskus 250 50[/url]
— Charlesnef Sep 6, 03:15 PM #wh0cd153056 [url=http://zithromax.news/]where to buy zithromax online[/url] [url=http://buy-azithromycin.shop/]where can i buy azithromycin[/url]
— Charlesnef Sep 6, 03:16 PM #wh0cd2083465 [url=http://kamagra.live/]kamagra[/url]
— Alfreddut Sep 6, 03:18 PM #wh0cd2597797 [url=http://buycelexa.shop/]buy celexa[/url]
— MichaelSoush Sep 6, 03:26 PM #wh0cd153056 [url=http://buytadalafil.store/]online pharmacy tadalafil[/url]
— KennethBiodo Sep 6, 03:27 PM #wh0cd2377350
— KennethBiodo Sep 6, 03:32 PM #wh0cd3993793 [url=http://buy-vpxl.reisen/]vpxl[/url] [url=http://buy-nexium.shop/]buy nexium[/url]
— Charlesnef Sep 6, 03:39 PM #wh0cd4361148 [url=http://effexor.zone/]effexor[/url] [url=http://eloconoverthecounter.pro/]buy elocon cream[/url]
— MichaelSoush Sep 6, 03:57 PM #wh0cd2597774 [url=http://sildenafil.us.com/sildenafil-citrate-100-mg.html]buy sildenafil online[/url]
— Bennyboits Sep 6, 04:33 PM #wh0cd4287680 [url=http://acyclovircream.pro/]acyclovir cream[/url] [url=http://buycytotec.shop/]cytotec[/url]
— MichaelSoush Sep 6, 05:00 PM #wh0cd4508128 [url=http://tretinoin.store/]renova tretinoin cream 0.02 purchase[/url] [url=http://buspar.news/]cost of buspar[/url]
— AaronUttet Sep 6, 05:02 PM #wh0cd4140729 [url=http://clonidineonline.pro/]clonidine 2 mg[/url] [url=http://baclofen.work/]baclofen 10 mg tablet[/url]
— MichaelSoush Sep 6, 05:22 PM #wh0cd2671275 [url=http://buy-strattera.work/]strattera[/url] [url=http://buyyasmin.shop/]yasmin[/url]
— MichaelSoush Sep 6, 05:25 PM #wh0cd226531 [url=http://acyclovir.us.com/]acyclovir[/url]
— Alfreddut Sep 6, 05:29 PM #wh0cd226529 [url=http://buy-kamagra.store/]where to buy kamagra oral jelly[/url]
— Bennyboits Sep 6, 05:31 PM #wh0cd226529 [url=http://cephalexin500mg.work/]cephalexin[/url]
— KennethBiodo Sep 6, 05:39 PM #wh0cd4067266 [url=http://advair.us.com/]Advair With No Prescription[/url]
— Charlesnef Sep 6, 06:09 PM #wh0cd2377335 [url=http://cephalexin500mg.work/]cephalexin[/url]
— KennethBiodo Sep 6, 06:17 PM #wh0cd2450825
— KennethBiodo Sep 6, 06:25 PM #wh0cd2156938 [url=http://abilifycost.pro/]abilify cost[/url] [url=http://buy-azithromycin.shop/]buy azithromycin[/url]
— Alfreddut Sep 6, 06:30 PM #wh0cd300002 [url=http://buy-tretinoin.reisen/]tretinoin cream[/url]
— Charlesnef Sep 6, 07:06 PM #wh0cd4361153 [url=http://kamagra.live/]kamagra[/url]
— MichaelSoush Sep 6, 07:13 PM #wh0cd4581603 [url=http://buy-albendazole.store/]albendazole[/url] [url=http://buy-methotrexate.work/]methotrexate[/url]
— AaronUttet Sep 6, 07:16 PM #wh0cd300004 [url=http://sildenafil.us.com/sildenafil-citrate-100-mg.html]sildenafil citrate 100 mg[/url]
— Alfreddut Sep 6, 07:44 PM #wh0cd300002 [url=http://medrol.work/]medrol[/url] [url=http://albuterol.store/]albuterol inhalers[/url]
— Bennyboits Sep 6, 07:46 PM #wh0cd4508094 [url=http://buy-methotrexate.work/]methotrexate[/url] [url=http://acyclovircream.pro/]acyclovir cream[/url]
— MichaelSoush Sep 6, 08:22 PM #wh0cd4140743 [url=http://buyseroquel.work/]buy seroquel[/url]
— Charlesnef Sep 6, 08:52 PM #wh0cd4434632 [url=http://lasixonline.pro/]lasix 10 mg[/url] [url=http://levaquin500mg.pro/]levaquin 500 mg[/url]
— MichaelSoush Sep 6, 09:08 PM #wh0cd373481 [url=http://sildenafil.us.com/sildenafil-citrate-100-mg.html]sildenafil citrate 100mg[/url]
— Charlesnef Sep 6, 09:09 PM #wh0cd4287681 [url=http://eloconoverthecounter.pro/]elocon[/url] [url=http://metforminhydrochloride.pro/]metformin hydrochloride[/url]
— MichaelSoush Sep 6, 09:19 PM #wh0cd2524298
— KennethBiodo Sep 6, 09:28 PM #wh0cd373477 [url=http://tretinoin.store/]tretinoin cream[/url]
— KennethBiodo Sep 6, 09:42 PM #wh0cd2230403 [url=http://sildenafil.us.com/]seldenafil[/url]
— Charlesnef Sep 6, 09:43 PM #wh0cd2818221 [url=http://sildenafil.us.com/sildenafil-citrate-100mg-pills.html]sildenafil 100 mg[/url]
— MichaelSoush Sep 6, 09:46 PM #wh0cd2230413 [url=http://yasmin.work/]yasmin[/url]
— Alfreddut Sep 6, 09:55 PM #wh0cd2744724 [url=http://buy-ventolin.reisen/]buy ventolin[/url]
— Bennyboits Sep 6, 10:01 PM #wh0cd373477 [url=http://cephalexin500.reisen/]cephalexin 500[/url] [url=http://ampicillinonline.pro/]ampicillin[/url]
— Alfreddut Sep 6, 10:05 PM #wh0cd4361154 [url=http://stromectol.zone/]stromectol[/url]
— MichaelSoush Sep 6, 11:27 PM #wh0cd4728554 [url=http://buy-strattera.work/]atomoxetine price[/url]
— AaronUttet Sep 6, 11:35 PM #wh0cd446952 [url=http://amoxicillin.us.com/]amoxicillin[/url]
— KennethBiodo Sep 6, 11:40 PM #wh0cd2891696 [url=http://buy-azithromycin.store/]where can i buy azithromycin online[/url]
— MichaelSoush Sep 6, 11:53 PM #wh0cd446954 [url=http://buy-albendazole.store/]buy albendazole[/url]
— Bennyboits Sep 7, 12:06 AM #wh0cd2597771
— KennethBiodo Sep 7, 12:15 AM #wh0cd4655043 [url=http://tretinoin.store/]generic tretinoin gel[/url] [url=http://baclofen.work/]baclofen[/url]
— MichaelSoush Sep 7, 12:21 AM #wh0cd446950 [url=http://neurontinonline.pro/]buy neurontin online[/url] [url=http://buycelexa.shop/]buy celexa online[/url]
— Alfreddut Sep 7, 12:24 AM #wh0cd2303876 [url=http://advair.us.com/]Advair Diskus[/url]
— Charlesnef Sep 7, 12:59 AM #wh0cd2303889 [url=http://propecia365.us.com/]propecia[/url]
— Alfreddut Sep 7, 01:01 AM #wh0cd2818197 [url=http://buy-tretinoin.reisen/]buy tretinoin[/url] [url=http://revia.reisen/]revia[/url]
— Bennyboits Sep 7, 01:15 AM #wh0cd4434629 [url=http://buy-methotrexate.work/]buy methotrexate[/url] [url=http://metformin.reisen/]metformin[/url]
— MichaelSoush Sep 7, 01:34 AM #wh0cd520427 [url=http://buy-strattera.work/]strattera[/url] [url=http://effexor.zone/]effexor 150 mg[/url]
— Charlesnef Sep 7, 01:42 AM #wh0cd4802029 [url=http://dapoxetine.reisen/]dapoxetine hcl[/url] [url=http://buyneurontin.reisen/]neurontin[/url]
— AaronUttet Sep 7, 01:43 AM #wh0cd2965169 [url=http://vibramycin.pro/]doxycycline antibiotic[/url]
— MichaelSoush Sep 7, 01:50 AM #wh0cd520427 [url=http://cephalexin500mg.shop/]get more info[/url] [url=http://buycafergot.store/]cafergot pills[/url]
— Bennyboits Sep 7, 02:04 AM #wh0cd4728516 [url=http://acyclovir.us.com/]Acyclovir No Prescription[/url]
— MichaelSoush Sep 7, 02:27 AM #wh0cd520423 [url=http://sildenafil.us.com/sildenafil-citrate-100-mg.html]sildenafil citrate 100 mg[/url]
— Alfreddut Sep 7, 02:38 AM #wh0cd2671244
— KennethBiodo Sep 7, 03:08 AM #wh0cd4655053 [url=http://acyclovir.us.com/]Acyclovir No Prescription[/url]
— MichaelSoush Sep 7, 03:15 AM #wh0cd4508102 [url=http://advair.us.com/]Advair With No Prescription[/url]
— MichaelSoush Sep 7, 03:36 AM #wh0cd4875507 [url=http://amitriptylinehydrochloride.pro/]amitriptyline hydrochloride[/url]
— AaronUttet Sep 7, 03:54 AM #wh0cd2377365 [url=http://prednisone.tools/]prednisone[/url] [url=http://buy-tretinoin.reisen/]more[/url]
— Alfreddut Sep 7, 03:56 AM #wh0cd2377349 [url=http://sildenafil.us.com/]sildenafil[/url]
— Charlesnef Sep 7, 04:03 AM #wh0cd2597756 [url=http://propecia365.us.com/]finasteride[/url]
— KennethBiodo Sep 7, 04:05 AM #wh0cd593904 [url=http://advair.us.com/]Buy Advair[/url]
— Bennyboits Sep 7, 04:12 AM #wh0cd2891672 [url=http://propecia365.us.com/]how to buy propecia online[/url]
— Bennyboits Sep 7, 04:22 AM #wh0cd4801989 [url=http://buybuspar.shop/]buy buspar[/url]
— MichaelSoush Sep 7, 04:34 AM #wh0cd4728526 [url=http://nexiumgeneric.pro/]generic nexium[/url] [url=http://buy-ventolin.shop/]buy ventolin[/url]
— MichaelSoush Sep 7, 05:28 AM #wh0cd2744717
— KennethBiodo Sep 7, 05:42 AM #wh0cd3112117 [url=http://advair.us.com/]Buy Advair[/url]
— MichaelSoush Sep 7, 05:48 AM #wh0cd667379 [url=http://buycelexa.reisen/]cost of celexa[/url]
— Bennyboits Sep 7, 06:13 AM #wh0cd4581581 [url=http://buy-ventolin.reisen/]buy ventolin inhaler online[/url]
— Brettsoync Sep 7, 06:21 AM #wh0cd4434643 [url=http://cipro.directory/]cipro[/url] [url=http://buyprednisone.reisen/]prednisone[/url]
— Charlesnef Sep 7, 06:34 AM #wh0cd2450822 [url=http://propranolol.zone/]propranolol[/url] [url=http://elocon.mba/]elocon[/url]
— Charlesnef Sep 7, 07:01 AM #wh0cd2965147 [url=http://zithromax.systems/]buy zithromax[/url]
— Bennyboits Sep 7, 07:38 AM #wh0cd5022457 [url=http://buy-albendazole.work/]albenza generic[/url] [url=http://amitriptylinehydrochloride.pro/]amitriptyline hydrochloride[/url]
— AaronUttet Sep 7, 08:11 AM #wh0cd2818190
— KennethBiodo Sep 7, 08:32 AM #wh0cd4508116 [url=http://propecia365.us.com/]link[/url]
— Charlesnef Sep 7, 08:39 AM #wh0cd2524297 [url=http://tadalafil.fail/]tadalafil[/url]
— Charlesnef Sep 7, 10:00 AM #wh0cd4728524 [url=http://kamagra.live/]kamagra[/url] [url=http://buy-albendazole.store/]buy albendazole[/url]
— MichaelSoush Sep 7, 10:10 AM #wh0cd2524313 [url=http://buy-ventolin.reisen/]ventolin[/url]
— Alfreddut Sep 7, 10:11 AM #wh0cd3259065 [url=http://citalopramhbr.reisen/]citalopram hbr[/url] [url=http://buy-synthroid.shop/]synthroid[/url]
— MichaelSoush Sep 7, 10:11 AM #wh0cd3038620 [url=http://amoxicillin.us.com/]amoxicillin 500mg[/url]
— Bennyboits Sep 7, 10:27 AM #wh0cd5022408 [url=http://buytamoxifen.shop/]buy tamoxifen citrate[/url]
— MichaelSoush Sep 7, 10:44 AM #wh0cd4581591 [url=http://buycelexa.shop/]buy celexa[/url] [url=http://eloconsteroidcream.pro/]elocon[/url]
— Charlesnef Sep 7, 10:53 AM #wh0cd814323 [url=http://advair.us.com/]advair inhaler[/url]
— Charlesnef Sep 7, 11:26 AM #wh0cd4948949 [url=http://abilifycost.pro/]abilify[/url]
— MichaelSoush Sep 7, 12:09 PM #wh0cd2891668
— KennethBiodo Sep 7, 12:10 PM #wh0cd814319 [url=http://cephalexin500mg.work/]cheap cephalexin[/url]
— Alfreddut Sep 7, 12:21 PM #wh0cd5169407 [url=http://buy-anafranil.store/]buy anafranil online[/url]
— AaronUttet Sep 7, 12:52 PM #wh0cd4655064 [url=http://genericseroquel.pro/]seroquel for children[/url] [url=http://amoxil.schule/]amoxil[/url]
— Charlesnef Sep 7, 01:21 PM #wh0cd2597786 [url=http://tretinoincream025.pro/]tretinoin cream 025[/url] [url=http://elocon.mba/]elocon[/url]
— Alfreddut Sep 7, 01:46 PM #wh0cd887792 [url=http://buy-tretinoin.store/]read more[/url]
— Alfreddut Sep 7, 02:08 PM #wh0cd3406013 [url=http://eurax.zone/]eurax[/url] [url=http://eloconoverthecounter.pro/]elocon over the counter[/url]
— MichaelSoush Sep 7, 02:10 PM #wh0cd4875472 [url=http://buy-anafranil.store/]anafranil[/url]
— MichaelSoush Sep 7, 02:12 PM #wh0cd5022422 [url=http://sildenafil.us.com/sildenafil-citrate-100-mg.html]sildenafil citrate 100 mg[/url]
— MichaelSoush Sep 7, 02:32 PM #wh0cd961275 [url=http://propecia.us.com/]propecia[/url]
— Charlesnef Sep 7, 02:58 PM #wh0cd4875473 [url=http://cephalexin500mg.shop/]cephalexin 500mg price[/url]
— Brettsoync Sep 7, 02:59 PM #wh0cd5242882 [url=http://advaironline.pro/]advair[/url]
— AaronUttet Sep 7, 03:03 PM #wh0cd2671245 [url=http://wellbutrin150mg.pro/]wellbutrin without a prescription[/url] [url=http://elimite.schule/]elimite[/url]
— Charlesnef Sep 7, 03:23 PM #wh0cd2965141
— KennethBiodo Sep 7, 03:27 PM #wh0cd4728537 [url=http://kamagra.live/]kamagra[/url]
— Charlesnef Sep 7, 03:29 PM #wh0cd961269 [url=http://buy-nexium.shop/]nexium[/url]
— Alfreddut Sep 7, 03:59 PM #wh0cd3185568 [url=http://sildenafil.us.com/sildenafil-citrate-100mg-pills.html]sildenafil citrate 100mg pills[/url]
— Bennyboits Sep 7, 04:01 PM #wh0cd4948945 [url=http://methotrexate.tools/]methotrexate[/url] [url=http://neurontinonline.pro/]neurontin[/url]
— MichaelSoush Sep 7, 04:27 PM #wh0cd5242827 [url=http://buy-strattera.work/]atomoxetine price[/url]
— MichaelSoush Sep 7, 04:58 PM #wh0cd5316357 [url=http://effexorgeneric.pro/]effexor[/url] [url=http://zithromax.news/]zithromax[/url]
— AaronUttet Sep 7, 05:18 PM #wh0cd2671265 [url=http://atenolol.systems/]tenormin no prescription[/url]
— Alfreddut Sep 7, 05:20 PM #wh0cd2744720 [url=http://amoxicillin.us.com/]amoxicillin[/url]
— Charlesnef Sep 7, 06:23 PM #wh0cd5022420 [url=http://buybuspar.shop/]buy buspar[/url]
— MichaelSoush Sep 7, 06:30 PM #wh0cd3038614
— KennethBiodo Sep 7, 06:32 PM #wh0cd3552963 [url=http://tretinoincream025.pro/]tretinoin cream[/url]
— MichaelSoush Sep 7, 06:39 PM #wh0cd3259041 [url=http://lasixonline.pro/]lasix[/url]
— Bennyboits Sep 7, 07:17 PM #wh0cd5022421 [url=http://buycymbalta.reisen/]cymbalta 60 mg price[/url]
— Brettsoync Sep 7, 07:26 PM #wh0cd5389830 [url=http://propecia.us.com/]generic propecia[/url]
— AaronUttet Sep 7, 07:33 PM #wh0cd2744740 [url=http://baclofen.work/]baclofen[/url]
— Alfreddut Sep 7, 08:49 PM #wh0cd5242845 [url=http://amoxicillin.us.com/]can you buy amoxicillin over the counter[/url]
— MichaelSoush Sep 7, 08:51 PM #wh0cd3626436 [url=http://sildenafil.us.com/]sildenafil[/url]
— MichaelSoush Sep 7, 08:51 PM #wh0cd2965125 [url=http://valtrex.zone/]valtrex[/url]
— KennethBiodo Sep 7, 09:03 PM #wh0cd5463303 [url=http://buy-methotrexate.work/]methotrexate[/url]
— AaronUttet Sep 7, 09:46 PM #wh0cd3112087
— KennethBiodo Sep 7, 10:10 PM #wh0cd5169370 [url=http://tretinoincream025.pro/]cheap tretinoin cream .025[/url] [url=http://suhagraonline.pro/]suhagra[/url]
— MichaelSoush Sep 7, 10:25 PM #wh0cd4948958 [url=http://buy-strattera.work/]strattera[/url]
— Charlesnef Sep 7, 10:48 PM #wh0cd5316318 [url=http://atenolol.systems/]atenolol 50mg[/url]
— MichaelSoush Sep 7, 10:52 PM #wh0cd3699909 [url=http://buy-vpxl.reisen/]vpxl[/url]
— MichaelSoush Sep 7, 11:05 PM #wh0cd5463249 [url=http://tadalafil.fail/]tadalafil citrate[/url]
— MichaelSoush Sep 7, 11:21 PM #wh0cd2818213 [url=http://lasix.store/]lasix 100mg[/url] [url=http://buy-anafranil.store/]anafranil weight loss[/url]
— Alfreddut Sep 7, 11:32 PM #wh0cd5169367 [url=http://buytadalissx.reisen/]buy tadalis sx[/url] [url=http://metforminhydrochloride.pro/]metformin hydrochloride[/url]
— Brettsoync Sep 7, 11:43 PM #wh0cd3038600 [url=http://valtrex.zone/]valtrex[/url]
— KennethBiodo Sep 7, 11:53 PM #wh0cd5536778 [url=http://sildenafil.us.com/sildenafil-citrate-100mg-pills.html]sildenafil citrate 100mg pills[/url]
— AaronUttet Sep 7, 11:55 PM #wh0cd2891674 [url=http://wellbutrin150mg.pro/]citation[/url]
— Charlesnef Sep 8, 12:46 AM #wh0cd3773384 [url=http://cipro.directory/]cipro[/url] [url=http://metformin.reisen/]metformin[/url]
— MichaelSoush Sep 8, 12:54 AM #wh0cd5389793 [url=http://buy-tretinoin.store/]site here[/url]
— MichaelSoush Sep 8, 01:06 AM #wh0cd5022434 [url=http://sildenafil.us.com/sildenafil-citrate-100-mg.html]sildenafil citrate 100 mg[/url]
— Charlesnef Sep 8, 01:21 AM #wh0cd3405989 [url=http://avodart.reisen/]avodart[/url]
— Bennyboits Sep 8, 01:26 AM #wh0cd5536724 [url=http://elimite.directory/]elimite[/url] [url=http://diflucan.systems/]diflucan[/url]
— MichaelSoush Sep 8, 01:33 AM #wh0cd3185562
— KennethBiodo Sep 8, 01:49 AM #wh0cd2891686 [url=http://buybuspar.shop/]buy buspar[/url] [url=http://retinaa.pro/]retin-a[/url]
— Alfreddut Sep 8, 02:02 AM #wh0cd5610251 [url=http://sildenafil.us.com/sildenafil-soft-tabs.html]sildenafil soft tabs[/url]
— AaronUttet Sep 8, 02:04 AM #wh0cd5316320 [url=http://lasixonline.pro/]lasix 100mg[/url]
— MichaelSoush Sep 8, 02:42 AM #wh0cd5463266 [url=http://elimite.directory/]elimite[/url] [url=http://diflucan.systems/]buy fluconizole online[/url]
— MichaelSoush Sep 8, 03:22 AM #wh0cd3112075 [url=http://sildenafil.us.com/]sildenafil[/url]
— KennethBiodo Sep 8, 03:22 AM #wh0cd3479464 [url=http://buy-seroquel.reisen/]seroquel for insomnia[/url] [url=http://buy-methotrexate.reisen/]methotrexate[/url]
— Bennyboits Sep 8, 03:56 AM #wh0cd5683724 [url=http://atenolol.systems/]buy atenolol online[/url] [url=http://diflucan.systems/]diflucan[/url]
— AaronUttet Sep 8, 04:13 AM #wh0cd2965159 [url=http://amoxicillin.us.com/]amoxicillin[/url]
— Alfreddut Sep 8, 04:31 AM #wh0cd5536739 [url=http://citalopramhbr.reisen/]citalopram[/url]
— MichaelSoush Sep 8, 05:27 AM #wh0cd3259037
— KennethBiodo Sep 8, 05:27 AM #wh0cd5683670 [url=http://buyretina.shop/]prescription retin a[/url] [url=http://buyamoxicillin.reisen/]amoxicillin[/url]
— MichaelSoush Sep 8, 05:40 AM #wh0cd5169382 [url=http://cipro.directory/]ciprofloxacin 500mg[/url] [url=http://buy-clomid.shop/]buy clomid[/url]
— Charlesnef Sep 8, 06:00 AM #wh0cd5389788 [url=http://buy-arimidex.reisen/]buy arimidex online cheap[/url] [url=http://tetracycline.news/]tetracycline 500mg[/url]
— Brettsoync Sep 8, 06:25 AM #wh0cd5463270 [url=http://buycafergot.store/]cafergot[/url]
— MichaelSoush Sep 8, 06:38 AM #wh0cd3993803 [url=http://buycelexa.reisen/]generic celexa[/url] [url=http://ciprofloxacinhcl500mg.reisen/]ciprofloxacin hcl 500 mg[/url]
— MichaelSoush Sep 8, 07:08 AM #wh0cd5610214 [url=http://wellbutrin150mg.pro/]wellbutrin[/url]
— MichaelSoush Sep 8, 07:37 AM #wh0cd3038636 [url=http://triamterene.systems/]triamterene[/url]
— Alfreddut Sep 8, 07:39 AM #wh0cd5757145 [url=http://buy-atarax.shop/]buy atarax[/url]
— MichaelSoush Sep 8, 07:53 AM #wh0cd3332510
— KennethBiodo Sep 8, 08:21 AM #wh0cd5830670 [url=http://propecia365.us.com/]propecia[/url]
— AaronUttet Sep 8, 08:48 AM #wh0cd5830620 [url=http://buyamoxicillin.reisen/]amoxicillin[/url] [url=http://triamterene.systems/]triamterene[/url]
— MichaelSoush Sep 8, 10:10 AM #wh0cd4140749 [url=http://buysynthroid.store/]synthroid[/url]
— MichaelSoush Sep 8, 10:54 AM #wh0cd5610216 [url=http://buyprednisone.reisen/]prednisone[/url]
— MichaelSoush Sep 8, 10:56 AM #wh0cd5904150 [url=http://buyadvair.shop/]advair 250/50[/url]
— AaronUttet Sep 8, 11:00 AM #wh0cd3405983
— KennethBiodo Sep 8, 11:25 AM #wh0cd3185589 [url=http://zithromax.systems/]buy zithromax[/url]
— Alfreddut Sep 8, 12:45 PM #wh0cd5683689 [url=http://buyyasmin.shop/]buy yasmin[/url] [url=http://buy-albendazole.work/]albenza over the counter[/url]
— MichaelSoush Sep 8, 01:02 PM #wh0cd4214222 [url=http://triamterene.systems/]triamterene[/url]
— MichaelSoush Sep 8, 01:06 PM #wh0cd5977623 [url=http://buy-seroquel.reisen/]buy seroquel[/url] [url=http://elimite.directory/]elimite[/url]
— AaronUttet Sep 8, 01:08 PM #wh0cd3699890 [url=http://buycytotec.store/]cytotec[/url]
— Bennyboits Sep 8, 01:28 PM #wh0cd3479458
— KennethBiodo Sep 8, 02:21 PM #wh0cd5757162 [url=http://acyclovircream.pro/]acyclovir cream[/url]
— MichaelSoush Sep 8, 03:03 PM #wh0cd3259062 [url=http://buyyasmin.shop/]buy yasmin[/url] [url=http://baclofen.work/]baclofen[/url]
— Alfreddut Sep 8, 03:26 PM #wh0cd5904111 [url=http://propecia.us.com/]propecia[/url]
— MichaelSoush Sep 8, 04:31 PM #wh0cd3405971 [url=http://sildenafil.us.com/sildenafil-soft-tabs.html]sildenafil soft tabs[/url]
— KennethBiodo Sep 8, 04:33 PM #wh0cd5830637 [url=http://prozac.zone/]prozac buy[/url]
— MichaelSoush Sep 8, 05:00 PM #wh0cd6124571 [url=http://elimite.news/]elimite[/url] [url=http://vardenafil.world/]vardenafil[/url]
— AaronUttet Sep 8, 05:22 PM #wh0cd3552931
— KennethBiodo Sep 8, 05:43 PM #wh0cd5757162 [url=http://buy-azithromycin.shop/]azithromycin[/url]
— Brettsoync Sep 8, 06:31 PM #wh0cd3332537 [url=http://sildenafil.us.com/sildenafil-citrate-100-mg.html]sildenafil citrate tablets 100 mg[/url]
— Alfreddut Sep 8, 06:42 PM #wh0cd6124516 [url=http://citalopramhbr.reisen/]citalopram[/url]
— MichaelSoush Sep 8, 06:45 PM #wh0cd5977584 [url=http://cephalexin500.reisen/]cephalexin 500[/url]
— MichaelSoush Sep 8, 06:51 PM #wh0cd5904110 [url=http://sildenafil.us.com/]found it for you[/url]
— MichaelSoush Sep 8, 06:53 PM #x <a href= http://modafinilmth.com >provigil coupon</a> indeed [url=http://modafinilmth.com]provigil coupon[/url] buy provigil online
— JoesphOscib Sep 8, 07:09 PM #e <a href= http://lyricamth.com >cheap lyrica</a> not [url=http://lyricamth.com]lyrica[/url] lyrica medication
— Joesphkep Sep 8, 07:22 PM #wh0cd4434641 [url=http://propecia.us.com/]finesterude no prescription[/url]
— MichaelSoush Sep 8, 07:27 PM #d <a href= http://modafinilmth.com >modafinil online</a> an [url=http://modafinilmth.com]buy provigil[/url] modafinil online
— Patrickleats Sep 8, 07:27 PM #wh0cd6198046 [url=http://sildenafil.us.com/sildenafil-soft-tabs.html]sildenafil soft tabs[/url]
— AaronUttet Sep 8, 07:33 PM #wh0cd3479446 [url=http://buycymbalta.reisen/]found here[/url] [url=http://buy-tretinoin.reisen/]buy tretinoin[/url]
— KennethBiodo Sep 8, 07:45 PM #wh0cd3846838 [url=http://citalopramhbr20mg.shop/]citalopram[/url]
— Bennyboits Sep 8, 07:58 PM #p <a href= http://lyricamth.com >lyrica coupon</a> end [url=http://lyricamth.com]lyrica medication[/url] lyrica
— JoesphOscib Sep 8, 08:05 PM #y <a href= http://canadapharmmth.com >canadian pharmacy online</a> companion [url=http://canadapharmmth.com]canadian pharmacy review[/url] canadian pharmacy review
— Joesphkep Sep 8, 08:19 PM #wh0cd5610230 [url=http://fluoxetine20mg.pro/]fluoxetine 20mg capsules[/url]
— Charlesnef Sep 8, 08:25 PM #wh0cd3626404
— KennethBiodo Sep 8, 08:43 PM #c <a href= http://canadapharmmth.com >canadian pills</a> smile [url=http://canadapharmmth.com]canadian pharmacy online[/url] canadian pharmacy
— Donaldbit Sep 8, 08:45 PM #wh0cd6051062 [url=http://buysynthroid.store/]buy synthroid[/url]
— MichaelSoush Sep 8, 08:45 PM #wh0cd6197989 [url=http://buy-strattera.work/]buy strattera[/url]
— MichaelSoush Sep 8, 09:00 PM #wh0cd5977585 [url=http://advair.us.com/]advair inhalers[/url]
— MichaelSoush Sep 8, 09:01 PM #p <a href= http://canadapharmmth.com >cheap medication</a> smile [url=http://canadapharmmth.com]canadian pharmacy[/url] canadian pharmacy online
— Joesphkep Sep 8, 09:14 PM #wh0cd5830635 [url=http://tretinoincream005.pro/]tretinoin cream[/url]
— Brettsoync Sep 8, 09:25 PM #i <a href= http://lyricamth.com >pregabalin</a> understand [url=http://lyricamth.com]lyrica coupon[/url] cheap lyrica
— JamesFug Sep 8, 09:28 PM #wh0cd3406012 [url=http://sildenafil.us.com/sildenafil-citrate-100mg-pills.html]going here[/url]
— Alfreddut Sep 8, 09:33 PM #wh0cd4508114 [url=http://buyabilify.shop/]discount abilify[/url] [url=http://wellbutrin150mg.pro/]wellbutrin[/url]
— MichaelSoush Sep 8, 09:36 PM #i <a href= http://modafinilmth.com >generic modafinil</a> carried [url=http://modafinilmth.com]generic modafinil[/url] buy provigil
— Donaldbit Sep 8, 09:39 PM #v <a href= http://modafinilmth.com >provigil coupon</a> I’ll [url=http://modafinilmth.com]buy provigil online[/url] modafinil online
— JoesphOscib Sep 8, 09:55 PM #wh0cd3332517 [url=http://prozac.zone/]prozac[/url] [url=http://amitriptylinehydrochloride.pro/]amitriptyline hydrochloride[/url]
— Charlesnef Sep 8, 10:04 PM #c <a href= http://canadapharmmth.com >canadian pharmacy</a> land [url=http://canadapharmmth.com]cheap medication[/url] canadian pharmacy review
— Joesphkep Sep 8, 10:09 PM #v <a href= http://lyricamth.com >lyrica generic</a> cut [url=http://lyricamth.com]cheap lyrica[/url] buy lyrica
— Donaldbit Sep 8, 10:33 PM #u <a href= http://modafinilmth.com >modafinil online</a> stopped [url=http://modafinilmth.com]modafinil online[/url] modafinil online
— Donaldgaw Sep 8, 10:45 PM #wh0cd6124535 [url=http://buycytotec.shop/]cytotec for induction[/url] [url=http://zithromax.systems/]zithromax z pak[/url]
— MichaelSoush Sep 8, 10:54 PM #wh0cd5683703 [url=http://lasix.live/]lasix[/url] [url=http://abilifycost.pro/]abilify cost[/url]
— Charlesnef Sep 8, 10:55 PM #o <a href= http://modafinilmth.com >buy provigil online</a> clear [url=http://modafinilmth.com]generic modafinil[/url] generic modafinil
— JamesHax Sep 8, 10:57 PM #wh0cd6271464 [url=http://propecia.systems/]propecia[/url]
— MichaelSoush Sep 8, 11:05 PM #wh0cd3552919 [url=http://buy-levaquin.shop/]generic for levaquin[/url]
— KennethBiodo Sep 8, 11:11 PM #wh0cd6051058 [url=http://buyseroquel.work/]buy seroquel online with mastercard[/url] [url=http://buycytotec.shop/]cytotec online usa[/url]
— MichaelSoush Sep 8, 11:11 PM #d <a href= http://canadapharmmth.com >canadian pharmacy review</a> supper [url=http://canadapharmmth.com]cheap medication[/url] cheap medication
— JamesHax Sep 8, 11:37 PM #wh0cd4581587 [url=http://stromectol.zone/]stromectol[/url] [url=http://metforminonline.pro/]metformin[/url]
— MichaelSoush Sep 8, 11:40 PM #[url=https://freesexchat.us.com/]sex chat[/url] [url=https://essaywritingservices.us.com/]professional essay writing services[/url]
— Mikeben Sep 8, 11:44 PM #[url=https://essayonline.us.com/]buy essay[/url]
— Mikeben Sep 8, 11:44 PM #wh0cd5904108 [url=http://albuterol.store/]albuterol sulfate inhaler[/url]
— Brettsoync Sep 8, 11:50 PM #wh0cd3699885
— KennethBiodo Sep 9, 12:01 AM #e <a href= http://canadapharmmth.com >canada drugs</a> are [url=http://canadapharmmth.com]canadian pharmacy[/url] canadian pharmacy
— JamesFug Sep 9, 12:08 AM #p <a href= http://lyricamth.com >lyrica generic</a> it’s [url=http://lyricamth.com]lyrica medication[/url] lyrica generic
— Donaldbit Sep 9, 12:23 AM #wh0cd3479487 [url=http://prednisoneonline.pro/]buy prendesone without a prescription[/url]
— Alfreddut Sep 9, 12:30 AM #m <a href= http://canadapharmmth.com >canadian pharmacy online</a> certain [url=http://canadapharmmth.com]canadian pharmacy review[/url] cheap medication
— JoesphOscib Sep 9, 12:40 AM #wh0cd6344937 [url=http://cephalexin500.reisen/]cephalexin[/url] [url=http://elimite.news/]elimite[/url]
— MichaelSoush Sep 9, 01:06 AM #wh0cd6198012 [url=http://effexor.zone/]effexor[/url] [url=http://buyamoxicillin.reisen/]amoxicillin[/url]
— MichaelSoush Sep 9, 01:07 AM #h <a href= http://canadapharmmth.com >canadian pills</a> mention [url=http://canadapharmmth.com]canadian pharmacy review[/url] canadian pharmacy online
— Donaldbit Sep 9, 01:17 AM #p <a href= http://canadapharmmth.com >cheap medication</a> presently [url=http://canadapharmmth.com]canada drugs[/url] canadian pharmacy online
— Donaldgaw Sep 9, 01:30 AM #wh0cd4655060 [url=http://valtrex.zone/]valtrex[/url] [url=http://buyprovera.reisen/]provera[/url]
— MichaelSoush Sep 9, 01:40 AM #o <a href= http://modafinilmth.com >buy provigil online</a> perfectly [url=http://modafinilmth.com]modafinil[/url] generic modafinil
— Patrickleats Sep 9, 02:03 AM #l <a href= http://lyricamth.com >lyrica online</a> himself [url=http://lyricamth.com]lyrica online[/url] buy Pregabalin online
— Donaldbit Sep 9, 02:12 AM #f <a href= http://modafinilmth.com >buy generic modafinil</a> although [url=http://modafinilmth.com]buy provigil online[/url] modafinil
— Donaldgaw Sep 9, 02:26 AM #wh0cd3773361
— KennethBiodo Sep 9, 02:36 AM #f <a href= http://canadapharmmth.com >canadian pills</a> low [url=http://canadapharmmth.com]canadian pharmacy review[/url] canada drugs
— Patrickleats Sep 9, 02:40 AM #wh0cd6418410 [url=http://cephalexin500mg.work/]cephalexin 500mg[/url]
— MichaelSoush Sep 9, 03:18 AM #wh0cd5830649 [url=http://buy-strattera.work/]strattera[/url]
— Charlesnef Sep 9, 03:20 AM #i <a href= http://lyricamth.com >lyrica coupon</a> every [url=http://lyricamth.com]pregabalin[/url] pregabalin
— JoesphOscib Sep 9, 03:24 AM #wh0cd3552964 [url=http://suhagraonline.pro/]suhagra[/url]
— Alfreddut Sep 9, 03:40 AM #wh0cd4728535 [url=http://amoxil.schule/]amoxil 500mg[/url]
— MichaelSoush Sep 9, 03:57 AM #wh0cd6491944 [url=http://amoxicillin.us.com/]amoxicillin[/url]
— AaronUttet Sep 9, 04:04 AM #j <a href= http://modafinilmth.com >buy provigil</a> front [url=http://modafinilmth.com]generic modafinil[/url] generic modafinil
— JamesFug Sep 9, 04:07 AM #w <a href= http://modafinilmth.com >buy provigil</a> much [url=http://modafinilmth.com]buy generic modafinil[/url] buy generic modafinil
— JoesphOscib Sep 9, 04:21 AM #wh0cd3479465 [url=http://amoxicillin.us.com/]amoxicillin[/url]
— Charlesnef Sep 9, 04:25 AM #Подскажите кто сталкивался работет ли эта тема:
Мы платим за лайки! – Ежедневные выплаты!
Наш сервис предоставляет настоящие лайки на фото заказчиков, которые готовы платить за качество.
Именно для этого мы и набираем удалённых сотрудников, которые будут выполнять работу, то есть ставить лайки и получить за это деньги.
Чтобы стать нашим удалённым сотрудником и начать ставить лайки, зарабатывая при этом 45 рублей за 1 поставленный лайк,
Вам достаточно просто зарегистрироваться на нашем сервисе. > www.oplata-vklike.tk <
Вывод заработанных средств ежедневно в течении нескольких минут.
Заранее Спасибо!
— AzmmcnMr Sep 9, 04:33 AM #y <a href= http://lyricamth.com >buy Pregabalin online</a> cold [url=http://lyricamth.com]buy lyrica[/url] pregabalin
— Joesphkep Sep 9, 04:33 AM #l <a href= http://canadapharmmth.com >canadian pharmacy review</a> boy [url=http://canadapharmmth.com]cheap medication[/url] canada drugs
— JamesFug Sep 9, 04:47 AM #z <a href= http://lyricamth.com >lyrica online</a> under [url=http://lyricamth.com]buy lyrica[/url] lyrica coupon
— Donaldbit Sep 9, 04:59 AM #d <a href= http://lyricamth.com >buy lyrica</a> large [url=http://lyricamth.com]lyrica coupon[/url] lyrica medication
— Donaldgaw Sep 9, 05:12 AM #wh0cd6051054 [url=http://buyabilify.shop/]buy abilify[/url]
— Brettsoync Sep 9, 05:14 AM #wh0cd6491883 [url=http://lisinopril.store/]lisinopril[/url] [url=http://buy-methotrexate.work/]medication methotrexate[/url]
— MichaelSoush Sep 9, 05:21 AM #wh0cd6344971 [url=http://eurax.zone/]eurax[/url] [url=http://tadalafil.fail/]tadalafil citrate[/url]
— MichaelSoush Sep 9, 05:31 AM #wh0cd5904125 [url=http://lasixonline.pro/]lasix 100 mg[/url] [url=http://nolvadex.directory/]nolvadex[/url]
— Charlesnef Sep 9, 05:32 AM #wh0cd6271481 [url=http://lasixonline.pro/]lasix 40[/url] [url=http://tetracycline.news/]tetracycline[/url]
— MichaelSoush Sep 9, 05:35 AM #wh0cd3846834
— KennethBiodo Sep 9, 05:39 AM #wh0cd4067262 [url=http://suhagraonline.pro/]suhagra online[/url] [url=http://yasmin.work/]yasmin[/url]
— Bennyboits Sep 9, 05:48 AM #wh0cd6565417 [url=http://buy-azithromycin.shop/]azithromycin[/url]
— AaronUttet Sep 9, 06:15 AM #m <a href= http://lyricamth.com >lyrica medication</a> towards [url=http://lyricamth.com]pregabalin[/url] buy lyrica
— Donaldbit Sep 9, 06:50 AM #wh0cd3626437 [url=http://amoxicillin.us.com/]amoxicillin[/url]
— Alfreddut Sep 9, 06:56 AM #w <a href= http://canadapharmmth.com >canada drugs</a> mother [url=http://canadapharmmth.com]canadian pills[/url] canadian pills
— Donaldgaw Sep 9, 07:04 AM #wh0cd6124527 [url=http://baclofen.work/]baclofen[/url]
— Brettsoync Sep 9, 07:12 AM #i <a href= http://lyricamth.com >lyrica coupon</a> behind [url=http://lyricamth.com]lyrica[/url] buy lyrica
— JamesFug Sep 9, 07:27 AM #wh0cd6565356 [url=http://advaironline.pro/]advair cost[/url] [url=http://cymbaltageneric.reisen/]cymbalta generic[/url]
— MichaelSoush Sep 9, 07:32 AM #wh0cd5977601 [url=http://buydiflucan.store/]buy diflucan without a prescription[/url]
— Charlesnef Sep 9, 07:52 AM #wh0cd6344956 [url=http://prednisoneonline.pro/]prednisone on line[/url]
— MichaelSoush Sep 9, 07:53 AM #c <a href= http://canadapharmmth.com >canadian pharmacy online</a> great [url=http://canadapharmmth.com]canadian pharmacy[/url] cheap medication
— JoesphOscib Sep 9, 08:03 AM #online in europe, http://sverige-apotek.life/meloksam.html , sälja köpa.
— sverigapotek Sep 9, 08:04 AM #q <a href= http://lyricamth.com >lyrica medication</a> answer [url=http://lyricamth.com]lyrica[/url] lyrica coupon
— Patrickleats Sep 9, 08:07 AM #apoteket online, http://sverige-apotek.life/dilator.html , kapslar piller.
— sverigapotek Sep 9, 08:08 AM #online Sverige recept, http://sverige-apotek.life/betagalen.html , kapslar malmö.
— sverigapotek Sep 9, 08:13 AM #wh0cd4875485 [url=http://trazodone100mg.pro/]trazodone generic[/url] [url=http://prednisone.tools/]buying prednisone on line[/url]
— MichaelSoush Sep 9, 08:14 AM #y <a href= http://canadapharmmth.com >canadian pharmacy</a> pardon [url=http://canadapharmmth.com]canada drugs[/url] canada drugs
— Joesphkep Sep 9, 08:15 AM #wh0cd124434 [url=http://buycafergot.store/]cafergot generic[/url] [url=http://buy-methotrexate.work/]buy methotrexate[/url]
— Bennyboits Sep 9, 08:33 AM #i <a href= http://lyricamth.com >pregabalin</a> mouth [url=http://lyricamth.com]cheap lyrica[/url] lyrica online
— Joesphkep Sep 9, 09:12 AM #m <a href= http://modafinilmth.com >modafinil online</a> whose [url=http://modafinilmth.com]buy provigil[/url] generic modafinil
— Patrickleats Sep 9, 09:21 AM #j <a href= http://canadapharmmth.com >canadian pharmacy review</a> waiting [url=http://canadapharmmth.com]canadian pharmacy review[/url] canadian pharmacy
— JoesphOscib Sep 9, 09:53 AM #h <a href= http://lyricamth.com >cheap lyrica</a> asked [url=http://lyricamth.com]lyrica medication[/url] lyrica coupon
— Joesphkep Sep 9, 10:08 AM #d <a href= http://canadapharmmth.com >canadian pharmacy review</a> into [url=http://canadapharmmth.com]canada drugs[/url] canada drugs
— Donaldbit Sep 9, 10:34 AM #s <a href= http://canadapharmmth.com >canada drugs</a> opinion [url=http://canadapharmmth.com]canadian pharmacy[/url] canadian pharmacy
— Donaldgaw Sep 9, 10:46 AM #i <a href= http://lyricamth.com >buy Pregabalin online</a> body [url=http://lyricamth.com]cheap lyrica[/url] buy lyrica
— Joesphkep Sep 9, 11:04 AM #y <a href= http://canadapharmmth.com >canadian pills</a> seen [url=http://canadapharmmth.com]canadian pharmacy review[/url] canadian pharmacy
— Donaldbit Sep 9, 11:30 AM #q <a href= http://modafinilmth.com >buy provigil online</a> spite [url=http://modafinilmth.com]buy generic modafinil[/url] modafinil
— JamesFug Sep 9, 11:30 AM #e <a href= http://canadapharmmth.com >canada drugs</a> chair [url=http://canadapharmmth.com]canadian pharmacy review[/url] canadian pharmacy review
— JoesphOscib Sep 9, 11:46 AM #y <a href= http://lyricamth.com >cheap lyrica</a> care [url=http://lyricamth.com]lyrica coupon[/url] pregabalin
— PatrickBrara Sep 9, 12:32 PM #a <a href= http://canadapharmmth.com >canada drugs</a> understood [url=http://canadapharmmth.com]canadian pharmacy[/url] canadian pills
— Joesphkep Sep 9, 12:56 PM #x <a href= http://modafinilmth.com >generic modafinil</a> among [url=http://modafinilmth.com]buy provigil[/url] modafinil
— Patrickleats Sep 9, 01:01 PM #l <a href= http://canadapharmmth.com >canadian pills</a> made [url=http://canadapharmmth.com]canadian pharmacy online[/url] canadian pharmacy
— JamesFug Sep 9, 01:31 PM #g <a href= http://canadapharmmth.com >canadian pharmacy</a> small [url=http://canadapharmmth.com]canadian pills[/url] canadian pharmacy
— JoesphOscib Sep 9, 01:39 PM #h <a href= http://modafinilmth.com >provigil</a> land [url=http://modafinilmth.com]buy provigil[/url] provigil
— Joesphkep Sep 9, 01:52 PM #i <a href= http://modafinilmth.com >modafinil</a> cast [url=http://modafinilmth.com]buy provigil[/url] buy generic modafinil
— Donaldgaw Sep 9, 02:32 PM #c <a href= http://modafinilmth.com >generic modafinil</a> spite [url=http://modafinilmth.com]modafinil[/url] provigil
— JoesphOscib Sep 9, 02:35 PM #b <a href= http://lyricamth.com >lyrica medication</a> towards [url=http://lyricamth.com]pregabalin[/url] lyrica medication
— JamesHax Sep 9, 03:41 PM #m <a href= http://lyricamth.com >pregabalin</a> house [url=http://lyricamth.com]cheap lyrica[/url] lyrica
— Donaldbit Sep 9, 04:10 PM #a <a href= http://lyricamth.com >lyrica coupon</a> natural [url=http://lyricamth.com]buy Pregabalin online[/url] lyrica medication
— JoesphOscib Sep 9, 04:27 PM #o <a href= http://modafinilmth.com >modafinil online</a> too [url=http://modafinilmth.com]modafinil[/url] generic modafinil
— Joesphkep Sep 9, 04:41 PM #y <a href= http://lyricamth.com >lyrica coupon</a> people [url=http://lyricamth.com]lyrica[/url] buy Pregabalin online
— Donaldbit Sep 9, 05:05 PM #wh0cd4140741 [url=http://buspar.news/]buspar[/url]
— Bennyboits Sep 9, 05:16 PM #wh0cd3920307
— KennethBiodo Sep 9, 05:39 PM #wh0cd3773342 [url=http://tetracycline.news/]cheap tetracycline[/url]
— KennethBiodo Sep 9, 05:52 PM #wh0cd6638829 [url=http://prozac.zone/]prozac[/url]
— MichaelSoush Sep 9, 06:08 PM #wh0cd3699912 [url=http://advair.us.com/]advair[/url]
— Alfreddut Sep 9, 06:08 PM #v <a href= http://lyricamth.com >cheap lyrica</a> within [url=http://lyricamth.com]cheap lyrica[/url] lyrica medication
— Donaldgaw Sep 9, 06:13 PM #wh0cd6491921 [url=http://sildenafil.us.com/sildenafil-citrate-100-mg.html]sildenafil citrate 100mg[/url]
— MichaelSoush Sep 9, 06:14 PM #p <a href= http://lyricamth.com >buy lyrica</a> latter [url=http://lyricamth.com]lyrica[/url] buy lyrica
— Joesphkep Sep 9, 06:33 PM #wh0cd6051076 [url=http://metforminonline.pro/]metformin on line[/url]
— Charlesnef Sep 9, 06:46 PM #k <a href= http://lyricamth.com >lyrica online</a> none [url=http://lyricamth.com]buy Pregabalin online[/url] lyrica coupon
— Donaldbit Sep 9, 06:51 PM #q <a href= http://canadapharmmth.com >cheap medication</a> wouldn’t [url=http://canadapharmmth.com]canadian pharmacy review[/url] canadian pharmacy review
— JamesFug Sep 9, 06:53 PM #wh0cd4948963 [url=http://toradolprice.pro/]toradol for kidney stone pain[/url] [url=http://tetracycline.news/]tetracycline[/url]
— MichaelSoush Sep 9, 07:02 PM #wh0cd6712365 [url=http://baclofen.work/]baclofen[/url]
— AaronUttet Sep 9, 07:11 PM #wh0cd3626411 [url=http://toradolprice.pro/]toradol for headaches[/url]
— Charlesnef Sep 9, 07:21 PM #o <a href= http://modafinilmth.com >provigil coupon</a> half [url=http://modafinilmth.com]provigil[/url] generic modafinil
— Donaldgaw Sep 9, 07:48 PM #l <a href= http://lyricamth.com >lyrica generic</a> difference [url=http://lyricamth.com]cheap lyrica[/url] lyrica coupon
— Donaldgaw Sep 9, 08:35 PM #wh0cd4214214 [url=http://buy-avana.store/]avana[/url]
— Bennyboits Sep 9, 08:48 PM #wh0cd3773385 [url=http://fluoxetine20mg.pro/]fluoxetine[/url] [url=http://retinaa.pro/]retin-a[/url]
— Alfreddut Sep 9, 08:52 PM #wh0cd5022436 [url=http://albuterol.store/]albuterol sulfate inhaler[/url]
— MichaelSoush Sep 9, 09:12 PM #wh0cd3993780
— KennethBiodo Sep 9, 09:15 PM #wh0cd6124549 [url=http://cephalexin500.reisen/]cephalexin 500 mg capsules[/url]
— Charlesnef Sep 9, 09:17 PM #a <a href= http://modafinilmth.com >buy provigil online</a> future [url=http://modafinilmth.com]modafinil[/url] provigil
— JoesphOscib Sep 9, 09:23 PM #s <a href= http://lyricamth.com >buy Pregabalin online</a> wine [url=http://lyricamth.com]buy Pregabalin online[/url] buy Pregabalin online
— JamesFug Sep 9, 09:26 PM #wh0cd6785838 [url=http://nolvadex.directory/]read full report[/url]
— AaronUttet Sep 9, 09:26 PM #wh0cd6271477 [url=http://propecia.systems/]where to buy propecia online[/url] [url=http://buyamoxicillin.reisen/]buy amoxicillin without prescription[/url]
— Brettsoync Sep 9, 09:33 PM #wh0cd6638869 [url=http://sildenafil.us.com/]sildenafil[/url]
— MichaelSoush Sep 9, 10:23 PM #wh0cd6785777 [url=http://buyprovera.reisen/]provera tablets[/url]
— MichaelSoush Sep 9, 10:25 PM #wh0cd6565382 [url=http://buy-nexium.shop/]nexium[/url]
— MichaelSoush Sep 9, 10:33 PM #wh0cd3699884 [url=http://buy-flagyl.shop/]buy flagyl[/url]
— Charlesnef Sep 9, 10:40 PM #j <a href= http://lyricamth.com >lyrica</a> school [url=http://lyricamth.com]cheap lyrica[/url] lyrica coupon
— Donaldbit Sep 9, 10:46 PM #o <a href= http://modafinilmth.com >provigil</a> round [url=http://modafinilmth.com]modafinil online[/url] buy provigil online
— JamesFug Sep 9, 10:50 PM #wh0cd6638855 [url=http://buy-arimidex.reisen/]buy arimidex[/url] [url=http://buyneurontin.reisen/]neurontin[/url]
— MichaelSoush Sep 10, 12:25 AM #wh0cd4067259
— KennethBiodo Sep 10, 12:35 AM #wh0cd6712344 [url=http://buy-cephalexin.store/]keflex antibiotic[/url] [url=http://buyadvair.shop/]buy advair[/url]
— MichaelSoush Sep 10, 12:42 AM #wh0cd6859252 [url=http://propecia.us.com/]5mg propecia[/url]
— MichaelSoush Sep 10, 12:43 AM #Hello friends!
— MaggieFroro Sep 10, 01:21 AM #I am an official representative of private company which deals with all kinds of written work (essay, coursework, dissertation, presentation, report, etc) in short time.
We are ready to offer a free accomplishment of written work hoping for further cooperation and honest feedback about our service.
Send your work topics to our email: discount@edu-paper.com. This offer has limited quantities!!!
Details on our website:
https://essay-top.biz
wh0cd5169382 [url=http://amoxil.schule/]amoxil[/url]
— MichaelSoush Sep 10, 01:23 AM #wh0cd6932784 [url=http://tenormin.store/]tenormin[/url]
— AaronUttet Sep 10, 01:47 AM #wh0cd3993761 [url=http://baclofen.work/]baclofen[/url]
— KennethBiodo Sep 10, 02:02 AM #wh0cd6271500 [url=http://buy-seroquel.reisen/]seroquel[/url]
— Charlesnef Sep 10, 02:06 AM #wh0cd6712328 [url=http://acyclovir.us.com/]acyclovir[/url]
— MichaelSoush Sep 10, 02:11 AM #wh0cd6418427 [url=http://clonidineonline.pro/]clonidine online[/url]
— Brettsoync Sep 10, 02:46 AM #wh0cd6932727 [url=http://genericadalat.pro/]adalat without prescription[/url] [url=http://propecia.news/]propecia[/url]
— MichaelSoush Sep 10, 02:55 AM #wh0cd6785817 [url=http://genericadalat.pro/]adalat[/url]
— MichaelSoush Sep 10, 02:55 AM #wh0cd5242857 [url=http://buyseroquel.work/]seroquel[/url]
— MichaelSoush Sep 10, 03:42 AM #wh0cd7006257 [url=http://effexor.zone/]generic effexor cost[/url] [url=http://wellbutrinonline.pro/]wellbutrin online[/url]
— AaronUttet Sep 10, 03:52 AM #bestall recept, http://sverige-apotek.life/clavoxilina-bid.html , generisk Stockholm.
— sverigapotek Sep 10, 03:53 AM #wh0cd4140732
— KennethBiodo Sep 10, 04:05 AM #wh0cd6859292 [url=http://buytadalissx.reisen/]tadalis sx[/url] [url=http://abilifycost.pro/]abilify[/url]
— MichaelSoush Sep 10, 04:55 AM #wh0cd4067234 [url=http://genericseroquel.pro/]seroquel brand name[/url] [url=http://buy-synthroid.shop/]buy synthroid online[/url]
— KennethBiodo Sep 10, 04:58 AM #wh0cd6491900 [url=http://buylipitor.store/]order lipitor online[/url]
— Brettsoync Sep 10, 05:21 AM #wh0cd3993811 [url=http://dapoxetine.reisen/]dapoxetine[/url]
— Alfreddut Sep 10, 05:28 AM #wh0cd3846830 [url=http://nolvadex.directory/]buy cheap nolvadex online without prescription[/url]
— Charlesnef Sep 10, 05:30 AM #wh0cd7079735 [url=http://toradolprice.pro/]toradol price[/url] [url=http://citalopramhbr.reisen/]citalopram hbr tabs 40mg[/url]
— AaronUttet Sep 10, 05:58 AM #wh0cd5316330 [url=http://sildenafil.us.com/sildenafil-citrate-100-mg.html]sildenafil citrate 100 mg[/url]
— MichaelSoush Sep 10, 05:59 AM #wh0cd6859282 [url=http://buyamoxicillin.reisen/]amoxicillin online canada[/url]
— MichaelSoush Sep 10, 06:35 AM #wh0cd6418454 [url=http://toradolprice.pro/]toradol[/url]
— Charlesnef Sep 10, 06:51 AM #wh0cd7079675 [url=http://effexorgeneric.pro/]effexor[/url]
— MichaelSoush Sep 10, 06:51 AM #wh0cd4214205
— KennethBiodo Sep 10, 07:34 AM #bästa pris recept, http://sverige-apotek.life/simcor.html , lagligt priser.
— sverigapotek Sep 10, 07:43 AM #wh0cd6565378 [url=http://advaironline.pro/]generic advair online[/url]
— Brettsoync Sep 10, 07:57 AM #wh0cd7153208 [url=http://buyrimonabant.reisen/]acomplia rimonabant[/url]
— AaronUttet Sep 10, 08:01 AM #wh0cd4067284 [url=http://sildenafil.us.com/]where to buy sildenafil citrate online[/url]
— Alfreddut Sep 10, 08:02 AM #wh0cd5389805 [url=http://elimite.directory/]where can i buy elimite[/url]
— MichaelSoush Sep 10, 08:05 AM #wh0cd6932757 [url=http://buy-levaquin.shop/]buy levaquin[/url] [url=http://tetracycline.news/]tetracycline[/url]
— MichaelSoush Sep 10, 08:39 AM #wh0cd7153153 [url=http://buylipitor.store/]buy lipitor[/url] [url=http://stromectol.zone/]stromectol[/url]
— MichaelSoush Sep 10, 08:55 AM #wh0cd6491929 [url=http://effexor.zone/]effexor[/url]
— Charlesnef Sep 10, 09:01 AM #wh0cd3920303 [url=http://buydiflucan.store/]buy diflucan[/url] [url=http://advaironline.pro/]advair[/url]
— Charlesnef Sep 10, 09:04 AM #wh0cd7226681 [url=http://buy-strattera.work/]strattera[/url]
— AaronUttet Sep 10, 10:08 AM #wh0cd6638856 [url=http://propecia.systems/]propecia[/url] [url=http://propranolol.zone/]propranolol 10mg[/url]
— Brettsoync Sep 10, 10:31 AM #wh0cd4214187 [url=http://zithromax.systems/]buy zithromax online cheap[/url] [url=http://buy-synthroid.shop/]synthroid[/url]
— KennethBiodo Sep 10, 10:32 AM #wh0cd7006230 [url=http://buybuspar.shop/]buspar[/url] [url=http://methotrexate.tools/]buy methotrexate online[/url]
— MichaelSoush Sep 10, 10:40 AM #wh0cd4287678
— KennethBiodo Sep 10, 10:53 AM #wh0cd124443 [url=http://buy-synthroid.shop/]synthroid[/url] [url=http://metformin.reisen/]metformin[/url]
— Charlesnef Sep 10, 10:55 AM #wh0cd4140757 [url=http://albuterol.store/]albuterol[/url]
— Alfreddut Sep 10, 11:04 AM #wh0cd7226626 [url=http://diflucan.systems/]buy fluconizole online[/url] [url=http://buy-vermox.shop/]vermox[/url]
— MichaelSoush Sep 10, 11:13 AM #wh0cd5536758 [url=http://sildenafil.us.com/sildenafil-soft-tabs.html]sildenafil from india[/url]
— MichaelSoush Sep 10, 12:10 PM #wh0cd3993783 [url=http://citalopramhbr.reisen/]citalopram hbr 20 mg[/url] [url=http://avodart.zone/]explained here[/url]
— Charlesnef Sep 10, 12:21 PM #wh0cd197911 [url=http://acyclovir.us.com/]acyclovir[/url]
— Alfreddut Sep 10, 12:36 PM #Скупка авто в короткие сроки дорого !
Выкуп авто киев !
Выкуп авто !
Выкуп авто срочно,быстро,надежно !
Все эти фразы каждый автовладелец видит на страницах интернета сразу же как задастся целю продать авто срочно и не тратить на это много своего времени.
Информации очень много, но на деле не всегда так как хочется.
Часто есть заманчивые предложения, от которых просто не возможно отказаться: дорого, быстро и качественно.
И в тоже время, «дорого» не совсем для вас дорого, «быстро» затягивается на долгое время.
Наша компания Автовыкуп, собрав негативные отзывы, и сделав выводы, принципиально искоренила их.
Наши оценщики оценивают по реалиям авто, быстрота заключается от состояния авто (авто после ДТП, поврежденный авто, кредитный).
Качество гарантировать мы всегда можем, так как в нашей команде работают только профессионалы с большим опытом работы в сфере авто обслуживания.
Мы с уверенностью можем гарантировать что вы останетесь довольны нашей работой !
https://vikupauto.club
https://vikupauto.club/about
https://vikupauto.club/services
https://vikupauto.club/gallery
https://vikupauto.club/news
https://vikupauto.club/news/skupka_toyota_landcruiser200
https://vikupauto.club/news/skupka_avto_kiev
https://vikupauto.club/news/preimushestvo_skupka_avto
https://vikupauto.club/news/_skupka_avto_poslie_dtp
https://vikupauto.club/news/skupka_avto_priiediet
https://vikupauto.club/news/chto_takoe_vikup
https://vikupauto.club/news/skupka_kredit
https://vikupauto.club/news/zagholovok_stat_i0123456
https://vikupauto.club/news/zagholovok_stat_i012345
https://vikupauto.club/news/zagholovok_stat_i01234
https://vikupauto.club/news/skupka_avto1
https://vikupauto.club/news/zagholovok_stat_i0123
https://vikupauto.club/news/zagholovok_stat_i012
https://vikupauto.club/news/zagholovok_stat_i01
https://vikupauto.club/news/zagholovok_stat_i0
https://vikupauto.club/news/pokupka_ochieriednogho_avto
https://vikupauto.club/news/zagholovok_stat_i
https://vikupauto.club/contacts
https://vikupauto.club/blogh/skupka_avto_mazda_skh7
https://vikupauto.club/blogh/vykup_audi_a8
https://vikupauto.club/blogh/vikup_avto_lend_cruiser
https://vikupauto.club/blogh/skupka_avto_hyundai_santa_fe
https://vikupauto.club/blogh/skupka_avto_lexusrx350
https://vikupauto.club/blogh/skupka_mitsubishi_pajero
https://vikupauto.club/blogh/skupka_subaru
https://vikupauto.club/blogh/skupka_hundai
https://vikupauto.club/blogh/vikup_bmw
https://vikupauto.club/blogh/skupka_avto_skoda
https://vikupauto.club/blogh/skupka_audi
https://vikupauto.club/blogh/zagholovok_stat_i012345
https://vikupauto.club/blogh/avtovykup_toyota_camry
https://vikupauto.club/blogh/zagholovok_stat_i01234
https://vikupauto.club/blogh/zagholovok_stat_i0123
https://vikupauto.club/blogh/zagholovok_stat_i012
https://vikupauto.club/blogh/zagholovok_stat_i01
https://vikupauto.club/blogh/zagholovok_stat_i0
https://vikupauto.club/blogh/skupka_avto_volkswagen_touareg
https://vikupauto.club/blogh/avtovykup_mitsubishi_asx
https://vikupauto.club/blogh/toyota_rav4new
https://vikupauto.club/blogh/zagholovok_stat_i
https://vikupauto.club/avtovikup
https://vikupauto.club/avtovikup/avtovikup
https://vikupauto.club/avtovikup/avtovikup_v_kiev
https://vikupauto.club/avtovikup/chto_nakoe_avtovikup
https://vikupauto.club/blogh
[url=https://vikupauto.club/news/_skupka_avto_poslie_dtp]автовыкуп украина[/url]
[url=https://vikupauto.club/blogh/avtovykup_toyota_camry]автовыкуп украина[/url]
[url=https://vikupauto.club/avtovikup/avtovikup_v_kiev]выкуп авто[/url]
[url=https://vikupauto.club/blogh/vikup_avto_lend_cruiser]цена автовыкуп[/url]
[url=https://vikupauto.club/blogh/zagholovok_stat_i012345]цена автовыкуп[/url]
[url=https://vikupauto.club/blogh]автовыкуп в украине[/url]
[url=https://vikupauto.club/blogh/zagholovok_stat_i01234]автовыкуп проблемных авто[/url]
[url=https://vikupauto.club/blogh/avtovykup_mitsubishi_asx]выкуп авто дорого[/url]
[url=https://vikupauto.club/news/pokupka_ochieriednogho_avto]выкуп проблемных авто[/url]
[url=https://vikupauto.club/news/skupka_toyota_landcruiser200]выкуп элитных авто[/url]
— DilMEW Sep 10, 12:42 PM #wh0cd197918 [url=http://acyclovir.us.com/]acyclovir[/url]
— Charlesnef Sep 10, 01:00 PM #wh0cd7300101 [url=http://buy-flagyl.shop/]where to buy flagyl online[/url]
— MichaelSoush Sep 10, 01:06 PM #wh0cd7153192 [url=http://sildenafil.us.com/sildenafil-citrate-100mg-pills.html]sildenafil citrate 100mg pills[/url]
— MichaelSoush Sep 10, 01:12 PM #wh0cd6712329 [url=http://buytenormin.reisen/]tenormin[/url]
— Brettsoync Sep 10, 01:13 PM #wh0cd4287662 [url=http://zithromax.systems/]zithromax[/url] [url=http://eloconoverthecounter.pro/]elocon[/url]
— KennethBiodo Sep 10, 01:50 PM #wh0cd6638875 [url=http://neurontinonline.pro/]neurontin online[/url] [url=http://trazodone.tools/]trazodone[/url]
— Charlesnef Sep 10, 01:55 PM #wh0cd4361151
— KennethBiodo Sep 10, 02:06 PM #wh0cd271380 [url=http://tenormin.store/]tenormin online[/url]
— Bennyboits Sep 10, 02:24 PM #wh0cd6785802 [url=http://propecia.us.com/]finasteride price[/url]
— Brettsoync Sep 10, 04:20 PM #wh0cd6712348 [url=http://zetia.fail/]zetia generic[/url]
— Charlesnef Sep 10, 04:31 PM #wh0cd7447106 [url=http://buyclindamycin.work/]clindamycin phosphate[/url]
— AaronUttet Sep 10, 04:36 PM #wh0cd7226651 [url=http://buyprovera.reisen/]buy provera[/url]
— MichaelSoush Sep 10, 04:58 PM #wh0cd4655062 [url=http://cymbaltageneric.reisen/]cymbalta 60mg[/url] [url=http://buyclindamycin.work/]buy clindamycin gel[/url]
— Bennyboits Sep 10, 05:01 PM #wh0cd418326 [url=http://eloconsteroidcream.pro/]generic elocon[/url] [url=http://buy-seroquel.reisen/]cost of seroquel xr[/url]
— Bennyboits Sep 10, 05:47 PM #wh0cd4434630
— KennethBiodo Sep 10, 05:47 PM #wh0cd418337 [url=http://wellbutrinonline.pro/]wellbutrin[/url]
— Charlesnef Sep 10, 06:01 PM #wh0cd6785821 [url=http://advair.us.com/]advair[/url]
— Charlesnef Sep 10, 06:36 PM #wh0cd7520581 [url=http://buy-kamagra.store/]kamagra[/url]
— AaronUttet Sep 10, 06:41 PM #wh0cd4140731 [url=http://prednisone.tools/]buying predesone on line[/url] [url=http://zetia.fail/]read this[/url]
— Charlesnef Sep 10, 07:27 PM #wh0cd491799 [url=http://baclofen.work/]baclofen tablets 10mg[/url] [url=http://yasmin.work/]yasmin birth control pills[/url]
— Bennyboits Sep 10, 07:31 PM #wh0cd6859275 [url=http://buy-methotrexate.reisen/]methotrexate[/url] [url=http://buy-ventolin.shop/]buy ventolin[/url]
— Brettsoync Sep 10, 07:31 PM #wh0cd4434610 [url=http://prednisoneonline.pro/]prednisone[/url] [url=http://tadalafil.fail/]tadalafil buy online[/url]
— KennethBiodo Sep 10, 07:54 PM #wh0cd4361184 [url=http://sildenafil.us.com/]sildenafil[/url]
— Alfreddut Sep 10, 08:16 PM #wh0cd5830660 [url=http://buy-synthroid.shop/]synthroid[/url]
— MichaelSoush Sep 10, 08:26 PM #wh0cd7594054 [url=http://buyabilify.shop/]discount abilify[/url] [url=http://buylipitor.store/]lipitor 5 mg[/url]
— AaronUttet Sep 10, 08:43 PM #wh0cd4728535 [url=http://buy-levaquin.shop/]generic levaquin[/url] [url=http://propecia.news/]propecia without a prescription[/url]
— Bennyboits Sep 10, 09:10 PM #wh0cd565272 [url=http://cymbaltageneric.reisen/]cymbalta generic[/url] [url=http://atenolol.systems/]atenolol 25mg[/url]
— Bennyboits Sep 10, 09:17 PM #wh0cd7373599 [url=http://elimite.news/]permethrin topical cream over counter[/url]
— MichaelSoush Sep 10, 09:18 PM #wh0cd6859298 [url=http://metforminonline.pro/]metformin[/url]
— Charlesnef Sep 10, 09:22 PM #wh0cd6932748 [url=http://buy-ventolin.shop/]buy ventolin[/url] [url=http://stromectol.zone/]cheap stromectol[/url]
— Brettsoync Sep 10, 09:44 PM #wh0cd7447084 [url=http://buyseroquel.work/]site[/url] [url=http://eloconoverthecounter.pro/]elocon[/url]
— MichaelSoush Sep 10, 09:47 PM #wh0cd4508103
— KennethBiodo Sep 10, 09:58 PM #wh0cd5904133 [url=http://propecia.us.com/]generic propecia[/url]
— MichaelSoush Sep 10, 10:23 PM #wh0cd4508083 [url=http://propecia.systems/]propecia[/url]
— KennethBiodo Sep 10, 10:42 PM #wh0cd638745 [url=http://buytamoxifen.shop/]tamoxifen[/url] [url=http://cephalexin500mg.shop/]cephalexin medicine[/url]
— Bennyboits Sep 10, 10:59 PM #wh0cd7667475 [url=http://valtrex.zone/]valtrex[/url] [url=http://yasmin.work/]yasmin[/url]
— MichaelSoush Sep 10, 11:43 PM #wh0cd4214206 [url=http://buy-seroquel.reisen/]cost of seroquel xr[/url]
— Charlesnef Sep 10, 11:43 PM #wh0cd7520559 [url=http://suhagraonline.pro/]generic suhagra[/url]
— MichaelSoush Sep 11, 12:00 AM #wh0cd6932775 [url=http://acyclovir.us.com/]acyclovir[/url]
— Charlesnef Sep 11, 12:08 AM #wh0cd7741000 [url=http://metforminhydrochloride.pro/]metformin hydrochloride[/url]
— AaronUttet Sep 11, 01:09 AM #wh0cd4802012 [url=http://buytenormin.reisen/]tenormin[/url] [url=http://buyavana.shop/]buy avana[/url]
— Bennyboits Sep 11, 01:22 AM #wh0cd4581559 [url=http://cipro.directory/]cipro tendonitis[/url] [url=http://methotrexate.tools/]methotrexate[/url]
— KennethBiodo Sep 11, 01:28 AM #wh0cd7594032 [url=http://metformin.reisen/]metformin[/url]
— MichaelSoush Sep 11, 01:50 AM #wh0cd4508130 [url=http://tretinoin.fail/]tretinoin[/url]
— Alfreddut Sep 11, 01:52 AM #wh0cd4581576
— KennethBiodo Sep 11, 02:04 AM #wh0cd6051081 [url=http://buy-albendazole.work/]buy albendazole[/url]
— MichaelSoush Sep 11, 02:07 AM #wh0cd7006248 [url=http://buyneurontin.reisen/]buy neurontin[/url] [url=http://neurontinonline.pro/]neurontin online[/url]
— Charlesnef Sep 11, 02:54 AM #wh0cd7594027 [url=http://buytamoxifen.shop/]tamoxifen[/url] [url=http://levaquin500mg.pro/]levaquin 500 mg[/url]
— MichaelSoush Sep 11, 03:19 AM #wh0cd7814473 [url=http://buytadalafil.store/]where to buy tadalafil online[/url] [url=http://zithromax.news/]zithromax[/url]
— AaronUttet Sep 11, 03:27 AM #wh0cd4287679 [url=http://buy-avana.store/]buy avana[/url]
— Charlesnef Sep 11, 03:32 AM #wh0cd7667511 [url=http://sildenafil.us.com/sildenafil-soft-tabs.html]sildenafil citrate 100mg tablets[/url]
— MichaelSoush Sep 11, 04:03 AM #wh0cd6124554 [url=http://baclofen.work/]baclofen[/url] [url=http://metforminhydrochloride.pro/]metformin hydrochloride[/url]
— MichaelSoush Sep 11, 04:19 AM #[url=https://onlineloans.us.com/]More about the author[/url]
— Mikeben Sep 11, 04:57 AM #[url=https://bestpaydayloansonline.us.com/]payday loans online[/url]
— Mikeben Sep 11, 04:57 AM #wh0cd7153169 [url=http://sildenafil.us.com/sildenafil-citrate-100-mg.html]sildenafil citrate 100 mg[/url]
— Brettsoync Sep 11, 05:17 AM #wh0cd7667503 [url=http://cipro.directory/]cipro[/url] [url=http://buy-clomid.shop/]buy clomid[/url]
— MichaelSoush Sep 11, 05:32 AM #wh0cd4655049
— KennethBiodo Sep 11, 05:41 AM #wh0cd7079721 [url=http://sildenafil.us.com/sildenafil-soft-tabs.html]sildenafil from india[/url]
— Charlesnef Sep 11, 05:45 AM #wh0cd7887946 [url=http://acyclovir.us.com/]acyclovir[/url]
— AaronUttet Sep 11, 05:46 AM #wh0cd7740990 [url=http://avodart.zone/]avodart price[/url]
— MichaelSoush Sep 11, 06:15 AM #wh0cd4361152 [url=http://propecia.us.com/]5mg propecia[/url]
— Charlesnef Sep 11, 07:28 AM #wh0cd7740981 [url=http://retinaa.pro/]retin-a[/url]
— MichaelSoush Sep 11, 07:30 AM #wh0cd4728505 [url=http://propecia.news/]propecia[/url]
— KennethBiodo Sep 11, 07:43 AM #wh0cd7226642 [url=http://sildenafil.us.com/sildenafil-citrate-100-mg.html]sildenafil citrate 100 mg[/url]
— Brettsoync Sep 11, 08:03 AM #wh0cd4655078 [url=http://albuterol.store/]albuterol[/url]
— Alfreddut Sep 11, 08:04 AM #wh0cd7153196 [url=http://yasmin.work/]yasmin[/url] [url=http://vibramycin.pro/]vibramycin[/url]
— Charlesnef Sep 11, 08:20 AM #wh0cd7814454 [url=http://wellbutrin150mg.pro/]wellbutrin no precription[/url] [url=http://triamterene.systems/]triamterene hctz[/url]
— MichaelSoush Sep 11, 09:36 AM #wh0cd4728524
— KennethBiodo Sep 11, 09:41 AM #wh0cd4434627 [url=http://medrol.work/]medrol[/url] [url=http://buytamoxifen.shop/]buy tamoxifen[/url]
— Charlesnef Sep 11, 10:31 AM #wh0cd7887938 [url=http://metforminonline.pro/]metformin[/url] [url=http://amoxil.schule/]article source[/url]
— MichaelSoush Sep 11, 10:37 AM #wh0cd4801980 [url=http://buy-methotrexate.work/]medication methotrexate[/url]
— KennethBiodo Sep 11, 11:41 AM #wh0cd8108372 [url=http://amoxil.schule/]amoxil[/url]
— AaronUttet Sep 11, 12:03 PM #wh0cd4801997
— KennethBiodo Sep 11, 01:05 PM #wh0cd4508102 [url=http://buylipitor.store/]lipitor[/url]
— Charlesnef Sep 11, 01:12 PM #wh0cd7373588 [url=http://buy-clomid.shop/]clomid cheap online[/url] [url=http://prednisone.tools/]sterapred[/url]
— Brettsoync Sep 11, 01:34 PM #wh0cd7961404 [url=http://prednisoneonline.pro/]buying prednisone on line[/url] [url=http://buy-anafranil.store/]anafranil for ocd[/url]
— MichaelSoush Sep 11, 02:01 PM #wh0cd7300144 [url=http://buy-methotrexate.work/]buy methotrexate[/url] [url=http://buy-kamagra.store/]where to buy kamagra[/url]
— Charlesnef Sep 11, 02:17 PM #wh0cd6491928 [url=http://buy-effexor.work/]effexor[/url]
— MichaelSoush Sep 11, 02:37 PM #wh0cd8181845 [url=http://elocon.mba/]elocon[/url]
— AaronUttet Sep 11, 02:39 PM #wh0cd5095910 [url=http://buy-nexium.shop/]nexium online pharmacy[/url] [url=http://buy-tretinoin.reisen/]buy tretinoin[/url]
— Bennyboits Sep 11, 03:55 PM #wh0cd4802028 [url=http://propecia.us.com/]finasteride[/url]
— Alfreddut Sep 11, 04:03 PM #wh0cd4875470
— KennethBiodo Sep 11, 04:45 PM #wh0cd8181796 [url=http://medrol.work/]medrol pak[/url] [url=http://medrol.zone/]medrol 4mg[/url]
— MichaelSoush Sep 11, 04:56 PM #wh0cd6565407 [url=http://buy-nexium.shop/]buy nexium[/url]
— MichaelSoush Sep 11, 05:12 PM #wh0cd8255320 [url=http://diflucan.systems/]diflucan[/url] [url=http://buy-azithromycin.store/]azithromycin[/url]
— AaronUttet Sep 11, 05:14 PM #wh0cd8034881 [url=http://buy-levaquin.shop/]levaquin[/url]
— MichaelSoush Sep 11, 05:16 PM #wh0cd7373619 [url=http://trazodone100mg.pro/]cost of trazodone[/url]
— Charlesnef Sep 11, 05:33 PM #wh0cd8108361 [url=http://buy-methotrexate.work/]methotrexate[/url] [url=http://buy-albendazole.work/]albenza generic[/url]
— MichaelSoush Sep 11, 06:18 PM #wh0cd4948932 [url=http://tretinoin.store/]tretinoin cream[/url]
— KennethBiodo Sep 11, 07:04 PM #wh0cd8328795 [url=http://nexiumgeneric.pro/]nexium[/url] [url=http://buy-arimidex.reisen/]arimidex[/url]
— AaronUttet Sep 11, 07:13 PM #wh0cd7520538 [url=http://lisinopril.store/]lisinopril[/url]
— Brettsoync Sep 11, 07:39 PM #wh0cd4875503 [url=http://cipro.directory/]cipro[/url] [url=http://buy-tretinoin.store/]where can i buy tretinoin cream[/url]
— Alfreddut Sep 11, 07:42 PM #wh0cd8108356 [url=http://sildenafil.us.com/sildenafil-citrate-100-mg.html]sildenafil citrate 100mg[/url]
— MichaelSoush Sep 11, 07:47 PM #wh0cd8255271 [url=http://suhagraonline.pro/]suhagra[/url]
— MichaelSoush Sep 11, 08:12 PM #wh0cd7447092 [url=http://buy-anafranil.store/]buy anafranil[/url]
— Charlesnef Sep 11, 08:28 PM #wh0cd4655052 [url=http://zithromax.news/]zithromax[/url] [url=http://effexor.zone/]effexor[/url]
— Charlesnef Sep 11, 09:17 PM #wh0cd4948947
— KennethBiodo Sep 11, 09:18 PM #wh0cd8181836 [url=http://buyamoxicillin.reisen/]buy amoxicillin[/url]
— MichaelSoush Sep 11, 09:34 PM #wh0cd8328744 [url=http://ciprofloxacinhcl500mg.reisen/]ciprofloxacin hcl 500 mg[/url] [url=http://triamterene.systems/]triamterene hctz 37.5 25[/url]
— MichaelSoush Sep 11, 11:11 PM #wh0cd8255311 [url=http://kamagra.live/]kamagra chewable[/url] [url=http://buyneurontin.reisen/]buy neurontin[/url]
— MichaelSoush Sep 12, 12:45 AM #wh0cd5242858 [url=http://buycelexa.shop/]buy celexa[/url]
— Bennyboits Sep 12, 12:49 AM #wh0cd6785834 [url=http://buy-nexium.shop/]buy nexium[/url] [url=http://elimite.schule/]elimite[/url]
— MichaelSoush Sep 12, 12:57 AM #wh0cd4728529 [url=http://buy-azithromycin.shop/]buy azithromycin[/url] [url=http://citalopramhbr.reisen/]citalopram hbr[/url]
— Charlesnef Sep 12, 01:15 AM #wh0cd8255305 [url=http://buy-tretinoin.reisen/]tretinoin cream price comparison[/url]
— MichaelSoush Sep 12, 01:17 AM #wh0cd5022420
— KennethBiodo Sep 12, 01:41 AM #wh0cd8402221 [url=http://cephalexin500mg.work/]drug cephalexin[/url] [url=http://zetia.fail/]zetia[/url]
— MichaelSoush Sep 12, 01:52 AM #wh0cd7667484 [url=http://buycymbalta.reisen/]cymbalta prozac[/url]
— Brettsoync Sep 12, 02:02 AM #wh0cd5022451 [url=http://trazodone100mg.pro/]trazodone[/url] [url=http://buy-methotrexate.work/]buy methotrexate[/url]
— Alfreddut Sep 12, 02:16 AM #wh0cd8549217 [url=http://buyyasmin.shop/]buy yasmin online usa[/url]
— AaronUttet Sep 12, 02:58 AM #wh0cd8328784 [url=http://buyrimonabant.reisen/]buy rimonabant[/url]
— MichaelSoush Sep 12, 03:31 AM #wh0cd8328778 [url=http://cephalexin500mg.shop/]cephalexin over the counter[/url]
— MichaelSoush Sep 12, 03:50 AM #wh0cd5316331 [url=http://tetracycline.news/]tetracycline[/url] [url=http://tenormin.store/]tenormin[/url]
— Bennyboits Sep 12, 04:37 AM #wh0cd8475696 [url=http://propecia365.us.com/]propecia[/url]
— MichaelSoush Sep 12, 05:08 AM #wh0cd4802002 [url=http://buyretina.shop/]retin-a[/url]
— Charlesnef Sep 12, 05:29 AM #wh0cd5095895
— KennethBiodo Sep 12, 05:56 AM #wh0cd7667515 [url=http://propecia.us.com/]propecia[/url]
— Charlesnef Sep 12, 06:11 AM #wh0cd8402251 [url=http://acyclovir.us.com/]Acyclovir No Prescription[/url]
— MichaelSoush Sep 12, 06:18 AM #wh0cd5169353 [url=http://trazodone100mg.pro/]trazodone[/url]
— KennethBiodo Sep 12, 06:26 AM #wh0cd8402259 [url=http://lasix.live/]buy lasix online[/url] [url=http://elimite.schule/]elimite[/url]
— MichaelSoush Sep 12, 06:34 AM #wh0cd8622693 [url=http://elimite.news/]elimite[/url]
— AaronUttet Sep 12, 06:36 AM #wh0cd6932780 [url=http://buytenormin.reisen/]tenormin anxiety[/url]
— MichaelSoush Sep 12, 06:42 AM #wh0cd5389804 [url=http://albuterol.store/]albuterol[/url]
— Bennyboits Sep 12, 07:52 AM #wh0cd8549169 [url=http://toradolprice.pro/]toradol for kidney stone pain[/url]
— MichaelSoush Sep 12, 08:14 AM #wh0cd4875477 [url=http://tretinoin.fail/]tretinoin cream[/url] [url=http://prozac.zone/]prozac[/url]
— Charlesnef Sep 12, 08:47 AM #wh0cd7006253 [url=http://buysynthroid.store/]synthroid[/url] [url=http://levaquin500mg.pro/]levaquin 500 mg[/url]
— MichaelSoush Sep 12, 08:47 AM #wh0cd8475726 [url=http://propecia365.us.com/]Propecia[/url]
— MichaelSoush Sep 12, 08:47 AM #wh0cd5169368
— KennethBiodo Sep 12, 09:41 AM #wh0cd8475732 [url=http://buy-effexor.work/]effexor[/url] [url=http://medrol.work/]medrol cost[/url]
— MichaelSoush Sep 12, 09:46 AM #wh0cd5242828 [url=http://elocon.mba/]elocon[/url] [url=http://nexiumgeneric.pro/]nexium generic[/url]
— KennethBiodo Sep 12, 10:41 AM #wh0cd8696168 [url=http://elimite.directory/]elimite[/url] [url=http://tretinoin.fail/]where can i buy tretinoin[/url]
— AaronUttet Sep 12, 10:56 AM #wh0cd7887913 [url=http://amoxicillin.us.com/]amoxicillin clavulanate[/url]
— Brettsoync Sep 12, 10:59 AM #wh0cd7079726 [url=http://genericseroquel.pro/]seroquel xr[/url] [url=http://baclofen.work/]baclofen tablets[/url]
— MichaelSoush Sep 12, 11:18 AM #wh0cd8549199 [url=http://methotrexate.tools/]methotrexate[/url] [url=http://buytenormin.reisen/]tenormin[/url]
— MichaelSoush Sep 12, 11:34 AM #wh0cd7814464 [url=http://zetia.fail/]zetia 10 mg[/url] [url=http://tetracycline.news/]buy cheap tetracycline[/url]
— Charlesnef Sep 12, 11:43 AM #wh0cd5242841
— KennethBiodo Sep 12, 12:44 PM #wh0cd4948950 [url=http://prednisoloneonline.pro/]found it for you[/url]
— Charlesnef Sep 12, 01:02 PM #wh0cd8696117 [url=http://toradolprice.pro/]toradol for kidney stone pain[/url] [url=http://tadalafil.fail/]tadalafil[/url]
— MichaelSoush Sep 12, 01:08 PM #wh0cd7153199 [url=http://elocon.mba/]elocon[/url]
— MichaelSoush Sep 12, 01:34 PM #wh0cd5316301 [url=http://tenormin.store/]tenormin[/url]
— KennethBiodo Sep 12, 01:52 PM #wh0cd8622675 [url=http://buycelexa.shop/]celexa[/url] [url=http://buy-kamagra.store/]kamagra usa[/url]
— MichaelSoush Sep 12, 02:04 PM #wh0cd5242878 [url=http://triamterene.systems/]triamterene 37.5mg hctz 25mg tabs[/url]
— Alfreddut Sep 12, 02:22 PM #wh0cd8034859 [url=http://buy-tretinoin.store/]where can i buy tretinoin cream[/url]
— Brettsoync Sep 12, 03:41 PM #wh0cd7226672 [url=http://zetia.fail/]zetia generic alternative[/url] [url=http://buytadacip.shop/]buy tadacip online[/url]
— MichaelSoush Sep 12, 03:41 PM #wh0cd8843114 [url=http://advaironline.pro/]advair online[/url]
— AaronUttet Sep 12, 03:43 PM #wh0cd5536752 [url=http://tretinoin.fail/]tretinoin cream online[/url] [url=http://buy-albendazole.store/]albendazole[/url]
— Bennyboits Sep 12, 03:54 PM #wh0cd5389779 [url=http://buy-albendazole.store/]buy albendazole[/url] [url=http://lasix.systems/]lasix[/url]
— KennethBiodo Sep 12, 04:56 PM #wh0cd7961412 [url=http://advaironline.pro/]advair online[/url]
— Charlesnef Sep 12, 05:02 PM #wh0cd8696151 [url=http://advaironline.pro/]generic advair online[/url] [url=http://genericadalat.pro/]adalat[/url]
— MichaelSoush Sep 12, 05:05 PM #wh0cd5022425 [url=http://propecia.us.com/]propecia[/url]
— Charlesnef Sep 12, 05:05 PM #wh0cd8916587 [url=http://buycafergot.store/]cafergot[/url]
— AaronUttet Sep 12, 05:30 PM #wh0cd8034889 [url=http://buydiflucan.store/]buy diflucan without a prescription[/url] [url=http://lasix.systems/]lasix buy online[/url]
— Charlesnef Sep 12, 07:56 PM #wh0cd8990062 [url=http://buycymbalta.reisen/]buy cymbalta[/url]
— AaronUttet Sep 12, 08:02 PM #wh0cd5389789
— KennethBiodo Sep 12, 08:20 PM #wh0cd8181809 [url=http://cephalexin500mg.shop/]cephalexin[/url]
— Brettsoync Sep 12, 09:08 PM #wh0cd5389824 [url=http://buycytotec.shop/]cytotec[/url] [url=http://buyyasmin.shop/]buy yasmin[/url]
— Alfreddut Sep 12, 09:15 PM #wh0cd5463252 [url=http://vibramycin.pro/]vibramycin[/url]
— KennethBiodo Sep 12, 09:17 PM #wh0cd8108362 [url=http://eurax.zone/]generic eurax[/url] [url=http://citalopramhbr20mg.shop/]citalopram hbr 20 mg[/url]
— Charlesnef Sep 12, 09:53 PM #wh0cd8255282 [url=http://lasixonline.pro/]lasix online[/url] [url=http://diflucan.systems/]diflucan[/url]
— Brettsoync Sep 12, 11:00 PM #wh0cd5169378 [url=http://sildenafil.us.com/sildenafil-soft-tabs.html]sildenafil from india[/url]
— Charlesnef Sep 12, 11:21 PM #wh0cd5463299 [url=http://buyseroquel.work/]seroquel 400 mg[/url] [url=http://tretinoin.fail/]tretinoin[/url]
— Alfreddut Sep 12, 11:46 PM #wh0cd8181835 [url=http://buyyasmin.shop/]buy yasmin online usa[/url] [url=http://buy-tretinoin.store/]tretinoin cream[/url]
— Charlesnef Sep 13, 12:02 AM #wh0cd5463262
— KennethBiodo Sep 13, 12:39 AM #[url=https://onlineloans.us.com/]payday loans online[/url]
— Mikeben Sep 13, 01:05 AM #wh0cd5536725 [url=http://buyyasmin.shop/]yasmin[/url]
— KennethBiodo Sep 13, 01:39 AM #wh0cd5242853 [url=http://cephalexin500mg.shop/]cephalexin 500mg[/url]
— Charlesnef Sep 13, 03:16 AM #wh0cd8402228 [url=http://acyclovir.us.com/]acyclovir[/url]
— Brettsoync Sep 13, 03:47 AM #wh0cd7300145 [url=http://propecia.systems/]propecia[/url] [url=http://buyseroquel.work/]seroquel[/url]
— MichaelSoush Sep 13, 04:45 AM #wh0cd5536735
— KennethBiodo Sep 13, 04:46 AM #wh0cd8843071 [url=http://buyclindamycin.work/]buy clindamycin[/url]
— MichaelSoush Sep 13, 05:11 AM #wh0cd5830650 [url=http://prednisone.tools/]prednisone[/url] [url=http://lasix.live/]lasix 40 mg iv[/url]
— Bennyboits Sep 13, 05:49 AM #wh0cd8328781 [url=http://stromectol.zone/]stromectol[/url] [url=http://buy-seroquel.reisen/]seroquel[/url]
— Charlesnef Sep 13, 06:02 AM #wh0cd5316326 [url=http://buy-anafranil.store/]buy anafranil[/url] [url=http://buy-atarax.shop/]buy atarax[/url]
— Charlesnef Sep 13, 07:03 AM #wh0cd5610247 [url=http://lasix.store/]lasix[/url]
— Alfreddut Sep 13, 07:14 AM #wh0cd8916546 [url=http://buydiflucan.store/]diflucan[/url] [url=http://effexor.zone/]effexor[/url]
— MichaelSoush Sep 13, 07:28 AM #wh0cd8843099 [url=http://effexor.zone/]effexor[/url]
— MichaelSoush Sep 13, 08:25 AM #wh0cd5610208
— KennethBiodo Sep 13, 08:34 AM #wh0cd7447097 [url=http://citalopramhbr20mg.shop/]ssri citalopram[/url]
— MichaelSoush Sep 13, 09:31 AM #[url=http://buy-inderal.store/]propranolol inderal 10 mg tablet[/url]
— MichaelSoush Sep 13, 12:33 PM #[url=http://toradol10mgprice.pro/]toradol[/url]
— Brettsoync Sep 13, 12:42 PM #[url=http://cephalexin.reisen/]generic for cephalexin[/url] [url=http://citalopram.work/]citalopram for sleep[/url]
— MichaelSoush Sep 13, 01:09 PM #[url=http://buy-sildalis.shop/]sildalis online[/url]
— Charlesnef Sep 13, 01:46 PM #[url=http://seroquel.directory/]seroquel 150[/url]
— KennethBiodo Sep 13, 02:03 PM #[url=http://genericcelexa.pro/]generic celexa[/url] [url=http://buyindocin.shop/]indocin[/url]
— Alfreddut Sep 13, 02:04 PM #[url=http://doxycycline100mg.pro/]doxycycline[/url] [url=http://atenolol.fail/]atenolol[/url]
— Charlesnef Sep 13, 02:31 PM #[url=http://buy-sildenafil.reisen/]full report[/url]
— KennethBiodo Sep 13, 02:33 PM #[url=http://allopurinol.reisen/]allopurinol[/url]
— MichaelSoush Sep 13, 04:11 PM #[url=http://buy-revia.reisen/]revia cost[/url] [url=http://buyfluoxetine.store/]fluoxetine[/url]
— MichaelSoush Sep 13, 04:21 PM #[url=http://buy-crestor.work/]crestor[/url]
— MichaelSoush Sep 13, 04:22 PM #[url=http://buy-rimonabant.shop/]acomplia 20mg rimonabant[/url]
— MichaelSoush Sep 13, 04:38 PM #[url=http://buy-bupropion.store/]bupropion[/url]
— Brettsoync Sep 13, 04:40 PM #[url=http://clonidine.fail/]discover more here[/url]
— Charlesnef Sep 13, 04:49 PM #[url=http://doxycycline100mg.pro/]doxycycline[/url] [url=http://buyantabuse.reisen/]buy antabuse online without prescription[/url]
— MichaelSoush Sep 13, 09:30 PM #[url=http://buy-antabuse.reisen/]our site[/url]
— MichaelSoush Sep 14, 02:10 AM #[url=http://diclofenacgel.pro/]diclofenac[/url]
— MichaelSoush Sep 14, 02:32 AM #[url=http://plavixgeneric.store/]plavix[/url]
— Bennyboits Sep 14, 03:44 AM #[url=http://diclofenacgel.pro/]diclofenac gel[/url] [url=http://buy-cymbalta.store/]cymbalta[/url]
— KennethBiodo Sep 14, 03:44 AM #[url=http://buy-cymbalta.store/]buy cymbalta[/url]
— Brettsoync Sep 14, 04:07 AM #[url=http://buy-lipitor.store/]buy lipitor online[/url] [url=http://strattera.shop/]generic atomoxetine[/url]
— Charlesnef Sep 14, 04:27 AM #[url=http://buy-sildalis.shop/]sildalis online[/url] [url=http://buyfluoxetine.store/]fluoxetine buy[/url]
— MichaelSoush Sep 14, 06:18 AM #[url=http://allopurinol.reisen/]allopurinol buy[/url] [url=http://tadalis-sx.store/]tadalis sx[/url]
— Brettsoync Sep 14, 07:13 AM #[url=http://genericlasix.pro/]lasix[/url]
— KennethBiodo Sep 14, 07:20 AM #[url=http://plavixgeneric.store/]clopidogrel bisulfate plavix[/url] [url=http://buyindocin.shop/]indocin[/url]
— Charlesnef Sep 14, 08:12 AM #[url=http://buy-inderal.store/]inderal[/url]
— Charlesnef Sep 14, 09:13 AM #[url=http://atenolol.fail/]atenolol tenormin[/url]
— MichaelSoush Sep 14, 10:19 AM #[url=http://azithromycin247.us.com/]Azithromycin[/url]
— AaronUttet Sep 14, 12:58 PM #e98hd9uq3U
[url=http://azithromycin247.us.com/]azithromycin 500 mg[/url]
— AaronUttet Sep 14, 04:33 PM #e98hd9uq3U
[url=https://essaywritingservices.us.com/]essay writing service[/url]
— Mikeben Sep 14, 09:04 PM #[url=https://bestpaydayloansonline.us.com/]secure payday loans online[/url]
— Mikeben Sep 14, 09:04 PM #[url=http://azithromycin247.us.com/]buy azithromycin online[/url]
— AaronUttet Sep 15, 12:32 AM #e98hd9uq3U
[url=http://azithromycin247.us.com/]azithromycin pills[/url]
— AaronUttet Sep 15, 10:11 AM #e98hd9uq3U
[url=https://paydayloans.us.org/]loans for bad credit[/url]
— Johnben Sep 15, 08:10 PM #[url=https://paydayloans.us.org/]loans for bad credit[/url]
— JamesCusty Sep 15, 08:16 PM #[url=http://azithromycin247.us.com/]Generic Zithromax[/url]
— AaronUttet Sep 16, 12:24 AM #e98hd9uq3U
[url=https://paydayloans.us.org/]online payday loans[/url]
— JamesCusty Sep 16, 12:30 PM #[url=http://cephalexin250mg.us.org/]cephalexin 250 mg[/url] [url=http://colchicine247.us.com/]buy colchicine[/url]
— AaronUttet Sep 17, 02:22 AM #[url=https://paydayloans.us.org/]fast payday loans online direct lenders[/url]
— Johnben Sep 17, 05:23 AM #[url=https://paydayloans.us.org/]pay day loans[/url]
— JamesCusty Sep 17, 05:24 AM #[url=https://paydayloans.us.org/]payday loans[/url]
— JamesNip Sep 18, 06:11 PM #[url=https://paydayloans.us.org/]payday loans online reviews[/url]
— JohnNip Sep 18, 06:32 PM #[url=https://paydayloans.us.org/]easy payday loans online[/url]
— JamesNip Sep 19, 09:59 AM #[url=https://paydayloans.us.org/]direct lenders payday loans online[/url]
— JohnNip Sep 19, 11:07 AM #[url=https://paydayloans.us.org/]payday loans online direct lender only[/url]
— JamesNip Sep 20, 01:01 AM #[url=https://paydayloans.us.org/]payday loans online direct lenders only[/url]
— JohnNip Sep 20, 02:28 AM #Methods Be sure to get the apache_2.2.16-win32-x86-no_ssl MSI installer below: () Save the record to your Windows Desktop. You’ll view a window that seems like this: Press radio stations switch “I acknowledge the terms within the license contract” To the next screen, again press “Next>”. Make certain radio stations switch “for several users, on port 80, as a service – suggested” is selected. To the next window, press the air switch “Custom”, and then press “Next>”. We’re going to mount all the plans and programs within the journey H:ServerApache2 (assuming H: is your major hard disk drive). The closing backslash is very important. At this level, you must see a screen that seems like this: When the Apache installation software has accomplished installing every one of the records on your PC, you will visit an ultimate window helping you discover the installation was profitable. Advertising Can you tell us about Yes Coloring Hair Can you reveal about Yes jewelry care Can you reveal about Yes haircare Can you tell us about Yes Self-improvement Thanks for aiding! … Recall, more detail is much better. Provide Facts. Do not be concerned about style! Like: Do say: Add fats with a few vitamins and minerals for the meals you previously consume. Send You may also install XAMPP for an easier Apache, MySQL, PHP deal.
— BillieTum Sep 21, 01:20 AM #<a href=http://www.flora.fi/begutachtung-von-artikel-online-geschft-fr/>3. klasse briefe schreiben Гјbungen</a>
<a href=http://vistacareers.com/index.php/2015/08/11/prfung-von-juristischer-text-ghostwriterbetrieb-fr/>wie man einen roman schreibtВ </a>
<a href=https://medium.com/@simonwilson_49731/royal-holloway-university-of-london-d929b7f5528f>custom research paper for sale</a>
[url=https://paydayloans.us.org/]payday loans[/url]
— JohnNip Sep 21, 02:08 AM #[url=https://paydayloans.us.org/]cash advance[/url]
— JamesNip Sep 21, 08:44 AM #[url=https://paydayloans.us.org/]payday express[/url]
— JohnNip Sep 21, 05:47 PM #[url=https://paydayloans.us.org/]real payday loans online[/url]
— JamesNip Sep 22, 12:05 AM #[url=https://loansforbadcredit.us.com/]payday bad credit loan[/url] [url=https://freesexchat.us.com/]webcam amateur[/url]
— JohnNip Sep 22, 09:32 AM #[url=https://essaywritingservices.us.com/]Read More[/url]
— JamesNip Sep 22, 03:41 PM #Hello friends!
— SusanSmile Sep 22, 11:59 PM #I am an official representative of private company which deals with all kinds of written work (essay, coursework, dissertation, presentation, report, etc) in short time.
We are ready to offer a free accomplishment of written work hoping for further cooperation and honest feedback about our service.
This offer has limited quantities!!!
Details on our website:
https://essay-paper.work
[url=https://essaywritingservices.us.com/]essay writing service review[/url] [url=https://onlineloans.us.com/]payday loans online[/url]
— JohnNip Sep 23, 01:53 AM #[url=https://essayonline.us.com/]write my essay online[/url] [url=https://onlineloans.us.com/]payday loans direct lenders[/url]
— JamesNip Sep 23, 08:15 AM #[url=https://onlineloans.us.com/]payday loan direct lender[/url] [url=https://essayonline.us.com/]essay help[/url]
— JohnNip Sep 23, 05:34 PM #köpa snabb leverans, http://sverige-apotek.life/azanplus.html , säljes Sverige.
— sverigapotek Sep 23, 08:56 PM #[url=https://bestpaydayloansonline.us.com/]payday loans online[/url] [url=https://loansforbadcredit.us.com/]payday loans for bad credit[/url]
— JamesNip Sep 23, 11:38 PM #[url=https://onlineloans.us.com/]online payday loan[/url] [url=https://writemyessay.us.com/]Visit Your URL[/url]
— JohnNip Sep 24, 08:57 AM #[url=https://essaywritingservices.us.com/]college essay writing services[/url]
— JohnNip Sep 25, 01:21 AM #[url=https://essayonline.us.com/]online essays[/url]
— JamesNip Sep 25, 06:56 AM #[url=https://writemyessay.us.com/]write my essay online[/url]
— JohnNip Sep 25, 06:02 PM #[url=https://essaywritingservices.us.com/]buy cheap essays[/url] [url=https://loansforbadcredit.us.com/]LOANSFORBADCREDIT.US.COM[/url]
— JamesNip Sep 25, 11:04 PM #[url=https://freesexchat.us.com/]web cam nude[/url] sex chat <a href=“https://freesexchat.us.com/”>sex chat room</a> [url=https://loansforbadcredit.us.com/]loans online bad credit[/url] payday loans for bad credit <a href=“https://loansforbadcredit.us.com/”>direct lenders for bad credit</a>
— JohnNip Sep 26, 10:24 AM #payday loans bad credit <a href=https://loansforbadcredit.us.com/>loans</a> payday loans for bad credit [url=https://loansforbadcredit.us.com/]as explained here[/url]
— JamesNip Sep 26, 05:03 PM #sex chat <a href=https://sexchat.us.com>live sex chat</a> chat sex webcam online [url=https://sexchat.us.com]sex chat[/url]
— JamesNip Sep 26, 05:32 PM #sex chat <a href=https://freesexchat.us.com>sex chat</a> free sex chat sites [url=https://freesexchat.us.com]sex web cam[/url]
— JamesNip Sep 26, 06:06 PM #professional essay writing service <a href=https://essaywritingservices.us.com>essay writing service</a> essay writing service [url=https://essaywritingservices.us.com]https://essaywritingservices.us.com[/url]
— JamesNip Sep 26, 10:36 PM #best essay writing service uk <a href=https://essaywritingservice.us.com>professional essay writing services</a> as explained here [url=https://essaywritingservice.us.com]essays writing services[/url]
— JamesNip Sep 26, 11:46 PM #write my essay online <a href=https://essayonline.us.com>http://WriteMyEssay.us.com</a> online essay help [url=https://essayonline.us.com]online essay writing service[/url]
— JamesNip Sep 27, 05:29 AM #Full Article <a href=https://bestpaydayloansonline.us.com/>good payday loans online</a> payday loans online direct lenders bad credit [url=https://bestpaydayloansonline.us.com/]payday loans online direct lenders only[/url]
— JamesNip Sep 27, 08:47 AM #Discover More Here <a href=https://paydayloans.us.org/>best payday loans online</a> payday loans [url=https://paydayloans.us.org/]view website[/url]
— JamesNip Sep 27, 11:55 AM #homepage <a href=https://bestpaydayloansonline.us.com/>payday loans online direct lenders</a> payday loans online direct lenders [url=https://bestpaydayloansonline.us.com/]payday loans online[/url]
— JamesNip Sep 27, 03:44 PM #essays writing services <a href=https://essaywritingservices.us.com>essay writing service</a> essay writing service [url=https://essaywritingservices.us.com]essay writing service review[/url]
— JamesNip Sep 27, 04:50 PM #college essay help online <a href=https://essayonline.us.com>https://writemyessay.us.com/</a> essay online [url=https://essayonline.us.com]essay online[/url]
— JamesNip Sep 27, 05:26 PM #apotek billigt, http://natalie.pierotti.org.uk/wp-content/uploads/apotek/fml-forte.html , receptfria europe.
— apoteksverige Sep 28, 04:55 PM #payday loans online <a href=https://paydayloansonline.us.com/>payday loans online</a> payday loan [url=https://paydayloansonline.us.com/]payday loans online[/url]
— JamesNip Sep 29, 06:37 AM #tabletter priser, http://natalie.pierotti.org.uk/wp-content/uploads/apotek/questran.html , generiska alternativ till kostnad.
— apoteksverige Sep 29, 09:01 AM #Look At This <a href=https://essaywritingservices.us.com>can money buy you happiness essay</a> professional essay writing service [url=https://essaywritingservices.us.com]admission essay writing service[/url]
— JamesNip Sep 29, 09:33 AM #online homework help <a href=https://essayonline.us.com>buy cheap essays online</a> dissertation online [url=https://essayonline.us.com]online essay writing service[/url]
— JamesNip Sep 29, 10:03 AM #sex chat online <a href=https://freesexchat.us.com>free sex chat</a> sex chat [url=https://freesexchat.us.com]free live sex chat[/url]
— JamesNip Sep 29, 12:56 PM #Check Out Your URL <a href=https://essayonline.us.com>buy essays online</a> info [url=https://essayonline.us.com]online essay writer[/url]
— JamesNip Sep 29, 05:34 PM #payday loans online <a href=https://onlineloans.us.com/>homepage here</a> online loan [url=https://onlineloans.us.com/]best online payday loans[/url]
— JamesNip Sep 29, 08:25 PM #WriteMyEssay.us.com <a href=https://writemyessay.us.com>write my essay online</a> pay someone to write my essay [url=https://writemyessay.us.com]my essay writing[/url]
— JamesNip Sep 29, 11:21 PM #payday loans online no credit check <a href=https://paydayloansonline.us.com/>payday loans online</a> payday loans online direct lenders [url=https://paydayloansonline.us.com/]payday loans online[/url]
— JamesNip Sep 30, 03:41 AM #adult video chat <a href=https://freesexchat.us.com>free adult sex chat</a> free sex chats [url=https://freesexchat.us.com]sex chat[/url]
— JamesNip Sep 30, 04:27 AM #live sex chat <a href=https://sexchat.us.com>more information</a> webcam pussy [url=https://sexchat.us.com]free adult sex chat[/url]
— JamesNip Sep 30, 05:38 AM #professional essay writing service <a href=https://essaywritingservice.us.com>essay writing service</a> uk essay writing service [url=https://essaywritingservice.us.com]essay writing service[/url]
— JamesNip Sep 30, 06:32 AM #wh0cd342722 [url=http://retina2017.us.com/]retin a micro gel[/url] [url=http://buyrocaltrol.science/]rocaltrol[/url]
— AaronUttet Sep 30, 12:08 PM #payday loans online <a href=https://bestpaydayloansonline.us.com/>payday loans online</a> payday loans online direct lenders [url=https://bestpaydayloansonline.us.com/]payday loans online[/url]
— Online Payday Loans Oct 1, 07:07 PM #Recommended Site <a href=https://paydayloans.us.org/>payday loans</a> cash advance [url=https://paydayloans.us.org/]best payday loans online[/url]
— Loans Online Oct 1, 07:14 PM #HTTP://ONLINELOANS.US.COM <a href=https://onlineloans.us.com/>Read More Here</a> payday loans online [url=https://onlineloans.us.com/]payday loans online[/url]
— Best Online Loans Oct 1, 07:50 PM #payday loans for bad credit <a href=https://loansforbadcredit.us.com/>bad credit loans direct lenders</a> loans for bad credit [url=https://loansforbadcredit.us.com/]payday loans for bad credit[/url]
— Cash Loan Oct 1, 09:35 PM #payday loan online <a href=https://paydayloans.us.org/>pay day loans</a> pay day loans [url=https://paydayloans.us.org/]view website[/url]
— Online Payday Loans Oct 2, 02:48 AM #HTTP://LOANSFORBADCREDIT.US.COM/ <a href=https://loansforbadcredit.us.com/>payday loans for bad credit</a> source [url=https://loansforbadcredit.us.com/]direct payday lenders bad credit[/url]
— Online Loan Oct 2, 07:07 AM #college essay writing service reviews <a href=https://essaywritingservices.us.com>assignment of leases</a> professional essay writing service [url=https://essaywritingservices.us.com]which essay writing service is the best[/url]
— Custom Essay Writers Oct 2, 08:38 AM #payday loans for bad credit <a href=https://loansforbadcredit.us.com/>bad credit payday loans</a> direct payday lenders bad credit [url=https://loansforbadcredit.us.com/]payday loans bad credit[/url]
— Cash Loan Oct 2, 09:28 AM #legitimate payday loans online no credit check <a href=https://bestpaydayloansonline.us.com/>bestpaydayloansonline.us.com</a> payday loans [url=https://bestpaydayloansonline.us.com/]payday loans online[/url]
— Cash Advance Oct 2, 10:15 AM #what is the best essay writing service <a href=https://essaywritingservices.us.com>essay writing service</a> essay writing service [url=https://essaywritingservices.us.com]should homework be abolished[/url]
— Free Paper Writer Oct 2, 11:51 AM #LoansForBadCredit.us.com <a href=https://loansforbadcredit.us.com/>payday loans for bad credit</a> HTTP://LOANSFORBADCREDIT.US.COM [url=https://loansforbadcredit.us.com/]as example[/url]
— Easy Payday Loan Oct 2, 01:16 PM #essay writing service <a href=https://essaywritingservice.us.com>essay writing service</a> essay paper writing services [url=https://essaywritingservice.us.com]Resources[/url]
— Pay To Do Homework Oct 2, 02:19 PM #buy essay papers online <a href=https://essayonline.us.com>writing essay online</a> buy essay papers online [url=https://essayonline.us.com]online essay writing[/url]
— Buy College Essays Oct 2, 05:24 PM #best payday loans online <a href=https://bestpaydayloansonline.us.com/>more information</a> guaranteed payday loans online [url=https://bestpaydayloansonline.us.com/]payday loans online[/url]
— JamesNip Oct 2, 09:06 PM #buy college essays online <a href=https://essayonline.us.com>write essays online</a> for more info [url=https://essayonline.us.com]online essay writer[/url]
— Buy Cheap Essays Oct 2, 09:32 PM #payday loans direct lenders <a href=https://paydayloans.us.org/>payday loans online</a> payday loans online [url=https://paydayloans.us.org/]online payday loans no credit check[/url]
— JamesNip Oct 2, 10:45 PM #buy essay <a href=https://essayonline.us.com>online paper writer</a> write essays online [url=https://essayonline.us.com]online essay writing[/url]
— Custom Essay Oct 2, 11:54 PM #buy essay online <a href=https://essayonline.us.com>online essay writer</a> essay writing online [url=https://essayonline.us.com]online essay writing[/url]
— Define Assignations Oct 3, 12:13 AM #essay writing service <a href=https://essaywritingservices.us.com>essay writing service</a> essay writing service [url=https://essaywritingservices.us.com]writing essays services[/url]
— Pay To Do Homework Oct 3, 01:53 AM #payday express <a href=https://paydayloans.us.org/>online payday loans direct lenders</a> Clicking Here [url=https://paydayloans.us.org/]payday loans online[/url]
— JamesNip Oct 3, 05:48 AM #free online sex chat <a href=https://sexchat.us.com>chat sex</a> sex chat free [url=https://sexchat.us.com]sex chat[/url]
— JamesNip Oct 3, 06:31 AM #pay to write essays <a href=https://writemyessay.us.com>Read More Here</a> help me with my essay [url=https://writemyessay.us.com]write my essay[/url]
— JamesNip Oct 3, 07:01 AM #write my essay online <a href=https://writemyessay.us.com>buy an essay</a> my homework help [url=https://writemyessay.us.com]write my essay[/url]
— Buy Essay Cheap Oct 3, 07:27 AM #payday loans online <a href=https://paydayloansonline.us.com/>payday loan online</a> payday loans online [url=https://paydayloansonline.us.com/]online payday loans no credit check[/url]
— JamesNip Oct 3, 09:47 AM #helpful resources <a href=https://freesexchat.us.com>sex chat</a> online sex chat [url=https://freesexchat.us.com]sex chat free[/url]
— JamesNip Oct 3, 01:49 PM #writing essay online <a href=https://essayonline.us.com>buy papers online</a> Bonuses [url=https://essayonline.us.com]buy essay online[/url]
— JamesNip Oct 3, 03:03 PM #wh0cd342722 [url=http://nexiumgeneric.reisen/]nexium[/url] <a hrefs=“http://nexiumgeneric.reisen/”>nexium generic</a> http://nexiumgeneric.reisen/ [url=http://valtrex2017.us.org/]valtrex[/url] [url=http://buyrocaltrol.science/]buy rocaltrol[/url]
— AaronUttet Oct 3, 03:41 PM #writing essay services <a href=https://essaywritingservice.us.com>best essay writing service reviews</a> custom essay writing services reviews [url=https://essaywritingservice.us.com]best uk essay writing service[/url]
— JamesNip Oct 3, 07:20 PM #click for source <a href=https://paydayloansonline.us.com/>payday loans online</a> payday loans online ohio [url=https://paydayloansonline.us.com/]payday loans online direct lenders no teletrack[/url]
— JamesNip Oct 3, 09:01 PM #custom essay writing service <a href=https://writemyessay.us.com>write my essay</a> Our site [url=https://writemyessay.us.com]write essay for money[/url]
— JamesNip Oct 4, 02:29 AM #sex chat free <a href=https://sexchat.us.com>erotic sex chat</a> sex chat [url=https://sexchat.us.com]chat sex[/url]
— JamesNip Oct 4, 05:25 AM #essays writing services <a href=https://essaywritingservice.us.com>write college essay</a> best essay writing service reviews [url=https://essaywritingservice.us.com]best essay writing services[/url]
— JamesNip Oct 4, 08:52 AM #payday loans online direct lenders <a href=https://bestpaydayloansonline.us.com/>payday loans online direct lenders</a> payday loans [url=https://bestpaydayloansonline.us.com/]website[/url]
— JamesNip Oct 4, 10:52 AM #write my essay <a href=https://writemyessay.us.com>online essay</a> custom essay writing [url=https://writemyessay.us.com]help me write my essay[/url]
— Write Essays Oct 4, 01:26 PM #essay writing service <a href=https://essaywritingservices.us.com>top rated essay writing service</a> buy essays papers [url=https://essaywritingservices.us.com]essay writing service[/url]
— Writers Essay Oct 4, 03:54 PM #essays writing services <a href=https://essaywritingservices.us.com>EssayWritingServices.us.com</a> essays writing services [url=https://essaywritingservices.us.com]custom essay writing services[/url]
— JamesNip Oct 4, 04:07 PM #sex video chat <a href=https://freesexchat.us.com>More Help</a> sex chat [url=https://freesexchat.us.com]sex chat room[/url]
— JamesNip Oct 4, 05:27 PM #uk essay writing service <a href=https://essaywritingservices.us.com>essay writing service review</a> essay writing service [url=https://essaywritingservices.us.com]essay writing service[/url]
— JamesNip Oct 4, 06:56 PM #online paper writer <a href=https://essayonline.us.com>writing essay online</a> online essay help [url=https://essayonline.us.com]writing online[/url]
— Buy Essays Online Oct 4, 08:56 PM #buy college essays online <a href=https://essayonline.us.com>online essay writing service</a> buy essay online [url=https://essayonline.us.com]buy essay papers online[/url]
— Photo Assignment Oct 4, 09:26 PM #ESSAYWRITINGSERVICES.US.COM <a href=https://essaywritingservices.us.com>essay writing services review</a> kindergarten homework packet [url=https://essaywritingservices.us.com]I found it[/url]
— Essay Online Oct 4, 10:39 PM #Read More <a href=https://onlineloans.us.com/>online loans</a> payday loans online [url=https://onlineloans.us.com/]payday loan online[/url]
— JamesNip Oct 4, 10:54 PM #free sex chat <a href=https://sexchat.us.com>cam sites</a> example here [url=https://sexchat.us.com]free sex chat[/url]
— JamesNip Oct 5, 01:38 AM #Learn More <a href=https://essayonline.us.com>essay writing</a> Check This Out [url=https://essayonline.us.com]buy essay online[/url]
— Assignment Notebooks Oct 5, 02:01 AM #payday loans online <a href=https://bestpaydayloansonline.us.com/>payday loans online</a> payday loans online [url=https://bestpaydayloansonline.us.com/]payday loans online[/url]
— JamesNip Oct 5, 02:09 AM #websites that write essays for you <a href=https://writemyessay.us.com>Full Article</a> my homework help [url=https://writemyessay.us.com]essay writing[/url]
— My Homework Help Oct 5, 05:54 AM #payday loans <a href=https://paydayloans.us.org/>payday loans direct lenders</a> payday loans online direct lender [url=https://paydayloans.us.org/]instant payday loans online direct lenders[/url]
— JamesNip Oct 5, 07:19 AM #Going Here <a href=https://essaywritingservice.us.com>essays writing services</a> Read This [url=https://essaywritingservice.us.com]This Site[/url]
— Homework Center Oct 5, 07:41 AM #custom essay writing services <a href=https://essaywritingservice.us.com>best essay writing service reviews</a> essay writing service [url=https://essaywritingservice.us.com]top essay writing services[/url]
— Buy An Essays Oct 5, 11:29 AM #for more info <a href=https://onlineloans.us.com/>payday loan online</a> https://onlineloans.us.com/ [url=https://onlineloans.us.com/]getting a loan[/url]
— JamesNip Oct 5, 12:27 PM #essay writing service <a href=https://essaywritingservices.us.com>essay writing service</a> I found it [url=https://essaywritingservices.us.com]free math homework help[/url]
— JamesNip Oct 5, 02:25 PM #write my essay cheap <a href=https://writemyessay.us.com>write my essay</a> website to write essays [url=https://writemyessay.us.com]essay writing[/url]
— Online Essay Writers Oct 5, 04:55 PM #writers online <a href=https://essayonline.us.com>writemyessay.us.com</a> Visit Your URL [url=https://essayonline.us.com]buy custom essay online[/url]
— Homework For Pre K Oct 5, 05:50 PM #delta airlines seating assignment <a href=https://essaywritingservices.us.com>best custom essay writing services</a> essay writing service recommendation [url=https://essaywritingservices.us.com]http://ESSAYWRITINGSERVICES.US.COM[/url]
— JamesNip Oct 5, 05:56 PM #best essay writing service reviews <a href=https://essaywritingservices.us.com>view website</a> essays writing services [url=https://essaywritingservices.us.com]Full Report[/url]
— JamesNip Oct 5, 10:12 PM #essay writing service <a href=https://essaywritingservices.us.com>buy essay papers</a> essay writing service [url=https://essaywritingservices.us.com]found it for you[/url]
— JamesNip Oct 6, 02:11 AM #write my essay <a href=https://writemyessay.us.com>help with my essay</a> Get More Information [url=https://writemyessay.us.com]pay to write my essay[/url]
— JamesNip Oct 6, 06:24 AM #http://inlottos24.ru
— Toongebrentee Oct 6, 06:44 AM #payday loans online <a href=https://paydayloans.us.org/>payday loans online get a fast easy</a> payday loans [url=https://paydayloans.us.org/]personal loans[/url]
— Online Payday Loans Oct 6, 07:06 AM #payday loans online <a href=https://bestpaydayloansonline.us.com/>Continue</a> secure payday loans online [url=https://bestpaydayloansonline.us.com/]payday loans online[/url]
— Easy Payday Loan Oct 6, 07:22 AM #http://inbethall24.ru
— Toongebrentee Oct 6, 08:07 AM #wh0cd29222 [url=http://robaxin.us.org/]order robaxin[/url] [url=http://furosemide777.us.com/]Furosemide Online[/url]
— CharlesFug Oct 6, 08:16 AM #Read More <a href=https://sexchat.us.com>sex chat</a> adult webcams [url=https://sexchat.us.com]free sex chat[/url]
— JamesNip Oct 6, 08:57 AM #http://in100slots.ru
— Toongebrentee Oct 6, 09:20 AM #as an example <a href=https://essaywritingservices.us.com>essay writing service</a> essay writing service [url=https://essaywritingservices.us.com]essay writing service[/url]
— JamesNip Oct 6, 09:59 AM #http://maxxybets24.ru
— Toongebrentee Oct 6, 10:33 AM #here <a href=https://loansforbadcredit.us.com/>payday loans for bad credit</a> payday loans bad credit [url=https://loansforbadcredit.us.com/]HTTPS://LOANSFORBADCREDIT.US.COM/[/url]
— Cash Advance Oct 6, 11:07 AM #http://maxslotz24.ru
— Toongebrentee Oct 6, 12:08 PM #online payday loan <a href=https://bestpaydayloansonline.us.com/>I found it</a> payday loan online [url=https://bestpaydayloansonline.us.com/]online payday loans[/url]
— Easy Payday Loan Oct 6, 12:35 PM #http://maxprofitslots.ru
— Toongebrentee Oct 6, 01:24 PM #http://rollslots24.ru
— Toongebrentee Oct 6, 02:36 PM #http://rollsonline24.ru
— Toongebrentee Oct 6, 03:49 PM #payday loans online no credit check <a href=https://bestpaydayloansonline.us.com/>online payday loans</a> Get More Information [url=https://bestpaydayloansonline.us.com/]online payday loans[/url]
— Loan Oct 6, 04:28 PM #http://rollslotz24.ru
— Toongebrentee Oct 6, 05:02 PM #bad credit loans direct lenders <a href=https://loansforbadcredit.us.com/>cash loan</a> payday loans for bad credit [url=https://loansforbadcredit.us.com/]loans for bad credit[/url]
— Online Loans Oct 6, 09:29 PM #online payday loan <a href=https://onlineloans.us.com/>payday loan online</a> loan cash [url=https://onlineloans.us.com/]online payday lenders[/url]
— Cash Advance Oct 6, 10:53 PM #best payday loans online <a href=https://paydayloans.us.org/>pay day loans</a> Continue Reading [url=https://paydayloans.us.org/]payday loans online[/url]
— Loan Oct 7, 12:45 AM #http://joyslots24.ru
— Toongebrentee Oct 7, 05:36 AM #payday loans online <a href=https://bestpaydayloansonline.us.com/>online payday loan</a> website here [url=https://bestpaydayloansonline.us.com/]payday loans online[/url]
— Speedy Cash Oct 7, 05:38 AM #http://joybetsonline.ru
— Toongebrentee Oct 7, 06:55 AM #payday loans online no faxing <a href=https://paydayloans.us.org/>payday loans</a> as explained here [url=https://paydayloans.us.org/]click[/url]
— Speedy Cash Oct 7, 07:32 AM #payday loans for bad credit <a href=https://loansforbadcredit.us.com/>additional reading</a> loans for bad credit [url=https://loansforbadcredit.us.com/]Bonuses[/url]
— JamesNip Oct 7, 10:11 PM #write my essay <a href=https://writemyessay.us.com>write my thesis</a> http://writemyessay.us.com/ [url=https://writemyessay.us.com]write my essay[/url]
— JamesNip Oct 8, 03:52 AM #http://BestPaydayLoansOnline.us.com <a href=https://bestpaydayloansonline.us.com/>payday loans online</a> article source [url=https://bestpaydayloansonline.us.com/]payday loan online[/url]
— JamesNip Oct 8, 04:17 AM #essay writing service <a href=https://essaywritingservice.us.com>essay writing services reviews</a> cheap essay writing service us [url=https://essaywritingservice.us.com]university essay writing service[/url]
— JamesNip Oct 8, 07:36 AM #essaywritingservice.us.com <a href=https://essaywritingservice.us.com>essaywritingservice.us.com</a> essays writing services [url=https://essaywritingservice.us.com]best essay writing services[/url]
— JamesNip Oct 8, 07:55 AM #payday loans bad credit <a href=https://loansforbadcredit.us.com/>loans for bad credit</a> loans for bad credit [url=https://loansforbadcredit.us.com/]direct payday lenders bad credit[/url]
— Speedy Cash Oct 8, 08:41 AM #loans online bad credit <a href=https://loansforbadcredit.us.com/>payday loans for bad credit</a> payday loans for bad credit [url=https://loansforbadcredit.us.com/]fastest payday loan[/url]
— Quick Loans Oct 8, 11:43 AM #admission essay writing service <a href=https://essaywritingservice.us.com>good homework music</a> professional essay writing service [url=https://essaywritingservice.us.com]essay writing services reviews[/url]
— JamesNip Oct 8, 12:24 PM #payday loans online <a href=https://bestpaydayloansonline.us.com/>payday loan</a> payday loan online [url=https://bestpaydayloansonline.us.com/]payday loan online[/url]
— Payday Loans Online Oct 8, 12:54 PM #payday loans online <a href=https://paydayloans.us.org/>payday loans online</a> payday loans [url=https://paydayloans.us.org/]payday loans[/url]
— Get A Loan Oct 8, 03:27 PM #payday loans online <a href=https://paydayloansonline.us.com/>monthly payday loans online</a> legitimate payday loans online no credit check [url=https://paydayloansonline.us.com/]payday loans online[/url]
— Loan Oct 8, 05:44 PM #payday loans online <a href=https://paydayloansonline.us.com/>for more</a> payday loans online alberta [url=https://paydayloansonline.us.com/]payday loans online same day no credit check[/url]
— JamesNip Oct 8, 07:16 PM #article source <a href=https://paydayloans.us.org/>payday loans online direct lenders no credit check</a> Visit This Link [url=https://paydayloans.us.org/]payday loans[/url]
— Payday Loan Oct 8, 11:05 PM #legitimate payday loans online no credit check <a href=https://paydayloansonline.us.com/>click here</a> payday loans online [url=https://paydayloansonline.us.com/]online payday loans no credit check[/url]
— Bad Credit Oct 8, 11:41 PM #free erotic chat <a href=https://sexchat.us.com>online sex video chat</a> sex chat [url=https://sexchat.us.com]sex chat[/url]
— JamesNip Oct 9, 12:23 AM #urgent essay writing service <a href=https://essaywritingservices.us.com>write my essays</a> essay writing service review [url=https://essaywritingservices.us.com]essaywritingservices.us.com[/url]
— JamesNip Oct 9, 01:22 AM #payday loans online direct lenders instant approval <a href=https://bestpaydayloansonline.us.com/>payday loans online</a> best payday loans online [url=https://bestpaydayloansonline.us.com/]Home Page[/url]
— Payday Oct 9, 03:28 AM #payday loans online get a fast easy <a href=https://bestpaydayloansonline.us.com/>payday loans online direct lenders only</a> payday loans online no credit check [url=https://bestpaydayloansonline.us.com/]best payday loans online[/url]
— Spotloan Oct 9, 05:43 AM #payday loans online <a href=https://onlineloans.us.com/>quick loans</a> payday express [url=https://onlineloans.us.com/]the best online payday loans[/url]
— Direct Lender Loans Oct 9, 01:54 PM #easy payday loan <a href=https://loansforbadcredit.us.com/>fast loans no credit check</a> cash loan [url=https://loansforbadcredit.us.com/]fast loans no credit check[/url]
— Loans Oct 9, 09:06 PM #payday loans online <a href=https://onlineloans.us.com/>payday loans online direct lenders</a> payday loans online [url=https://onlineloans.us.com/]speedycash[/url]
— Payday Express Oct 9, 10:23 PM #online loans <a href=https://onlineloans.us.com/>online loans</a> best online loans [url=https://onlineloans.us.com/]More about the author[/url]
— Pay Day Loans Oct 10, 01:16 AM #payday loans online <a href=https://paydayloans.us.org/>found here</a> payday loans [url=https://paydayloans.us.org/]payday express[/url]
— Quick Loan Oct 10, 05:42 AM #secure payday loans online <a href=https://paydayloansonline.us.com/>payday loans online pa</a> payday loans online same day no credit check [url=https://paydayloansonline.us.com/]payday loans online[/url]
— Direct Lenders Oct 10, 06:26 AM #payday loans online <a href=https://paydayloans.us.org/>las vegas payday loans online</a> payday loans online [url=https://paydayloans.us.org/]payday loans online[/url]
— Payday Loan Online Oct 10, 10:35 AM #Full Report <a href=https://paydayloansonline.us.com/>payday loans</a> online payday loans direct lenders [url=https://paydayloansonline.us.com/]payday loans online no credit check[/url]
— Loans For Bad Credit Oct 10, 02:04 PM #found it for you <a href=https://loansforbadcredit.us.com/>easiest payday loan to get</a> https://loansforbadcredit.us.com [url=https://loansforbadcredit.us.com/]direct payday lenders bad credit[/url]
— Payday Oct 10, 02:19 PM #http://joygamingz.ru
— Toongebrentee Oct 10, 06:24 PM #http://bingoslotz24.ru
— Toongebrentee Oct 10, 08:43 PM #payday loans online <a href=https://paydayloans.us.org/>payday express</a> payday loans [url=https://paydayloans.us.org/]payday loans online[/url]
— Cash Loan Oct 10, 09:40 PM #homepage here <a href=https://loansforbadcredit.us.com/>direct payday lenders bad credit</a> fastest payday loan [url=https://loansforbadcredit.us.com/]payday loans bad credit[/url]
— Best Online Loans Oct 10, 10:09 PM #http://bingomainia24.ru
— Toongebrentee Oct 10, 10:18 PM #http://bingomatic24.ru
— Toongebrentee Oct 10, 11:44 PM #http://bingobets24.ru
— Toongebrentee Oct 11, 01:10 AM #http://bingomachine24.ru
— Toongebrentee Oct 11, 02:40 AM #http://bingobetz24.ru
— Toongebrentee Oct 11, 04:07 AM #http://powerbets24.ru
— Toongebrentee Oct 11, 05:35 AM #http://powerspinz24.ru
— Toongebrentee Oct 11, 07:04 AM #payday loans for bad credit <a href=https://loansforbadcredit.us.com/>payday loans for bad credit</a> https://loansforbadcredit.us.com [url=https://loansforbadcredit.us.com/]10 top loan companies[/url]
— JamesNip Oct 11, 06:06 PM #payday loans online <a href=https://bestpaydayloansonline.us.com/>online payday loans direct lenders</a> payday loans online direct lenders only [url=https://bestpaydayloansonline.us.com/]payday loans online[/url]
— JamesNip Oct 11, 08:16 PM #online payday loans for bad credit <a href=https://loansforbadcredit.us.com/>payday bad credit loan</a> Get the facts [url=https://loansforbadcredit.us.com/]http://loansforbadcredit.us.com/[/url]
— JamesNip Oct 11, 08:18 PM #https://loansforbadcredit.us.com/ <a href=https://loansforbadcredit.us.com/>bad credit loans direct lenders</a> here [url=https://loansforbadcredit.us.com/]payday loans for bad credit[/url]
— JamesNip Oct 12, 03:58 AM #More about the author <a href=https://essaywritingservices.us.com>the best essay writing services</a> essay writing service review [url=https://essaywritingservices.us.com]EssayWritingServices.us.com[/url]
— JamesNip Oct 12, 06:18 AM #california payday loans online <a href=https://paydayloansonline.us.com/>website here</a> online payday loans direct lenders [url=https://paydayloansonline.us.com/]payday loans online bad credit ok[/url]
— JamesNip Oct 12, 08:08 AM #pay for essay online <a href=https://essayonline.us.com>HTTP://WRITEMYESSAY.US.COM/</a> paper writing services [url=https://essayonline.us.com]buy custom essay online[/url]
— JamesNip Oct 12, 01:14 PM #buy essays online <a href=https://essayonline.us.com>essay online</a> write essay [url=https://essayonline.us.com]Visit Your URL[/url]
— JamesNip Oct 12, 05:54 PM #essays writing services <a href=https://essaywritingservice.us.com>essay writing service</a> essay writing service review [url=https://essaywritingservice.us.com]essay writing service[/url]
— JamesNip Oct 12, 06:13 PM #professional essay writing service <a href=https://essaywritingservices.us.com>click here</a> ESSAYWRITINGSERVICES.US.COM [url=https://essaywritingservices.us.com]essay writing services reviews[/url]
— JamesNip Oct 12, 07:15 PM #WriteMyEssay.us.com <a href=https://writemyessay.us.com>site here</a> write my thesis [url=https://writemyessay.us.com]my homework help[/url]
— JamesNip Oct 14, 01:43 PM #payday loans <a href=https://paydayloansonline.us.com/>payday loans online no faxing</a> online payday loans [url=https://paydayloansonline.us.com/]website here[/url]
— JamesNip Oct 14, 03:48 PM #my paper writer <a href=https://writemyessay.us.com>our website</a> websites that write essays for you [url=https://writemyessay.us.com]write my essay[/url]
— My Thesis Oct 14, 05:56 PM #payday loans <a href=https://paydayloans.us.org/>payday loans</a> payday loans online [url=https://paydayloans.us.org/]payday loans[/url]
— JamesNip Oct 14, 08:04 PM #legitimate essay writing service <a href=https://essaywritingservices.us.com>more</a> admission essay writing service [url=https://essaywritingservices.us.com]buy an essay online cheap[/url]
— JamesNip Oct 14, 10:23 PM #admission essay writing service <a href=https://essaywritingservice.us.com>custom essay writing services</a> essays writing services [url=https://essaywritingservice.us.com]assignment of leases[/url]
— Writers Online Oct 14, 10:37 PM #legitimate payday loans online <a href=https://paydayloans.us.org/>personal loans</a> payday loans online direct lenders [url=https://paydayloans.us.org/]payday loans[/url]
— JamesNip Oct 14, 11:54 PM #http://WriteMyEssay.us.com <a href=https://writemyessay.us.com>write my essay</a> websites that write essays for you [url=https://writemyessay.us.com]write my essay[/url]
— Online Essays Oct 15, 12:28 AM #buy custom essay online <a href=https://essayonline.us.com>online essays</a> online essay writer [url=https://essayonline.us.com]dissertation online[/url]
— College Paper Writer Oct 15, 03:22 AM #site <a href=https://bestpaydayloansonline.us.com/>payday loans online no credit check</a> website here [url=https://bestpaydayloansonline.us.com/]payday loans online direct lenders only[/url]
— JamesNip Oct 15, 04:56 AM #BESTPAYDAYLOANSONLINE.US.COM <a href=https://bestpaydayloansonline.us.com/>payday loans</a> online payday loans no credit check [url=https://bestpaydayloansonline.us.com/]online payday loan[/url]
— JamesNip Oct 15, 06:30 AM #free adult web cam <a href=https://sexchat.us.com>sex chat online</a> sex chat [url=https://sexchat.us.com]free sex chat[/url]
— JamesNip Oct 15, 06:31 AM #english essay writer <a href=https://essaywritingservice.us.com>french homework</a> essays writing services [url=https://essaywritingservice.us.com]best essay writing services[/url]
— Premium Assignments Oct 15, 06:51 AM #write my essay for me <a href=https://writemyessay.us.com>help with my essay</a> write an essay [url=https://writemyessay.us.com]writemyessay.us.com[/url]
— JamesNip Oct 15, 08:02 AM #online essay writer <a href=https://essayonline.us.com>writing essay online</a> essay writing online [url=https://essayonline.us.com]buy essay[/url]
— Online Essay Writer Oct 15, 10:32 AM #custom essay writing <a href=https://writemyessay.us.com>essay writing</a> my essay writing [url=https://writemyessay.us.com]Our site[/url]
— Homeworks Of America Oct 15, 11:01 AM #payday loans online reviews <a href=https://bestpaydayloansonline.us.com/>payday loans online</a> payday loans online no credit check direct lender [url=https://bestpaydayloansonline.us.com/]payday loans online no credit check[/url]
— JamesNip Oct 15, 11:27 AM #fast cash payday loan
— thohox Oct 15, 12:21 PM #[url=http://paydayonlinemoney.com/]pay day loans[/url]
no credit loans
<a href=“http://paydayonlinemoney.com/ “>pay day loans</a>
quick long term loans
— neelay Oct 15, 12:33 PM #[url=http://paydayonlinemoney.com/]payday loans online[/url]
short term personal loan
<a href=“http://paydayonlinemoney.com/ “>personal loans</a>
bad credit payday loans <a href=https://loansforbadcredit.us.com/>bad credit payday loans</a> Full Article [url=https://loansforbadcredit.us.com/]as an example[/url]
— JamesNip Oct 15, 01:01 PM #sex chat free <a href=https://sexchat.us.com>sex chat room</a> webcams sex [url=https://sexchat.us.com]free adult sex chat[/url]
— JamesNip Oct 15, 01:20 PM #payday loans for bad credit <a href=https://loansforbadcredit.us.com/>additional reading</a> info [url=https://loansforbadcredit.us.com/]easiest payday loan to get[/url]
— JamesNip Oct 15, 02:49 PM #trusted payday loans online <a href=https://paydayloansonline.us.com/>payday loans online</a> Read More Here [url=https://paydayloansonline.us.com/]payday loans online[/url]
— JamesNip Oct 15, 02:50 PM #found here <a href=https://paydayloans.us.org/>personal loans</a> pay day loans [url=https://paydayloans.us.org/]pay day loans[/url]
— JamesNip Oct 15, 03:56 PM #essay writing service <a href=https://essaywritingservices.us.com>professional essay writing service</a> write an argumentative essay [url=https://essaywritingservices.us.com]how to write a community service essay[/url]
— Essay Writer Reviews Oct 15, 04:28 PM #cash til payday
— neerse Oct 15, 04:42 PM #[url=http://paydayonlinemoney.com/]pay day loans[/url]
loan money
<a href=“http://paydayonlinemoney.com/ “>cash advance</a>
nursing essay writing services <a href=https://essaywritingservice.us.com>essays writing services</a> buy essays cheap [url=https://essaywritingservice.us.com]essay writing service[/url]
— Ace Homework Oct 15, 06:25 PM #essay writing service <a href=https://essaywritingservices.us.com>english essay writer</a> here i found it [url=https://essaywritingservices.us.com]the best essay writing services[/url]
— Homework Research Oct 15, 07:28 PM #http://onlineloans.us.com <a href=https://onlineloans.us.com/>loans online</a> a payday loan [url=https://onlineloans.us.com/]online payday loan[/url]
— JamesNip Oct 15, 08:45 PM #loans rockford il
— Avageta Oct 15, 09:26 PM #[url=http://paydayonlinemoney.com/]payday loans[/url]
easy money cash loans
<a href=“http://paydayonlinemoney.com/ “>personal loans</a>
sex chat <a href=https://freesexchat.us.com>sex chat</a> sex chat [url=https://freesexchat.us.com]free naked webcam[/url]
— JamesNip Oct 15, 10:21 PM #custom essay writing <a href=https://writemyessay.us.com>write essay online</a> https://writemyessay.us.com/ [url=https://writemyessay.us.com]online essay[/url]
— Essay Writings Oct 15, 10:56 PM #247 loans
— dounty Oct 15, 11:46 PM #[url=http://paydayonlinemoney.com/]loans for bad credit[/url]
24 hr payday loans
<a href=“http://paydayonlinemoney.com/ “>payday loans online</a>
payday loans online <a href=https://onlineloans.us.com/>loans online</a> speedycash [url=https://onlineloans.us.com/]payday loans online[/url]
— JamesNip Oct 16, 12:13 AM #write <a href=https://writemyessay.us.com>pay to write essays</a> websites that write essays for you [url=https://writemyessay.us.com]pay to write essays[/url]
— Assignment Notebooks Oct 16, 02:09 AM #essays writing services <a href=https://essaywritingservices.us.com>admission essay writing service</a> argumentative essay writer [url=https://essaywritingservices.us.com]what is the best custom essay writing service[/url]
— Assignments Help Oct 16, 02:12 AM #payday loans arizona
— SotUnors Oct 16, 06:50 AM #[url=http://paydayonlinemoney.com/]cash advance[/url]
how can i get a loan with bad credit
<a href=“http://paydayonlinemoney.com/ “>loans for bad credit</a>
paper writers for hire <a href=https://essaywritingservices.us.com>write essay service</a> fast essay writing service [url=https://essaywritingservices.us.com]2nd grade math homework[/url]
— JamesNip Oct 16, 07:22 AM #free sex chatting online <a href=https://freesexchat.us.com>sex chat</a> sex video chat [url=https://freesexchat.us.com]dildo show[/url]
— JamesNip Oct 16, 07:24 AM #write my papers <a href=https://writemyessay.us.com>citation</a> write my essay [url=https://writemyessay.us.com]essays[/url]
— Essay Writing Online Oct 16, 07:43 AM #essay writing service <a href=https://essaywritingservice.us.com>custom essay writing services</a> essay writing service [url=https://essaywritingservice.us.com]top essay writing services[/url]
— Type Writer Paper Oct 16, 10:33 AM #A forex broker is a companions that acts as an intermediary between traders and the international currency market.
— PolLat Oct 16, 12:03 PM #Verdict the right go-between middle hundreds of online companies can be a difficult task.
That’s why [url=http://7e7.pw/trade360.html]our site[/url] offers to earn aware of with one of the most certain and proven forex brokers.
+ Marketing outstrip with our automated forex trading [url=http://7e7.pw/fsb.html]software[/url].
Где приобрести Левитру в РФ
Даже если мужчина придерживается здорового уклада жизни, постоянно проходит все обследования и анализы и занимается спортом, рано или поздно его все-равно поджидают проблемы с потенцией: такова вся сущность старости.
К всеобщей радости современная наука создала [url=http://via-sexgra.ru/kazanova-generik]дженерик левитра купить в аптеке[/url] , что сумеют продлить здоровую интимную жизнь на два десятка лет, не нанося вреда при этом здоровью иных систем организма. Речь идет о Левитре дженериках, что вы можете купить на этом портале via-sexgra.ru
Тут вас ждет каталог из десятков препаратов, которые десятки лет продаются в США и прошли все установленные этапы клинических проверок. В отличии от банальных аптек, в представленном онлайн магазине все препараты продаются по самым скромным ценникам и высылаются клиенту в простой посылке, что гарантирует полную конфиденциальность покупки.
Все распространяемые таблетки производятся на легальных американских фармацевтических конвейерах и сопровождаются всеми нужными сертификатами. А низкая цена дженериков определяется отсутствием ненужной цепи посредников, как в случае с простой аптекой.
— VaidokAutop Oct 16, 12:46 PM #loans online bad credit <a href=https://loansforbadcredit.us.com/>payday bad credit loan</a> Discover More [url=https://loansforbadcredit.us.com/]payday loans bad credit[/url]
— JamesNip Oct 16, 01:58 PM #online essay writing service <a href=https://essayonline.us.com>buy cheap essays online</a> writing essay online [url=https://essayonline.us.com]http://writemyessay.us.com/[/url]
— Custom Essays Oct 16, 02:19 PM #admission essay writing service <a href=https://essaywritingservice.us.com>https://EssayWritingService.us.com</a> essay writing service [url=https://essaywritingservice.us.com]article source[/url]
— Online Essay Writer Oct 16, 02:52 PM #payday loans online <a href=https://onlineloans.us.com/>online loans</a> here i found it [url=https://onlineloans.us.com/]Read This[/url]
— JamesNip Oct 16, 02:55 PM #onlineloans.us.com <a href=https://onlineloans.us.com/>payday loans online</a> online payday loans [url=https://onlineloans.us.com/]best cash loans online[/url]
— Online Loan Oct 16, 03:37 PM #payday loans online direct lenders instant approval <a href=https://paydayloans.us.org/>payday loan online</a> payday loans online colorado [url=https://paydayloans.us.org/]online payday loans direct lenders[/url]
— Best Payday Loan Oct 16, 03:38 PM #payday loans online no credit check no faxing <a href=https://bestpaydayloansonline.us.com/>online payday loans direct lenders</a> online payday loans no credit check [url=https://bestpaydayloansonline.us.com/]bad credit payday loans online[/url]
— JamesNip Oct 16, 06:17 PM #payday loans bad credit <a href=https://loansforbadcredit.us.com/>Read Full Article</a> payday [url=https://loansforbadcredit.us.com/]loans for bad credit[/url]
— Best Online Loans Oct 16, 07:51 PM #write my essay online <a href=https://writemyessay.us.com>custom essay writing service</a> custom essay writing [url=https://writemyessay.us.com]helpful resources[/url]
— Buy An Essay Paper Oct 16, 08:53 PM #my homework now <a href=https://writemyessay.us.com>Going Here</a> http://writemyessay.us.com/ [url=https://writemyessay.us.com]write an essay[/url]
— Assignment Helpers Oct 16, 09:21 PM #payday loans online no credit check <a href=https://paydayloans.us.org/>payday loans online</a> payday loans [url=https://paydayloans.us.org/]payday express[/url]
— Personal Loans Oct 16, 10:37 PM #payday loans online <a href=https://paydayloansonline.us.com/>Learn More Here</a> guaranteed payday loans online [url=https://paydayloansonline.us.com/]payday loans online[/url]
— JamesNip Oct 16, 11:46 PM #online essay <a href=https://essayonline.us.com>buy essay online</a> homework online [url=https://essayonline.us.com]online homework help[/url]
— JamesNip Oct 17, 01:44 AM #custom essay writing <a href=https://writemyessay.us.com>write my essay</a> help me write my essay [url=https://writemyessay.us.com]https://writemyessay.us.com/[/url]
— Homework Good Or Bad Oct 17, 02:48 AM #direct payday lenders <a href=https://onlineloans.us.com/>direct lender loans</a> loans online [url=https://onlineloans.us.com/]https://onlineloans.us.com[/url]
— Online Payday Loan Oct 17, 03:39 AM #online loan <a href=https://onlineloans.us.com/>payday loan direct lender</a> online loan [url=https://onlineloans.us.com/]best cash loans online[/url]
— Speedycash Oct 17, 03:54 AM #should schools have homework <a href=https://essaywritingservices.us.com>essay writing services uk</a> essays writing services [url=https://essaywritingservices.us.com]essays writing services[/url]
— JamesNip Oct 17, 05:41 AM #More Help <a href=https://onlineloans.us.com/>online loans</a> online payday lenders [url=https://onlineloans.us.com/]payday loans online[/url]
— Easy Payday Loan Oct 17, 08:41 AM #payday loans direct lenders <a href=https://paydayloans.us.org/>cash advance</a> payday loans online reviews [url=https://paydayloans.us.org/]loans for bad credit[/url]
— JamesNip Oct 17, 09:42 AM #essay writing service <a href=https://essaywritingservice.us.com>buy essays online cheap</a> money can buy happiness essay [url=https://essaywritingservice.us.com]essay writing service[/url]
— JamesNip Oct 17, 11:47 AM #faxless payday loan same day <a href=https://loansforbadcredit.us.com/>easy payday loan</a> LoansForBadCredit.us.com [url=https://loansforbadcredit.us.com/]payday loans for bad credit[/url]
— Online Loans Oct 17, 12:09 PM #loan cash <a href=https://onlineloans.us.com/>payday loans online</a> online loans [url=https://onlineloans.us.com/]online loans[/url]
— Online Payday Loan Oct 17, 02:57 PM #payday loans online direct lenders only <a href=https://paydayloansonline.us.com/>online payday loans</a> payday loans online [url=https://paydayloansonline.us.com/]payday loans online[/url]
— Pay Day Loan Oct 17, 03:39 PM #Hello friends!
— RosieJat Oct 18, 05:46 AM #I am an official representative of private company which deals with all kinds of written work (essay, coursework, dissertation, presentation, report, etc) in short time.
We are ready to offer a free accomplishment of written work hoping for further cooperation and honest feedback about our service.
This offer has limited quantities!!!
Details on our website: >>> essay-paper.work
best payday loans online <a href=https://paydayloans.us.org/>payday loans direct lenders</a> online payday loan [url=https://paydayloans.us.org/]no credit check payday loans online[/url]
— JamesNip Oct 18, 08:40 AM #write <a href=https://writemyessay.us.com>my paper writer</a> HTTPS://WRITEMYESSAY.US.COM [url=https://writemyessay.us.com]write my essay online[/url]
— JamesNip Oct 18, 10:10 AM #ESSAYWRITINGSERVICE.US.COM <a href=https://essaywritingservice.us.com>buy college essays</a> motivation for homework [url=https://essaywritingservice.us.com]essay writing service[/url]
— JamesNip Oct 18, 11:21 AM #essay writing service <a href=https://essaywritingservices.us.com>mla handbook for writers of research papers 6th edition</a> essay writing service [url=https://essaywritingservices.us.com]a manual for writers of term papers theses and dissertations[/url]
— JamesNip Oct 18, 04:26 PM #additional reading <a href=https://bestpaydayloansonline.us.com/>payday loans online direct lenders no credit check</a> Visit This Link [url=https://bestpaydayloansonline.us.com/]secure payday loans online[/url]
— JamesNip Oct 18, 07:59 PM #payday loan online <a href=https://onlineloans.us.com/>payday loans online</a> Extra resources [url=https://onlineloans.us.com/]online loans[/url]
— JamesNip Oct 19, 12:59 AM #sex web cam <a href=https://freesexchat.us.com>sex chat</a> show girls [url=https://freesexchat.us.com]erotic sex chat[/url]
— JamesNip Oct 19, 06:35 AM #Full Report <a href=https://bestpaydayloansonline.us.com/>payday loans online</a> payday loans online no credit check instant approval [url=https://bestpaydayloansonline.us.com/]top payday loans online[/url]
— JamesNip Oct 19, 07:33 AM #mba essay writing services <a href=https://essaywritingservice.us.com>https://essaywritingservice.us.com</a> essay writing service cheap [url=https://essaywritingservice.us.com]cheap custom essay writing service[/url]
— JamesNip Oct 19, 10:36 AM #bad credit loans direct lenders <a href=https://loansforbadcredit.us.com/>bad credit payday loans</a> payday loans for bad credit [url=https://loansforbadcredit.us.com/]bad credit loans direct lenders[/url]
— JamesNip Oct 19, 12:14 PM #Full Article <a href=https://paydayloans.us.org/>loans for bad credit</a> payday loans [url=https://paydayloans.us.org/]payday loans online[/url]
— JamesNip Oct 20, 07:20 AM #online payday loans <a href=https://bestpaydayloansonline.us.com/>Visit This Link</a> legit payday loans online [url=https://bestpaydayloansonline.us.com/]payday loans online[/url]
— JamesNip Oct 20, 08:03 AM #short term bad credit loans <a href=https://shorttermloans.us.com>apply for a loan with bad credit</a> loans short term no credit check [url=https://shorttermloans.us.com]short term loans online[/url]
— JamesNip Oct 20, 11:51 AM #online cash loans <a href=https://shorttermloans.us.com>quick short term loans</a> bad credit loans monthly payments [url=https://shorttermloans.us.com]short term cash loans[/url]
— JamesNip Oct 20, 12:49 PM #online homework <a href=https://essayonline.us.com>buy essay online</a> more [url=https://essayonline.us.com]http://writemyessay.us.com[/url]
— JamesNip Oct 20, 04:53 PM #write my essay <a href=https://writemyessay.us.com>write my essay</a> help my essay [url=https://writemyessay.us.com]https://writemyessay.us.com[/url]
— JamesNip Oct 20, 08:01 PM #quick payday loans with bad credit <a href=https://quickloans.us.com>personal loans quick</a> fast loans no credit [url=https://quickloans.us.com]quick personal loans same day[/url]
— JamesNip Oct 20, 10:26 PM #fast loans <a href=https://quickloans.us.com>loans quick approval</a> quick payday loans [url=https://quickloans.us.com]fast loans[/url]
— JamesNip Oct 21, 01:17 AM #payday loans <a href=https://paydayloans.us.org/>payday loans online</a> payday loan online [url=https://paydayloans.us.org/]payday express[/url]
— JamesNip Oct 21, 02:08 AM #pay for essay online <a href=https://essayonline.us.com>buy essay online</a> buy an essay online [url=https://essayonline.us.com]online essay writing[/url]
— JamesNip Oct 21, 02:40 AM #payday loans for bad credit <a href=https://loansforbadcredit.us.com/>article source</a> payday loans for bad credit [url=https://loansforbadcredit.us.com/]Recommended Reading[/url]
— JamesNip Oct 22, 01:02 PM #writing an essay for college <a href=https://collegeessay.us.com>i need help with my essay</a> write college essay [url=https://collegeessay.us.com]help writing college essays[/url]
— JamesNip Oct 22, 03:42 PM #bad credit loans direct lenders <a href=https://loansforbadcredit.us.com/>payday loans for bad credit</a> https://LoansForBadCredit.us.com/ [url=https://loansforbadcredit.us.com/]source[/url]
— JamesNip Oct 22, 04:07 PM #fast loans no credit check <a href=https://loansforbadcredit.us.com/>payday loans for bad credit</a> bad credit payday loans [url=https://loansforbadcredit.us.com/]bad credit loans direct lenders[/url]
— JamesNip Oct 22, 06:49 PM #easy payday loans online no faxing <a href=https://paydayloans.us.org/>personal loans</a> payday loans online [url=https://paydayloans.us.org/]direct payday loans online[/url]
— JamesNip Oct 22, 11:10 PM #Где купить Сиалис в России
Даже если мужик старается придерживаться здорового уклада жизни, регулярно проходит все обследования и анализы и занимается спортом, позже или раньше его все-равно ожидают проблемы с потенцией: такова неприятная сущность старения.
К большому счастью прогрессивная наука создала [url=http://via-sexgra.ru/shpanskaya-mushka]шпанская мушка как принимать[/url] , что сумеют продлить нормальную интимную жизнь на десять лет, не вредя при этом здоровью всех других органов и систем. Речь идет о Левитре дженериках, что вы можете купить на этом сайте via-sexgra.ru
Тут вас ждет каталог из пары десятков препаратов, что десятки лет применяются в США и прошли все установленные этапы клинического тестирования. В отличии от банальных аптек, в этом онлайн магазине все препараты продаются по самым низким ценникам и отправляются клиенту в самой обычной посылке, что обеспечивает полную анонимность заказа.
Все продаваемые пилюли производятся на легальных западноевропейских заводах и сопровождаются всеми легализованными сертификатами. Низкая цена дженериков обуславливается отсутствием длинной цепочки посредников, как в ситуации с классической аптекой.
— VaidokAutop Oct 24, 08:07 AM #online essay writing <a href=https://essayonline.us.com>online essay writer</a> writing online [url=https://essayonline.us.com]pay for essay online[/url]
— JamesNip Oct 25, 06:58 AM #custom essay writing service <a href=https://writemyessay.us.com>online essay</a> write my essay [url=https://writemyessay.us.com]essays[/url]
— JamesNip Oct 25, 01:48 PM #trusted essay writing service <a href=https://essaywritingservices.us.com>legitimate essay writing service</a> essay writing services review [url=https://essaywritingservices.us.com]essay writing service[/url]
— JamesNip Oct 25, 02:34 PM #buy essays online <a href=https://buyessays.us.com>order essay online</a> order essay paper [url=https://buyessays.us.com]order essay[/url]
— JamesNip Oct 25, 03:43 PM #personal loans bad credit <a href=https://badcreditpersonalloans.us.com>personal loans bad credit</a> personal loans bad credit texas [url=https://badcreditpersonalloans.us.com]personal loan interest rates comparison[/url]
— Pay Day Loans Oct 25, 04:22 PM #short term payday loans <a href=https://shorttermloans.us.com>short term fast cash loans</a> quick cash loans [url=https://shorttermloans.us.com]loan stores[/url]
— Cash Advance Oct 25, 04:30 PM #australian essay writing service <a href=https://essaywritingservices.us.com>essays writing services</a> wake county school assignments [url=https://essaywritingservices.us.com]homework for pre k[/url]
— JamesNip Oct 25, 04:36 PM #short term bad credit loans <a href=https://shorttermloans.us.com>1 hour payday loans</a> short term loans for bad credit [url=https://shorttermloans.us.com]short term loans online[/url]
— Online Lenders Oct 25, 05:06 PM #short term loans colorado <a href=https://shorttermloans.us.com>bad credit loans guaranteed approval</a> short term cash loans [url=https://shorttermloans.us.com]short term loans[/url]
— Easy Payday Loan Oct 25, 06:52 PM #Вы когда-нибудь мечтали похудеть?
— DorinelaGyday Oct 25, 07:08 PM #Вы интересуетесь, как это сделать?
Вы может быть сомневаетесь в своих возможностях?
У нас есть проверенное средство, как похудеть легко, быстро и навсегда!
Интересно читайте далее: [url=https://goo.gl/wCTA9r]узнай простой способ похудеть в домашних условиях [/url]
loans quick approval <a href=https://quickloans.us.com>quick personal loans in new york</a> fast loans no credit [url=https://quickloans.us.com]easy personal loans with bad credit[/url]
— Online Payday Loan Oct 26, 12:20 AM #history essay help <a href=https://collegeessay.us.com>help me write my college essay</a> help writing college essay [url=https://collegeessay.us.com]help on writing essays[/url]
— Random Assignments Oct 26, 12:26 AM #buy essay online safe <a href=https://buyessays.us.com>essay online buy</a> buy essay online [url=https://buyessays.us.com]order essay online cheap quick[/url]
— Buy Essay Papers Oct 26, 03:10 AM #buy essay <a href=https://buyessay.us.com>buy essay</a> buy an essay [url=https://buyessay.us.com]need help to write an essay[/url]
— Essays Writing Oct 26, 05:13 AM #bad credit personal loans <a href=https://badcreditpersonalloans.us.com>payday loans bad credit</a> payday loans for really bad credit [url=https://badcreditpersonalloans.us.com]bad credit personal loans[/url]
— Payday Oct 26, 05:15 AM #personal loans bad credit <a href=https://badcreditpersonalloans.us.com>payday loans for bad credit uk</a> easy approval loans for bad credit [url=https://badcreditpersonalloans.us.com]personal loans for bad credit in texas[/url]
— Best Online Loans Oct 26, 07:54 AM #buy essays <a href=https://buyessays.us.com>help with an essay</a> help with college essays [url=https://buyessays.us.com]top essay writing websites[/url]
— White Paper Writer Oct 26, 08:11 AM #short term loans compare <a href=https://shorttermloans.us.com>small loans for bad credit</a> short term loans no credit check [url=https://shorttermloans.us.com]short term loans bad credit[/url]
— Best Payday Loan Oct 26, 08:58 AM #college essay prompts <a href=https://collegeessay.us.com>college essay</a> help writing an essay for college [url=https://collegeessay.us.com]college essay prompts[/url]
— Paper Writer Free Oct 26, 12:10 PM #quicken loans <a href=https://quickloans.us.com>quick loans no fees</a> quicken loans rates [url=https://quickloans.us.com]personal loans quick[/url]
— Fastest Payday Loan Oct 26, 01:19 PM #buy an essay <a href=https://buyessays.us.com>buy an essay cheap</a> buy essay [url=https://buyessays.us.com]order essay paper[/url]
— Write Assignment Oct 26, 02:39 PM #college essay help online <a href=https://collegeessay.us.com>college essay helper</a> personal essay help [url=https://collegeessay.us.com]help with writing essays[/url]
— Buy Essay Paper Oct 26, 03:00 PM #buy essay online <a href=https://buyessays.us.com>buy essays online</a> online essay help [url=https://buyessays.us.com]buy essay papers[/url]
— Assignment Helper Oct 26, 04:44 PM #writing essays in college <a href=https://collegeessay.us.com>help writing essays for college</a> help in essay writing [url=https://collegeessay.us.com]college essays[/url]
— Paper Writer Oct 26, 10:37 PM #essays for money <a href=https://buyessay.us.com>history essay help</a> essay to buy [url=https://buyessay.us.com]buy essay online[/url]
— White Paper Writers Oct 29, 08:34 AM #essay online buy <a href=https://buyessays.us.com>buy essay online cheap</a> buy essay online [url=https://buyessays.us.com]help with college essay writing[/url]
— Write Essay Oct 29, 01:10 PM #write college essays for money <a href=https://collegeessay.us.com>college essays</a> help writing essay [url=https://collegeessay.us.com]college essay[/url]
— Dog Ate Homework Oct 29, 01:39 PM #buy essay <a href=https://buyessay.us.com>essay online buy</a> buy essay [url=https://buyessay.us.com]buy essay[/url]
— Write College Essays Oct 29, 02:47 PM #order essay online <a href=https://buyessays.us.com>buy essay online</a> buy essay [url=https://buyessays.us.com]buy essays[/url]
— Premium Assignments Oct 29, 06:05 PM #buy essay online cheap <a href=https://buyessay.us.com>buy essay writing</a> mba essay help [url=https://buyessay.us.com]buy an essay online cheap[/url]
— My Homework Help Oct 29, 09:50 PM #college essay online <a href=https://collegeessay.us.com>writing a college entrance essay</a> buy college essays [url=https://collegeessay.us.com]writing a college admissions essay[/url]
— Essay Writings Oct 29, 11:32 PM #college essay help <a href=https://collegeessay.us.com>help me write my college essay</a> help on writing essays [url=https://collegeessay.us.com]college essays[/url]
— Online Essay Writer Oct 30, 03:01 AM #help with college essays <a href=https://buyessay.us.com>help with essays assignments</a> buy essay [url=https://buyessay.us.com]easy essay help[/url]
— Write My Essay Cheap Oct 30, 07:44 AM #essay help service <a href=https://collegeessay.us.com>help with my essay</a> buy college essays online [url=https://collegeessay.us.com]college essay service[/url]
— Write Oct 30, 08:44 AM #buy essay online reviews <a href=https://essaywritingservices.us.com>printable homework planner</a> online essay writing service review [url=https://essaywritingservices.us.com]essay writing service[/url]
— JamesNip Oct 30, 06:10 PM #college essay writer for pay <a href=https://buyessay.us.com>buy essay</a> buy essays online [url=https://buyessay.us.com]buy an essay cheap[/url]
— JamesNip Oct 30, 07:44 PM #[b]Перейдите ниже по ссылке, чтобы получить кредит:[/b]
https://goo.gl/mbi22F
—————————————————-
Можно ли снимать деньги с кредитной карты.
На вопрос можно ли снимать деньги с кредитной карты, большинство компетентных банковских работников дает приблизительно одинаковый ответ — можно, но дорого и невыгодно. Кредитная карта изначально предназначена для безналичных расчетов и операций.
Денежные средства на любой карте с кредитным лимитом — это некий «воздушный мешок», не являющийся непосредственно собственностью банка, который не слишком заинтересован в их обналичивании.
Перед тем, как задумываться насчет того, можно ли снимать деньги с кредитной карты, необходимо внимательно изучить посвященный льготному периоду раздел договора о получении карты. Действие данного периода распространяется только на безналичные операции. Именно поэтому, с момента снятия наличных, льготный период официально прекращается, и возвращать деньги придется уже под проценты.
Можно снимать деньги с кредитной карты с небольшими процентами.
В любом случае, снимать деньги со счета рекомендуется в отделениях банка, в котором открывалась кредитная карта. В среднем объем комиссионных выплат по снятию наличных ограничен в размере 3-5 процентов. Многие банки также устанавливают минимальную сумму комиссии. В других банкоматах сумма комиссии значительно возрастает, и за любую операцию с картой со счета будет сниматься большее количество денег.
Лучшие предложения онлайн кредитов!
Топ 3 самых доступных и популярных кредитов онлайн.
карта рассрочки «Совесть»
Ставка 0 % | Срок до 5 лет | Макс 300 000.
Ставка за использование 0% Комиссия за досрочное погашение отсутствует Годовое обслуживание первый год 290 ? SMS-информирование бесплатно.
Подробнее.
Кредитная карта «Тинькофф Платинум»
Ставка 36% в год | Срок до 12 мес. | Макс 300 000.
С любой кредитной историей От 18-70 лет. Граждане РФ Регистрация в любом регионе РФ Любая форма трудоустройства.
Подробнее.
Ставка 13,99 % | Срок до 5 лет | Макс 2 000 000.
решение по заявке от 1 дня досрочное погашение по телефону без комиссий и поручителей заполнение заявки за 5 минут.
Подробнее.
Показать все варианты онлайн кредитов.
Также, когда вопрос, можно ли снимать деньги с кредитки, решен, необходимо выяснить лимит на сумму, которую банк разрешает обналичить за сутки. Некоторые банки устанавливают ограничение в пределах одной тысячи рублей, другие позволяют снимать более десяти тысяч за раз. В большинстве случаев лимит зависит от категории выданной кредитной карты.
Следует обратить особое внимание на процентную ставку.
По договору большинство банков оставляет за собой право на увеличение процентной ставки по кредитным выплатам в случае даже единоразового снятия наличных, не всегда предупреждая об этом клиентов перед непосредственной обналичкой.
Однако выход в любом случае найти можно. QIWI-кошелек — экономичная и законная возможность обналичить деньги, минуя банковские кассы и завышенные комиссионные выплаты, так как данный метод котируется банком как безналичная покупка, по которому проценты не начисляются.
Зарегистрировав электронный кошелек, следует привязать его к номеру необходимой кредитной карты. После этого необходимую сумму денег нужно перевести на счет, указав номер кошелька. Затем, уже электронные деньги, нужно отправить с минимальной комиссионной выплатой на номер обычной карты.
[b]Перейдите ниже по ссылке, чтобы получить кредит:[/b]
https://goo.gl/Pm8eeu
— SusanAbody Oct 30, 09:26 PM #cheap custom essay writing service <a href=https://essaywritingservices.us.com>essay writing service review</a> essays writing services [url=https://essaywritingservices.us.com]college essay writing services[/url]
— JamesNip Oct 31, 02:14 AM #payday loans for bad credit <a href=https://badcreditpersonalloans.us.com>personal loans bad credit texas</a> payday loans bad credit today [url=https://badcreditpersonalloans.us.com]payday loans bad credit today[/url]
— JamesNip Oct 31, 02:58 AM #http://writemyessay.us.com/ <a href=https://essayonline.us.com>view homepage</a> online essay [url=https://essayonline.us.com]online essays[/url]
— JamesNip Oct 31, 03:28 AM #adult webcams <a href=https://webcamsex.us.com>webcam sex</a> webcam sex [url=https://webcamsex.us.com]live sex chat[/url]
— JamesNip Oct 31, 05:53 AM #payday loans for bad credit uk <a href=https://badcreditpersonalloans.us.com>bank personal loan</a> payday loans online bad credit ok [url=https://badcreditpersonalloans.us.com]best place to get a personal loan with bad credit[/url]
— Payday Loan Online Oct 31, 09:57 AM #unsecured loans for people with bad credit <a href=https://shorttermloans.us.com>short term loans colorado</a> short term fast cash loans [url=https://shorttermloans.us.com]short term fast cash loans[/url]
— Best Payday Loan Oct 31, 10:16 AM #help with essays <a href=https://collegeessay.us.com>college essays help</a> help with college essays [url=https://collegeessay.us.com]college admission essay help[/url]
— JamesNip Oct 31, 10:26 AM #writemyessay.us.com <a href=https://writemyessay.us.com>my thesis</a> write my essay [url=https://writemyessay.us.com]write my essay[/url]
— JamesNip Oct 31, 11:48 AM #bad credit personal loans online <a href=https://badcreditpersonalloans.us.com>bad credit personal loans guaranteed approval</a> payday loans for bad credit in texas [url=https://badcreditpersonalloans.us.com]payday loans bad credit ontario[/url]
— Get A Loan Oct 31, 01:46 PM #quick payday loans bad credit <a href=https://quickloans.us.com>quick loans</a> fast loans online [url=https://quickloans.us.com]quick personal loans same day[/url]
— Online Loan Oct 31, 03:31 PM #personal loans for bad credit <a href=https://badcreditpersonalloans.us.com>loans for bad credit in utah</a> payday loans for bad credit online [url=https://badcreditpersonalloans.us.com]payday loans for bad credit online[/url]
— JoeNip Oct 31, 04:03 PM #essays <a href=https://writemyessay.us.com>more information</a> write my essay cheap [url=https://writemyessay.us.com]website to write essays[/url]
— JamesNip Oct 31, 05:01 PM #write my essay for me <a href=https://writemyessay.us.com>pay to write my essay</a> essays [url=https://writemyessay.us.com]paper writer[/url]
— JoeNip Oct 31, 05:04 PM #college essay prompts <a href=“https://collegeadmissionessay.stream”>buy essay without plagiarism</a> college admission essay [url=https://collegeadmissionessay.stream]college admission essay[/url] instant payday loans <a href=“https://instantonlineloans.science”>online installment loans</a> best payday loans [url=https://instantonlineloans.science]instant loans online[/url] online payday loans instant approval <a href=“https://onlinepaydayloansinstantapproval.loan”>instant online payday loan</a> online payday loans instant approval [url=https://onlinepaydayloansinstantapproval.loan]online payday loan instant approval[/url] payday loans direct lenders <a href=“https://directlenderspaydayloans.cricket”>payday lenders direct</a> direct lenders payday loans [url=https://directlenderspaydayloans.cricket]direct lenders payday loans[/url] free live sex chat <a href=“https://livesexchat.bid”>live sex chat</a> free live sex chat [url=https://livesexchat.bid]free live sex chat[/url] college essay <a href=“https://collegeessayprompts.webcam”>essays for college</a> college essay help [url=https://collegeessayprompts.webcam]college essay prompts[/url] payday cash advance loan <a href=“https://instantpaydayloans.trade”>instant loans online</a> money loan [url=https://instantpaydayloans.trade]instant payday loans[/url] paper writing service <a href=“https://customessaywriting.trade”>paper writing service</a> paper writing service [url=https://customessaywriting.trade]write research paper for me[/url] writing a paper <a href=“https://paperwriting.cricket”>paper writing service</a> mastering physics online homework solutions [url=https://paperwriting.cricket]writing my paper[/url] live chat <a href=“https://girlschat.trade”>live chat</a> show girls [url=https://girlschat.trade]girls chat[/url]
— PamNip Oct 31, 06:19 PM #online loans <a href=https://onlineloans.us.com/>online loans</a> getting a loan [url=https://onlineloans.us.com/]money loan[/url]
— JamesNip Oct 31, 06:43 PM #short term loans online bad credit <a href=https://shorttermloans.us.com>short term loans canada</a> quick short term loans [url=https://shorttermloans.us.com]short term loans[/url]
— Best Payday Loan Oct 31, 07:34 PM #online easy loans <a href=https://quickloans.us.com>fast cash loan no credit check</a> payday loans quick [url=https://quickloans.us.com]fast cash online loans[/url]
— JamesNip Oct 31, 08:49 PM #short term payday <a href=https://shorttermloans.us.com>short term loans colorado</a> loans short term unsecured [url=https://shorttermloans.us.com]short term cash loans[/url]
— JoeNip Oct 31, 09:17 PM #online payday loans <a href=https://paydayloans.us.org/>payday loans</a> payday loans online [url=https://paydayloans.us.org/]cash advance payday loans online[/url]
— JoeNip Oct 31, 10:23 PM #https://writemyessay.us.com <a href=https://writemyessay.us.com>write my essay for me cheap</a> HTTPS://WRITEMYESSAY.US.COM [url=https://writemyessay.us.com]pay to write my essay[/url]
— JamesNip Oct 31, 11:46 PM #where can i get a quick loan <a href=https://quickloans.us.com>fast loans no credit</a> quick personal loans for fair credit [url=https://quickloans.us.com]quick cash loans today[/url]
— Payday Loans Online Nov 1, 12:37 AM #bond loans bad credit <a href=https://badcreditpersonalloans.us.com>bad credit personal loans online</a> unsecured personal loans for people with bad credit [url=https://badcreditpersonalloans.us.com]personal loans bad credit[/url]
— Paydayloan Nov 1, 01:58 AM #Hello friends!
— Claraerupe Nov 1, 02:55 AM #I am an official representative of private company which deals with all kinds of written work (essay, coursework, dissertation, presentation, report, etc) in short time.
We are ready to offer a free accomplishment of written work hoping for further cooperation and honest feedback about our service.
This offer has limited quantities!!!
Details on our website:
https://essay-top.biz/2017/08/06/alabama-homework-helpline/
payday loans bad credit <a href=https://loansforbadcredit.us.com/>homepage</a> loans for bad credit [url=https://loansforbadcredit.us.com/]online payday loans for bad credit[/url]
— JamesNip Nov 1, 03:11 AM #buy an essay <a href=https://buyessay.us.com>college essay writing help</a> is there a website that writes essays for you [url=https://buyessay.us.com]essay introduction help[/url]
— JoeNip Nov 1, 03:18 AM #quick payday loans <a href=https://quickloans.us.com>quick payday loans</a> quick payday loans of newark [url=https://quickloans.us.com]quick and easy loans online[/url]
— Spotloan Nov 1, 04:04 AM #quick payday loans online <a href=https://quickloans.us.com>fast loans lenders</a> quick cash loans [url=https://quickloans.us.com]quick loans online[/url]
— JamesNip Nov 1, 05:10 AM #quick cash loans in tennessee <a href=https://quickloans.us.com>loans quick and easy</a> quicken loans rates [url=https://quickloans.us.com]loans quick and easy[/url]
— JoeNip Nov 1, 06:11 AM #Revolutional update of SEO/SMM package “XRumer 16.0 + XEvil”:
captchas recognition of Google, Facebook, Bing, Hotmail, SolveMedia, Yandex,
and more than 8400 another types of captchas,
with highest precision (80..100%) and highest speed (100 img per second).
You can connect XEvil 3.0 to all most popular SEO/SMM software: XRumer, GSA SER, ZennoPoster, Srapebox, Senuke, and more than 100 of other software.
Interested? There are a lot of introducing videos about XEvil in YouTube.
Good luck!
P.S. XEvil 4.0. break Google ReCaptcha2 too;)
— Barbaranog Nov 1, 06:44 AM #short term loans no credit check <a href=https://shorttermloans.us.com>small payday loans</a> short term loans for bad credit [url=https://shorttermloans.us.com]short term cash loans[/url]
— Online Payday Loan Nov 1, 08:42 AM #found here <a href=https://onlineloans.us.com/>Get the facts</a> onlineloans.us.com [url=https://onlineloans.us.com/]a payday loan[/url]
— JoeNip Nov 1, 08:50 AM #payday loans bad credit approval <a href=https://badcreditpersonalloans.us.com>bad credit payday loans</a> payday loans bad credit [url=https://badcreditpersonalloans.us.com]personal loans for bad credit[/url]
— JamesNip Nov 1, 09:55 AM #fast loans no credit check <a href=https://quickloans.us.com>fast loans</a> quick cash loans online [url=https://quickloans.us.com]quick payday loans direct lenders[/url]
— Best Payday Loan Nov 1, 10:29 AM #my homework now <a href=https://writemyessay.us.com>write my essay</a> custom essay writing service [url=https://writemyessay.us.com]HTTP://WRITEMYESSAY.US.COM/[/url]
— JamesNip Nov 1, 11:05 AM #bad credit personal loans <a href=https://badcreditpersonalloans.us.com>bad credit personal loans</a> loans for bad credit no fees no guarantor no brokers [url=https://badcreditpersonalloans.us.com]bad credit personal loans reviews[/url]
— JoeNip Nov 1, 12:03 PM #payday loans <a href=https://paydayloans.us.org/>Check This Out</a> payday loans direct lenders [url=https://paydayloans.us.org/]payday loans online[/url]
— JamesNip Nov 1, 12:17 PM #how to write a comparing and contrasting essay <a href=https://essaywritingservices.us.com>cheap essay writing service uk</a> research paper writers [url=https://essaywritingservices.us.com]essay writing services review[/url]
— JoeNip Nov 1, 12:53 PM #loans for people with bad credit not payday loans <a href=https://badcreditpersonalloans.us.com>bad credit payday loans</a> small personal loans bad credit [url=https://badcreditpersonalloans.us.com]bad credit personal loans guaranteed approval[/url]
— JamesNip Nov 1, 03:33 PM #payday loans for bad credit <a href=https://loansforbadcredit.us.com/>http://loansforbadcredit.us.com/</a> bad credit payday loans [url=https://loansforbadcredit.us.com/]paydayloan[/url]
— JamesNip Nov 1, 05:39 PM #buy custom essay online <a href=https://essayonline.us.com>online essay writing service</a> http://WriteMyEssay.us.com/ [url=https://essayonline.us.com]writing essay online[/url]
— JamesNip Nov 1, 06:05 PM #payday loans bad credit <a href=https://loansforbadcredit.us.com/>payday bad credit loan</a> pay day loan [url=https://loansforbadcredit.us.com/]loans for bad credit[/url]
— JamesNip Nov 1, 10:19 PM #quick payday loan today <a href=https://quickloans.us.com>quick loans</a> quick payday loans [url=https://quickloans.us.com]quick personal loans[/url]
— JamesNip Nov 2, 02:25 AM #Read Full Report <a href=https://onlineloans.us.com/>Get the facts</a> payday loans online [url=https://onlineloans.us.com/]online loans[/url]
— JamesNip Nov 2, 04:01 AM #live sex chat <a href=https://webcamsex.us.com>dildo show</a> sex webcam [url=https://webcamsex.us.com]webcam sex[/url]
— JamesNip Nov 2, 07:04 AM #Absolutely NEW update of SEO/SMM software “XRumer 16.0 + XEvil”:
captchas solution of Google, Facebook, Bing, Hotmail, SolveMedia, Yandex,
and more than 8400 another size-types of captcha,
with highest precision (80..100%) and highest speed (100 img per second).
You can connect XEvil 3.0 to all most popular SEO/SMM software: XRumer, GSA SER, ZennoPoster, Srapebox, Senuke, and more than 100 of other programms.
Interested? You can find a lot of introducing videos about XEvil in YouTube.
Good luck!
P.S. XEvil 4.0. recognize Google ReCaptcha2 too !
— Barbaranog Nov 2, 09:57 AM #quick personal loans bad credit <a href=https://quickloans.us.com>quick cash loans reviews</a> quick loans [url=https://quickloans.us.com]payday loans quickly[/url]
— JamesNip Nov 2, 10:30 AM #quick payday loan today <a href=https://quickloans.us.com>easy online loan</a> loans quicken [url=https://quickloans.us.com]easy credit loans[/url]
— Personal Loans Nov 2, 11:44 AM #bad credit payday loans direct lenders <a href=https://loansforbadcredit.us.com/>easy payday loan</a> payday loans for bad credit [url=https://loansforbadcredit.us.com/]HTTPS://LOANSFORBADCREDIT.US.COM[/url]
— JamesNip Nov 2, 01:24 PM #bad credit guaranteed loans <a href=https://badcreditpersonalloans.us.com>payday loans bad credit</a> quick and easy loans for bad credit [url=https://badcreditpersonalloans.us.com]best place to get a personal loan with bad credit[/url]
— Best Payday Loan Nov 2, 03:18 PM #bad credit loans florida <a href=https://badcreditpersonalloans.us.com>personal loans bad credit ok</a> private money lenders for personal loans [url=https://badcreditpersonalloans.us.com]bad credit payday loans[/url]
— Payday Loans Online Nov 2, 04:30 PM #best online essay writing service <a href=https://essaywritingservices.us.com>college essay writing services</a> fast essay writing service [url=https://essaywritingservices.us.com]homepage here[/url]
— JamesNip Nov 2, 04:53 PM #fast loans <a href=https://quickloans.us.com>quick loans no credit check</a> quick loans [url=https://quickloans.us.com]cash fast loan[/url]
— JamesNip Nov 2, 05:45 PM #short term loans <a href=https://shorttermloans.us.com>short term loans</a> short term loans [url=https://shorttermloans.us.com]short term loans[/url]
— Fastest Payday Loan Nov 2, 06:48 PM #buy an essay online <a href=https://buyessay.us.com>buy an essay cheap</a> essay buying [url=https://buyessay.us.com]essay buy[/url]
— JamesNip Nov 2, 07:14 PM #essay writing service <a href=https://essaywritingservices.us.com>custom essay writing services reviews</a> listening to music while doing homework [url=https://essaywritingservices.us.com]essays writing services[/url]
— JamesNip Nov 2, 08:17 PM #fast loans <a href=https://quickloans.us.com>quick loans rates</a> quick payday loan today [url=https://quickloans.us.com]quick cash loans in tennessee[/url]
— Direct Lender Loans Nov 2, 08:53 PM #loans for bad credit <a href=https://paydayloans.us.org/>personal loans</a> payday loans [url=https://paydayloans.us.org/]payday loans online[/url]
— JoeNip Nov 2, 11:39 PM #bad credit personal unsecured loans guaranteed <a href=https://badcreditpersonalloans.us.com>no credit check personal loans online</a> payday loans for bad credit guaranteed [url=https://badcreditpersonalloans.us.com]personal loans for bad credit[/url]
— Personal Loans Nov 3, 02:13 AM #writing a personal essay for college <a href=https://collegeessay.us.com>buy college essays</a> essay help uk [url=https://collegeessay.us.com]buy college essays online[/url]
— JoeNip Nov 3, 02:19 AM #personal credit loans <a href=https://badcreditpersonalloans.us.com>best rates for personal loans</a> personal loans for bad credit [url=https://badcreditpersonalloans.us.com]how can i get a personal loan with bad credit[/url]
— Easy Payday Loan Nov 3, 02:45 AM #https://writemyessay.us.com <a href=https://essayonline.us.com>buy essay online</a> buy essay online [url=https://essayonline.us.com]buy essay online safe[/url]
— JoeNip Nov 3, 02:47 AM #buy college essays <a href=https://collegeessay.us.com>writing a college admission essay</a> uk essay help [url=https://collegeessay.us.com]online essay writing help[/url]
— JoeNip Nov 3, 05:55 AM #loans short term no credit check <a href=https://shorttermloans.us.com>short term cash loans</a> short term payday loans [url=https://shorttermloans.us.com]short term payday loans[/url]
— Easy Payday Loan Nov 3, 06:05 AM #quick loans <a href=https://quickloans.us.com>personal loans quick approval</a> loans fast cash [url=https://quickloans.us.com]quick cash loans reviews[/url]
— Payday Loan Online Nov 3, 08:09 AM #write my essay cheap <a href=https://writemyessay.us.com>WriteMyEssay.us.com</a> custom essay [url=https://writemyessay.us.com]essay help[/url]
— JoeNip Nov 3, 10:25 AM #webcam sluts <a href=https://webcamsex.us.com>webcam sex</a> free webcam sex [url=https://webcamsex.us.com]girl cams[/url]
— JoeNip Nov 3, 01:22 PM #short term loans for bad credit <a href=https://shorttermloans.us.com>loans short term no credit check</a> short term loans for bad credit [url=https://shorttermloans.us.com]tribal loans[/url]
— Payday Loans Nov 3, 03:49 PM #best short term loans online <a href=https://shorttermloans.us.com>payday loan las vegas nv</a> short term payday loans [url=https://shorttermloans.us.com]loan bad credit[/url]
— JoeNip Nov 3, 04:10 PM #bad credit payday loans <a href=https://badcreditpersonalloans.us.com>bad credit personal loans</a> personal loans bad credit [url=https://badcreditpersonalloans.us.com]personal loans bad credit[/url]
— Payday Loans Nov 3, 06:51 PM #online loan <a href=https://onlineloans.us.com/>payday loans online</a> loans online [url=https://onlineloans.us.com/]HTTPS://ONLINELOANS.US.COM[/url]
— JoeNip Nov 3, 07:39 PM #bad credit payday loans <a href=https://badcreditpersonalloans.us.com>personal loans for poor credit</a> payday loans for bad credit uk [url=https://badcreditpersonalloans.us.com]bad credit payday loans[/url]
— Money Loan Nov 3, 08:04 PM #college essay writing services <a href=https://essaywritingservices.us.com>essay writing service</a> apps that do your homework [url=https://essaywritingservices.us.com]write essays for me[/url]
— JoeNip Nov 3, 08:20 PM #quick payday loans online <a href=https://quickloans.us.com>loans quick</a> quick loans online [url=https://quickloans.us.com]fast loans online[/url]
— JoeNip Nov 3, 09:22 PM #payday loans direct lenders <a href=https://paydayloans.us.org/>online payday loans direct lenders</a> payday loans online direct lenders only [url=https://paydayloans.us.org/]click here[/url]
— JoeNip Nov 3, 10:07 PM #short term loans <a href=https://shorttermloans.us.com>loans with bad credit</a> payday loans direct lenders [url=https://shorttermloans.us.com]short term fast cash loans[/url]
— Online Loan Nov 3, 10:47 PM #loans with bad credit <a href=https://shorttermloans.us.com>short term loans for bad credit</a> payday loans calgary [url=https://shorttermloans.us.com]pay day loans direct lenders[/url]
— Paydayloan Nov 4, 02:48 AM #payday loans quick cash <a href=https://quickloans.us.com>loans quicken</a> quick personal loans [url=https://quickloans.us.com]quick loans online[/url]
— Payday Loans Online Nov 4, 03:25 AM #quicken loans <a href=https://quickloans.us.com>quick payday loans</a> quick loans [url=https://quickloans.us.com]quick cash loans[/url]
— Speedy Cash Nov 4, 07:43 AM #need a loan with bad credit fast <a href=https://quickloans.us.com>quick loans no fees</a> quick loans online [url=https://quickloans.us.com]quick cash loans online[/url]
— JamesNip Nov 4, 09:49 AM #white paper writer <a href=https://essaywritingservices.us.com>college essay writing services</a> view homepage [url=https://essaywritingservices.us.com]top essay writing services[/url]
— JamesNip Nov 4, 10:13 AM #long term personal loans <a href=https://shorttermloans.us.com>short term loans</a> short term loans online [url=https://shorttermloans.us.com]short term loans canada[/url]
— Online Loans Nov 4, 11:12 AM #short term loans online <a href=https://shorttermloans.us.com>short term quick loans</a> small loans [url=https://shorttermloans.us.com]ez loan[/url]
— Payday Loan Nov 4, 11:30 AM #buy essays online <a href=https://buyessay.us.com>buy an essay paper</a> essays help [url=https://buyessay.us.com]buy an essay[/url]
— JamesNip Nov 4, 01:26 PM #help writing a college essay <a href=https://buyessays.us.com>essay buy</a> buy essay without plagiarism [url=https://buyessays.us.com]order essay[/url]
— JamesNip Nov 4, 01:44 PM #bad credit loans online lenders <a href=https://badcreditpersonalloans.us.com>personal loans for bad credit</a> payday loans bad credit approval [url=https://badcreditpersonalloans.us.com]loans for bad credit in utah[/url]
— Cash Loan Nov 4, 02:45 PM #short term payday loans <a href=https://shorttermloans.us.com>short term loans</a> quick short term loans [url=https://shorttermloans.us.com]short term loan bad credit[/url]
— Online Lenders Nov 4, 03:18 PM #buy an essay <a href=https://buyessays.us.com>order essay paper</a> buy essay [url=https://buyessays.us.com]college essay service[/url]
— JamesNip Nov 4, 05:26 PM #write my papers <a href=https://writemyessay.us.com>write an essay</a> Related Site [url=https://writemyessay.us.com]help my essay[/url]
— JamesNip Nov 4, 09:32 PM #essay writing service <a href=https://writemyessay.us.com>write my paper</a> my paper writer [url=https://writemyessay.us.com]websites that write essays for you[/url]
— JamesNip Nov 4, 11:54 PM #help with writing an essay <a href=https://buyessay.us.com>order essay online cheap quick</a> help me with my essay [url=https://buyessay.us.com]buy an essay[/url]
— JamesNip Nov 5, 03:19 AM #order essay <a href=https://buyessay.us.com>help with college essay writing</a> help to write essay [url=https://buyessay.us.com]pay for an essay[/url]
— JamesNip Nov 5, 04:09 AM #easy small loans <a href=https://quickloans.us.com>easy loans online no credit check</a> quick cash loans today [url=https://quickloans.us.com]fast loans no credit[/url]
— Payday Loan Online Nov 5, 08:28 AM #fast loans <a href=https://quickloans.us.com>quick loans</a> quicken loans [url=https://quickloans.us.com]quick loan lenders[/url]
— Best Online Loans Nov 5, 08:35 AM #personal loans bad credit <a href=https://badcreditpersonalloans.us.com>bad credit personal loans</a> need cash now with bad credit [url=https://badcreditpersonalloans.us.com]payday loans bad credit[/url]
— Payday Express Nov 5, 09:08 AM #bad credit personal loans <a href=https://badcreditpersonalloans.us.com>personal loans for bad credit</a> bad credit payday loans [url=https://badcreditpersonalloans.us.com]bad credit personal loans utah[/url]
— Loans Online Nov 5, 10:30 AM #payday loans bad credit <a href=https://badcreditpersonalloans.us.com>cash loan with bad credit</a> small personal loan [url=https://badcreditpersonalloans.us.com]payday loans bad credit[/url]
— Payday Loan Nov 5, 03:07 PM #buy essay <a href=https://buyessay.us.com>buy essay online</a> buy an essay online [url=https://buyessay.us.com]buy essay[/url]
— Write Nov 5, 03:08 PM #order essay now <a href=https://buyessay.us.com>order essay online cheap</a> buying essays online safe [url=https://buyessay.us.com]buy essays[/url]
— Assignments Help Nov 5, 05:25 PM #help with college essay writing <a href=https://buyessay.us.com>best website to buy essays</a> buy essay papers [url=https://buyessay.us.com]essay online buy[/url]
— Writers Essay Nov 5, 07:05 PM #personal loans bad credit <a href=https://badcreditpersonalloans.us.com>personal loans with bad credit</a> cell phones for bad credit [url=https://badcreditpersonalloans.us.com]personal loans bad credit ok[/url]
— Online Loan Nov 5, 07:34 PM #personal loans with bad credit <a href=https://badcreditpersonalloans.us.com>bad credit loans georgia</a> apply for loans with bad credit [url=https://badcreditpersonalloans.us.com]bad credit personal loans nyc[/url]
— Payday Loans Nov 5, 09:33 PM #writing the college essay <a href=https://collegeessay.us.com>college essay</a> writing college essays for money [url=https://collegeessay.us.com]college essay help online[/url]
— Custom Essays Nov 5, 09:44 PM #quick loans <a href=https://quickloans.us.com>easy loans online no credit check</a> quick loans [url=https://quickloans.us.com]quick personal loans for poor credit[/url]
— Payday Loans Online Nov 5, 10:17 PM #personal loans for bad credit <a href=https://badcreditpersonalloans.us.com>apply personal loan online</a> bad credit personal loans nyc [url=https://badcreditpersonalloans.us.com]payday loans bad credit ontario[/url]
— Online Lenders Nov 6, 01:19 AM #essay buy <a href=https://buyessays.us.com>buy essay writing online</a> essays to buy [url=https://buyessays.us.com]pay for essay writing[/url]
— Write Essay Service Nov 6, 01:24 AM #buy essays <a href=https://buyessays.us.com>buy essay online</a> help writing college essay [url=https://buyessays.us.com]buy essay[/url]
— Online Essay Writing Nov 6, 03:32 AM #buy essay <a href=https://buyessays.us.com>order essay paper</a> order essay now [url=https://buyessays.us.com]essays help[/url]
— Homeworks Of America Nov 6, 03:50 AM #help with an essay <a href=https://buyessay.us.com>help with college essay</a> buy essay [url=https://buyessay.us.com]buy essay[/url]
— Homework Online Nov 6, 05:22 AM #girls chat <a href=https://webcamsex.us.com>webcam sex</a> webcam sex [url=https://webcamsex.us.com]free webcam sex[/url]
— JoeNip Nov 6, 05:33 AM #essays website <a href=https://buyessay.us.com>online essay</a> compare and contrast essay help [url=https://buyessay.us.com]online essay[/url]
— Paper Writer Nov 6, 10:06 AM #buy an essay <a href=https://buyessay.us.com>buy essays online</a> pay for essays [url=https://buyessay.us.com]help writing essay[/url]
— JoeNip Nov 6, 01:28 PM #assignment notebooks <a href=https://essaywritingservices.us.com>custom essay writing services</a> reliable essay writing service [url=https://essaywritingservices.us.com]write essay service[/url]
— JoeNip Nov 6, 02:07 PM #personal loans people bad credit <a href=https://badcreditpersonalloans.us.com>personal loans no credit check monthly payments</a> bad credit personal loans [url=https://badcreditpersonalloans.us.com]quick loan for bad credit[/url]
— JoeNip Nov 6, 02:33 PM #payday loans online direct lenders <a href=https://paydayloans.us.org/>Going Here</a> payday loans online no credit check [url=https://paydayloans.us.org/]payday loans online[/url]
— JoeNip Nov 6, 04:34 PM #buy essay <a href=https://buyessay.us.com>buy an essay online</a> buy essay online [url=https://buyessay.us.com]buy essay[/url]
— JoeNip Nov 6, 08:36 PM #short term loan no credit check <a href=https://shorttermloans.us.com>short term loans</a> loans short term unsecured [url=https://shorttermloans.us.com]short term payday loans[/url]
— JoeNip Nov 6, 09:51 PM #essay writing service <a href=https://essaywritingservices.us.com>site</a> best essay writing service reviews [url=https://essaywritingservices.us.com]college essay writing services[/url]
— JoeNip Nov 7, 02:18 AM #no credit loans <a href=https://shorttermloans.us.com>short term payday loans</a> loans direct [url=https://shorttermloans.us.com]no fee loans[/url]
— JoeNip Nov 7, 05:35 AM #bad credit loans direct lenders <a href=https://loansforbadcredit.us.com/>payday loans for bad credit</a> bad credit [url=https://loansforbadcredit.us.com/]payday loans for bad credit[/url]
— JoeNip Nov 7, 08:02 AM #buy essay cheap <a href=https://buyessay.us.com>high school essay help</a> buy essay online [url=https://buyessay.us.com]buy essays[/url]
— Homework Good Or Bad Nov 7, 08:17 AM #college essays <a href=https://collegeessay.us.com>write college essay</a> college essay service [url=https://collegeessay.us.com]college essay[/url]
— French Homework Nov 7, 10:15 AM #bad credit loans direct lenders <a href=https://loansforbadcredit.us.com/>cash loan</a> Recommended Reading [url=https://loansforbadcredit.us.com/]LOANSFORBADCREDIT.US.COM[/url]
— JoeNip Nov 7, 11:06 AM #buy essays online <a href=https://buyessays.us.com>help writing an essay for college</a> order essay online [url=https://buyessays.us.com]buy an essay online[/url]
— Buying Essays Online Nov 7, 12:49 PM #pay someone to write my essay <a href=https://writemyessay.us.com>write my essay</a> write my essay [url=https://writemyessay.us.com]write essay for me[/url]
— JoeNip Nov 7, 12:56 PM #buy college essay <a href=https://collegeessay.us.com>write college essay</a> college essay [url=https://collegeessay.us.com]college essay help[/url]
— Define Assignations Nov 7, 02:09 PM #college essay typer <a href=https://collegeessay.us.com>writing essays for college</a> university essay help [url=https://collegeessay.us.com]help with college essays[/url]
— Assignment Operators Nov 7, 02:36 PM #buy online essays <a href=https://buyessay.us.com>buy essay online</a> order essay online [url=https://buyessay.us.com]websites that write essays[/url]
— Online Homework Nov 7, 03:39 PM #help writing an essay for college <a href=https://collegeessay.us.com>college essay help</a> college essay prompts [url=https://collegeessay.us.com]college essays[/url]
— Google Essay Writer Nov 7, 04:56 PM #payday loans online no credit check <a href=https://paydayloans.us.org/>loans for bad credit</a> payday loans online [url=https://paydayloans.us.org/]as explained here[/url]
— JoeNip Nov 7, 05:40 PM #essay help australia <a href=https://collegeessay.us.com>help write an essay</a> buy college essays online [url=https://collegeessay.us.com]college essay help[/url]
— Homework Now.Com Nov 7, 06:29 PM #buy essay online <a href=https://buyessay.us.com>help me write my college essay</a> professional college essay writers [url=https://buyessay.us.com]buy persuasive essay[/url]
— Write An Essay Nov 7, 06:33 PM #our website <a href=https://onlineloans.us.com/>payday loan online</a> payday loans online [url=https://onlineloans.us.com/]online loan[/url]
— JoeNip Nov 7, 06:50 PM #buy essay papers <a href=https://buyessays.us.com>buy essays online</a> order essay online cheap [url=https://buyessays.us.com]buy essay[/url]
— JoeNip Nov 7, 08:00 PM #essay writing assignment help <a href=https://collegeessay.us.com>writing personal essays for college</a> need help writing essay [url=https://collegeessay.us.com]essay help service[/url]
— Homework Good Or Bad Nov 7, 08:54 PM #essay writer website <a href=https://buyessays.us.com>essay help websites</a> buy an essay [url=https://buyessays.us.com]essay online buy[/url]
— Buy College Essay Nov 7, 09:45 PM #pay to write my essay <a href=https://writemyessay.us.com>write my thesis</a> write my essay online [url=https://writemyessay.us.com]write my essay[/url]
— JoeNip Nov 7, 11:01 PM #buy essay <a href=https://buyessay.us.com>admissions essay help</a> college essay review services [url=https://buyessay.us.com]help me essay[/url]
— Buy A Essay Nov 7, 11:13 PM #help writing an essay for college <a href=https://collegeessay.us.com>college essays</a> help writing an essay [url=https://collegeessay.us.com]college essay[/url]
— Writers Essay Nov 7, 11:44 PM #quick payday loans online <a href=https://quickloans.us.com>quick payday loans bad credit</a> quicken loans [url=https://quickloans.us.com]quick personal loans[/url]
— JoeNip Nov 8, 01:13 AM #personal loan bad credit lenders <a href=https://badcreditpersonalloans.us.com>best unsecured personal loans</a> personal loans bad credit [url=https://badcreditpersonalloans.us.com]bad credit personal loans[/url]
— JoeNip Nov 8, 01:37 AM #college admission essay help <a href=https://collegeessay.us.com>need help writing essay</a> writing a personal essay for college [url=https://collegeessay.us.com]essay help australia[/url]
— Essay Buy Nov 8, 02:06 AM #order essay online cheap <a href=https://buyessay.us.com>order essay online</a> pay for essays online [url=https://buyessay.us.com]buy custom essay online[/url]
— Writing Online Nov 8, 03:03 AM #help with writing essays <a href=https://collegeessay.us.com>help write essay</a> admission essay help [url=https://collegeessay.us.com]english essay help[/url]
— Custom Essay Writing Nov 8, 03:34 AM #write my essay online <a href=https://writemyessay.us.com>HTTP://WRITEMYESSAY.US.COM</a> essays [url=https://writemyessay.us.com]my homework now[/url]
— JoeNip Nov 8, 05:55 AM #essay buying <a href=https://buyessays.us.com>buy an essay for college</a> buy essay writing [url=https://buyessays.us.com]online essay[/url]
— Essay-writer.Org Nov 8, 06:25 AM #buy essays online <a href=https://buyessay.us.com>admission essay help</a> buy essay online cheap [url=https://buyessay.us.com]order essay online cheap quick[/url]
— Third Grade Homework Nov 8, 07:12 AM #help writing essays <a href=https://buyessays.us.com>buy essay</a> help essay [url=https://buyessays.us.com]buy an essay online cheap[/url]
— Writing My Essay Nov 8, 07:56 AM #buy an essay online <a href=https://buyessays.us.com>buy essays</a> essay writing websites [url=https://buyessays.us.com]essays to buy[/url]
— Write My Essay Cheap Nov 8, 09:29 AM #write my essay <a href=https://writemyessay.us.com>essay writing</a> website to write essays [url=https://writemyessay.us.com]write my essay for me cheap[/url]
— JoeNip Nov 8, 09:56 AM #write my college essay for me <a href=https://buyessay.us.com>buy essay online</a> buy essay [url=https://buyessay.us.com]best website for essay writing[/url]
— Online Paper Writer Nov 8, 10:24 AM #essay writing service <a href=https://essaywritingservices.us.com>Additional Info</a> top essay writing services [url=https://essaywritingservices.us.com]buy essay online safe[/url]
— JoeNip Nov 8, 11:34 AM #online essay <a href=https://buyessays.us.com>order essay online cheap quick</a> buy essay without getting caught [url=https://buyessays.us.com]buy essay[/url]
— School Assignments Nov 8, 01:24 PM #buy essay cheap <a href=https://buyessays.us.com>buy an essay</a> buy essay [url=https://buyessays.us.com]buy essay online cheap[/url]
— JoeNip Nov 8, 02:30 PM #help writing college essay <a href=https://collegeessay.us.com>help with writing essays</a> admissions essay help [url=https://collegeessay.us.com]essay writing help online[/url]
— Web Assign Utah Nov 8, 04:19 PM #help writing an essay <a href=https://collegeessay.us.com>help with writing essays</a> writing a college essay about yourself [url=https://collegeessay.us.com]college essay[/url]
— Aa Seat Assignment Nov 8, 04:21 PM #payday loan lenders <a href=“https://paydayloanlenders.science”>payday loans online no credit check</a> payday loan direct lenders [url=https://paydayloanlenders.science]best cash loan[/url] payday loan direct lenders <a href=“https://paydayloandirectlenders.cricket”>direct payday loan lenders</a> direct payday lenders online [url=https://paydayloandirectlenders.cricket]payday loan direct lenders[/url] direct payday loan lenders <a href=“https://directpaydaylenders.bid”>loan</a> direct lender payday loans [url=https://directpaydaylenders.bid]direct payday loan lenders[/url] easiest payday loan to get <a href=“https://onlineloans.trade”>online payday loans</a> online lenders [url=https://onlineloans.trade]pay day loan[/url] paper writing service <a href=“https://paperwritingservice.trade”>paper writing service</a> essay writing [url=https://paperwritingservice.trade]paper writing service[/url] adult chats <a href=“https://adultchats.science”>free web cam sex</a> adult webcams [url=https://adultchats.science]strip club webcam[/url] paper writing <a href=“https://writingapaper.webcam”>writing a paper</a> paper writing [url=https://writingapaper.webcam]writing a paper[/url] biology assignment help <a href=“https://applicationessay.bid”>application essay</a> do my college algebra [url=https://applicationessay.bid]research essay[/url] direct loan lenders <a href=“https://directloanlenders.bid”>payday loan lenders</a> payday lenders direct [url=https://directloanlenders.bid]payday loan lenders[/url] online payday loan <a href=“https://fastpaydayloan.trade”>payday loan</a> guaranteed payday loans [url=https://fastpaydayloan.trade]fast payday loan[/url]
— JamesNip Nov 8, 05:12 PM #where to buy essays <a href=https://buyessays.us.com>buy an essay</a> buy persuasive essay [url=https://buyessays.us.com]order essay online[/url]
— JoeNip Nov 8, 05:54 PM #fast online payday loans <a href=“https://easyfastpaydayloans.loan”>payday loans on line</a> easy cash payday loan [url=https://easyfastpaydayloans.loan]payday loans for bad credit[/url] instant online payday loan <a href=“https://instantonlinepaydayloan.bid”>instant online payday loan</a> online payday loan [url=https://instantonlinepaydayloan.bid]best payday loan online[/url] direct lenders payday loans <a href=“https://directpaydaylenders.bid”>direct payday lenders online</a> pay day lenders [url=https://directpaydaylenders.bid]payday advance loans[/url]
— JamesNip Nov 8, 07:40 PM #payday advance loan <a href=“https://paydayadvanceloan.trade”>advance cash payday loan</a> payday advance loan [url=https://paydayadvanceloan.trade]online payday advance loan[/url] easy fast payday loans <a href=“https://easyfastpaydayloans.loan”>cash til payday loan</a> easy approval payday loans [url=https://easyfastpaydayloans.loan]no credit check loan[/url] loans online bad credit <a href=“https://onlinepaydayloans.bid”>fast online payday loans</a> bad credit loans direct lenders [url=https://onlinepaydayloans.bid]no credit check lenders only[/url] no credit check payday loans instant approval <a href=“https://directloanlenders.bid”>instant loans online</a> direct payday loan lenders [url=https://directloanlenders.bid]direct loan lenders[/url]
— JamesNip Nov 8, 07:42 PM #online payday loans for bad credit <a href=https://loansforbadcredit.us.com/>online payday loans for bad credit</a> faxless payday loan same day [url=https://loansforbadcredit.us.com/]online payday loans for bad credit[/url]
— JoeNip Nov 8, 09:26 PM #writing a essay for college <a href=https://collegeessay.us.com>help me write a essay</a> essay introduction help [url=https://collegeessay.us.com]college essay writer[/url]
— Pay For Essay Online Nov 8, 09:55 PM #buy college essays <a href=https://collegeessay.us.com>college essay service</a> college essay prompts [url=https://collegeessay.us.com]college essay prompts[/url]
— White Paper Writer Nov 9, 12:27 AM #buy essay <a href=https://essayonline.us.com>essay writer online</a> homework online [url=https://essayonline.us.com]buy essay online[/url]
— JoeNip Nov 9, 12:37 AM #personal loans bad credit <a href=https://badcreditpersonalloans.us.com>personal loans for bad credit</a> personal loans with bad credit [url=https://badcreditpersonalloans.us.com]personal loans bad credit ok[/url]
— JoeNip Nov 9, 01:24 AM #webcam sex <a href=https://webcamsex.us.com>live chat</a> adult webcams [url=https://webcamsex.us.com]free sex webcam[/url]
— JoeNip Nov 9, 02:50 AM #buy essay <a href=https://buyessay.us.com>order essay online</a> buy an essay [url=https://buyessay.us.com]buy essays[/url]
— My Paper Writer Nov 9, 03:37 AM #sex webcam <a href=https://webcamsex.us.com>free sex web chat</a> sex webcam [url=https://webcamsex.us.com]asian sex show[/url]
— JoeNip Nov 9, 03:49 AM #writing essays for college <a href=https://collegeessay.us.com>college essay help</a> college essay [url=https://collegeessay.us.com]help on essay writing[/url]
— Write Essay Nov 9, 04:00 AM #buy essay <a href=https://buyessay.us.com>buy essay</a> buy essay [url=https://buyessay.us.com]buy essays[/url]
— Third Grade Homework Nov 9, 08:40 AM #buy essays online <a href=https://buyessays.us.com>buy essay online</a> writing essays for college [url=https://buyessays.us.com]buy essay[/url]
— Homework Assignments Nov 9, 09:05 AM #quick payday loans with bad credit <a href=https://quickloans.us.com>fast cash loans with monthly payments</a> quick loans [url=https://quickloans.us.com]quick loans[/url]
— Loan Cash Nov 9, 10:05 AM #loan stores <a href=https://shorttermloans.us.com>loans short term unsecured</a> private loan [url=https://shorttermloans.us.com]short term loans online[/url]
— Speedy Cash Nov 9, 10:21 AM #paper writing service <a href=“https://paperwritingservice.trade”>paper writing service</a> paper writing service [url=https://paperwritingservice.trade]homework help social studies[/url] easiest payday loan to get <a href=“https://easiestpaydayloantoget.loan”>payday advance loan</a> payday bad credit loan [url=https://easiestpaydayloantoget.loan]fastest payday loan[/url] doing my homework <a href=“https://writingapaper.webcam”>writing my paper</a> outlining research paper [url=https://writingapaper.webcam]paper writing service[/url] direct lenders payday loans <a href=“https://directlendersonlineloans.science”>direct lenders online loans</a> direct lenders online loans [url=https://directlendersonlineloans.science]speedy cash payday loans online[/url] webcam asian <a href=“https://freelivesexchat.webcam”>free live sex chat</a> live show [url=https://freelivesexchat.webcam]live sex chat[/url] online installment loans <a href=“https://bestpaydayloan.science”>best payday loan</a> cash loans [url=https://bestpaydayloan.science]best payday loan[/url]
— JamesNip Nov 9, 11:13 AM #quick cash loans bad credit <a href=https://quickloans.us.com>quick loans</a> quick cash loans reviews [url=https://quickloans.us.com]quick loans[/url]
— A Payday Loan Nov 9, 02:02 PM #buy essay without plagiarism <a href=https://buyessay.us.com>buy an essay</a> buy essay [url=https://buyessay.us.com]buy essay[/url]
— Buy Essay Papers Nov 9, 02:07 PM #essay writing services review <a href=https://essaywritingservices.us.com>college essay writing services</a> spanish word for homework [url=https://essaywritingservices.us.com]essaywritingservices.us.com[/url]
— JamesNip Nov 9, 03:09 PM #short term loans colorado <a href=https://shorttermloans.us.com>loans with bad credit and monthly payments</a> loans short term unsecured [url=https://shorttermloans.us.com]short loans[/url]
— A Payday Loan Nov 9, 03:44 PM #next day loans bad credit <a href=https://badcreditpersonalloans.us.com>payday loans bad credit online</a> personal loans for bad credit [url=https://badcreditpersonalloans.us.com]personal loans bad credit reviews[/url]
— Payday Loans Nov 9, 05:41 PM #short term payday loans <a href=https://shorttermloans.us.com>unsecured loan</a> best bad credit loans [url=https://shorttermloans.us.com]short term cash loans[/url]
— Payday Nov 9, 05:42 PM #buy pre written essays <a href=https://buyessays.us.com>writing a personal essay for college</a> help me write my college essay [url=https://buyessays.us.com]write college essay[/url]
— JamesNip Nov 9, 05:52 PM #buy essay <a href=“https://buyessay.stream”>buy essay</a> buy an essay [url=https://buyessay.stream]buy an essay[/url] loan cash <a href=“https://directpaydaylenders.loan”>payday loan direct lenders</a> payday loan no credit check [url=https://directpaydaylenders.loan]direct lenders payday loans[/url] paper writing service <a href=“https://bestessaywritingservice.stream”>chemical engineering assignment help</a> dissertation writing [url=https://bestessaywritingservice.stream]paper writing[/url]
— JamesNip Nov 9, 05:57 PM #best loans <a href=https://shorttermloans.us.com>short term loan no credit check</a> short term payday [url=https://shorttermloans.us.com]bad credit personal loans guaranteed approval[/url]
— Online Loans Nov 9, 07:36 PM #payday loans for bad credit <a href=https://loansforbadcredit.us.com/>payday loans for bad credit</a> as explained here [url=https://loansforbadcredit.us.com/]bad credit payday loans[/url]
— JamesNip Nov 9, 09:56 PM #short term loans <a href=https://shorttermloans.us.com>short term loans</a> best short term loans [url=https://shorttermloans.us.com]100 day loans[/url]
— Payday Loans Online Nov 9, 10:21 PM #bad credit cash loan <a href=https://badcreditpersonalloans.us.com>bad credit personal loans utah</a> ge personal loan [url=https://badcreditpersonalloans.us.com]payday loans bad credit approval[/url]
— Loans Online Nov 10, 12:06 AM #custom essay <a href=https://writemyessay.us.com>write essay</a> write my essay [url=https://writemyessay.us.com]custom essay writing[/url]
— JamesNip Nov 10, 12:10 AM #personal loans bad credit texas <a href=https://badcreditpersonalloans.us.com>bad credit personal loans</a> www bad credit loans [url=https://badcreditpersonalloans.us.com]personal loans for bad credit[/url]
— Getting A Loan Nov 10, 12:44 AM #direct lenders <a href=“https://paydayloanlenders.science”>payday loan lenders</a> payday loan lenders [url=https://paydayloanlenders.science]bad credit loans direct lenders[/url] direct payday lenders <a href=“https://paydaylendersdirect.cricket”>loans</a> payday lenders direct [url=https://paydaylendersdirect.cricket]best payday loans online[/url] direct lenders online loans <a href=“https://directlendersonlineloans.bid”>direct lenders payday loans</a> direct lenders of loans [url=https://directlendersonlineloans.bid]loans online bad credit[/url] easy payday loans online <a href=“https://easypaydayloansonline.webcam”>easy payday loans online</a> easy payday loans online [url=https://easypaydayloansonline.webcam]advance payday loans online[/url] payday loan direct lenders <a href=“https://paydayloandirectlenders.cricket”>direct lenders payday loans</a> fast cash loans with no credit check [url=https://paydayloandirectlenders.cricket]direct payday lenders[/url] writing a paper <a href=“https://paperwriting.stream”>paper writing</a> paper writing [url=https://paperwriting.stream]paper writing[/url] online installment loans <a href=“https://smallonlinepaydayloans.trade”>small online payday loans</a> small online payday loans [url=https://smallonlinepaydayloans.trade]payday loans online[/url] payday loan near me <a href=“https://directlendersonlineloans.science”>direct lenders online loans</a> direct online lenders [url=https://directlendersonlineloans.science]payday loans direct lenders[/url] payday loans online <a href=“https://onlinepaydayloans.bid”>cash advance no credit check</a> online payday loans [url=https://onlinepaydayloans.bid]best payday loans online[/url]
— JamesNip Nov 10, 01:02 AM #payday loan las vegas nv <a href=https://shorttermloans.us.com>short term loans</a> short term loan no credit check [url=https://shorttermloans.us.com]payday loans in las vegas[/url]
— Loans Nov 10, 01:13 AM #payday loans online bad credit <a href=https://paydayloans.us.org/>Full Article</a> payday loans online get a fast easy [url=https://paydayloans.us.org/]online payday loans[/url]
— JamesNip Nov 10, 01:54 AM #payday loan direct lenders <a href=“https://directpaydaylenders.bid”>direct payday lenders</a> direct payday lenders [url=https://directpaydaylenders.bid]check into cash[/url] online payday loans <a href=“https://onlinepaydayloans.science”>online payday loans</a> online payday loans [url=https://onlinepaydayloans.science]online payday advance loan[/url] paper writing <a href=“https://writingapaper.webcam”>writing my paper</a> paid to do homework [url=https://writingapaper.webcam]writing a paper[/url] write essays <a href=“https://collegeessaywriter.trade”>college essay prompts</a> college essay prompts [url=https://collegeessaywriter.trade]college essay writer[/url] buy essay online <a href=“https://buyessay.stream”>i need help with my essay</a> buy essay [url=https://buyessay.stream]buy essay[/url] write my paper for me <a href=“https://writemypaperforme.bid”>write my paper for me</a> i need help writing a essay [url=https://writemypaperforme.bid]do my paper[/url] online payday loans for bad credit <a href=“https://samedaypaydayloansonline.trade”>cash loan lenders</a> guaranteed payday loans [url=https://samedaypaydayloansonline.trade]quick loans[/url] how to write a good college essay <a href=“https://collegeapplicationessays.science”>jishka homework help</a> homework help ks3 [url=https://collegeapplicationessays.science]college essay prompts[/url] free sex video chat <a href=“https://freeadultvideochat.stream”>free adult video chat</a> free adult video chat [url=https://freeadultvideochat.stream]free adult cam chat[/url]
— JamesNip Nov 10, 02:32 AM #quick loans <a href=https://quickloans.us.com>quick loans online</a> fast loans [url=https://quickloans.us.com]easy to get loans with bad credit[/url]
— Online Loans Nov 10, 02:50 AM #personal loans bad credit <a href=https://badcreditpersonalloans.us.com>payday loans bad credit</a> bad credit loan direct lender [url=https://badcreditpersonalloans.us.com]no credit personal loans[/url]
— Payday Nov 10, 05:32 AM #instant approval bad credit loans <a href=https://badcreditpersonalloans.us.com>payday loans for bad credit near me</a> easy personal loan [url=https://badcreditpersonalloans.us.com]payday loans for bad credit[/url]
— Loans Nov 10, 05:49 AM #short term loans online <a href=https://shorttermloans.us.com>payday loans online</a> loans no credit checks [url=https://shorttermloans.us.com]best short term loans bad credit[/url]
— Paydayloan Nov 10, 06:29 AM #online loans <a href=https://onlineloans.us.com/>more helpful hints</a> Additional Info [url=https://onlineloans.us.com/]payday loans online[/url]
— JamesNip Nov 10, 07:07 AM #bad credit payday loans <a href=https://badcreditpersonalloans.us.com>best personal loans for bad credit reviews</a> payday loans for bad credit guaranteed [url=https://badcreditpersonalloans.us.com]bad credit personal loans utah[/url]
— Cash Advance Nov 10, 08:04 AM #personal loans bad credit texas <a href=https://badcreditpersonalloans.us.com>personal loans bad credit guaranteed</a> payday loans for bad credit [url=https://badcreditpersonalloans.us.com]bad credit personal loans reviews[/url]
— JamesNip Nov 10, 08:23 AM #personal loans bad credit <a href=https://badcreditpersonalloans.us.com>bad credit personal loans nyc</a> personal loans bad credit reviews [url=https://badcreditpersonalloans.us.com]5000 personal loan[/url]
— Bad Credit Nov 10, 10:22 AM #college essay help <a href=https://collegeessay.us.com>college essay review services</a> help write an essay [url=https://collegeessay.us.com]college essay prompts[/url]
— JamesNip Nov 10, 12:18 PM #best essay writing services <a href=https://essaywritingservices.us.com>admission essay writing service</a> professional essay writing services [url=https://essaywritingservices.us.com]EssayWritingServices.us.com[/url]
— JoeNip Nov 10, 12:42 PM #bad credit personal loans <a href=https://badcreditpersonalloans.us.com>bad credit personal loans online</a> need a personal loan with bad credit [url=https://badcreditpersonalloans.us.com]personal loans bad credit az[/url]
— Payday Loans Online Nov 10, 01:26 PM #help my essay <a href=https://writemyessay.us.com>my thesis</a> write essay online [url=https://writemyessay.us.com]write my essay for me[/url]
— JamesNip Nov 10, 01:38 PM #webcam sex <a href=https://webcamsex.us.com>sex webcam</a> adult cam [url=https://webcamsex.us.com]sex webcam[/url]
— JamesNip Nov 10, 02:42 PM #quicken loans <a href=https://quickloans.us.com>quick loans online</a> loans quick cash [url=https://quickloans.us.com]quick loans online[/url]
— Payday Express Nov 10, 03:39 PM #short term cash loans <a href=https://shorttermloans.us.com>short term instant loans</a> short term loans [url=https://shorttermloans.us.com]short term payday loans[/url]
— Online Payday Loans Nov 10, 04:20 PM #buy online essays <a href=https://buyessay.us.com>buy essay online</a> buy essay online [url=https://buyessay.us.com]buy essay[/url]
— JoeNip Nov 10, 05:39 PM #buy essay online safe <a href=https://essayonline.us.com>buy essay online</a> online essay writing service [url=https://essayonline.us.com]online essay writing[/url]
— JoeNip Nov 10, 06:00 PM #[b]Перейдите ниже по ссылке, чтобы получить кредит:[/b]
http://kredit.bestsky.info/
—————————————————-
Номер деньги в займ на дом.
От руб Займы с доставкой на дом позволяют решать многие жизненные ситуации Случается так, что деньги не просто нужны, а очень нужны и причем последнее обстоятельство встречается со значительным перевесом в количестве А заемщики в возрасте от до лет обязательно должны предоставить номер телефона Отдельного внимания заслуживает пролонгация займа в Деньги на Дом Многие услуги в современной экономике переведены в электронный формат Компания Деньги на дом предлагает частным лицам взять микрозайм, Мы ценим ваше время и готовы предложить вам доставку денег на дом или на работу Вам нужно заполнить заявку и после одобрения мы доставим Ищу срочную помощь в подборе займа на потребительские нужды Срочно нужна помощь в получении денег в интернете Теперь оформить срочный заем денег по паспорту стало еще проще Отправьте заявку прямо с нашего сайта, а после подпишите договор и заберите А заемщики в возрасте от до лет обязательно должны предоставить номер телефона Отдельного внимания заслуживает пролонгация займа в Деньги на Дом Вы можете оформить и даже получить кредит, не вставая со стула и не выходя из собственного дома Вы даете займы или быстрые деньги в Астрахани по Восточный экспресс банк пермь кредиты Деньги в долг без проверки кредитной истории от компании Деньги на дом Компания Деньги на дом принимает решение о выдаче займа по вашей от -пз-и, номер свидетельства , Понятная схема погашения займа, отсутствие залога и поручителей Удобно Быстро за минутУдобно подай заявку из домаЗайм без залогов и.
Займ Деньги на дом – Займы Онлайн Займы на карту от компании Деньги на дом | Наш номер телефона: 8- Срочные займы на карту онлайн без отказа, занять деньги в долг Деньги в долг в Астрахани – быстрые деньги, займы онлайн Срочные займы и микрозаймы | Взять деньги в долг на дом срочно в.
Возможность продления сроков займа Быстрый перевод денег Номер телефона и паспорт гражданина РФ Заявку рассматривает робот за только паспорт Рассмотрение заявки за один день Выдача денег у Вас дома Раньше, чтобы получить деньги в долг срочно, необходимо было заполнять уйму документов! Теперь оформить кредит можно, даже не выходя из дому Возможность продления сроков займа Быстрый перевод денег Номер телефона и паспорт гражданина РФ Заявку рассматривает робот за только паспорт Рассмотрение заявки за один день Выдача денег у Вас дома Теперь оформить срочный заем денег по паспорту стало еще проще Отправьте заявку прямо с нашего сайта, а после подпишите договор и заберите Главная Микрозаймы Физическим лицам Доставка денег на дом и в И чем более длительный срок займа Вы указываете в заявке, тем ниже реестр микрофинансовых организаций Регистрационный номер записи Теперь оформить срочный заем денег по паспорту стало еще проще Отправьте заявку прямо с нашего сайта, а после подпишите договор и заберите Теперь оформить срочный заем денег по паспорту стало еще проще Отправьте заявку прямо с нашего сайта, а после подпишите договор и заберите С Росмикрокредит можно легко получить деньги на карту, не совершая никаких усилий а Вы получите деньги в течение минут, не выходя из дома! регистрационный номер записи в государственном Получите деньги не выходя из дома Займ Моментальный регистрационный номер записи в государственном реестре Возможность продления сроков займа Быстрый перевод денег Номер телефона и паспорт гражданина РФ Заявку рассматривает робот за только паспорт Рассмотрение заявки за один день Выдача денег у Вас дома.
Ищу срочную помощь в подборе займа на потребительские нужды Срочно нужна помощь в получении денег в интернете Деньги в долг без проверки кредитной истории от компании Деньги на дом Компания Деньги на дом принимает решение о выдаче займа по вашей от -пз-и, номер свидетельства , Возможность продления сроков займа Быстрый перевод денег Номер телефона и паспорт гражданина РФ Заявку рассматривает робот за только паспорт Рассмотрение заявки за один день Выдача денег у Вас дома Бесплатная доставка денег на дом Погашение займа по договору указать номер договора и ФИО клиента Главная Микрозаймы Физическим лицам Доставка денег на дом и в И чем более длительный срок займа Вы указываете в заявке, тем ниже реестр микрофинансовых организаций Регистрационный номер записи Выгодные условия на получение срочных займов в Москве от компании Домашние Деньги Богатый опыт работы, индивидуальный подход к каждому Понятная схема погашения займа, отсутствие залога и поручителей Удобно Быстро за минутУдобно подай заявку из домаЗайм без залогов и Возможность оформить повторный займ даже в том случае, если вы еще не расплатились по предыдущему Деньги в долг честные условия и быстрое оформление Деньги на дом это партнер Как активировать карту кредит урал банк Самый простой способ получить деньги не выходя из дому займ на рублей, помогите чем сможете вот номер карты Понятная схема погашения займа, отсутствие залога и поручителей Удобно Быстро за минутУдобно подай заявку из домаЗайм без залогов и.
Взял займ в компании Домашние деньги на ремонт автомобиля Остался доволен доставка карты на дом Вы уже брали у нас займ? получить деньги под залог в ломбарде Максимум прибыли с партнерской программой ! Регистрируйся сейчас! Минимальные вложения! Окупаемость за месяц! Доход от руб в месяц! Моментальный онлайн займ за минут Автоматическое перечисление на карту Деньги за час Серия и номер паспорта Я уже брал займ в компании Оформление заявки за минут Без залога под низкие проценты! Заем денег Сегодня скидка на первый займ Получить сейчас! Взял займ в компании Домашние деньги на ремонт автомобиля Остался доволен Стандартный займ при этом наши отделы расположены в легкодоступных Получить деньги.
Возможность оформить повторный займ даже в том случае, если вы еще не расплатились по предыдущему Деньги в долг честные условия и быстрое оформление Деньги на дом это партнер Деньги на дом срочно это оформление быстрого займа за один день Чтобы получить займ в компании Деньги на дом, необходимо выполнить несколько простых действий позвонить в Центр обслуживания клиентов по номеру Займ на дом возможен без залога, справок о доходах и поручителей, нужен только паспорт Фирма Деньги на дом предлагает оформить займ за один день на территории клиента со следующими условиями Получить деньги в займ на дом, дистанционно, можно двумя способами заказать наличные на дом или получить их на карту, электронный кошелек, заполнив электронную заявку Займ на дом возможен без залога, справок о доходах и поручителей, нужен только паспорт Фирма Деньги на дом предлагает оформить займ за один день на территории клиента со следующими условиями Деньги в займ с доставкой на дом, как вы убедились, взять просто, но и выплачивать задолженность по такому продукту совсем несложно Со счета номера мобильного телефона Разумеется, несмотря на возможность доставки средств менеджером Займ на дом возможен без залога, справок о доходах и поручителей, нужен только паспорт Фирма Деньги на дом предлагает оформить займ за один день на территории клиента со следующими условиями Справочник Кредита Кредит через интернет Кредиты наличными Компания Деньги на дом срочные займы до рублей онлайн заявка , отзывы , телефон Где взять деньги в долг в бобруйске Получить деньги в займ на дом, дистанционно, можно двумя способами заказать наличные на дом или получить их на карту, электронный кошелек, заполнив электронную заявку Возможность оформить повторный займ даже в том случае, если вы еще не расплатились по предыдущему Деньги в долг честные условия и быстрое оформление Деньги на дом это партнер.
[b]Перейдите ниже по ссылке, чтобы получить кредит:[/b]
http://kredit.bestsky.info/
— SusanAbody Nov 10, 06:32 PM #payday loans online no credit check <a href=https://paydayloans.us.org/>payday loans online</a> payday loans online [url=https://paydayloans.us.org/]payday loans[/url]
— JoeNip Nov 10, 09:03 PM #writemyessay.us.com <a href=https://essayonline.us.com>buy essay papers online</a> Read More Here [url=https://essayonline.us.com]buy essays online[/url]
— JoeNip Nov 10, 09:20 PM #custom essay writing <a href=https://writemyessay.us.com>WRITEMYESSAY.US.COM</a> write my thesis [url=https://writemyessay.us.com]buy an essay[/url]
— JoeNip Nov 11, 01:20 AM #https://loansforbadcredit.us.com/ <a href=https://loansforbadcredit.us.com/>https://loansforbadcredit.us.com/</a> loans for bad credit [url=https://loansforbadcredit.us.com/]loans for bad credit[/url]
— JoeNip Nov 11, 05:25 AM #personal loans poor credit <a href=https://badcreditpersonalloans.us.com>bad credit personal loans for 3000</a> secured personal loan bad credit [url=https://badcreditpersonalloans.us.com]bad credit personal loans[/url]
— Best Online Loans Nov 11, 06:33 AM #buy essay online <a href=https://essayonline.us.com>write essay online</a> online essay help [url=https://essayonline.us.com]buy essay online[/url]
— JoeNip Nov 11, 06:55 AM #quick loans in pa <a href=https://quickloans.us.com>quick cash loans</a> fast loans [url=https://quickloans.us.com]quick loans rates[/url]
— Best Payday Loan Nov 11, 09:37 AM #quick loans <a href=https://quickloans.us.com>fast loans online</a> quick easy payday loans [url=https://quickloans.us.com]quick personal loans same day[/url]
— Loan Nov 11, 10:45 AM #essay writing service <a href=https://essaywritingservices.us.com>Look At This</a> Additional Info [url=https://essaywritingservices.us.com]assignment helps[/url]
— JoeNip Nov 11, 11:46 AM #e loans <a href=https://shorttermloans.us.com>quickloans</a> short term loans [url=https://shorttermloans.us.com]unsecured loans bad credit[/url]
— JoeNip Nov 11, 12:37 PM #microloan <a href=https://shorttermloans.us.com>short term loans online</a> personal loans rates [url=https://shorttermloans.us.com]90 day loans[/url]
— Quick Loans Nov 11, 12:47 PM #loans quick <a href=https://quickloans.us.com>quick personal loans</a> fast loans lenders [url=https://quickloans.us.com]bad credit quick loans[/url]
— Speedycash Nov 11, 02:43 PM #personal loans bad credit <a href=https://badcreditpersonalloans.us.com>personal loans bad credit</a> payday loans bad credit [url=https://badcreditpersonalloans.us.com]personal loans bad credit[/url]
— Loans For Bad Credit Nov 11, 07:37 PM #personal loans bad credit texas <a href=https://badcreditpersonalloans.us.com>personal loans for bad credit in ohio</a> personal loans columbus ohio [url=https://badcreditpersonalloans.us.com]online personal loan[/url]
— Loan Nov 11, 08:07 PM #short term loans no credit check <a href=https://shorttermloans.us.com>short term loans</a> short term loans [url=https://shorttermloans.us.com]applying for a loan[/url]
— Online Lenders Nov 11, 11:20 PM #quicken loans <a href=https://quickloans.us.com>quick loans online</a> quick payday loans with bad credit [url=https://quickloans.us.com]fast cash loans today[/url]
— Loan Nov 12, 01:23 AM #personal loan <a href=https://shorttermloans.us.com>short term loans</a> short term loans online [url=https://shorttermloans.us.com]payday loans houston[/url]
— Getting A Loan Nov 12, 09:10 AM #bad credit payday loans <a href=https://badcreditpersonalloans.us.com>bad credit personal loans utah</a> payday loans for bad credit [url=https://badcreditpersonalloans.us.com]payday loans for bad credit[/url]
— Payday Loans Nov 12, 12:14 PM #easy loan site <a href=https://shorttermloans.us.com>interest free loan</a> short term loans online [url=https://shorttermloans.us.com]personal loans unsecured[/url]
— Online Payday Loan Nov 12, 01:23 PM #loans for really bad credit <a href=https://shorttermloans.us.com>short term loans</a> short term quick loans [url=https://shorttermloans.us.com]short term loans online[/url]
— Loans Nov 12, 03:56 PM #online loans with monthly payments <a href=https://shorttermloans.us.com>short term cash loans</a> short term loans no credit checks [url=https://shorttermloans.us.com]where can i get a personal loan with bad credit[/url]
— Loan Cash Nov 12, 07:44 PM #И что бы мы делали без вашей отличной фразы
—-
— cospcoltix Nov 12, 08:20 PM #Какая нужная фраза… супер, замечательная идея fifa 15 скачать торрент от механиков, скачать fifa 15 обновленную а также [url=http://15fifa.ru/]fifarus[/url] fifa 15 скачать торрент pc от механиков
quick loans online <a href=https://quickloans.us.com>loans quick and easy</a> payday loans quickly [url=https://quickloans.us.com]fast loans lenders[/url]
— Loan Nov 12, 08:24 PM #direct lenders payday loans <a href=https://onlineloans.us.com/>payday loans online</a> payday loan online [url=https://onlineloans.us.com/]payday loans online[/url]
— JamesNip Nov 12, 11:54 PM #short term payday loans <a href=https://shorttermloans.us.com>short term loans</a> short term payday loans [url=https://shorttermloans.us.com]bad credit cash loans[/url]
— Direct Lender Loans Nov 13, 12:10 AM #essaywritingservices.us.com <a href=https://essaywritingservices.us.com>buy essay cheap</a> essays writing services [url=https://essaywritingservices.us.com]website here[/url]
— JamesNip Nov 13, 12:55 AM #personal loans bad credit <a href=https://badcreditpersonalloans.us.com>personal loans bad credit</a> small cash loans bad credit [url=https://badcreditpersonalloans.us.com]how to apply for a personal loan[/url]
— Loan Nov 13, 03:11 AM #i need a personal loan now with bad credit <a href=https://badcreditpersonalloans.us.com>payday loans for bad credit</a> personal loans bad credit ok [url=https://badcreditpersonalloans.us.com]personal loans bad credit guaranteed[/url]
— Pay Day Loans Nov 13, 03:25 AM #buy essay <a href=https://buyessays.us.com>online essay</a> buy essay online [url=https://buyessays.us.com]buy an essay for college[/url]
— JamesNip Nov 13, 05:24 AM #bad credit personal loans guaranteed <a href=https://badcreditpersonalloans.us.com>bad credit personal loans online</a> bad credit personal loans [url=https://badcreditpersonalloans.us.com]bad credit personal loans[/url]
— Online Payday Loan Nov 13, 06:32 AM #fast short term loans <a href=https://shorttermloans.us.com>short term quick loans</a> short term payday loans [url=https://shorttermloans.us.com]direct lender payday loans online[/url]
— Payday Loans Online Nov 13, 07:05 AM #HTTP://WRITEMYESSAY.US.COM <a href=https://writemyessay.us.com>my homework help</a> pay to write essays [url=https://writemyessay.us.com]my homework help[/url]
— JamesNip Nov 13, 09:27 AM #custom essay <a href=“https://customessay.trade”>argumentative essay</a> primary help homework [url=https://customessay.trade]essay writing[/url] direct loan lenders <a href=“https://directloanlenders.trade”>direct online lenders</a> payday loan direct lenders [url=https://directloanlenders.trade]direct payday loan lenders[/url] free sex web cams <a href=“https://lesbianshow.bid”>cfnm show</a> lesbian show [url=https://lesbianshow.bid]asian sex show[/url] payday loans online <a href=“https://onlinepaydayloans.bid”>fast online payday loans</a> online payday loans [url=https://onlinepaydayloans.bid]fast online payday loans[/url] direct payday loan lenders <a href=“https://directpaydaylenders.loan”>direct payday lenders</a> direct payday lenders [url=https://directpaydaylenders.loan]direct payday lenders bad credit[/url] payday loan direct lenders <a href=“https://onlinepaydayloanlenders.bid”>instant loans online</a> online payday loan lenders [url=https://onlinepaydayloanlenders.bid]online payday loan lenders[/url]
— JamesNip Nov 13, 01:36 PM #need help with essay <a href=https://collegeessay.us.com>college essay online</a> mba essay help [url=https://collegeessay.us.com]buy college essays online[/url]
— JamesNip Nov 13, 01:53 PM #webcam sex <a href=https://webcamsex.us.com>sex webcam</a> sex webcam [url=https://webcamsex.us.com]webcam sex chat[/url]
— JamesNip Nov 13, 02:00 PM #personal loans bad credit az <a href=https://badcreditpersonalloans.us.com>where to get a personal loan</a> direct lender payday loans for bad credit [url=https://badcreditpersonalloans.us.com]guaranteed personal loans for bad credit[/url]
— JamesNip Nov 13, 06:40 PM #write an essay <a href=https://writemyessay.us.com>writemyessay.us.com</a> write [url=https://writemyessay.us.com]write my essay[/url]
— JamesNip Nov 13, 07:34 PM #same day loans <a href=“https://onlinepaydayloanlenders.bid”>direct lender loans</a> online payday loan lenders [url=https://onlinepaydayloanlenders.bid]direct payday loan lenders[/url] application essay <a href=“https://applicationessay.bid”>law homework help</a> buy essay [url=https://applicationessay.bid]term paper[/url] research essay <a href=“https://researchpaperproposal.stream”>research essay</a> research essay [url=https://researchpaperproposal.stream]primary homework help victorians[/url] direct lender payday loans <a href=“https://paydayloansonlinedirectlender.stream”>payday loans direct lender</a> payday loans online direct lender [url=https://paydayloansonlinedirectlender.stream]direct payday loans[/url] pay day loans <a href=“https://paydaylendersdirect.trade”>direct payday lenders</a> direct payday lenders [url=https://paydaylendersdirect.trade]payday loan online[/url] direct loan lenders <a href=“https://directloanlenders.bid”>direct payday loan lenders</a> payday loan lenders [url=https://directloanlenders.bid]direct lenders payday loans[/url] writing a paper <a href=“https://writingapaper.webcam”>paper writing service</a> paper writing [url=https://writingapaper.webcam]writing a paper[/url] best college essay <a href=“https://writemypaperforme.bid”>do my assignment</a> do my homework for me [url=https://writemypaperforme.bid]write my paper for me[/url] payday loan direct lenders <a href=“https://paydayloandirectlenders.cricket”>installment loans no credit check</a> payday lenders direct [url=https://paydayloandirectlenders.cricket]payday loan direct lenders[/url]
— JamesNip Nov 13, 07:51 PM #payday loans direct lenders <a href=https://paydayloans.us.org/>cash advance</a> payday loans online [url=https://paydayloans.us.org/]online payday loans[/url]
— JamesNip Nov 13, 10:53 PM #direct payday lenders <a href=“https://directpaydaylenders.loan”>direct payday loans</a> payday loan direct lenders [url=https://directpaydaylenders.loan]direct loan lenders[/url] bad credit loans direct lenders <a href=“https://paydaylendersdirect.cricket”>no credit loans guaranteed approval</a> direct payday lenders [url=https://paydaylendersdirect.cricket]online lenders[/url] 15 minute loans direct lenders <a href=“https://samedaypaydayloansonline.trade”>best online payday loans</a> same day payday loans online [url=https://samedaypaydayloansonline.trade]same day payday loans online[/url] essay help <a href=“https://applicationessay.bid”>application essay</a> i need help with my geometry homework [url=https://applicationessay.bid]do my college algebra[/url] college essay prompts <a href=“https://collegeessaywriter.trade”>essay corrector</a> college essay writer [url=https://collegeessaywriter.trade]college essay prompts[/url] free live sex chat <a href=“https://freelivesexchat.webcam”>free live sex chat</a> live sex chat [url=https://freelivesexchat.webcam]free live sex chat[/url] easiest payday loan to get <a href=“https://easiestpaydayloantoget.loan”>fastest payday loan</a> easiest payday loan to get [url=https://easiestpaydayloantoget.loan]payday loan direct lenders[/url] direct payday lenders <a href=“https://directpaydaylenders.bid”>direct payday lenders online</a> direct payday lenders [url=https://directpaydaylenders.bid]direct payday lenders[/url] online payday loans <a href=“https://onlinepaydayloans.science”>advance payday loans online</a> no credit check lenders only [url=https://onlinepaydayloans.science]payday lenders direct[/url]
— JamesNip Nov 13, 11:41 PM #buy an essay paper <a href=https://buyessay.us.com>buy essay</a> help me with my essay [url=https://buyessay.us.com]buy essay[/url]
— JamesNip Nov 14, 12:30 AM #payday loans online <a href=https://paydayloans.us.org/>trusted payday loans online</a> personal loans [url=https://paydayloans.us.org/]best payday loans online[/url]
— JamesNip Nov 14, 02:57 PM #bad credit personal loans online <a href=https://badcreditpersonalloans.us.com>payday loans bad credit approval</a> quick loan bad credit same day [url=https://badcreditpersonalloans.us.com]payday loans bad credit online[/url]
— JamesNip Nov 14, 03:46 PM #essay writing services australia <a href=https://essaywritingservices.us.com>cheap custom essay writing service</a> essay writing service [url=https://essaywritingservices.us.com]essay writing service canada[/url]
— JamesNip Nov 14, 07:32 PM #online essay writer <a href=https://essayonline.us.com>pay for essay online</a> essay online [url=https://essayonline.us.com]essay online[/url]
— JamesNip Nov 14, 08:33 PM #kindergarten homework packet <a href=https://essaywritingservices.us.com>essay writing service</a> essay writing service [url=https://essaywritingservices.us.com]should homework be abolished[/url]
— JamesNip Nov 15, 12:45 AM #essay help <a href=https://essayonline.us.com>buy essay online</a> buy essay [url=https://essayonline.us.com]online essay writing[/url]
— JamesNip Nov 15, 03:42 AM #nude chats <a href=https://webcamsex.us.com>adult webcam</a> webcam sex [url=https://webcamsex.us.com]chat sex[/url]
— JamesNip Nov 15, 06:15 AM #buy essays <a href=https://buyessays.us.com>buy essay without plagiarism</a> order essay now [url=https://buyessays.us.com]buy essays online[/url]
— JamesNip Nov 15, 09:30 AM #bad credit personal loans utah <a href=https://badcreditpersonalloans.us.com>personal loans bad credit</a> bad credit personal loans online [url=https://badcreditpersonalloans.us.com]best place to get a personal loan with bad credit[/url]
— JamesNip Nov 15, 10:21 AM #write my essay <a href=https://writemyessay.us.com>custom essay writing</a> write my essay [url=https://writemyessay.us.com]essays[/url]
— JamesNip Nov 15, 10:49 AM #Regards, Terrific stuff.
— AnthonyWab Nov 15, 01:53 PM #canadianpharmaciesbnt.com
buy prescription drugs canada
college essay <a href=https://collegeessay.us.com>buy college essays online</a> help writing essays for college [url=https://collegeessay.us.com]college essay helper[/url]
— My Thesis Nov 15, 11:36 PM #how to writing an essay <a href=https://essaywritingservices.us.com>writers essay</a> essays writing services [url=https://essaywritingservices.us.com]essay writing service[/url]
— JoeNip Nov 16, 12:58 AM #quick cash loans reviews <a href=https://quickloans.us.com>where can i get a loan fast</a> quicken loans rates [url=https://quickloans.us.com]fast loans lenders[/url]
— JoeNip Nov 16, 07:24 AM #buy essays online <a href=https://buyessay.us.com>buy online essays</a> college essays help [url=https://buyessay.us.com]buy essay cheap[/url]
— My Paper Writer Nov 16, 07:59 AM #easy money cash loans <a href=https://quickloans.us.com>quick payday loans with bad credit</a> quick cash loans online [url=https://quickloans.us.com]quick personal loans[/url]
— Cash Advance Nov 16, 08:48 AM #short term loans <a href=https://shorttermloans.us.com>short term fast cash loans</a> quick personal loans [url=https://shorttermloans.us.com]best short term loans[/url]
— Best Payday Loan Nov 16, 08:56 AM #get money online fast <a href=https://quickloans.us.com>quick loans</a> loans quick cash [url=https://quickloans.us.com]fast loans in 1 hour[/url]
— Pay Day Loans Nov 16, 09:29 AM #college essay help <a href=https://collegeessay.us.com>pay for college essays</a> help write essay [url=https://collegeessay.us.com]help writing college essays[/url]
— Dog Ate Homework Nov 16, 09:31 AM #online webcam sex <a href=https://webcamsex.us.com>erotic chat</a> live cams [url=https://webcamsex.us.com]webcam sex[/url]
— JoeNip Nov 16, 11:05 AM #quick loans no credit check <a href=https://quickloans.us.com>quick loans online</a> fast loans [url=https://quickloans.us.com]fast online payday loan[/url]
— Fastest Payday Loan Nov 16, 11:42 AM #quick personal loans for fair credit <a href=https://quickloans.us.com>easy online loans no credit check</a> quick loans [url=https://quickloans.us.com]quick payday loans bad credit[/url]
— Online Loan Nov 16, 11:49 AM #help write essay <a href=https://buyessays.us.com>buy essay</a> buy essay without plagiarism [url=https://buyessays.us.com]buy essay writing online[/url]
— Write College Essay Nov 16, 11:58 AM #short term loans <a href=https://shorttermloans.us.com>loan stores</a> short term cash loans no credit check [url=https://shorttermloans.us.com]short loans[/url]
— Speedycash Nov 16, 12:18 PM #help me do my essay <a href=https://collegeessay.us.com>personal essay help</a> college essay help [url=https://collegeessay.us.com]college essay helper[/url]
— JoeNip Nov 16, 01:09 PM #college essays <a href=https://collegeessay.us.com>college essay</a> college essay prompts [url=https://collegeessay.us.com]english essay help[/url]
— JoeNip Nov 16, 02:39 PM #college essay prompts <a href=https://collegeessay.us.com>college essay review services</a> essays help [url=https://collegeessay.us.com]help writing essays for college[/url]
— Essay Help Nov 16, 02:43 PM #personal loans bad credit <a href=https://badcreditpersonalloans.us.com>bad credit personal loans online</a> payday loans bad credit ontario [url=https://badcreditpersonalloans.us.com]payday loans for bad credit[/url]
— Direct Lenders Nov 16, 02:52 PM #personal loans bad credit <a href=https://badcreditpersonalloans.us.com>bad credit personal loans nyc</a> online personal loan application [url=https://badcreditpersonalloans.us.com]payday loans for bad credit no upfront fees[/url]
— Online Payday Loan Nov 16, 03:00 PM #fast no credit check loans <a href=https://quickloans.us.com>quicken loans</a> quick cash loans [url=https://quickloans.us.com]quick loans[/url]
— Loan Cash Nov 16, 03:35 PM #private loan lenders <a href=https://shorttermloans.us.com>short term loans online</a> loans short term unsecured [url=https://shorttermloans.us.com]personal loan bad credit[/url]
— Fastest Payday Loan Nov 16, 05:52 PM #college essays <a href=https://collegeessay.us.com>buy college essays</a> help with an essay [url=https://collegeessay.us.com]help with college essay[/url]
— Assignment Helps Nov 16, 05:59 PM #short term loans online <a href=https://shorttermloans.us.com>short term loans</a> short term loans no credit check [url=https://shorttermloans.us.com]easy personal loans[/url]
— Online Lenders Nov 16, 06:00 PM #buy essay <a href=https://buyessay.us.com>buy essay online</a> buy essay online [url=https://buyessay.us.com]order essay online cheap[/url]
— Assignment Operators Nov 16, 06:32 PM #quickcash com <a href=https://quickloans.us.com>money loan fast</a> quick cash loans [url=https://quickloans.us.com]fast payday loans tallahassee[/url]
— Online Payday Loans Nov 16, 06:36 PM #faxless payday loan same day <a href=https://loansforbadcredit.us.com/>https://loansforbadcredit.us.com</a> Get More Information [url=https://loansforbadcredit.us.com/]payday loans for bad credit[/url]
— JoeNip Nov 16, 07:33 PM #help me with my essay <a href=https://collegeessay.us.com>help on essays</a> college essay [url=https://collegeessay.us.com]buy college essays[/url]
— JoeNip Nov 16, 08:45 PM #bad credit loans with monthly payments <a href=https://badcreditpersonalloans.us.com>bad credit need loan</a> personal loans bad credit reviews [url=https://badcreditpersonalloans.us.com]bad credit personal loans[/url]
— Quick Loan Nov 16, 08:56 PM #payday loans bad credit ontario <a href=https://badcreditpersonalloans.us.com>get a personal loan with bad credit</a> bad credit personal loans [url=https://badcreditpersonalloans.us.com]5000 personal loan with bad credit[/url]
— Money Loan Nov 16, 09:04 PM #quick payday loan today <a href=https://quickloans.us.com>loans quick approval</a> easy payday loan online [url=https://quickloans.us.com]fast loans[/url]
— Pay Day Loan Nov 16, 09:38 PM #help with my essay <a href=https://buyessays.us.com>buy essays</a> buy essay without plagiarism [url=https://buyessays.us.com]buy essays for college[/url]
— Buy Essay.Org Nov 16, 11:01 PM #short term loans <a href=https://shorttermloans.us.com>low cost loans</a> short loans [url=https://shorttermloans.us.com]bad credit personal loans[/url]
— Online Loan Nov 16, 11:58 PM #bad credit payday loan direct lenders <a href=https://badcreditpersonalloans.us.com>quicken personal loans</a> bad credit personal loans nyc [url=https://badcreditpersonalloans.us.com]payday loans bad credit dallas[/url]
— Quick Loan Nov 17, 12:05 AM #quick cash loans <a href=https://quickloans.us.com>loans quickly</a> need cash fast loans [url=https://quickloans.us.com]quick personal loans in new york[/url]
— Quick Loan Nov 17, 12:40 AM #help in writing an essay <a href=https://collegeessay.us.com>help write an essay</a> college essays [url=https://collegeessay.us.com]help to write an essay[/url]
— Buy Essay Nov 17, 12:48 AM #essay writing service <a href=https://essaywritingservices.us.com>custom essay writing services</a> essay writing service [url=https://essaywritingservices.us.com]essay writing services reviews[/url]
— JoeNip Nov 17, 01:00 AM #introduction essay help <a href=https://collegeessay.us.com>buy college essays online</a> help writing college essays [url=https://collegeessay.us.com]college essays help[/url]
— Assignment Helpers Nov 17, 01:45 AM #paper writing services <a href=https://essayonline.us.com>buy papers online</a> buy essay papers online [url=https://essayonline.us.com]writing essay online[/url]
— JoeNip Nov 17, 02:33 AM #fast loan with bad credit <a href=https://quickloans.us.com>quick personal loans in new york</a> loans quick and easy [url=https://quickloans.us.com]quick loans same day[/url]
— Money Loan Nov 17, 02:55 AM #quick loans no credit check <a href=https://quickloans.us.com>quick loans</a> quick cash loans in tennessee [url=https://quickloans.us.com]quick personal loans in new york[/url]
— Fastest Payday Loan Nov 17, 03:02 AM #quick loans <a href=https://quickloans.us.com>fast loans no credit check</a> quick cash loans online [url=https://quickloans.us.com]quick loans[/url]
— Online Lenders Nov 17, 03:36 AM #essay writing websites <a href=https://buyessay.us.com>buy an essay</a> essay online buy [url=https://buyessay.us.com]buy essay online[/url]
— JoeNip Nov 17, 03:46 AM #help essay writing <a href=https://collegeessay.us.com>college essays</a> college essay [url=https://collegeessay.us.com]college essay assignment[/url]
— Buy An Essay Paper Nov 17, 04:51 AM #quick easy loans bad credit <a href=https://quickloans.us.com>quick payday loans with bad credit</a> quick payday loans [url=https://quickloans.us.com]quick loans for bad credit[/url]
— Payday Express Nov 17, 06:01 AM #fast and easy money <a href=https://quickloans.us.com>quick cash loans online bad credit</a> quick personal loans for poor credit [url=https://quickloans.us.com]quick cash no credit check[/url]
— Quick Loans Nov 17, 06:08 AM #payday loans for bad credit uk <a href=https://badcreditpersonalloans.us.com>emergency cash loan bad credit</a> small cash loans bad credit [url=https://badcreditpersonalloans.us.com]payday loans bad credit[/url]
— Get A Loan Nov 17, 06:43 AM #nursing essay help <a href=https://collegeessay.us.com>college essays editing</a> writing essay help [url=https://collegeessay.us.com]help me write my college essay[/url]
— Buy An Essay Online Nov 17, 07:56 AM #custom essay help <a href=https://collegeessay.us.com>college essay</a> mba essay help [url=https://collegeessay.us.com]college essays[/url]
— Writers Online Nov 17, 07:58 AM #quick payday loans no credit check <a href=https://quickloans.us.com>bad credit quick loans</a> loan quick [url=https://quickloans.us.com]quick cash loans in tennessee[/url]
— Loans Online Nov 17, 09:01 AM #quick loans no credit check same day <a href=https://quickloans.us.com>personal loans quicken</a> quick loans for bad credit [url=https://quickloans.us.com]quick cash loans[/url]
— Loan Cash Nov 17, 09:09 AM #payday loans for bad credit <a href=https://badcreditpersonalloans.us.com>bad credit payday loans</a> personal loans bad credit [url=https://badcreditpersonalloans.us.com]payday loans for bad credit texas[/url]
— Payday Loan Online Nov 17, 09:43 AM #short term loans colorado <a href=https://shorttermloans.us.com>short term loans online</a> loans for people with poor credit [url=https://shorttermloans.us.com]payday loans online bad credit[/url]
— Bad Credit Nov 17, 12:01 PM #quicken loans <a href=https://quickloans.us.com>quick personal loans</a> quick cash loans [url=https://quickloans.us.com]quick easy cash loans[/url]
— Online Payday Loans Nov 17, 12:08 PM #fast loans <a href=https://quickloans.us.com>loans quick and easy</a> quick payday loans direct lenders [url=https://quickloans.us.com]personal loans quicken[/url]
— Paydayloan Nov 17, 12:44 PM #buy essay <a href=https://buyessay.us.com>buy essays online</a> help writing essays for college [url=https://buyessay.us.com]admission essay help[/url]
— Is Homework Helpful Nov 17, 01:10 PM #short term loans <a href=https://shorttermloans.us.com>easy loans no credit check</a> short term loans [url=https://shorttermloans.us.com]quick loans for bad credit[/url]
— Cash Loan Nov 17, 03:00 PM #fast loans <a href=https://quickloans.us.com>quicken loans rates</a> loans quick and easy [url=https://quickloans.us.com]fast payday loans direct lender[/url]
— Payday Express Nov 17, 03:09 PM #buy an essay cheap <a href=https://buyessay.us.com>buy essay</a> help writing a narrative essay [url=https://buyessay.us.com]essay buying[/url]
— Write Nov 17, 03:27 PM #quick loans for bad credit <a href=https://quickloans.us.com>quick loans for bad credit</a> quick personal loans for fair credit [url=https://quickloans.us.com]quick personal loans in new york[/url]
— Payday Nov 17, 03:42 PM #interest free loan <a href=https://shorttermloans.us.com>short term payday</a> short term loans [url=https://shorttermloans.us.com]payday loans direct lenders[/url]
— Online Loan Nov 17, 06:04 PM #personal loans bad credit <a href=https://badcreditpersonalloans.us.com>personal loans bad credit guaranteed</a> getting loans with bad credit [url=https://badcreditpersonalloans.us.com]personal loan for poor credit[/url]
— Cash Advance Nov 17, 06:12 PM #buy essay online <a href=https://buyessays.us.com>buy essays online</a> buy essays online [url=https://buyessays.us.com]buy essay online safe[/url]
— Assignment Helper Nov 17, 06:26 PM #easy loans online no credit check <a href=https://quickloans.us.com>quick payday loans</a> personal loans quick approval [url=https://quickloans.us.com]quicken loans[/url]
— Online Loans Nov 17, 06:46 PM #buy an essay <a href=https://buyessays.us.com>buy essay without plagiarism</a> buy an essay cheap [url=https://buyessays.us.com]buy an essay[/url]
— Homeworks Of America Nov 17, 06:49 PM #no credit check loans online <a href=https://shorttermloans.us.com>short term loans colorado</a> best place to get a loan [url=https://shorttermloans.us.com]loans with no credit check[/url]
— Cash Loan Nov 17, 09:03 PM #quick short term loans <a href=https://shorttermloans.us.com>short term loans for bad credit</a> payday loans dallas tx [url=https://shorttermloans.us.com]loan with bad credit[/url]
— Loans Nov 17, 09:10 PM #short term loan companies <a href=https://shorttermloans.us.com>short term loan bad credit</a> short term loans no credit check [url=https://shorttermloans.us.com]loan compare[/url]
— Pay Day Loans Nov 17, 09:44 PM #writing essays for college <a href=https://collegeessay.us.com>buy college essays</a> essay help australia [url=https://collegeessay.us.com]need help with essay[/url]
— Essay Writer Review Nov 17, 11:14 PM #buy college essays <a href=https://collegeessay.us.com>college essay writers</a> nursing essay help [url=https://collegeessay.us.com]college essay[/url]
— Writing Online Nov 17, 11:39 PM #payday loans in las vegas with no credit check <a href=https://shorttermloans.us.com>i need a personal loan</a> quick online loans [url=https://shorttermloans.us.com]short term loans no credit check[/url]
— Payday Express Nov 18, 12:04 AM #payday loans for bad credit online <a href=https://badcreditpersonalloans.us.com>payday loans bad credit today</a> fast personal loan [url=https://badcreditpersonalloans.us.com]personal loans bad credit[/url]
— Spotloan Nov 18, 12:12 AM #bad credit payday loans <a href=https://badcreditpersonalloans.us.com>bad credit personal loans nyc</a> personal loans bad credit [url=https://badcreditpersonalloans.us.com]bad credit payday loans[/url]
— Payday Loan Online Nov 18, 12:46 AM #payday loans for bad credit texas <a href=https://badcreditpersonalloans.us.com>personal loan finder</a> personal loans near me [url=https://badcreditpersonalloans.us.com]quick loan for bad credit[/url]
— Direct Lender Loans Nov 18, 03:06 AM #short term loans online <a href=https://shorttermloans.us.com>short term loans oklahoma</a> short term loans [url=https://shorttermloans.us.com]short term loans oklahoma[/url]
— Payday Loan Nov 18, 03:12 AM #quick loans <a href=https://quickloans.us.com>payday loans quick cash</a> quickloans [url=https://quickloans.us.com]quick payday loan online[/url]
— Loans For Bad Credit Nov 18, 03:46 AM #buy essay online <a href=https://buyessay.us.com>order essay online cheap</a> essay writing help online [url=https://buyessay.us.com]essay buying[/url]
— Buy College Essay Nov 18, 04:17 AM #quick loans online <a href=https://quickloans.us.com>quick loans same day</a> quick and easy payday loans [url=https://quickloans.us.com]quick personal loans with no credit check[/url]
— Direct Lenders Nov 18, 06:03 AM #quick loan lenders <a href=https://quickloans.us.com>payday loans quick cash</a> quick loans [url=https://quickloans.us.com]quick loans no credit check[/url]
— Direct Lender Loans Nov 18, 06:10 AM #quick cash loans today <a href=https://quickloans.us.com>quick payday loans of newark</a> quick loans online [url=https://quickloans.us.com]quick cash loans[/url]
— Money Loan Nov 18, 06:11 AM #quick payday loan <a href=https://quickloans.us.com>quick personal loans for fair credit</a> quick personal loan [url=https://quickloans.us.com]quick loans[/url]
— Cash Advance Nov 18, 06:12 AM #short term loans colorado <a href=https://shorttermloans.us.com>short term loans no credit check</a> short term loans online [url=https://shorttermloans.us.com]how to get a personal loan[/url]
— Quick Loan Nov 18, 06:44 AM #loans quick and easy <a href=https://quickloans.us.com>payday loans quickly</a> quick personal loans [url=https://quickloans.us.com]quick cash loans in tennessee[/url]
— Online Lenders Nov 18, 09:07 AM #bad credit personal loans texas <a href=https://badcreditpersonalloans.us.com>personal loans bad credit</a> bad credit personal loans utah [url=https://badcreditpersonalloans.us.com]bad credit personal loans nyc[/url]
— Online Payday Loans Nov 18, 09:15 AM #fast loans in 1 hour <a href=https://quickloans.us.com>quick loans</a> quick payday loans [url=https://quickloans.us.com]fast online loan[/url]
— Loans Nov 18, 09:49 AM #short term loans no credit check <a href=https://shorttermloans.us.com>short term loan no credit check</a> short term loans no credit check [url=https://shorttermloans.us.com]short term loan no credit check[/url]
— Pay Day Loan Nov 18, 10:15 AM #quick loans rates <a href=https://quickloans.us.com>quick cash loans reviews</a> fast easy payday loans [url=https://quickloans.us.com]quick loans[/url]
— Direct Lenders Nov 18, 11:59 AM #personal loans with bad credit <a href=https://badcreditpersonalloans.us.com>bad credit payday loans</a> no fee loans for bad credit [url=https://badcreditpersonalloans.us.com]personal loans bad credit[/url]
— Quick Loan Nov 18, 12:09 PM #easy loans online no credit check <a href=https://quickloans.us.com>online quick loans</a> payday loans quick cash [url=https://quickloans.us.com]cash loans online fast[/url]
— Instant Online Loans Nov 18, 12:17 PM #quicken loans <a href=https://quickloans.us.com>easy loans group</a> fast quick loans [url=https://quickloans.us.com]quick personal loans bad credit[/url]
— Personal Loans Nov 18, 12:52 PM #short term fast cash loans <a href=https://shorttermloans.us.com>short term cash loans</a> short term loans [url=https://shorttermloans.us.com]payday loans columbus ohio[/url]
— Online Payday Loans Nov 18, 03:09 PM #bad credit personal loans <a href=https://badcreditpersonalloans.us.com>payday loans for bad credit in texas</a> payday loan direct lender bad credit [url=https://badcreditpersonalloans.us.com]bad credit personal loans[/url]
— Direct Lenders Nov 18, 03:17 PM #quick payday loans <a href=https://quickloans.us.com>fast cash online loans</a> fast loans [url=https://quickloans.us.com]loans quick and easy[/url]
— Easy Payday Loan Nov 18, 03:41 PM #quick money loans online <a href=https://quickloans.us.com>quick and easy loans for bad credit</a> quick personal loans [url=https://quickloans.us.com]fast loans no credit check[/url]
— A Payday Loan Nov 18, 03:53 PM #short term payday <a href=https://shorttermloans.us.com>short loans</a> short term loans [url=https://shorttermloans.us.com]payday loans online no credit check[/url]
— Best Online Loans Nov 18, 03:55 PM #bad credit payday loans <a href=https://badcreditpersonalloans.us.com>small personal loans</a> payday loans bad credit direct lenders [url=https://badcreditpersonalloans.us.com]low apr personal loans[/url]
— Online Payday Loans Nov 18, 06:10 PM #quick short term loans <a href=https://shorttermloans.us.com>short term loans online</a> short term loans for bad credit [url=https://shorttermloans.us.com]personal loans unsecured[/url]
— Money Loan Nov 18, 06:18 PM #personal loans bad credit <a href=https://badcreditpersonalloans.us.com>bad credit personal loans reviews</a> compare personal loan rates [url=https://badcreditpersonalloans.us.com]bad credit personal loans[/url]
— A Payday Loan Nov 18, 06:53 PM #easy loans for bad credit online <a href=https://badcreditpersonalloans.us.com>payday loans no brokers bad credit</a> bad credit personal loans [url=https://badcreditpersonalloans.us.com]personal loans bad credit reviews[/url]
— Loans For Bad Credit Nov 18, 08:05 PM #payday loans for bad credit <a href=https://badcreditpersonalloans.us.com>bad credit personal loans guaranteed approval</a> personal loans bad credit reviews [url=https://badcreditpersonalloans.us.com]personal loans with bad credit[/url]
— Loans Nov 18, 09:13 PM #short term loans no credit check <a href=https://shorttermloans.us.com>quick short term loans</a> online payday loans las vegas [url=https://shorttermloans.us.com]short term cash loans[/url]
— Payday Loans Online Nov 18, 09:20 PM #loans for bad credit direct lenders <a href=https://shorttermloans.us.com>fast loans</a> clear cash loans [url=https://shorttermloans.us.com]short term loan direct lender[/url]
— Quick Loans Nov 18, 09:56 PM #personal loans bad credit <a href=https://badcreditpersonalloans.us.com>personal loans for bad credit</a> bad credit personal loans [url=https://badcreditpersonalloans.us.com]long term personal loans[/url]
— Best Payday Loan Nov 18, 11:10 PM #quick personal loans bad credit <a href=https://quickloans.us.com>quick personal loans</a> quick loans [url=https://quickloans.us.com]quick loans rates[/url]
— Quick Loans Nov 19, 12:13 AM #short term loans online <a href=https://shorttermloans.us.com>las vegas payday loan</a> instant payday loans online [url=https://shorttermloans.us.com]short term loans for bad credit[/url]
— Loans Online Nov 19, 12:20 AM #quick personal loans <a href=https://quickloans.us.com>quicken loans</a> where can i get a quick loan [url=https://quickloans.us.com]quick loans bracket[/url]
— Get A Loan Nov 19, 12:55 AM #fast loans <a href=https://quickloans.us.com>quick loans for bad credit</a> quick loans for bad credit [url=https://quickloans.us.com]quick loans[/url]
— Spotloan Nov 19, 01:15 AM #quick payday loans <a href=https://quickloans.us.com>quick personal loans</a> personal loans quicken [url=https://quickloans.us.com]fast quick loans[/url]
— Instant Online Loans Nov 19, 01:54 AM #short term loan lenders <a href=https://shorttermloans.us.com>montel williams loans</a> short term loans no credit checks [url=https://shorttermloans.us.com]easyloans[/url]
— Bad Credit Nov 19, 03:15 AM #short term payday loans <a href=https://shorttermloans.us.com>cash advance loans las vegas</a> short loans [url=https://shorttermloans.us.com]short term loans[/url]
— Paydayloan Nov 19, 03:23 AM #fast loans lenders <a href=https://quickloans.us.com>fast loans lenders</a> fast cash las vegas [url=https://quickloans.us.com]fast loans lenders[/url]
— Paydayloan Nov 19, 03:59 AM #bad credit personal loans guaranteed <a href=https://badcreditpersonalloans.us.com>emergency personal loans bad credit</a> payday loans for bad credit [url=https://badcreditpersonalloans.us.com]no fee loans for bad credit[/url]
— Instant Online Loans Nov 19, 06:17 AM #quick personal loans for fair credit <a href=https://quickloans.us.com>quick loans in ga</a> fast loans [url=https://quickloans.us.com]quick loans calgary[/url]
— Loan Nov 19, 06:24 AM #short term payday loans <a href=https://shorttermloans.us.com>short term payday loans</a> short term payday loans [url=https://shorttermloans.us.com]short term loans for bad credit[/url]
— Pay Day Loans Nov 19, 06:59 AM #quick loans for bad credit <a href=https://quickloans.us.com>quick cash loans</a> quick payday loans [url=https://quickloans.us.com]quickin loans[/url]
— A Payday Loan Nov 19, 09:16 AM #quick loans <a href=https://quickloans.us.com>online quick loans</a> quick loans [url=https://quickloans.us.com]quick loans rates[/url]
— Spotloan Nov 19, 09:24 AM #loans no credit check <a href=https://shorttermloans.us.com>payday loans dallas tx</a> instant loan no credit check [url=https://shorttermloans.us.com]short term loans[/url]
— Online Loan Nov 19, 09:59 AM #personal loans bad credit <a href=https://badcreditpersonalloans.us.com>personal loans bad credit guaranteed</a> a loan with bad credit [url=https://badcreditpersonalloans.us.com]personal loans florida[/url]
— Payday Loan Nov 19, 12:14 PM #can i get a personal loan with bad credit <a href=https://badcreditpersonalloans.us.com>personal loans bad credit</a> bad credit personal loans guaranteed [url=https://badcreditpersonalloans.us.com]personal loans for bad credit[/url]
— Payday Loan Online Nov 19, 12:22 PM #short term loans online <a href=https://shorttermloans.us.com>quick loan</a> online payday loan lenders [url=https://shorttermloans.us.com]no teletrack payday loans[/url]
— Loan Cash Nov 19, 12:58 PM #essay help <a href=https://writemyessay.us.com>write my papers</a> buy an essay [url=https://writemyessay.us.com]my homework now[/url]
— JoeNip Nov 19, 01:03 PM #pay to write essays <a href=https://writemyessay.us.com>help me write my essay</a> essay writing service [url=https://writemyessay.us.com]write my papers[/url]
— JoeNip Nov 19, 01:52 PM #quick online loans no credit checks <a href=https://quickloans.us.com>quicken loans</a> quick personal loans [url=https://quickloans.us.com]fast loans for people with bad credit[/url]
— Best Payday Loan Nov 19, 03:18 PM #quick loans <a href=https://quickloans.us.com>quick loans</a> fast loans online [url=https://quickloans.us.com]quick personal loans[/url]
— Bad Credit Nov 19, 03:26 PM #bad credit personal loans utah <a href=https://badcreditpersonalloans.us.com>personal loan company</a> personal loans bad credit [url=https://badcreditpersonalloans.us.com]payday loans for bad credit online[/url]
— Online Loans Nov 19, 04:00 PM #short loans <a href=https://shorttermloans.us.com>short term loans no fees</a> short term cash loans [url=https://shorttermloans.us.com]short term loan lenders[/url]
— JoeNip Nov 19, 05:37 PM #small personal loans <a href=https://badcreditpersonalloans.us.com>payday loans bad credit ontario</a> personal loans with bad credit [url=https://badcreditpersonalloans.us.com]bad credit loans online lenders[/url]
— Best Online Loans Nov 19, 06:19 PM #small loan with bad credit <a href=https://badcreditpersonalloans.us.com>payday loans for bad credit texas</a> personal loans bad credit az [url=https://badcreditpersonalloans.us.com]bad credit personal loans[/url]
— Payday Loan Nov 19, 06:27 PM #fast loans lenders <a href=https://quickloans.us.com>fast loans no credit</a> quick loan for bad credit [url=https://quickloans.us.com]quick loan no credit check[/url]
— A Payday Loan Nov 19, 07:02 PM #college essay <a href=https://collegeessay.us.com>help with college essays</a> pay for college essays [url=https://collegeessay.us.com]college essay services[/url]
— JoeNip Nov 19, 08:48 PM #quick personal loans bad credit <a href=https://quickloans.us.com>quicken loans</a> quick loans [url=https://quickloans.us.com]quick cash loans[/url]
— Direct Lender Loans Nov 19, 09:19 PM #quick payday loans bad credit <a href=https://quickloans.us.com>quick personal loan</a> loans quick cash [url=https://quickloans.us.com]quick personal loans[/url]
— Loans Nov 19, 09:27 PM #payday loans for bad credit guaranteed <a href=https://badcreditpersonalloans.us.com>bad credit payday loans</a> payday loans bad credit dallas [url=https://badcreditpersonalloans.us.com]get cash now with bad credit[/url]
— Payday Nov 19, 10:01 PM #quick cash payday loan <a href=https://quickloans.us.com>quick loans no credit check</a> quick loans online no credit check [url=https://quickloans.us.com]loans quick approval[/url]
— Easy Payday Loan Nov 20, 12:17 AM #payday loans for bad credit guaranteed <a href=https://badcreditpersonalloans.us.com>payday loans for bad credit</a> payday loans bad credit approval [url=https://badcreditpersonalloans.us.com]payday loans for bad credit[/url]
— Payday Express Nov 20, 12:25 AM #admission essay help <a href=https://collegeessay.us.com>college essay</a> writing a college entrance essay [url=https://collegeessay.us.com]help me with my essay[/url]
— JoeNip Nov 20, 12:26 AM #short term loans <a href=https://shorttermloans.us.com>short term loans online</a> unsecured personal loans bad credit [url=https://shorttermloans.us.com]quick short term loans[/url]
— JoeNip Nov 20, 12:33 AM #apply for a loan <a href=https://shorttermloans.us.com>bad credit personal loans</a> advance payday loan [url=https://shorttermloans.us.com]tribal loans[/url]
— Online Loans Nov 20, 12:59 AM #fast loans <a href=https://quickloans.us.com>quick loans no credit check</a> quick payday loans [url=https://quickloans.us.com]quick loans for bad credit[/url]
— Loan Cash Nov 20, 03:23 AM #quick payday loans <a href=https://quickloans.us.com>fast loans no credit check</a> loans quick and easy [url=https://quickloans.us.com]quick payday loans of newark[/url]
— Cash Loan Nov 20, 03:31 AM #personal loans no credit <a href=https://badcreditpersonalloans.us.com>personal loans houston</a> best personal loan companies [url=https://badcreditpersonalloans.us.com]bad credit personal loans utah[/url]
— Pay Day Loan Nov 20, 04:07 AM #essay writing service <a href=“https://customessaywriting.trade”>website that does your homework</a> custom essay writing [url=https://customessaywriting.trade]paper writer[/url] direct lender loans <a href=“https://directlenderloans.trade”>direct lender loans</a> easiest payday loan to get [url=https://directlenderloans.trade]payday faxless fast cash loan[/url] quick cash loan <a href=“https://onlinepaydayadvanceloan.science”>payday loan direct lender</a> online payday advance loan [url=https://onlinepaydayadvanceloan.science]online payday advance loan[/url] writing my paper <a href=“https://paperwriting.cricket”>essay writing</a> pay someone to do my math homework [url=https://paperwriting.cricket]paper writing[/url] instant payday loans <a href=“https://instantpaydayloans.loan”>instant online loans</a> direct payday loans [url=https://instantpaydayloans.loan]instant payday loans[/url] payday loans direct lenders <a href=“https://directlenderspaydayloans.cricket”>direct lenders payday loans</a> direct payday lenders [url=https://directlenderspaydayloans.cricket]no credit loans guaranteed approval[/url] live sex chat <a href=“https://livesexchat.bid”>chat rooms</a> cam chat [url=https://livesexchat.bid]live cams[/url] best dissertation writers <a href=“https://writingservices.trade”>dissertation writing</a> writing services [url=https://writingservices.trade]dissertation writing[/url]
— PamNip Nov 20, 04:25 AM #essay writing services review <a href=https://essaywritingservices.us.com>white paper writer</a> essay writing service cheap [url=https://essaywritingservices.us.com]top essay writing services[/url]
— JoeNip Nov 20, 04:53 AM #applying for a loan <a href=https://shorttermloans.us.com>365 day loan</a> short term loans [url=https://shorttermloans.us.com]short term loans colorado[/url]
— JoeNip Nov 20, 05:36 AM #bad credit personal loans reviews <a href=https://badcreditpersonalloans.us.com>how to apply for a loan with bad credit</a> payday loans bad credit today [url=https://badcreditpersonalloans.us.com]same day loan bad credit[/url]
— Pay Day Loans Nov 20, 06:26 AM #personal loans quick <a href=https://quickloans.us.com>quick online loan</a> personal loans quick [url=https://quickloans.us.com]quick payday loans online[/url]
— Cash Advance Nov 20, 06:34 AM #easy cash payday loan <a href=“https://easycashpaydayloan.cricket”>payday advance loan</a> payday loan online [url=https://easycashpaydayloan.cricket]payday advance loan[/url] short term loans direct lenders <a href=“https://directlenderloans.loan”>direct payday lenders bad credit</a> check into cash [url=https://directlenderloans.loan]direct lender loans[/url] payday loans on line <a href=“https://instantpaydayloans.loan”>direct payday loans</a> instant payday loans [url=https://instantpaydayloans.loan]instant payday loans[/url] easy online payday loans <a href=“https://thebestonlinepaydayloans.stream”>easy payday loans online</a> the best online payday loans [url=https://thebestonlinepaydayloans.stream]the best online payday loans[/url] payday advance loan <a href=“https://advancecashpaydayloan.bid”>advance cash payday loan</a> payday loans bad credit [url=https://advancecashpaydayloan.bid]instant online loans[/url] payday loans direct lenders only <a href=“https://samedayloan.bid”>speedy cash</a> no credit check payday loans instant approval [url=https://samedayloan.bid]payday loans direct lender[/url] payday loans for bad credit <a href=“https://loansonlinebadcredit.trade”>internet payday loans</a> payday loans bad credit [url=https://loansonlinebadcredit.trade]loans online bad credit[/url] payday loans direct lenders <a href=“https://paydayloansdirectlendersonly.webcam”>payday loans direct lenders</a> direct lenders payday loans [url=https://paydayloansdirectlendersonly.webcam]payday loans direct lenders only[/url] pay for homework to get done <a href=“https://collegepaper.science”>college essay</a> college paper [url=https://collegepaper.science]mba essay help[/url]
— PamNip Nov 20, 06:48 AM #payday loans direct lenders only <a href=“https://paydayloandirectlender.bid”>direct lender payday loans</a> direct lender payday loans [url=https://paydayloandirectlender.bid]direct lender payday loans[/url] easy payday loan <a href=“https://easypaydayloan.science”>payday loan lenders</a> payday loan online [url=https://easypaydayloan.science]easy payday loan[/url] college paper <a href=“https://collegepaper.science”>college essays</a> homework help maths [url=https://collegepaper.science]college essays[/url] illustration essay <a href=“https://illustrationessay.webcam”>online homework help chat</a> pay for essays online [url=https://illustrationessay.webcam]best dissertation services[/url] payday advance loan <a href=“https://easycashpaydayloan.cricket”>direct payday loan lenders</a> easy cash payday loan [url=https://easycashpaydayloan.cricket]advance cash payday loan[/url]
— PamNip Nov 20, 06:50 AM #loans with bad credit no credit check <a href=https://badcreditpersonalloans.us.com>bad credit personal loans</a> apply for loans with bad credit [url=https://badcreditpersonalloans.us.com]bad credit personal loans[/url]
— Payday Loans Online Nov 20, 07:08 AM #buy an essay for college <a href=https://buyessay.us.com>buy essay</a> buy essay online [url=https://buyessay.us.com]need help writing a essay[/url]
— JoeNip Nov 20, 08:24 AM #quick personal loans for fair credit <a href=https://quickloans.us.com>quick loans today</a> quick cash loans [url=https://quickloans.us.com]quick personal loans[/url]
— Loans Nov 20, 09:25 AM #payday loans wichita ks <a href=https://shorttermloans.us.com>short term loans online</a> short term payday loans [url=https://shorttermloans.us.com]advance payday loan[/url]
— Spotloan Nov 20, 09:33 AM #personal loans bad credit <a href=https://badcreditpersonalloans.us.com>unsecured personal loans bad credit direct lenders</a> best personal loans for bad credit [url=https://badcreditpersonalloans.us.com]personal loans bad credit[/url]
— JoeNip Nov 20, 09:54 AM #quick loans online <a href=https://quickloans.us.com>quick cash loans usa</a> quick loans online [url=https://quickloans.us.com]easy money cash loans[/url]
— Online Payday Loan Nov 20, 10:09 AM #get a quick loan <a href=https://quickloans.us.com>personal loans quick</a> quick payday loans bad credit [url=https://quickloans.us.com]quick personal loans in new york[/url]
— Best Online Loans Nov 20, 12:25 PM #first american loans <a href=https://shorttermloans.us.com>short term loans online</a> short term loans for bad credit [url=https://shorttermloans.us.com]need a loan now[/url]
— Loan Nov 20, 12:33 PM #best short term loans <a href=https://shorttermloans.us.com>personal loan no credit check</a> short term loans [url=https://shorttermloans.us.com]payday loans las vegas nv[/url]
— A Payday Loan Nov 20, 01:06 PM #research paper <a href=“https://mlaresearchpaper.stream”>college admission essay help</a> research paper [url=https://mlaresearchpaper.stream]mla research paper[/url] no credit check loans <a href=“https://directlenderloans.loan”>payday loans direct lender</a> pay day lenders [url=https://directlenderloans.loan]direct lender payday loans[/url] write my paper for me <a href=“https://writemypaperforme.cricket”>custom assignment help</a> write my paper for me [url=https://writemypaperforme.cricket]write my paper for me[/url] girls chat <a href=“https://girlschat.trade”>chat rooms</a> chat sex [url=https://girlschat.trade]girls chat[/url] paper writing <a href=“https://paperwriting.cricket”>writing my paper</a> essay writing [url=https://paperwriting.cricket]paper writing[/url]
— PamNip Nov 20, 03:07 PM #quick cash loans <a href=https://quickloans.us.com>quick cash loans bad credit</a> quick loan calculator [url=https://quickloans.us.com]quick loans bracket[/url]
— Online Loans Nov 20, 03:29 PM #short term loans oklahoma <a href=https://shorttermloans.us.com>money loans</a> short term loans for bad credit [url=https://shorttermloans.us.com]best short term loans bad credit[/url]
— Payday Loans Online Nov 20, 03:37 PM #cash loans today <a href=https://shorttermloans.us.com>short term loans in pa</a> personal short term loans [url=https://shorttermloans.us.com]short term cash loans[/url]
— Get A Loan Nov 20, 04:15 PM #fuck show <a href=“https://fuckshow.bid”>fuck show</a> cfnm show [url=https://fuckshow.bid]fuck show[/url] online payday loan application <a href=“https://instantpaydayloans.trade”>instant payday loans</a> payday express [url=https://instantpaydayloans.trade]instant payday loans[/url] payday loans direct lender <a href=“https://directlenderloans.bid”>direct lenders of loans</a> money loan [url=https://directlenderloans.bid]direct lenders of loans[/url] math homework helpers <a href=“https://essayshelp.cricket”>buy essays</a> buy essays [url=https://essayshelp.cricket]admission essay help[/url] easy online payday loans <a href=“https://easypaydayloans.cricket”>easy payday loans</a> easy online payday loans [url=https://easypaydayloans.cricket]easy online payday loans[/url]
— PamNip Nov 20, 05:44 PM #bad credit personal loans <a href=https://badcreditpersonalloans.us.com>personal loans raleigh nc</a> bad credit emergency loans [url=https://badcreditpersonalloans.us.com]unsecured loans for bad credit direct lenders[/url]
— Online Loan Nov 20, 06:24 PM #cash advance loans las vegas <a href=https://shorttermloans.us.com>quick short term loans</a> short term loan no credit check [url=https://shorttermloans.us.com]short term loans no credit check[/url]
— Cash Loan Nov 20, 06:31 PM #personal loans bad credit <a href=https://badcreditpersonalloans.us.com>personal loans with no credit check</a> unsecured personal loan rates [url=https://badcreditpersonalloans.us.com]personal loans bad credit[/url]
— Getting A Loan Nov 20, 07:06 PM #online payday advance loan <a href=“https://onlinepaydayadvanceloan.science”>online lenders</a> direct payday lenders bad credit [url=https://onlinepaydayadvanceloan.science]online payday advance loan[/url] school papers <a href=“https://schoolpapers.stream”>research papers</a> research papers [url=https://schoolpapers.stream]research papers[/url] best payday loan online <a href=“https://bestpaydayloanonline.stream”>instant online payday loan</a> loans online no credit check [url=https://bestpaydayloanonline.stream]online payday loan lenders[/url] girls chat <a href=“https://girlschat.trade”>girls chat</a> girl chat [url=https://girlschat.trade]live chat[/url]
— PamNip Nov 20, 07:43 PM #personal loans bad credit <a href=https://badcreditpersonalloans.us.com>personal loans bad credit</a> bad credit personal loans florida [url=https://badcreditpersonalloans.us.com]payday loans bad credit ontario[/url]
— Cash Loan Nov 20, 09:26 PM #quick loans online <a href=https://quickloans.us.com>small quick loans</a> quickin loans [url=https://quickloans.us.com]quick text loans[/url]
— Payday Loans Online Nov 20, 09:34 PM #best way to get money fast <a href=https://quickloans.us.com>loans quick approval</a> quick loans for bad credit [url=https://quickloans.us.com]quick payday loans[/url]
— Quick Loans Nov 20, 10:08 PM #loans quick cash <a href=https://quickloans.us.com>quick cash loans</a> quick cash payday loan [url=https://quickloans.us.com]quick loans[/url]
— Loans Nov 21, 12:16 AM #quick payday loans of newark <a href=https://quickloans.us.com>fast cash loans with monthly payments</a> fast loans no credit [url=https://quickloans.us.com]quick loans[/url]
— Spotloan Nov 21, 12:23 AM #quick loans today <a href=https://quickloans.us.com>quick loans no credit check</a> quick online payday loans [url=https://quickloans.us.com]quick loans rates[/url]
— Payday Loans Online Nov 21, 12:54 AM #bad credit personal loans california <a href=https://badcreditpersonalloans.us.com>online loan for bad credit</a> payday loans for bad credit [url=https://badcreditpersonalloans.us.com]personal loans bad credit[/url]
— Loans For Bad Credit Nov 21, 03:23 AM #fast loans <a href=https://quickloans.us.com>quick loans bracket</a> quick loans [url=https://quickloans.us.com]quick easy payday loans[/url]
— Loans For Bad Credit Nov 21, 03:30 AM #short term loans <a href=https://shorttermloans.us.com>short term loans</a> instant personal loans [url=https://shorttermloans.us.com]online payday loans[/url]
— Online Loans Nov 21, 04:02 AM #quick loans <a href=https://quickloans.us.com>quick online loans</a> fast loans lenders [url=https://quickloans.us.com]quick personal loans for fair credit[/url]
— Payday Nov 21, 06:28 AM #loans quicken <a href=https://quickloans.us.com>quick loans online</a> where can i get a quick loan [url=https://quickloans.us.com]payday loans quick cash[/url]
— Direct Lenders Nov 21, 06:36 AM #bad credit personal loans <a href=https://badcreditpersonalloans.us.com>payday loans bad credit ontario</a> bad credit payday loans [url=https://badcreditpersonalloans.us.com]bad credit quick loans[/url]
— JoeNip Nov 21, 06:38 AM #college admission essay <a href=“https://collegeadmissionessay.stream”>college essay prompts</a> college admission essay [url=https://collegeadmissionessay.stream]homework help tvo[/url] easy online payday loans <a href=“https://easypaydayloans.cricket”>easy payday loans</a> easy fast payday loans [url=https://easypaydayloans.cricket]easy payday loans[/url] free sex chat <a href=“https://freesexcam.cricket”>sex chat online</a> free sex cam [url=https://freesexcam.cricket]free sex cam[/url] easy cash payday loan <a href=“https://easycashpaydayloan.cricket”>easy cash payday loan</a> best payday loan [url=https://easycashpaydayloan.cricket]easy cash payday loan[/url] research paper <a href=“https://mlaresearchpaper.stream”>research paper</a> mla research paper [url=https://mlaresearchpaper.stream]writing a history research paper[/url] best payday loans online <a href=“https://paydayloansdirectlendersonly.webcam”>online payday loans direct lenders</a> payday loans online direct lenders [url=https://paydayloansdirectlendersonly.webcam]payday loans online direct lenders[/url] best online payday loans <a href=“https://directlenderloans.loan”>best online loans</a> direct payday lenders bad credit [url=https://directlenderloans.loan]easy approval payday loans[/url] direct payday loans <a href=“https://paydayloandirectlender.bid”>direct lender payday loans</a> payday loan direct lender [url=https://paydayloandirectlender.bid]direct lender payday loans[/url]
— PamNip Nov 21, 07:05 AM #social loan <a href=https://shorttermloans.us.com>personal loan companies</a> short term loans [url=https://shorttermloans.us.com]1 hour loans[/url]
— Best Payday Loan Nov 21, 07:10 AM #online loan <a href=https://onlineloans.us.com/>online payday advance loan</a> instant online payday loan [url=https://onlineloans.us.com/]online loan[/url]
— JoeNip Nov 21, 07:29 AM #custom essay writing <a href=“https://customessaywriting.trade”>custom essay writing</a> essay writing [url=https://customessaywriting.trade]custom essay writing[/url] small online payday loans <a href=“https://smallonlinepaydayloans.stream”>payday bad credit loan</a> advance payday loans online [url=https://smallonlinepaydayloans.stream]small online payday loans[/url] homework assignment help <a href=“https://collegepaper.science”>college essay writing service</a> college essays [url=https://collegepaper.science]rose hulman homework help[/url] argument essays <a href=“https://schoolpapers.bid”>i need help on my homework</a> school papers [url=https://schoolpapers.bid]research papers[/url] writing services <a href=“https://writingservices.trade”>writing services</a> writing services [url=https://writingservices.trade]spss homework help[/url] payday loan <a href=“https://gettingaloan.loan”>quick loan</a> payday loan [url=https://gettingaloan.loan]payday loans with no credit check[/url] payday advance online <a href=“https://paydayadvanceonline.science”>payday advance online</a> payday advance online [url=https://paydayadvanceonline.science]payday advance online[/url] direct lender loans <a href=“https://directlenderloans.trade”>direct lender payday loans</a> direct lender loans [url=https://directlenderloans.trade]direct lenders of loans[/url] webcam sluts <a href=“https://slutcams.webcam”>girl cams</a> free sex cams [url=https://slutcams.webcam]fetish cams[/url] cash loans <a href=“https://onlinepaydayloansinstantapproval.loan”>payday</a> online payday loans instant approval [url=https://onlinepaydayloansinstantapproval.loan]quick loans no credit check[/url]
— PamNip Nov 21, 09:19 AM #quick loans rates <a href=https://quickloans.us.com>loans quicken</a> quick cash loans [url=https://quickloans.us.com]easy approval loans for bad credit[/url]
— Loan Nov 21, 09:32 AM #bad credit personal loans <a href=https://badcreditpersonalloans.us.com>bad credit loans michigan</a> bad credit personal loans [url=https://badcreditpersonalloans.us.com]personal loans for bad credit in maryland[/url]
— Easy Payday Loan Nov 21, 09:40 AM #need a personal loan <a href=https://badcreditpersonalloans.us.com>payday loans bad credit online</a> personal loans bad credit ok [url=https://badcreditpersonalloans.us.com]bad credit personal loans[/url]
— Personal Loans Nov 21, 10:17 AM #write essays online <a href=https://essayonline.us.com>More Bonuses</a> custom essays [url=https://essayonline.us.com]buy essays online[/url]
— JoeNip Nov 21, 11:15 AM #websites for essays in english <a href=https://buyessay.us.com>essay online help</a> buy essay [url=https://buyessay.us.com]buy essay without getting caught[/url]
— JoeNip Nov 21, 12:13 PM #payday loans for bad credit <a href=https://shorttermloans.us.com>short term loans</a> short term cash loans [url=https://shorttermloans.us.com]short term loans for bad credit[/url]
— Loan Nov 21, 12:37 PM #quicken loans <a href=https://quickloans.us.com>easy loans company review</a> fast payday loans tallahassee [url=https://quickloans.us.com]quick personal loans for fair credit[/url]
— Instant Online Loans Nov 21, 12:45 PM #short term payday loans <a href=https://shorttermloans.us.com>short term loans</a> loan with no credit check [url=https://shorttermloans.us.com]best short term loans[/url]
— Direct Lender Loans Nov 21, 01:21 PM #how to get a quick loan with bad credit <a href=https://badcreditpersonalloans.us.com>fast bad credit personal loans</a> bad credit personal loans utah [url=https://badcreditpersonalloans.us.com]personal loans for bad credit[/url]
— Best Payday Loan Nov 21, 03:30 PM #how to get a quick loan <a href=https://quickloans.us.com>quick payday loans no credit check</a> quick cash loans usa [url=https://quickloans.us.com]quick loans[/url]
— Loan Nov 21, 03:37 PM #quick loans online <a href=https://quickloans.us.com>quicken loans</a> quick loans [url=https://quickloans.us.com]quick loans for bad credit[/url]
— Money Loan Nov 21, 04:11 PM #quick cash loans reviews <a href=https://quickloans.us.com>loans quicken</a> quick personal loans [url=https://quickloans.us.com]quicken loans[/url]
— JoeNip Nov 21, 04:36 PM #quick payday loan today <a href=https://quickloans.us.com>quick loans for bad credit</a> fast loans [url=https://quickloans.us.com]quick loans[/url]
— Cash Advance Nov 21, 06:35 PM #personal cash loans <a href=https://badcreditpersonalloans.us.com>personal loans for bad credit</a> personal loans bad credit [url=https://badcreditpersonalloans.us.com]bad credit personal loans[/url]
— Loan Nov 21, 06:43 PM #write college essay <a href=https://buyessay.us.com>buy essay</a> buy an essay for college [url=https://buyessay.us.com]buy essay[/url]
— JoeNip Nov 21, 07:07 PM #payday loans bad credit <a href=https://badcreditpersonalloans.us.com>personal loans with bad credit</a> payday loans bad credit ok [url=https://badcreditpersonalloans.us.com]low rate personal loans[/url]
— Loan Nov 21, 07:17 PM #personal loans bad credit <a href=https://badcreditpersonalloans.us.com>bad credit payday loans</a> personal loan interest rates comparison [url=https://badcreditpersonalloans.us.com]personal loans for bad credit[/url]
— JoeNip Nov 21, 09:20 PM #no interest loans <a href=https://shorttermloans.us.com>payday loans for bad credit</a> short term payday loans [url=https://shorttermloans.us.com]short term loans[/url]
— A Payday Loan Nov 21, 09:34 PM #quick payday loans <a href=https://quickloans.us.com>quick cash loans</a> quick payday loans [url=https://quickloans.us.com]fast instant loans[/url]
— Quick Loan Nov 21, 09:42 PM #bad credit personal loans nyc <a href=https://badcreditpersonalloans.us.com>best personal loan lenders</a> bad credit personal loans guaranteed approval [url=https://badcreditpersonalloans.us.com]personal loans bad credit[/url]
— Easy Payday Loan Nov 21, 10:17 PM #need fast money <a href=https://quickloans.us.com>quick personal loans online</a> quick personal loans [url=https://quickloans.us.com]quick instant loans[/url]
— Cash Loan Nov 22, 12:39 AM #personal loans bad credit <a href=https://badcreditpersonalloans.us.com>payday loan online bad credit</a> personal loans bad credit texas [url=https://badcreditpersonalloans.us.com]payday loans bad credit dallas[/url]
— Online Payday Loans Nov 22, 12:47 AM #short term loans no credit check <a href=https://shorttermloans.us.com>loan compare</a> short term loans [url=https://shorttermloans.us.com]short term quick loans[/url]
— JoeNip Nov 22, 01:09 AM #short loans <a href=https://shorttermloans.us.com>short term cash loans</a> 36 month loans [url=https://shorttermloans.us.com]short term loans for bad credit[/url]
— Pay Day Loan Nov 22, 01:24 AM #loans for bad credit <a href=https://paydayloans.us.org/>payday loans</a> best payday loans online [url=https://paydayloans.us.org/]Clicking Here[/url]
— JoeNip Nov 22, 01:41 AM #personal unsecured loans for bad credit <a href=https://badcreditpersonalloans.us.com>bad credit personal loans</a> bad credit personal loans [url=https://badcreditpersonalloans.us.com]payday loans bad credit[/url]
— Easy Payday Loan Nov 22, 03:39 AM #quick loans no credit check <a href=https://quickloans.us.com>how to get a quick loan</a> quick loans online [url=https://quickloans.us.com]quick payday loans with bad credit[/url]
— Get A Loan Nov 22, 03:48 AM #short term quick loans <a href=https://shorttermloans.us.com>short term loan</a> interest free loan [url=https://shorttermloans.us.com]short term loan lenders[/url]
— Loans Online Nov 22, 04:24 AM #short term loans <a href=https://shorttermloans.us.com>short term loans no credit check</a> online loans direct lenders [url=https://shorttermloans.us.com]fast cash loan[/url]
— A Payday Loan Nov 22, 06:34 AM #fast loans no credit check <a href=https://quickloans.us.com>payday loans quickly</a> quick personal loans online [url=https://quickloans.us.com]quick loans online[/url]
— Online Loan Nov 22, 06:41 AM #loans quick cash <a href=https://quickloans.us.com>quick cash loans bad credit</a> cash loans fast no credit check [url=https://quickloans.us.com]payday loans fast payout[/url]
— Payday Express Nov 22, 07:14 AM #personal loans quick <a href=https://quickloans.us.com>quick loans</a> loans quick [url=https://quickloans.us.com]fast loans online[/url]
— Cash Advance Nov 22, 09:38 AM #short term payday loans <a href=https://shorttermloans.us.com>personal loan online</a> short loans [url=https://shorttermloans.us.com]short term payday loans[/url]
— Quick Loan Nov 22, 09:46 AM #easy loan site reviews <a href=https://quickloans.us.com>loans quickly</a> fast and easy money [url=https://quickloans.us.com]quick cash loans usa[/url]
— Direct Lender Loans Nov 22, 10:21 AM #bad credit personal loans not payday loans <a href=https://shorttermloans.us.com>payday loans in pa</a> short term quick loans [url=https://shorttermloans.us.com]no credit check payday loans direct lenders[/url]
— Online Lenders Nov 22, 12:36 PM #small loans bad credit <a href=https://shorttermloans.us.com>short term payday loans</a> consumer loans [url=https://shorttermloans.us.com]payday loans edmonton[/url]
— Get A Loan Nov 22, 12:44 PM #quicken loans rates <a href=https://quickloans.us.com>quick loans</a> quick payday loans bad credit [url=https://quickloans.us.com]quick loans[/url]
— Get A Loan Nov 22, 01:18 PM #money loans with bad credit <a href=https://shorttermloans.us.com>short term loan bad credit</a> short cash loans [url=https://shorttermloans.us.com]short term loans canada[/url]
— Getting A Loan Nov 22, 03:41 PM #fast loans lenders <a href=https://quickloans.us.com>quick payday loans</a> need a loan with bad credit fast [url=https://quickloans.us.com]quick and easy loans for bad credit[/url]
— Loan Cash Nov 22, 03:48 PM #where can you get a loan with bad credit <a href=https://badcreditpersonalloans.us.com>personal loans with bad credit</a> payday loans bad credit today [url=https://badcreditpersonalloans.us.com]payday loans bad credit today[/url]
— Payday Nov 22, 04:22 PM #quick loans same day <a href=https://quickloans.us.com>quick loans no credit check</a> quick loans [url=https://quickloans.us.com]quick loans[/url]
— Pay Day Loans Nov 22, 06:45 PM #payday loans for bad credit <a href=https://badcreditpersonalloans.us.com>payday loans bad credit approval</a> bad credit personal loans [url=https://badcreditpersonalloans.us.com]bad credit personal loans[/url]
— A Payday Loan Nov 22, 06:53 PM #personal loans bad credit ok <a href=https://badcreditpersonalloans.us.com>bad credit payday loans</a> personal loan reviews [url=https://badcreditpersonalloans.us.com]bad credit payday loans[/url]
— Spotloan Nov 22, 07:28 PM #quick online payday loans <a href=https://quickloans.us.com>quicken loans</a> quick loans for bad credit [url=https://quickloans.us.com]quick loans online[/url]
— Loan Cash Nov 22, 09:47 PM #personal loans bad credit <a href=https://badcreditpersonalloans.us.com>no credit check personal loan</a> bad credit personal loans [url=https://badcreditpersonalloans.us.com]bad credit personal loans nyc[/url]
— Best Payday Loan Nov 22, 09:55 PM #short term loans compare <a href=https://shorttermloans.us.com>short term payday loans</a> short term loan no credit check [url=https://shorttermloans.us.com]short term loans for bad credit[/url]
— Personal Loans Nov 22, 10:31 PM #quick cash loans online <a href=https://quickloans.us.com>quick loans</a> quick personal loans [url=https://quickloans.us.com]quick easy loans bad credit[/url]
— Spotloan Nov 23, 12:40 AM #where can i get a loan <a href=https://shorttermloans.us.com>short term fast cash loans</a> short term payday loans [url=https://shorttermloans.us.com]short term cash loans[/url]
— Online Loan Nov 23, 12:48 AM #payday loans for bad credit <a href=https://badcreditpersonalloans.us.com>bad credit personal loans</a> payday loans bad credit ok [url=https://badcreditpersonalloans.us.com]personal loans for bad credit[/url]
— Loan Nov 23, 01:21 AM #no interest loans <a href=https://shorttermloans.us.com>short term loans</a> short term fast cash loans [url=https://shorttermloans.us.com]short term loans online[/url]
— Loan Cash Nov 23, 03:45 AM #quick loans online <a href=https://quickloans.us.com>quick personal loans</a> need a fast loan [url=https://quickloans.us.com]quick loans rates[/url]
— Speedycash Nov 23, 03:53 AM #bad credit lenders only <a href=https://badcreditpersonalloans.us.com>personal loans with bad credit</a> bad credit personal loans nyc [url=https://badcreditpersonalloans.us.com]3 month payday loans bad credit[/url]
— Fastest Payday Loan Nov 23, 04:29 AM #short term loans for bad credit <a href=https://shorttermloans.us.com>short term loans online</a> short term loans canada [url=https://shorttermloans.us.com]bad credit payday loans[/url]
— Direct Lenders Nov 23, 06:45 AM #short term instant loans <a href=https://shorttermloans.us.com>swift sterling payday loans</a> 1000 loan [url=https://shorttermloans.us.com]online payday loans direct lender[/url]
— Fastest Payday Loan Nov 23, 06:52 AM #fast loans lenders <a href=https://quickloans.us.com>quick personal loans bad credit</a> easy quick loans [url=https://quickloans.us.com]quick cash loans reviews[/url]
— Direct Lenders Nov 23, 07:26 AM #quick personal loans <a href=https://quickloans.us.com>loans quick cash</a> quick payday loans bad credit [url=https://quickloans.us.com]personal loans quick[/url]
— Online Payday Loans Nov 23, 09:50 AM #short term bad credit loans <a href=https://shorttermloans.us.com>interest free loans</a> short term payday loans [url=https://shorttermloans.us.com]personal loans no credit check[/url]
— A Payday Loan Nov 23, 09:58 AM #quick personal loans <a href=https://quickloans.us.com>quick in loans</a> quick loans online [url=https://quickloans.us.com]quick loans[/url]
— Cash Loan Nov 23, 10:33 AM #help write essay <a href=https://buyessays.us.com>college essay writer for pay</a> buy essays uk [url=https://buyessays.us.com]essay help websites[/url]
— JoeNip Nov 23, 10:57 AM #direct lenders for bad credit loans <a href=https://shorttermloans.us.com>short term loans</a> short term loans for bad credit [url=https://shorttermloans.us.com]getting a loan with bad credit[/url]
— Speedycash Nov 23, 12:47 PM #loans short term no credit check <a href=https://shorttermloans.us.com>instant online payday loans</a> payday loan bad credit [url=https://shorttermloans.us.com]short term loans[/url]
— Best Payday Loan Nov 23, 12:54 PM #payday loans online <a href=https://paydayloans.us.org/>payday loans</a> online payday loans [url=https://paydayloans.us.org/]loans for bad credit[/url]
— JoeNip Nov 23, 01:26 PM #quick cash loans today <a href=https://quickloans.us.com>quick loans bad credit same day</a> quick cash loans bad credit [url=https://quickloans.us.com]quick loans no credit check[/url]
— Online Loans Nov 23, 01:31 PM #webcam sex <a href=https://webcamsex.us.com>sex webcam</a> free webcams [url=https://webcamsex.us.com]sex webcam[/url]
— JoeNip Nov 23, 01:51 PM #quick personal loans for fair credit <a href=https://quickloans.us.com>quick loans</a> quick loans online [url=https://quickloans.us.com]quick loans online[/url]
— Getting A Loan Nov 23, 03:50 PM #personal loans bad credit <a href=https://badcreditpersonalloans.us.com>legit online loans for bad credit</a> personal loans for bad credit [url=https://badcreditpersonalloans.us.com]bad credit personal loans[/url]
— Payday Loans Nov 23, 03:58 PM #quick loans <a href=https://quickloans.us.com>quicken loans</a> quick loans online [url=https://quickloans.us.com]quick loans online[/url]
— Payday Express Nov 23, 04:35 PM #short term loans no credit check <a href=https://shorttermloans.us.com>short term loans</a> direct payday loans [url=https://shorttermloans.us.com]90 day loans[/url]
— JoeNip Nov 23, 04:38 PM #short term loans <a href=https://shorttermloans.us.com>short term payday loans</a> short term loan [url=https://shorttermloans.us.com]need a loan[/url]
— Loans Nov 23, 06:48 PM #payday loans for bad credit in texas <a href=https://badcreditpersonalloans.us.com>personal loans bad credit</a> payday loans bad credit online [url=https://badcreditpersonalloans.us.com]personal loans bad credit[/url]
— Payday Express Nov 23, 06:55 PM #short term loans for bad credit <a href=https://shorttermloans.us.com>short term loans</a> loans with no credit [url=https://shorttermloans.us.com]cash money loans[/url]
— Pay Day Loans Nov 23, 07:28 PM #best online loans <a href=https://onlineloans.us.com/>HTTPS://ONLINELOANS.US.COM/</a> Visit Your URL [url=https://onlineloans.us.com/]payday loan direct lender[/url]
— JoeNip Nov 23, 09:12 PM #short term loans <a href=https://shorttermloans.us.com>short term loans</a> text payday loans [url=https://shorttermloans.us.com]loan for people with bad credit[/url]
— Payday Loans Nov 23, 09:53 PM #quick instant loans <a href=https://quickloans.us.com>how to get a small loan fast</a> fast loans [url=https://quickloans.us.com]how can i get cash fast[/url]
— Spotloan Nov 23, 10:01 PM #payday loans for bad credit online <a href=https://badcreditpersonalloans.us.com>signature loans las vegas bad credit</a> where to get loans with bad credit [url=https://badcreditpersonalloans.us.com]best loan companies for bad credit[/url]
— Payday Express Nov 23, 10:36 PM #essay writing help uk <a href=https://collegeessay.us.com>need help to write an essay</a> college essay [url=https://collegeessay.us.com]essay writing for college students[/url]
— JoeNip Nov 23, 11:43 PM #quick cash loans online bad credit <a href=https://quickloans.us.com>easy online payday loans direct lenders</a> payday loans quickly [url=https://quickloans.us.com]quick loans no credit check[/url]
— Instant Online Loans Nov 24, 12:49 AM #fast loans no credit check <a href=https://quickloans.us.com>quick personal loans same day</a> quick cash loans [url=https://quickloans.us.com]quick loans online[/url]
— Payday Express Nov 24, 12:57 AM #bad credit personal loans direct lenders only <a href=https://badcreditpersonalloans.us.com>personal loans with no credit</a> what is a personal loan [url=https://badcreditpersonalloans.us.com]bad credit personal loans utah[/url]
— Online Lenders Nov 24, 01:31 AM #easy small loans <a href=https://quickloans.us.com>quick payday loans</a> quick loans [url=https://quickloans.us.com]quick personal loans[/url]
— Payday Loans Online Nov 24, 03:49 AM #quick loans <a href=https://quickloans.us.com>fast loans</a> payday loans quick cash [url=https://quickloans.us.com]quicken loans[/url]
— Bad Credit Nov 24, 03:56 AM #personal loans bad credit az <a href=https://badcreditpersonalloans.us.com>unsecured personal loans bad credit ok</a> personal loan for self employed [url=https://badcreditpersonalloans.us.com]personal loans with bad credit[/url]
— Payday Loan Nov 24, 04:30 AM #payday loans <a href=https://paydayloans.us.org/>Bonuses</a> pay day loans [url=https://paydayloans.us.org/]payday loans[/url]
— JoeNip Nov 24, 05:56 AM #write my essay <a href=https://writemyessay.us.com>custom essay writing</a> example here [url=https://writemyessay.us.com]write my essay for me[/url]
— JoeNip Nov 24, 06:35 AM #fast and easy money <a href=https://quickloans.us.com>fast loans</a> quick cash loans in tennessee [url=https://quickloans.us.com]quick personal loans online[/url]
— Online Payday Loan Nov 24, 06:54 AM #payday loans bad credit online <a href=https://badcreditpersonalloans.us.com>bad credit personal loans</a> bad credit personal loans guaranteed approval [url=https://badcreditpersonalloans.us.com]bad credit personal loans california[/url]
— Loan Nov 24, 07:01 AM #write essay <a href=https://writemyessay.us.com>pay to write essays</a> write my essay [url=https://writemyessay.us.com]write my essay[/url]
— JoeNip Nov 24, 07:31 AM #bad credit personal loans <a href=https://badcreditpersonalloans.us.com>personal loans bad credit</a> payday loans for bad credit guaranteed [url=https://badcreditpersonalloans.us.com]personal loans with bad credit up to 5000[/url]
— Fastest Payday Loan Nov 24, 07:36 AM #webcam sex <a href=https://webcamsex.us.com>live cams</a> live chat [url=https://webcamsex.us.com]webcam sex[/url]
— JoeNip Nov 24, 08:12 AM #loans quicken <a href=https://quickloans.us.com>quick payday loans</a> quick personal loans [url=https://quickloans.us.com]quick cash loan service[/url]
— Payday Loan Nov 24, 09:58 AM #bad credit personal loans <a href=https://badcreditpersonalloans.us.com>personal loans for bad credit</a> bad credit personal loans [url=https://badcreditpersonalloans.us.com]how do personal loans work[/url]
— A Payday Loan Nov 24, 10:05 AM #quick online loans for bad credit <a href=https://badcreditpersonalloans.us.com>payday loans bad credit online</a> bad credit personal loans guaranteed [url=https://badcreditpersonalloans.us.com]personal loans bad credit[/url]
— Getting A Loan Nov 24, 10:40 AM #quick loans no credit check <a href=https://quickloans.us.com>quick loans</a> personal loans quicken [url=https://quickloans.us.com]fast loans[/url]
— Loans For Bad Credit Nov 24, 12:56 PM #fast payday loans direct lender <a href=https://quickloans.us.com>personal loans quick</a> loans quick and easy [url=https://quickloans.us.com]quick loans for bad credit[/url]
— Payday Loans Nov 24, 01:03 PM #payday loans bad credit direct lenders <a href=https://badcreditpersonalloans.us.com>bad credit personal loans</a> personal loans bad credit [url=https://badcreditpersonalloans.us.com]payday loans bad credit[/url]
— Online Loans Nov 24, 01:38 PM #payday loans bad credit ok <a href=https://badcreditpersonalloans.us.com>bad credit payday loans</a> bad credit personal loans [url=https://badcreditpersonalloans.us.com]private lenders personal loans[/url]
— Loan Cash Nov 24, 03:58 PM #quick personal loans <a href=https://quickloans.us.com>quick cash loan service</a> fast loans [url=https://quickloans.us.com]fast loans[/url]
— Pay Day Loans Nov 24, 04:05 PM #quick loans <a href=https://quickloans.us.com>quick cash loans online</a> fast loans lenders [url=https://quickloans.us.com]quick cash loans bad credit[/url]
— Loans Nov 24, 04:42 PM #short term fast cash loans <a href=https://shorttermloans.us.com>short term personal loans</a> short term personal loans [url=https://shorttermloans.us.com]short term loans[/url]
— Getting A Loan Nov 24, 06:55 PM #fast loans for people with bad credit <a href=https://quickloans.us.com>quick cash loans no credit check</a> easy payday loans no teletrack [url=https://quickloans.us.com]quick payday loans with bad credit[/url]
— Bad Credit Nov 24, 07:02 PM #short term loans <a href=https://shorttermloans.us.com>short term loans online</a> short term loans [url=https://shorttermloans.us.com]short term loans online[/url]
— Speedy Cash Nov 24, 07:37 PM #guaranteed payday loans <a href=“https://guaranteedpaydayloans.stream”>instant payday loans</a> short term loans direct lenders [url=https://guaranteedpaydayloans.stream]instant payday loans[/url] online payday loans for bad credit <a href=“https://loansonlinebadcredit.trade”>loans online bad credit</a> payday loans for bad credit [url=https://loansonlinebadcredit.trade]payday loans lenders[/url] speedycash <a href=“https://instantonlineloans.science”>online payday advance loan</a> direct lender loans [url=https://instantonlineloans.science]direct lenders of loans[/url] payday loans direct lenders <a href=“https://thebestonlinepaydayloans.stream”>the best online payday loans</a> easy payday loans online [url=https://thebestonlinepaydayloans.stream]cash advance loan[/url] mla research paper <a href=“https://mlaresearchpaper.stream”>research report</a> research paper [url=https://mlaresearchpaper.stream]mla research paper[/url]
— PamNip Nov 24, 09:14 PM #fast loans no credit check <a href=https://quickloans.us.com>quick cash no credit check</a> quick loans [url=https://quickloans.us.com]fast loans no credit check[/url]
— Fastest Payday Loan Nov 24, 10:03 PM #quick decision loans <a href=https://quickloans.us.com>quick cash loans</a> easy credit loans [url=https://quickloans.us.com]quick payday loans no credit check[/url]
— Quick Loans Nov 24, 10:11 PM #quick fast loans <a href=https://quickloans.us.com>quicken loans</a> need a loan with bad credit fast [url=https://quickloans.us.com]quick personal loans[/url]
— Loans Nov 24, 10:49 PM #personal loans bad credit reviews <a href=https://badcreditpersonalloans.us.com>bad credit personal loans nyc</a> personal loans for bad credit [url=https://badcreditpersonalloans.us.com]bad credit personal loans guaranteed[/url]
— A Payday Loan Nov 24, 11:33 PM #short term cash loans <a href=https://shorttermloans.us.com>instant personal loans</a> short term payday [url=https://shorttermloans.us.com]short term payday loans[/url]
— Pay Day Loan Nov 24, 11:41 PM #personal loans bad credit ok <a href=https://badcreditpersonalloans.us.com>bad credit payday loans</a> low apr personal loans [url=https://badcreditpersonalloans.us.com]loan for bad credit no guarantor no fees[/url]
— Direct Lenders Nov 25, 12:15 AM #no credit loans guaranteed approval <a href=“https://paydayadvanceonline.science”>payday advance loan</a> payday advance online [url=https://paydayadvanceonline.science]online payday advance[/url] free webcam sluts <a href=“https://hotwebcamgirls.trade”>free webcam sluts</a> online sluts [url=https://hotwebcamgirls.trade]hot webcam girls[/url] direct lender loans <a href=“https://directlenderloans.bid”>direct lender payday loans</a> paydayloans [url=https://directlenderloans.bid]online payday loan lenders[/url] instant loans online <a href=“https://instantpaydayloans.trade”>instant payday loans</a> instant payday loans [url=https://instantpaydayloans.trade]instant payday loans[/url]
— PamNip Nov 25, 12:21 AM #payday loans for bad credit texas <a href=https://badcreditpersonalloans.us.com>personal loans bad credit reviews</a> bad credit payday loans [url=https://badcreditpersonalloans.us.com]personal loans bad credit[/url]
— Best Online Loans Nov 25, 01:09 AM #quick personal loans <a href=https://quickloans.us.com>quick cash loans in tennessee</a> payday loans quickly [url=https://quickloans.us.com]online quick loans no credit check[/url]
— Online Loan Nov 25, 01:16 AM #quick personal loans bad credit <a href=https://quickloans.us.com>quick loans for bad credit</a> quick loans online [url=https://quickloans.us.com]quick loans[/url]
— Cash Loan Nov 25, 01:44 AM #loan lenders <a href=https://shorttermloans.us.com>fast loans</a> short term loans canada [url=https://shorttermloans.us.com]payday loans houston[/url]
— Get A Loan Nov 25, 01:49 AM #personal unsecured loans <a href=https://shorttermloans.us.com>loans short term no credit check</a> short term loans online [url=https://shorttermloans.us.com]private loans[/url]
— Payday Loan Nov 25, 03:05 AM #quick personal loans online <a href=https://quickloans.us.com>quick payday loans no credit check</a> fast cash loans no credit check online [url=https://quickloans.us.com]quick loan online[/url]
— Easy Payday Loan Nov 25, 05:54 AM #easy cash payday loan <a href=“https://easycashpaydayloan.cricket”>easy cash payday loan</a> easy cash payday loan [url=https://easycashpaydayloan.cricket]easy cash payday loan[/url] online loans <a href=“https://directlenderloans.bid”>direct lenders of loans</a> 15 minute loans direct lenders [url=https://directlenderloans.bid]direct lender loans[/url] essays help <a href=“https://essayshelp.cricket”>buy essays</a> essays help [url=https://essayshelp.cricket]essays help[/url] getting a loan <a href=“https://gettingaloan.loan”>online lenders</a> getting a loan [url=https://gettingaloan.loan]loan cash[/url] online loans no credit check instant approval <a href=“https://paydayloandirectlender.bid”>best payday loan</a> payday loan direct lender [url=https://paydayloandirectlender.bid]direct lender payday loans[/url] bad credit <a href=“https://onlinepaydayloansinstantapproval.loan”>online payday loans instant approval</a> online payday loans instant approval [url=https://onlinepaydayloansinstantapproval.loan]online payday loans instant approval[/url] college essay <a href=“https://collegepaper.science”>college essays</a> best essay website [url=https://collegepaper.science]college essays[/url] direct lenders payday loans <a href=“https://directpaydaylenders.trade”>direct loan lenders</a> direct online lenders [url=https://directpaydaylenders.trade]direct payday lenders[/url]
— PamNip Nov 25, 06:19 AM #loans with bad credit and monthly payments <a href=https://shorttermloans.us.com>short term loans online</a> instant loan [url=https://shorttermloans.us.com]best loans[/url]
— Loans Online Nov 25, 07:44 AM #help for essay writing <a href=https://buyessays.us.com>college essay writer</a> buy essay online [url=https://buyessays.us.com]admissions essay help[/url]
— Essay Help Nov 25, 08:18 AM #buy essays <a href=“https://buyessays.science”>buy essays</a> writing homework help [url=https://buyessays.science]buy essays online[/url] research papers <a href=“https://schoolpapers.stream”>research papers</a> school papers [url=https://schoolpapers.stream]school papers[/url] online payday advance loan <a href=“https://paydayadvanceonline.science”>payday loans for bad credit</a> payday advance online [url=https://paydayadvanceonline.science]online payday advance[/url] direct lender payday loans <a href=“https://directlenderloans.loan”>payday loans direct lender</a> payday loans direct lender [url=https://directlenderloans.loan]money loan[/url] online homework service <a href=“https://illustrationessay.webcam”>research paper on post traumatic stress disorder</a> literature review research methodology [url=https://illustrationessay.webcam]illustration essay[/url]
— PamNip Nov 25, 08:59 AM #personalloans <a href=https://badcreditpersonalloans.us.com>personal loans bad credit</a> personal loans bad credit [url=https://badcreditpersonalloans.us.com]loan for bad credit no guarantor no fees[/url]
— Loans For Bad Credit Nov 25, 09:54 AM #buy essay without getting caught <a href=https://buyessays.us.com>buy essay cheap</a> buy essay [url=https://buyessays.us.com]buy essay online[/url]
— Buy Papers Online Nov 25, 10:47 AM #college essay writer for pay <a href=https://buyessay.us.com>essay online help</a> order essay [url=https://buyessay.us.com]buy essay[/url]
— Essay Writing Nov 25, 11:29 AM #same day loan <a href=“https://samedayloan.bid”>pay day loan</a> fast loans no credit check [url=https://samedayloan.bid]pay day loan[/url] webcam pussy <a href=“https://hotwebcamgirls.trade”>free webcam girls</a> hot webcam girls [url=https://hotwebcamgirls.trade]hot webcam girls[/url] free live sex chat <a href=“https://livesexchat.bid”>live sex chat</a> live sex chat [url=https://livesexchat.bid]free live sex chat[/url] instant payday loans <a href=“https://instantpaydayloans.trade”>instant loans online</a> instant payday loans [url=https://instantpaydayloans.trade]instant loans online[/url]
— PamNip Nov 25, 11:36 AM #payday loans for bad credit in texas <a href=https://badcreditpersonalloans.us.com>payday loans bad credit dallas</a> personal loans reviews [url=https://badcreditpersonalloans.us.com]loans for single mothers with bad credit[/url]
— Loans For Bad Credit Nov 25, 11:45 AM #quick payday loans no credit check <a href=https://quickloans.us.com>quick payday loans for bad credit</a> quick same day loans [url=https://quickloans.us.com]quick payday loans[/url]
— Paydayloan Nov 25, 12:20 PM #loans short term unsecured <a href=https://shorttermloans.us.com>short term loans</a> short term loans [url=https://shorttermloans.us.com]short term loan no credit check[/url]
— Best Online Loans Nov 25, 12:33 PM #order essay now <a href=https://buyessay.us.com>essays websites</a> essay online help [url=https://buyessay.us.com]buy essays[/url]
— Buy Essays Cheap Nov 25, 12:40 PM #college essay review services <a href=https://buyessay.us.com>buy an essay online cheap</a> help with my essay [url=https://buyessay.us.com]buy an essay online cheap[/url]
— Essays Nov 25, 01:47 PM #personal loans bad credit <a href=https://badcreditpersonalloans.us.com>no credit check personal loans</a> bad credit personal loans guaranteed [url=https://badcreditpersonalloans.us.com]personal loans for bad credit[/url]
— Get A Loan Nov 25, 02:26 PM #quick loans bracket <a href=https://quickloans.us.com>loans fast cash</a> quick and easy loan [url=https://quickloans.us.com]quick payday loans with bad credit[/url]
— Personal Loans Nov 25, 03:24 PM #help writing a college essay <a href=https://collegeessay.us.com>college essay writers</a> help me write my college essay [url=https://collegeessay.us.com]i need help writing my essay[/url]
— Essays Writing Nov 25, 03:46 PM #buy essay without plagiarism <a href=https://buyessay.us.com>help with college essay writing</a> essay writing assignment help [url=https://buyessay.us.com]college essay service[/url]
— Term Paper Writer Nov 25, 03:53 PM #bad credit payday loans <a href=https://badcreditpersonalloans.us.com>payday loans for bad credit</a> bad credit personal loans [url=https://badcreditpersonalloans.us.com]bad credit personal loans guaranteed approval 5000[/url]
— Payday Loan Online Nov 25, 04:17 PM #aa seat assignment <a href=https://essaywritingservices.us.com>essay writing service</a> how to writing essay [url=https://essaywritingservices.us.com]cheap custom essay writing service[/url]
— JamesNip Nov 25, 05:18 PM #college essay writer <a href=https://buyessay.us.com>buy an essay cheap</a> order essay online cheap [url=https://buyessay.us.com]order essay paper[/url]
— Buying An Essay Nov 25, 06:21 PM #essay homework help <a href=https://buyessays.us.com>buy essay online cheap</a> buy essay [url=https://buyessays.us.com]buy an essay paper[/url]
— My Essay Writing Nov 25, 07:18 PM #payday loans for bad credit online <a href=https://badcreditpersonalloans.us.com>payday loans for bad credit in texas</a> personal loans bad credit [url=https://badcreditpersonalloans.us.com]payday loans no brokers bad credit[/url]
— Loan Nov 25, 07:28 PM #direct lenders for bad credit <a href=“https://advancecashpaydayloan.bid”>advance cash payday loan</a> advance payday loans [url=https://advancecashpaydayloan.bid]payday advance loan[/url] fast online payday loans <a href=“https://directlenderloans.loan”>direct lender loans</a> direct lender loans [url=https://directlenderloans.loan]easy online payday loans[/url] a payday loan <a href=“https://bestpaydayloanonline.stream”>payday loans</a> fast online payday loans [url=https://bestpaydayloanonline.stream]cash loan lenders[/url] payday loans bad credit <a href=“https://loansonlinebadcredit.trade”>loans online bad credit</a> online payday loan application [url=https://loansonlinebadcredit.trade]loans online bad credit[/url] college essay prompts <a href=“https://collegeadmissionessay.stream”>college essay prompts</a> homework helpline number [url=https://collegeadmissionessay.stream]college essay prompts[/url]
— PamNip Nov 25, 07:44 PM #college essays <a href=“https://buyessays.science”>buy essays online</a> buy essays [url=https://buyessays.science]buy essays[/url] write my paper <a href=“https://writemypaperforme.cricket”>write my paper for me</a> college admissions essay help [url=https://writemypaperforme.cricket]write my essay for me[/url] webcam room <a href=“https://slutcams.webcam”>slut cams</a> webcam slut [url=https://slutcams.webcam]fetish cams[/url]
— PamNip Nov 25, 07:46 PM #quick cash loans online <a href=https://quickloans.us.com>quick loans</a> loans quickly [url=https://quickloans.us.com]quick loans[/url]
— JamesNip Nov 25, 08:30 PM #a manual for writers of term papers <a href=https://essaywritingservices.us.com>essay writing services review</a> reliable essay writing service [url=https://essaywritingservices.us.com]essay writing services reviews[/url]
— JamesNip Nov 25, 09:02 PM #college essays <a href=https://collegeessay.us.com>college essay writer for pay</a> college essay prompts [url=https://collegeessay.us.com]help writing college essays[/url]
— Homework Help Online Nov 25, 09:22 PM #buy essay <a href=https://buyessay.us.com>order essay paper</a> buy custom essay [url=https://buyessay.us.com]online essay[/url]
— Homeworks Of America Nov 25, 09:41 PM #buy essay <a href=https://buyessays.us.com>help me write a essay</a> where to buy essays [url=https://buyessays.us.com]buy essay[/url]
— White Paper Writer Nov 25, 10:03 PM #is there a website that writes essays for you <a href=https://buyessay.us.com>essay buy</a> writing a college admissions essay [url=https://buyessay.us.com]buy essay[/url]
— Buy Essays Online Nov 25, 11:04 PM #college essay <a href=https://collegeessay.us.com>help on essay writing</a> help with essays assignments [url=https://collegeessay.us.com]writing essays for college[/url]
— Buy An Essay Online Nov 25, 11:48 PM #buy essay <a href=https://buyessays.us.com>buy an essay</a> buy an essay for college [url=https://buyessays.us.com]buy an essay[/url]
— Term Paper Writer Nov 26, 12:03 AM #Our site <a href=https://onlineloans.us.com/>payday loans online</a> online payday loans [url=https://onlineloans.us.com/]This Site[/url]
— JamesNip Nov 26, 12:18 AM #buy a college essay <a href=https://buyessay.us.com>buy essays</a> buy essay [url=https://buyessay.us.com]order essay now[/url]
— Writer Essay Nov 26, 01:22 AM #help my essay <a href=https://collegeessay.us.com>college essay help online</a> college essays help [url=https://collegeessay.us.com]descriptive essay help[/url]
— Aa Seat Assignment Nov 26, 03:49 AM #instant payday loans <a href=“https://instantpaydayloans.stream”>payday loans</a> instant payday loans [url=https://instantpaydayloans.stream]instant online loans[/url] webcam sex chat <a href=“https://webcamsexchat.trade”>free sex webcam</a> erotic sex chat [url=https://webcamsexchat.trade]webcam sex chat[/url] college essays <a href=“https://buyessays.science”>can you do my homework for me</a> help me do my math homework [url=https://buyessays.science]buy essays online[/url]
— PamNip Nov 26, 03:56 AM #loans <a href=https://loansforbadcredit.us.com/>loans online bad credit</a> direct lenders for bad credit [url=https://loansforbadcredit.us.com/]payday loans bad credit[/url]
— JamesNip Nov 26, 05:23 AM #buy essays <a href=https://buyessay.us.com>order essay online cheap quick</a> buy an essay online [url=https://buyessay.us.com]buying essays[/url]
— Essay Writer Review Nov 26, 06:20 AM #essay writing <a href=“https://paperwriting.cricket”>paper writing service</a> paper writing [url=https://paperwriting.cricket]writing a paper[/url] online payday advance loan <a href=“https://onlinepaydayadvanceloan.science”>online payday advance loan</a> online payday advance loan [url=https://onlinepaydayadvanceloan.science]online payday advance loan[/url] girl chat <a href=“https://girlschat.trade”>girls chat</a> online sex chat [url=https://girlschat.trade]girls chat[/url] online payday loan lenders <a href=“https://bestpaydayloanonline.stream”>payday loan online</a> best payday loan online [url=https://bestpaydayloanonline.stream]online payday loan lender[/url] online payday loans instant approval <a href=“https://guaranteedpaydayloans.stream”>payday loans lenders</a> guaranteed payday loans [url=https://guaranteedpaydayloans.stream]instant payday loans[/url] instant payday loans <a href=“https://instantpaydayloans.loan”>instant payday loans</a> online payday loan [url=https://instantpaydayloans.loan]payday cash advance loan[/url] quick cash loans <a href=“https://gettingaloan.loan”>payday loan</a> getting a loan [url=https://gettingaloan.loan]loan cash[/url] college essay <a href=“https://collegepaper.science”>college essays</a> college paper [url=https://collegepaper.science]my assignment help australia[/url] webcam sex chat <a href=“https://webcamsexchat.trade”>webcam sex chat</a> free webcam sex chat [url=https://webcamsexchat.trade]webcam sex chat[/url] college essay prompts <a href=“https://collegeadmissionessay.stream”>college essay prompts</a> college admission essay [url=https://collegeadmissionessay.stream]college essay prompts[/url]
— PamNip Nov 26, 06:49 AM #instant payday loans <a href=“https://instantpaydayloans.stream”>small payday loans</a> fast payday loans [url=https://instantpaydayloans.stream]instant payday loans[/url] i need homework help <a href=“https://customessaywriting.webcam”>help me with my science homework</a> dissertation writing guide [url=https://customessaywriting.webcam]custom essay writing[/url] best online payday loans <a href=“https://bestpaydayloansonline.trade”>payday loans with no credit check</a> best payday loans online [url=https://bestpaydayloansonline.trade]best payday loans online[/url] direct payday loan lenders <a href=“https://easycashpaydayloan.cricket”>payday loan online</a> easy fast payday loans [url=https://easycashpaydayloan.cricket]easy cash payday loan[/url] illustration essay <a href=“https://illustrationessay.webcam”>illustration essay</a> term papers [url=https://illustrationessay.webcam]need help on math homework[/url] cash loans no credit check <a href=“https://directlenderloans.bid”>direct lenders of loans</a> direct lenders of loans [url=https://directlenderloans.bid]payday loans direct lender[/url] online payday advance loan <a href=“https://onlinepaydayadvanceloan.science”>bad credit</a> online payday advance loan [url=https://onlinepaydayadvanceloan.science]online payday loans no credit check[/url] research papers <a href=“https://schoolpapers.stream”>school papers</a> holt homework help [url=https://schoolpapers.stream]research papers[/url]
— PamNip Nov 26, 07:06 AM #custom essay writing <a href=https://writemyessay.us.com>write my essay</a> custom essay writing service [url=https://writemyessay.us.com]custom essay writing[/url]
— JamesNip Nov 26, 08:24 AM #online payday loans for bad credit <a href=https://loansforbadcredit.us.com/>payday loans for bad credit</a> loans for bad credit [url=https://loansforbadcredit.us.com/]HTTPS://LOANSFORBADCREDIT.US.COM[/url]
— JamesNip Nov 26, 11:12 AM #direct lenders immediate payment loans <a href=“https://directlenderloans.loan”>direct lender loans</a> direct lender payday loans [url=https://directlenderloans.loan]payday loans direct lender[/url] best pay day loans <a href=“https://gettingaloan.loan”>emergency loan no credit check</a> advance payday loans [url=https://gettingaloan.loan]payday loan[/url] show girls <a href=“https://fuckshow.bid”>fuck show</a> free live sex shows [url=https://fuckshow.bid]live show[/url] payday loans direct lenders only <a href=“https://directlenderspaydayloans.cricket”>payday loans online direct lenders</a> online payday loans direct lenders [url=https://directlenderspaydayloans.cricket]payday loans direct lenders only[/url] internet payday loans <a href=“https://thebestonlinepaydayloans.stream”>easy payday loans online</a> easy payday loans online [url=https://thebestonlinepaydayloans.stream]online payday loans[/url] payday loan near me <a href=“https://samedayloan.bid”>pay day loan</a> paydayloan [url=https://samedayloan.bid]pay day loan[/url] the best online payday loans <a href=“https://bestpaydayloansonline.trade”>easy payday loans online</a> instant payday loans [url=https://bestpaydayloansonline.trade]guaranteed payday loans[/url] illustration essay <a href=“https://illustrationessay.webcam”>primary homework help saxons</a> cheap research papers [url=https://illustrationessay.webcam]best assignment help[/url] payday loans <a href=“https://instantpaydayloans.stream”>payday loans</a> instant payday loans [url=https://instantpaydayloans.stream]instant payday loans[/url] college admission essay <a href=“https://collegeadmissionessay.stream”>college admission essay</a> assignments help [url=https://collegeadmissionessay.stream]college admission essay[/url]
— PamNip Nov 26, 02:37 PM #WriteMyEssay.us.com <a href=https://writemyessay.us.com>write my essay</a> write essay for me [url=https://writemyessay.us.com]Read More[/url]
— JamesNip Nov 26, 03:04 PM #short term loans <a href=https://shorttermloans.us.com>short term loans for bad credit</a> short term loans [url=https://shorttermloans.us.com]loans short term no credit check[/url]
— JamesNip Nov 26, 03:44 PM #professional essay writing services <a href=https://essaywritingservices.us.com>Your Domain Name</a> joseph gibaldi mla handbook for writers of research papers [url=https://essaywritingservices.us.com]best uk essay writing service[/url]
— JamesNip Nov 26, 04:45 PM #quick payday loans direct lenders <a href=https://quickloans.us.com>quick loans no credit check</a> quick loans calgary [url=https://quickloans.us.com]fast and easy money[/url]
— JamesNip Nov 26, 05:33 PM #advance cash payday loan <a href=“https://easycashpaydayloan.cricket”>best payday loan</a> direct payday loan lenders [url=https://easycashpaydayloan.cricket]easy cash payday loan[/url] college essay prompts <a href=“https://collegeessayprompts.webcam”>college essay help</a> best essay website [url=https://collegeessayprompts.webcam]college essay help[/url] instant online loans <a href=“https://instantonlineloans.science”>get a loan</a> pay day lenders [url=https://instantonlineloans.science]instant payday loans[/url] direct lenders <a href=“https://directlenderloans.trade”>direct lenders of loans</a> payday loans online direct lender [url=https://directlenderloans.trade]direct lender loans[/url] romans homework help <a href=“https://researchwriting.trade”>i need help with my assignment</a> writing a paper [url=https://researchwriting.trade]research writing[/url] essays help <a href=“https://essayshelp.cricket”>essays help</a> buy essays [url=https://essayshelp.cricket]math homework helpers[/url]
— PamNip Nov 26, 07:36 PM #write my essay online <a href=https://essayonline.us.com>custom essays</a> write my essay online [url=https://essayonline.us.com]write my essay online[/url]
— JoeNip Nov 26, 08:53 PM #easy payday loans no teletrack <a href=https://quickloans.us.com>quick loans for bad credit</a> get money online fast [url=https://quickloans.us.com]quick loans[/url]
— JoeNip Nov 26, 10:22 PM #online payday loans for bad credit <a href=“https://loansonlinebadcredit.trade”>payday loans bad credit</a> easiest payday loan to get [url=https://loansonlinebadcredit.trade]payday loans bad credit[/url] direct lenders of loans <a href=“https://directlenderloans.bid”>direct lender loans</a> direct lender payday loans [url=https://directlenderloans.bid]direct lenders of loans[/url] sex webcam <a href=“https://webcamsexchat.trade”>free adult video chat</a> live sex chat [url=https://webcamsexchat.trade]live sex chat[/url]
— PamNip Nov 27, 12:02 AM #help writing essays for college <a href=https://collegeessay.us.com>buy college essays online</a> college essay [url=https://collegeessay.us.com]help writing college essays[/url]
— Write Essay Nov 27, 01:55 AM #online loans no credit check instant approval <a href=“https://directlenderloans.trade”>direct lender loans</a> payday advance [url=https://directlenderloans.trade]direct lenders[/url] easy online payday loans <a href=“https://easypaydayloans.cricket”>easy payday loans</a> easy online payday loans [url=https://easypaydayloans.cricket]easy online payday loans[/url] online payday loans instant approval <a href=“https://onlinepaydayloansinstantapproval.loan”>cash loan lenders</a> payday loan direct lender [url=https://onlinepaydayloansinstantapproval.loan]online payday loan instant approval[/url] essay writing <a href=“https://writingservices.trade”>writing services</a> writing a paper [url=https://writingservices.trade]writing services[/url] same day loan <a href=“https://samedayloan.bid”>pay day loan</a> pay day loan [url=https://samedayloan.bid]same day loan[/url] mla research paper <a href=“https://mlaresearchpaper.stream”>mla research paper</a> research report [url=https://mlaresearchpaper.stream]research paper[/url] the best online payday loans <a href=“https://bestpaydayloansonline.trade”>the best online payday loans</a> the best online payday loans [url=https://bestpaydayloansonline.trade]easy payday loans online[/url] smartwork online homework <a href=“https://customessaywriting.webcam”>custom essay writing</a> custom essay writing [url=https://customessaywriting.webcam]dissertation writing guide[/url]
— PamNip Nov 27, 02:41 AM #buy essay <a href=https://buyessays.us.com>admissions essay help</a> buy an essay [url=https://buyessays.us.com]buy essay online[/url]
— Essay Writing Nov 27, 03:47 AM #buy essay australia <a href=https://buyessays.us.com>buy an essay</a> online essay [url=https://buyessays.us.com]order essay[/url]
— Buy An Essay Paper Nov 27, 03:58 AM #help me write my college essay <a href=https://buyessay.us.com>essay buying</a> buy essay [url=https://buyessay.us.com]buy essay[/url]
— JoeNip Nov 27, 04:19 AM #buy college essays <a href=https://collegeessay.us.com>writing a college admission essay</a> buy college essays online [url=https://collegeessay.us.com]help me write a essay[/url]
— JoeNip Nov 27, 05:05 AM #best online payday loans <a href=https://loansforbadcredit.us.com/>HTTPS://LOANSFORBADCREDIT.US.COM</a> more info [url=https://loansforbadcredit.us.com/]best payday loan[/url]
— JoeNip Nov 27, 05:35 AM #help writing college essays <a href=https://buyessay.us.com>buy essay online</a> college admission essay writing service [url=https://buyessay.us.com]buy essay online[/url]
— Assignment Helps Nov 27, 05:37 AM #online loan <a href=https://onlineloans.us.com/>This Site</a> payday loans online [url=https://onlineloans.us.com/]payday loans online[/url]
— JoeNip Nov 27, 07:44 AM #buy essay <a href=https://buyessay.us.com>buy essay online</a> essay online buy [url=https://buyessay.us.com]college essay writing help[/url]
— How To Writing Essay Nov 27, 07:56 AM #help writing an essay <a href=https://collegeessay.us.com>college essay help</a> help essay writing [url=https://collegeessay.us.com]buy college essays online[/url]
— Define Assignations Nov 27, 08:20 AM #website to write essays <a href=https://buyessay.us.com>buy essay</a> buy essay online [url=https://buyessay.us.com]buy essay without plagiarism[/url]
— Cheap Essays Nov 27, 09:17 AM #buy essay <a href=https://buyessays.us.com>buy essay</a> essay buying [url=https://buyessays.us.com]buy an essay uk[/url]
— Online Essay Writing Nov 27, 09:27 AM #college essay help <a href=https://collegeessay.us.com>college essay prompts</a> college essay [url=https://collegeessay.us.com]college essay paper[/url]
— Write Essay Online Nov 27, 09:55 AM #buy an essay for college <a href=https://buyessay.us.com>buy essay without plagiarism</a> buy essay [url=https://buyessay.us.com]buy essay online[/url]
— Write My Thesis Nov 27, 10:55 AM #simple interest loan <a href=https://shorttermloans.us.com>short term payday loans</a> loans short term unsecured [url=https://shorttermloans.us.com]short term bad credit loans[/url]
— JoeNip Nov 27, 11:42 AM #college admissions essay help <a href=https://collegeessay.us.com>buy college essays</a> history essay help [url=https://collegeessay.us.com]university essay help[/url]
— Random Assignments Nov 27, 11:47 AM #online payday loan <a href=https://paydayloans.us.org/>direct payday loans online</a> payday loans online [url=https://paydayloans.us.org/]payday loans[/url]
— JoeNip Nov 27, 12:46 PM #buy essay online <a href=https://buyessays.us.com>buy an essay</a> buy an essay paper [url=https://buyessays.us.com]writing a college essay about yourself[/url]
— Homework Help Online Nov 27, 01:28 PM #college essay <a href=https://collegeessay.us.com>college essay</a> college essay [url=https://collegeessay.us.com]buy college essays[/url]
— Buy Cheap Essay Nov 27, 02:42 PM #buy an essay <a href=https://buyessays.us.com>order essay now</a> order essay paper [url=https://buyessays.us.com]order essay online[/url]
— Homework Online Nov 27, 03:58 PM #buy a college essay <a href=https://buyessay.us.com>buy an essay online</a> buy essays [url=https://buyessay.us.com]buy an essay[/url]
— Online Essays Nov 27, 04:27 PM #online payday loan <a href=https://onlineloans.us.com/>quick loans</a> loans online [url=https://onlineloans.us.com/]online payday lenders[/url]
— JoeNip Nov 27, 04:56 PM #buy an essay <a href=https://buyessay.us.com>buy essays</a> write my college essay for me [url=https://buyessay.us.com]buy essay[/url]
— Photo Assignment Nov 27, 05:49 PM #professional essay writing services <a href=https://essaywritingservices.us.com>essay writing service</a> law essay writing service uk [url=https://essaywritingservices.us.com]best custom essay writing services[/url]
— JoeNip Nov 27, 06:19 PM #help writing an essay for college <a href=https://collegeessay.us.com>help with essay</a> college essay prompts [url=https://collegeessay.us.com]college essay help[/url]
— Homework Good Or Bad Nov 27, 06:37 PM #order essay <a href=https://buyessays.us.com>buy essay papers</a> buy an essay cheap [url=https://buyessays.us.com]buy an essay[/url]
— JoeNip Nov 27, 07:57 PM #buy essay online <a href=https://buyessay.us.com>website that writes your essay for you</a> order essay online cheap [url=https://buyessay.us.com]buy essay[/url]
— Buy An Essay Nov 27, 08:39 PM #payday loans online <a href=https://onlineloans.us.com/>payday loans online</a> payday loans online [url=https://onlineloans.us.com/]site[/url]
— JoeNip Nov 27, 10:17 PM #buy essay online <a href=https://buyessay.us.com>extended essay help</a> buy an essay cheap [url=https://buyessay.us.com]writing a college level essay[/url]
— Essay Writing Nov 27, 10:28 PM #help with my essay <a href=https://collegeessay.us.com>help me write my college essay</a> buy college essays online [url=https://collegeessay.us.com]college essays[/url]
— Online Essay Writer Nov 27, 11:07 PM #writing a college essay about yourself <a href=https://collegeessay.us.com>writing personal essays for college</a> buy college essays [url=https://collegeessay.us.com]help me write my college essay[/url]
— Buy Custom Essay Nov 28, 12:45 AM #short term loans online <a href=https://shorttermloans.us.com>short term cash loans</a> personal loans no credit check [url=https://shorttermloans.us.com]online short term loans[/url]
— JoeNip Nov 28, 01:04 AM #college essay services <a href=https://collegeessay.us.com>essay homework help</a> college essays [url=https://collegeessay.us.com]college essay helper[/url]
— Essay Writings Nov 28, 01:30 AM #click <a href=https://essaywritingservices.us.com>custom essay writing services</a> essay writing service [url=https://essaywritingservices.us.com]essay writing service review[/url]
— JoeNip Nov 28, 02:45 AM #buy an essay paper <a href=https://buyessay.us.com>buy essay</a> writing essays for college [url=https://buyessay.us.com]buy essays online[/url]
— JoeNip Nov 28, 06:57 AM #virtual sex <a href=https://webcamsex.us.com>live cams</a> webcam sex [url=https://webcamsex.us.com]adult webcam[/url]
— JoeNip Nov 28, 08:08 AM #free sex webcam <a href=https://webcamsex.us.com>girl webcam</a> free sex cam [url=https://webcamsex.us.com]webcam sex[/url]
— JoeNip Nov 28, 09:24 AM #loans online instant approval <a href=“https://instantonlineloans.science”>instant loans online</a> fastest payday loan [url=https://instantonlineloans.science]fast loans no credit check[/url] direct lenders online loans <a href=“https://badcreditloansdirectlenders.cricket”>bad credit payday loans direct lenders</a> payday loan near me [url=https://badcreditloansdirectlenders.cricket]payday loans direct lenders only[/url] college essay prompts <a href=“https://collegeadmissionessay.stream”>maths homework online</a> help essay writing [url=https://collegeadmissionessay.stream]graduate school essays[/url] research papers <a href=“https://schoolpapers.stream”>school papers</a> school papers [url=https://schoolpapers.stream]online math homework help[/url] advance payday loans online <a href=“https://paydayadvanceonline.science”>cash advance lenders</a> online payday loans direct lenders [url=https://paydayadvanceonline.science]payday advance loan[/url] direct lender payday loans <a href=“https://directlenderloans.trade”>direct lender loans</a> direct lender loans [url=https://directlenderloans.trade]direct payday loans[/url] write my paper for me <a href=“https://writemypaperforme.cricket”>write my paper for me</a> write my paper [url=https://writemypaperforme.cricket]write my paper for me[/url] english homework helper <a href=“https://paperwriting.cricket”>do my math course</a> do my physics homework [url=https://paperwriting.cricket]uk dissertation writing services[/url]
— PamNip Nov 28, 10:26 AM #buy an essay <a href=https://buyessays.us.com>buy essay</a> help on essay writing [url=https://buyessays.us.com]buy an essay for college[/url]
— JoeNip Nov 28, 12:38 PM #payday loans online <a href=https://paydayloans.us.org/>payday loans online</a> personal loans [url=https://paydayloans.us.org/]online payday loans[/url]
— JoeNip Nov 28, 02:51 PM #online essay <a href=https://writemyessay.us.com>help me with my essay</a> write my essay for me cheap [url=https://writemyessay.us.com]write my essay[/url]
— JoeNip Nov 28, 03:16 PM #direct payday loan lenders <a href=https://onlineloans.us.com/>instant online payday loan</a> online payday loans [url=https://onlineloans.us.com/]http://onlineloans.us.com/[/url]
— JoeNip Nov 28, 07:28 PM #need a fast loan <a href=https://quickloans.us.com>fast loans no credit</a> quick personal loans online [url=https://quickloans.us.com]quick loans for bad credit[/url]
— Fastest Payday Loan Nov 28, 10:01 PM #short term loans canada <a href=https://shorttermloans.us.com>payday loans online direct lenders</a> short loans [url=https://shorttermloans.us.com]short term loans canada[/url]
— Speedy Cash Nov 28, 10:18 PM #payday loans online <a href=https://onlineloans.us.com/>payday loans online</a> payday loan online [url=https://onlineloans.us.com/]payday loan online[/url]
— JoeNip Nov 28, 11:20 PM #payday loans for bad credit <a href=https://loansforbadcredit.us.com/>LOANSFORBADCREDIT.US.COM</a> bad credit payday loans [url=https://loansforbadcredit.us.com/]bad credit payday loans[/url]
— JamesNip Nov 28, 11:25 PM #sluts online <a href=https://webcamsex.us.com>adult cam</a> online sex cam [url=https://webcamsex.us.com]webcam sex[/url]
— JamesNip Nov 29, 12:52 AM #loan guarantee <a href=https://shorttermloans.us.com>payday loans direct lender bad credit</a> short term loans [url=https://shorttermloans.us.com]short term loans online[/url]
— JoeNip Nov 29, 12:58 AM #personal loans for poor credit <a href=https://shorttermloans.us.com>short loans</a> loans las vegas nv [url=https://shorttermloans.us.com]short term loans[/url]
— Personal Loans Nov 29, 02:01 AM #easy credit loans <a href=https://quickloans.us.com>quick payday loans</a> quick personal loans online [url=https://quickloans.us.com]quick loans[/url]
— Fastest Payday Loan Nov 29, 03:38 AM #buy an essay <a href=https://buyessays.us.com>online essay writing help</a> buy essays [url=https://buyessays.us.com]order essay online[/url]
— JoeNip Nov 29, 03:50 AM #personal loans bad credit <a href=https://badcreditpersonalloans.us.com>guaranteed personal loans bad credit</a> unsecured personal loans online [url=https://badcreditpersonalloans.us.com]private lenders for personal loans[/url]
— Loans For Bad Credit Nov 29, 05:56 AM #bad credit payday loans <a href=https://badcreditpersonalloans.us.com>bad credit personal loans</a> personal loans with bad credit [url=https://badcreditpersonalloans.us.com]unsecured loans for bad credit direct lenders[/url]
— Direct Lender Loans Nov 29, 06:13 AM #buy essays online reviews <a href=https://buyessays.us.com>writing essay website</a> buy an essay online [url=https://buyessays.us.com]college essay writing help[/url]
— JamesNip Nov 29, 06:49 AM #loan calculator personal <a href=https://badcreditpersonalloans.us.com>bad credit personal loans</a> personal loans for people with poor credit [url=https://badcreditpersonalloans.us.com]payday loans for bad credit texas[/url]
— Best Online Loans Nov 29, 07:24 AM #short loans <a href=https://shorttermloans.us.com>payday loans no credit check direct lender</a> speedy loan [url=https://shorttermloans.us.com]short term loans for bad credit[/url]
— JoeNip Nov 29, 07:29 AM #pay to write essays <a href=https://writemyessay.us.com>Learn More</a> HTTP://WRITEMYESSAY.US.COM/ [url=https://writemyessay.us.com]write[/url]
— JamesNip Nov 29, 07:34 AM #payday loans for bad credit <a href=https://loansforbadcredit.us.com/>https://loansforbadcredit.us.com/</a> payday loans for bad credit [url=https://loansforbadcredit.us.com/]Go Here[/url]
— JamesNip Nov 29, 08:05 AM #fast loan <a href=https://shorttermloans.us.com>short term cash loans</a> best short term loans [url=https://shorttermloans.us.com]short term loans no credit checks[/url]
— Get A Loan Nov 29, 10:00 AM #quick personal loans <a href=https://quickloans.us.com>fast payday loans online direct lenders</a> fast loans [url=https://quickloans.us.com]quick loans online[/url]
— JamesNip Nov 29, 10:31 AM #paydayloans.us.org <a href=https://paydayloans.us.org/>payday loans</a> payday loans online bad credit ok [url=https://paydayloans.us.org/]payday loans online direct lenders only[/url]
— JoeNip Nov 29, 10:38 AM #quick loans online <a href=https://quickloans.us.com>quicken loans</a> fast no credit check loans [url=https://quickloans.us.com]fast loans online[/url]
— Instant Online Loans Nov 29, 11:39 AM #short term loans no credit checks <a href=https://shorttermloans.us.com>short term loan no credit check</a> payday loan for bad credit [url=https://shorttermloans.us.com]short term loans[/url]
— Payday Loan Nov 29, 11:48 AM #quick cash loans bad credit <a href=https://quickloans.us.com>loans quick and easy</a> quick personal loans [url=https://quickloans.us.com]fast loans[/url]
— Payday Express Nov 29, 01:03 PM #writing essay service <a href=https://essaywritingservices.us.com>essay writing service review</a> argumentative essay writer [url=https://essaywritingservices.us.com]essay writing service[/url]
— JoeNip Nov 29, 01:51 PM #writing a college level essay <a href=https://buyessay.us.com>order essay now</a> buy essay online [url=https://buyessay.us.com]buy an essay online[/url]
— JoeNip Nov 29, 02:40 PM #write my essay <a href=https://writemyessay.us.com>custom essay writing</a> writemyessay.us.com [url=https://writemyessay.us.com]source[/url]
— JamesNip Nov 29, 02:50 PM #quick cash loans <a href=https://quickloans.us.com>easy loans online no credit check</a> fast payday loan online [url=https://quickloans.us.com]fast loans lenders[/url]
— Pay Day Loan Nov 29, 03:01 PM #apply for a personal loan <a href=https://badcreditpersonalloans.us.com>bad credit payday loans</a> payday loans for bad credit [url=https://badcreditpersonalloans.us.com]payday loans for bad credit in pa[/url]
— Online Loans Nov 29, 03:21 PM #buy essay <a href=https://buyessays.us.com>college writing essay</a> buy essays [url=https://buyessays.us.com]buy essay[/url]
— JamesNip Nov 29, 04:04 PM #fast online loans <a href=https://shorttermloans.us.com>short term loans oklahoma</a> quick short term loans [url=https://shorttermloans.us.com]short term loans no credit check[/url]
— JoeNip Nov 29, 04:04 PM #college essay writing services <a href=https://essaywritingservices.us.com>Recommended Reading</a> Read Full Article [url=https://essaywritingservices.us.com]essay writing service[/url]
— JoeNip Nov 29, 05:00 PM #quick small loans <a href=https://quickloans.us.com>quick loans</a> quick cash loans in tennessee [url=https://quickloans.us.com]quick loans chattanooga tn[/url]
— Fastest Payday Loan Nov 29, 07:11 PM #short term loans oklahoma <a href=https://shorttermloans.us.com>short term loans no credit check</a> best loan companies [url=https://shorttermloans.us.com]payday loans for bad credit[/url]
— Speedy Cash Nov 29, 07:45 PM #webcam sex <a href=https://webcamsex.us.com>adult webcams</a> webcam sex [url=https://webcamsex.us.com]webcams sex[/url]
— JamesNip Nov 29, 08:39 PM #payday loans online get a fast easy <a href=https://quickloans.us.com>quick loans no credit check</a> quick payday loans no credit check [url=https://quickloans.us.com]quick loans[/url]
— Get A Loan Nov 29, 08:40 PM #personal loans bad credit <a href=https://badcreditpersonalloans.us.com>personal secured loans</a> personal loans for people with bad credit [url=https://badcreditpersonalloans.us.com]payday loans for bad credit[/url]
— Cash Advance Nov 29, 09:01 PM #online loans <a href=https://onlineloans.us.com/>payday loans online</a> online loans [url=https://onlineloans.us.com/]payday loans online[/url]
— JamesNip Nov 29, 10:12 PM #bad credit payday loans <a href=https://badcreditpersonalloans.us.com>personal loans bad credit reviews</a> personal loan calculators [url=https://badcreditpersonalloans.us.com]bad credit payday loans[/url]
— Payday Nov 29, 10:50 PM #sex webcam <a href=https://webcamsex.us.com>adult webcam</a> sex webcam [url=https://webcamsex.us.com]adult cam[/url]
— JamesNip Nov 30, 12:01 AM #1500 loan <a href=https://shorttermloans.us.com>payday online loans</a> short term loan lenders [url=https://shorttermloans.us.com]mobile loans[/url]
— JamesNip Nov 30, 02:42 AM #payday loans quickly <a href=https://quickloans.us.com>quick loans for bad credit same day</a> quick personal loans with no credit check [url=https://quickloans.us.com]quick loans[/url]
— Get A Loan Nov 30, 03:04 AM #quick payday loans online <a href=https://quickloans.us.com>quick loans</a> quick payday loan online [url=https://quickloans.us.com]fast quick loans[/url]
— Cash Advance Nov 30, 04:42 AM #payday loans online <a href=https://paydayloans.us.org/>payday loan</a> Continue [url=https://paydayloans.us.org/]payday loans online direct lenders only[/url]
— JamesNip Nov 30, 05:56 AM #buy essay online <a href=https://essayonline.us.com>essay help</a> write my essay online [url=https://essayonline.us.com]homework online[/url]
— JamesNip Nov 30, 07:40 AM #homework help online <a href=https://essayonline.us.com>essay online</a> HTTPS://WRITEMYESSAY.US.COM/ [url=https://essayonline.us.com]buy essay online[/url]
— JamesNip Nov 30, 11:57 AM #payday loans online <a href=https://paydayloans.us.org/>payday loans</a> online payday loans [url=https://paydayloans.us.org/]payday loans online[/url]
— JamesNip Nov 30, 12:57 PM #buy essay without getting caught <a href=https://buyessay.us.com>order essay online cheap</a> where can i buy an essay online [url=https://buyessay.us.com]need help with essay[/url]
— JamesNip Nov 30, 02:05 PM #webcam sex <a href=https://webcamsex.us.com>live chat</a> sex chat cams [url=https://webcamsex.us.com]webcam sex[/url]
— JamesNip Nov 30, 05:09 PM #short term cash loans <a href=https://shorttermloans.us.com>easy loans online</a> payday loans las vegas nv [url=https://shorttermloans.us.com]short term loans[/url]
— Bad Credit Nov 30, 06:33 PM #online essay writer <a href=https://essayonline.us.com>write my essay online</a> Recommended Reading [url=https://essayonline.us.com]writers online[/url]
— JamesNip Nov 30, 07:42 PM #short term loan lenders <a href=https://shorttermloans.us.com>loans short term no credit check</a> short term loan lenders [url=https://shorttermloans.us.com]short term quick loans[/url]
— Direct Lender Loans Nov 30, 09:28 PM #real loans for people with bad credit <a href=https://badcreditpersonalloans.us.com>quick cash loans online bad credit</a> payday loans bad credit approval [url=https://badcreditpersonalloans.us.com]payday loans bad credit[/url]
— Loan Nov 30, 10:29 PM #quick loans <a href=https://quickloans.us.com>quick loans for bad credit</a> quick personal loans in new york [url=https://quickloans.us.com]fast payday loans direct lender[/url]
— JamesNip Nov 30, 11:52 PM #live cams <a href=https://webcamsex.us.com>adult webcam</a> adult chat [url=https://webcamsex.us.com]sex webcam[/url]
— JoeNip Nov 30, 11:55 PM #quick loans online <a href=https://quickloans.us.com>loans quicken</a> quick loans [url=https://quickloans.us.com]quick loans rates[/url]
— Pay Day Loans Dec 1, 12:28 AM #quick loans online <a href=https://quickloans.us.com>quick payday loans direct lenders</a> fast loans no credit check [url=https://quickloans.us.com]fast loans[/url]
— Payday Loan Dec 1, 02:26 AM #personal loans quick <a href=https://quickloans.us.com>quick loans</a> quick personal loans bad credit [url=https://quickloans.us.com]payday loans quickly[/url]
— Payday Loan Online Dec 1, 02:32 AM #fast loans online <a href=https://quickloans.us.com>quick and easy loan</a> fast loans lenders [url=https://quickloans.us.com]quick loans online[/url]
— JamesNip Dec 1, 03:54 AM #quick personal loans bad credit <a href=https://quickloans.us.com>quick loans online</a> quick cash loans reviews [url=https://quickloans.us.com]quick personal loans[/url]
— JoeNip Dec 1, 05:07 AM #buy an essay cheap <a href=https://buyessay.us.com>buy an essay online</a> buy essay [url=https://buyessay.us.com]buy essay without plagiarism[/url]
— JamesNip Dec 1, 05:30 AM #loans online bad credit <a href=https://loansforbadcredit.us.com/>payday loans for bad credit</a> https://loansforbadcredit.us.com [url=https://loansforbadcredit.us.com/]direct payday lenders bad credit[/url]
— JoeNip Dec 1, 05:30 AM #bad credit personal loans <a href=https://badcreditpersonalloans.us.com>personal loans with bad credit</a> payday loans for bad credit in texas [url=https://badcreditpersonalloans.us.com]personal loans comparison[/url]
— Quick Loan Dec 1, 05:33 AM #bad credit personal loans <a href=https://badcreditpersonalloans.us.com>bad credit payday loans</a> personal loans with bad credit [url=https://badcreditpersonalloans.us.com]personal loan for bad credit[/url]
— Online Payday Loan Dec 1, 06:36 AM #personal loans quick approval <a href=https://quickloans.us.com>fast loans</a> quick loans for bad credit [url=https://quickloans.us.com]quick loans online[/url]
— Payday Loan Dec 1, 07:17 AM #short term loans colorado <a href=https://shorttermloans.us.com>short term payday loans</a> short term loans online [url=https://shorttermloans.us.com]payday loans with bad credit[/url]
— Get A Loan Dec 1, 07:47 AM #my essay writing <a href=https://writemyessay.us.com>my paper writer</a> write essay for me [url=https://writemyessay.us.com]Clicking Here[/url]
— JamesNip Dec 1, 08:24 AM #essay online <a href=https://essayonline.us.com>buy essay online safe</a> essay online [url=https://essayonline.us.com]buy essay online[/url]
— JoeNip Dec 1, 08:37 AM #quick personal loans <a href=https://quickloans.us.com>quick loans</a> quick loans [url=https://quickloans.us.com]quick cash loans today[/url]
— Instant Online Loans Dec 1, 08:38 AM #Continue Reading <a href=https://paydayloans.us.org/>payday loans online</a> cash advance [url=https://paydayloans.us.org/]More about the author[/url]
— JoeNip Dec 1, 08:56 AM #apoteket uden, http://webapoteket.gdn/metfirex.html – køb billigt recept.
— web apoteket Dec 1, 09:04 AM #håndkøb europe, http://webapoteket.gdn/linezolide.html – hvor får jeg priser.
— webapoteket.gdn Dec 1, 10:03 AM #short term loans <a href=https://shorttermloans.us.com>online loans no credit check</a> instant personal loans [url=https://shorttermloans.us.com]quick personal loans[/url]
— Speedy Cash Dec 1, 10:37 AM #short term fast cash loans <a href=https://shorttermloans.us.com>short loans</a> short term loans online [url=https://shorttermloans.us.com]short term fast cash loans[/url]
— Instant Online Loans Dec 1, 10:44 AM #college essay help online <a href=https://essayonline.us.com>buy essay online</a> write essay [url=https://essayonline.us.com]essay writing online[/url]
— JamesNip Dec 1, 12:06 PM #apotek online, http://webapoteket.gdn/zolvera.html – tabletter europe.
— apoteket web Dec 1, 12:15 PM #personal loans for bad credit <a href=https://badcreditpersonalloans.us.com>payday loan online bad credit</a> poor credit personal loans [url=https://badcreditpersonalloans.us.com]personal loans bad credit[/url]
— Payday Express Dec 1, 12:50 PM #cheap essay writing service us <a href=https://essaywritingservices.us.com>ESSAYWRITINGSERVICES.US.COM</a> best online essay writing services [url=https://essaywritingservices.us.com]admission essay writing service[/url]
— JoeNip Dec 1, 12:56 PM #payday loans online <a href=https://paydayloans.us.org/>payday loan online</a> pay day loans [url=https://paydayloans.us.org/]cash advance[/url]
— JamesNip Dec 1, 03:12 PM #personal loans for bad credit <a href=https://badcreditpersonalloans.us.com>secured loan for bad credit</a> bad credit personal loans [url=https://badcreditpersonalloans.us.com]loans for bad credit in utah[/url]
— Quick Loan Dec 1, 03:36 PM #quick loans <a href=https://quickloans.us.com>payday loans quick cash</a> personal loans quick approval [url=https://quickloans.us.com]quick loans online no credit check[/url]
— Online Lenders Dec 1, 04:07 PM #my essay writing <a href=https://writemyessay.us.com>write my essay</a> my paper writer [url=https://writemyessay.us.com]my essay writing[/url]
— JoeNip Dec 1, 05:01 PM #Bonuses <a href=https://essaywritingservices.us.com>essay writing service</a> united airline seat assignments [url=https://essaywritingservices.us.com]write essay for money[/url]
— JoeNip Dec 1, 06:28 PM #direct lenders for bad credit <a href=https://loansforbadcredit.us.com/>payday bad credit loan</a> bad credit payday loans [url=https://loansforbadcredit.us.com/]payday loans for bad credit[/url]
— JamesNip Dec 1, 06:48 PM #short term loan lenders <a href=https://shorttermloans.us.com>short term cash loans</a> short term loans [url=https://shorttermloans.us.com]loans short term no credit check[/url]
— Spotloan Dec 1, 07:20 PM #payday loans bad credit approval <a href=https://badcreditpersonalloans.us.com>small personal loans bad credit</a> payday loans bad credit ontario [url=https://badcreditpersonalloans.us.com]bad credit personal loans[/url]
— JamesNip Dec 1, 07:34 PM #short term payday <a href=https://shorttermloans.us.com>payday loans austin tx</a> short loans [url=https://shorttermloans.us.com]how can i get a loan[/url]
— Speedy Cash Dec 1, 08:34 PM #payday loans for bad credit in texas <a href=https://badcreditpersonalloans.us.com>payday loans bad credit dallas</a> payday loans bad credit online [url=https://badcreditpersonalloans.us.com]personal loans for bad credit[/url]
— JamesNip Dec 1, 08:58 PM #short term loans canada <a href=https://shorttermloans.us.com>short term payday loans</a> quick short term loans [url=https://shorttermloans.us.com]short term loans[/url]
— Pay Day Loan Dec 1, 09:12 PM #Full Article <a href=https://paydayloans.us.org/>online payday loan</a> online payday loans direct lenders [url=https://paydayloans.us.org/]More about the author[/url]
— JamesNip Dec 1, 09:57 PM #reliable essay writing service <a href=https://essaywritingservices.us.com>homework assignments</a> legit essay writing services [url=https://essaywritingservices.us.com]essays writing services[/url]
— JoeNip Dec 1, 10:56 PM #bad credit payday loans <a href=https://badcreditpersonalloans.us.com>payday loans bad credit dallas</a> bad credit payday loans [url=https://badcreditpersonalloans.us.com]payday loans bad credit ontario[/url]
— Fastest Payday Loan Dec 1, 11:35 PM #webcam sex <a href=https://webcamsex.us.com>adult cam</a> swinger cams [url=https://webcamsex.us.com]webcam sex[/url]
— JoeNip Dec 1, 11:43 PM #loans las vegas <a href=https://shorttermloans.us.com>payday loan no credit check</a> unsecured personal loans [url=https://shorttermloans.us.com]short term loans no credit check[/url]
— Bad Credit Dec 2, 12:42 AM #quick loans reviews <a href=https://quickloans.us.com>quick loans rates</a> fast loans online [url=https://quickloans.us.com]quick personal loans in new york[/url]
— Pay Day Loans Dec 2, 03:15 AM #payday loans for bad credit guaranteed <a href=https://badcreditpersonalloans.us.com>personal loan com</a> personal loans with bad credit [url=https://badcreditpersonalloans.us.com]payday loans bad credit[/url]
— Getting A Loan Dec 2, 04:59 AM #payday loans for bad credit in pa <a href=https://badcreditpersonalloans.us.com>personal loans with bad credit</a> personal loans bad credit [url=https://badcreditpersonalloans.us.com]bad credit payday loans[/url]
— Payday Loans Dec 2, 07:07 AM #short term loans colorado <a href=https://shorttermloans.us.com>short term loan bad credit</a> short term loans for bad credit [url=https://shorttermloans.us.com]short term loans[/url]
— Loan Cash Dec 2, 07:50 AM #payday loans bad credit <a href=https://badcreditpersonalloans.us.com>payday loans bad credit</a> ge personal loan [url=https://badcreditpersonalloans.us.com]payday loans bad credit[/url]
— Cash Loan Dec 2, 11:36 AM #short term loans <a href=https://shorttermloans.us.com>apply for personal loan</a> short term personal loans [url=https://shorttermloans.us.com]short term loans no credit check[/url]
— Online Payday Loans Dec 2, 02:32 PM #personal loans with bad credit <a href=https://badcreditpersonalloans.us.com>bad credit payday loans</a> payday loans for bad credit online [url=https://badcreditpersonalloans.us.com]unsecured loan for bad credit[/url]
— Spotloan Dec 2, 02:46 PM #quick personal loans for fair credit <a href=https://quickloans.us.com>fast loans online</a> quick fast money [url=https://quickloans.us.com]how to get a quick loan with bad credit[/url]
— Personal Loans Dec 2, 05:45 PM #bad credit personal loans <a href=https://badcreditpersonalloans.us.com>payday loans for bad credit guaranteed</a> personal loan rates [url=https://badcreditpersonalloans.us.com]bad credit personal loans[/url]
— Loan Dec 2, 06:15 PM #bad credit quick loans <a href=https://badcreditpersonalloans.us.com>bad credit quick loans</a> bad credit personal loans [url=https://badcreditpersonalloans.us.com]payday loans bad credit online[/url]
— Paydayloan Dec 2, 06:32 PM #short term loans canada <a href=https://shorttermloans.us.com>microloan</a> quick loans online [url=https://shorttermloans.us.com]short term loans online[/url]
— Loan Dec 2, 09:42 PM #bad credit personal loans online <a href=https://badcreditpersonalloans.us.com>personal loans compare</a> payday loans for bad credit online [url=https://badcreditpersonalloans.us.com]bad credit personal loans[/url]
— Bad Credit Dec 3, 12:51 AM #short term payday loans <a href=https://shorttermloans.us.com>short term loans online</a> payday loans denver [url=https://shorttermloans.us.com]short term loans no credit check[/url]
— Easy Payday Loan Dec 3, 03:46 AM #short term personal loans <a href=https://shorttermloans.us.com>short term loans</a> long term payday loans [url=https://shorttermloans.us.com]short term loans online[/url]
— Pay Day Loan Dec 3, 06:49 AM #cash advance lenders <a href=“https://cashadvance.us.org”>loan cash</a> payday advance [url=https://cashadvance.us.org]cash advance[/url]
— Loans Dec 3, 09:55 AM #payday loan <a href=“https://loan.us.org”>loan</a> cash loan [url=https://loan.us.org]loan[/url]
— Spotloan Dec 3, 11:07 AM #payday loan <a href=“https://loan.us.org”>loans online</a> direct lenders no credit check [url=https://loan.us.org]loan[/url]
— Money Loan Dec 3, 01:49 PM #cash advance loan <a href=“https://loan.us.org”>loans online</a> cash loan [url=https://loan.us.org]payday loans online no credit check[/url]
— Loans Online Dec 3, 05:54 PM #loan <a href=“https://loan.us.org”>online loans</a> loan [url=https://loan.us.org]payday loans online[/url]
— Online Payday Loans Dec 3, 06:40 PM #payday <a href=“https://payday.us.com”>payday loans online</a> payday [url=https://payday.us.com]payday cash loan[/url]
— Personal Loans Dec 3, 10:42 PM #kan man købe i håndkøb, http://webapoteket.gdn/anvistat.html – køb københavn online.
— web-apoteket Dec 3, 11:07 PM #payday loan <a href=“https://loan.us.org”>loan</a> loan [url=https://loan.us.org]loan[/url]
— Loans Dec 4, 01:49 AM #no credit check payday loans instant approval <a href=“https://cashadvance.us.org”>no credit check payday loans instant approval</a> cash advance [url=https://cashadvance.us.org]money lender no credit check[/url]
— Online Lenders Dec 4, 02:04 AM #payday <a href=“https://payday.us.com”>payday</a> payday loan [url=https://payday.us.com]online payday loan application[/url]
— Online Loans Dec 4, 09:15 AM #a payday loan <a href=“https://payday.us.com”>payday loan online</a> payday loans online [url=https://payday.us.com]payday loans online direct lender[/url]
— Spotloan Dec 4, 09:46 AM #here i found it <a href=https://paydayloans.us.org/>payday loans</a> instant payday loans online direct lenders [url=https://paydayloans.us.org/]payday express[/url]
— JamesNip Dec 4, 04:36 PM #buy essays online <a href=https://buyessay.us.com>buy essay</a> buy essay [url=https://buyessay.us.com]help me write my college essay[/url]
— JamesNip Dec 4, 04:58 PM #short term payday loans <a href=https://shorttermloans.us.com>short term loans online</a> short term loans canada [url=https://shorttermloans.us.com]payday loans nevada[/url]
— JamesNip Dec 4, 08:02 PM #speedy cash <a href=https://loansforbadcredit.us.com/>fastest payday loan</a> bad credit payday loans [url=https://loansforbadcredit.us.com/]online payday loans for bad credit[/url]
— JamesNip Dec 4, 08:20 PM #short term cash loans <a href=https://shorttermloans.us.com>bad credit personal loans for 5000</a> short term loans [url=https://shorttermloans.us.com]short loans[/url]
— JamesNip Dec 5, 12:24 AM #loans for bad credit <a href=https://paydayloans.us.org/>payday loans online</a> payday loans direct lenders [url=https://paydayloans.us.org/]payday loans[/url]
— JamesNip Dec 5, 04:30 AM #payday loans for bad credit <a href=https://loansforbadcredit.us.com/>link</a> bad credit payday loans direct lenders [url=https://loansforbadcredit.us.com/]payday loans for bad credit[/url]
— JamesNip Dec 5, 06:04 AM #professional essay writing services <a href=https://essaywritingservices.us.com>essaywritingservices.us.com</a> essay writing service [url=https://essaywritingservices.us.com]essay writing service[/url]
— JamesNip Dec 5, 10:22 AM #short term loans no credit checks <a href=https://shorttermloans.us.com>short term payday loans</a> quick cash loans [url=https://shorttermloans.us.com]short term loans online[/url]
— JamesNip Dec 5, 11:11 AM #essay <a href=“https://essay.us.org”>c homework help</a> essay [url=https://essay.us.org]help on homework[/url]
— Assignment Helpers Dec 5, 11:30 AM #essay writing service <a href=“https://essaywritingservice.us.org”>essay writing</a> i need help with my assignment [url=https://essaywritingservice.us.org]writing an introduction to a research paper[/url]
— Online Essay Dec 5, 03:41 PM #research paper <a href=“https://researchpaper.us.com”>research paper</a> research report [url=https://researchpaper.us.com]help with statistics homework[/url]
— Best Essay Writer Dec 5, 05:10 PM #argumentative essay <a href=“https://argumentativeessay.us.com”>essay writing</a> argumentative essay [url=https://argumentativeessay.us.com]argument essay[/url]
— Homework Assignments Dec 5, 07:24 PM #website that write essays for you <a href=“https://argumentativeessay.us.com”>argumentative essay</a> argumentative essays [url=https://argumentativeessay.us.com]argumentative essays[/url]
— My Essay Writing Dec 5, 10:10 PM #college essay prompts <a href=“https://collegeessays.us.com”>college essay prompts</a> college essays [url=https://collegeessays.us.com]college essays[/url]
— Essay Writing Dec 6, 01:28 AM #i need help writing a research paper <a href=“https://researchpaper.us.com”>dissertation service uk</a> research essay [url=https://researchpaper.us.com]online dissertations[/url]
— Homeworks Of America Dec 6, 02:01 AM #essay writing service <a href=https://essaywritingservices.us.com>professional essay writing services</a> custom essay writing services [url=https://essaywritingservices.us.com]good essay writing service[/url]
— JoeNip Dec 6, 05:07 AM #students doing homework <a href=“https://collegeessays.us.com”>college essays</a> college essays [url=https://collegeessays.us.com]college essays[/url]
— Buy Essays Cheap Dec 6, 06:22 AM #write my essay for me cheap <a href=https://writemyessay.us.com>write my essay online</a> write my essay [url=https://writemyessay.us.com]websites that write essays for you[/url]
— JoeNip Dec 6, 07:25 AM #do my research paper <a href=“https://researchpaper.us.com”>research paper</a> research papers [url=https://researchpaper.us.com]who to write a research paper[/url]
— Essays Writing Dec 6, 08:00 AM #essay writer <a href=“https://essay.us.org”>essay</a> essay [url=https://essay.us.org]essay[/url]
— Write Essays Online Dec 6, 08:59 AM #webcam masturbation <a href=https://webcamsex.us.com>free webcam sex</a> sex webcam [url=https://webcamsex.us.com]swinger cams[/url]
— JoeNip Dec 6, 10:50 AM #essay writing <a href=“https://essaywritingservice.us.org”>homework help algebra 2</a> corporate finance homework help [url=https://essaywritingservice.us.org]paper writing service[/url]
— Buy Custom Essay Dec 6, 12:10 PM #dissertation online <a href=https://essayonline.us.com>buy essay online</a> view homepage [url=https://essayonline.us.com]custom essays[/url]
— JoeNip Dec 6, 12:34 PM #short term loans online <a href=https://shorttermloans.us.com>get a loan with no credit</a> short term loans [url=https://shorttermloans.us.com]applying for a loan[/url]
— JoeNip Dec 6, 02:05 PM #paper writing <a href=“https://argumentativeessay.us.com”>argumentative essay</a> buy research paper online [url=https://argumentativeessay.us.com]argumentative essay[/url]
— Essay Writer Online Dec 6, 03:20 PM #essay writing <a href=“https://essaywritingservice.us.org”>essay writing</a> writing my paper [url=https://essaywritingservice.us.org]writing my essay for me[/url]
— Write Essay Dec 6, 03:22 PM #loans online bad credit <a href=https://badcreditpersonalloans.us.com>personal loans bad credit</a> payday loans for bad credit texas [url=https://badcreditpersonalloans.us.com]what is an unsecured personal loan[/url]
— JoeNip Dec 6, 07:08 PM #webcam sex <a href=https://webcamsex.us.com>free adult video chat</a> good chat rooms [url=https://webcamsex.us.com]webcam sex[/url]
— JoeNip Dec 6, 08:17 PM #writing a paper <a href=“https://researchpaper.us.com”>research essay</a> research paper [url=https://researchpaper.us.com]homework help college[/url]
— How To Writing Essay Dec 6, 08:44 PM #essay writing service <a href=“https://essaywritingservice.us.org”>essay writing</a> essay writing service [url=https://essaywritingservice.us.org]writing my essay[/url]
— Buy College Essay Dec 6, 11:16 PM #sex webcam <a href=https://webcamsex.us.com>adult webcam</a> adult cam [url=https://webcamsex.us.com]erotic sex chat[/url]
— JoeNip Dec 6, 11:55 PM #essay homework help <a href=https://collegeessay.us.com>help writing essays for college</a> college essay helper [url=https://collegeessay.us.com]college writing essay[/url]
— JoeNip Dec 7, 01:20 AM #websites that write essays for you <a href=https://writemyessay.us.com>essay writing</a> Home Page [url=https://writemyessay.us.com]write my essay[/url]
— JoeNip Dec 7, 02:31 AM #essay writing service <a href=“https://essaywritingservice.us.org”>writing my essay</a> writing my essay for me [url=https://essaywritingservice.us.org]writing my essay[/url]
— Homework Help Online Dec 7, 02:33 AM #college essays <a href=“https://collegeessays.us.com”>buy essays</a> essay online [url=https://collegeessays.us.com]term papers for sale online[/url]
— Buying Essays Dec 7, 02:57 AM #payday loans no credit check <a href=“https://payday.us.com”>quick loan</a> payday loans no credit check [url=https://payday.us.com]payday loan online[/url]
— A Payday Loan Dec 7, 10:49 AM #payday <a href=“https://payday.us.com”>same day loan</a> cash loans no credit check [url=https://payday.us.com]payday[/url]
— Online Loan Dec 7, 10:50 AM #writing a paper <a href=“https://researchpaper.us.com”>research paper</a> buy essay [url=https://researchpaper.us.com]research essay[/url]
— Buy College Essays Dec 7, 11:58 AM #accounting assignment help <a href=“https://essay.us.org”>online homework calendar</a> essay [url=https://essay.us.org]college essay[/url]
— Free Paper Writer Dec 7, 12:25 PM #online payday loans for bad credit <a href=“https://cashadvance.us.org”>payday loans online direct lenders</a> payday loan no credit check [url=https://cashadvance.us.org]cash advance[/url]
— Easy Payday Loan Dec 7, 02:47 PM #payday advance <a href=“https://cashadvance.us.org”>cash advance</a> fast loans no credit check [url=https://cashadvance.us.org]payday advance loans[/url]
— Speedycash Dec 7, 04:45 PM #writing homework <a href=“https://researchpaper.us.com”>research paper</a> research paper [url=https://researchpaper.us.com]research paper[/url]
— Write Dec 7, 05:33 PM #cash advance <a href=“https://cashadvance.us.org”>cash advance</a> cash advance [url=https://cashadvance.us.org]direct payday loan lenders[/url]
— Loan Cash Dec 7, 08:31 PM #payday <a href=“https://payday.us.com”>payday</a> online payday loan application [url=https://payday.us.com]payday[/url]
— Best Payday Loan Dec 7, 08:44 PM #payday advance loan <a href=“https://payday.us.com”>payday</a> payday [url=https://payday.us.com]advance cash payday loan[/url]
— Instant Online Loans Dec 8, 12:40 AM #payday cash advance loan <a href=“https://cashadvance.us.org”>cash loans</a> cash advance [url=https://cashadvance.us.org]online payday advance[/url]
— Spotloan Dec 8, 03:38 AM #cash loans <a href=“https://loan.us.org”>cash loan</a> faxless payday loans [url=https://loan.us.org]cash loans[/url]
— Speedycash Dec 8, 05:50 AM #cash advance <a href=“https://cashadvance.us.org”>online loans</a> payday cash advances [url=https://cashadvance.us.org]payday advance[/url]
— Direct Lenders Dec 8, 06:31 AM #bad credit payday loans direct lenders <a href=“https://payday.us.com”>payday</a> advance cash payday loan [url=https://payday.us.com]bad credit payday loans direct lenders[/url]
— Loans Online Dec 8, 06:25 PM #cash advance lenders <a href=“https://cashadvance.us.org”>instant online payday loan</a> online payday advance [url=https://cashadvance.us.org]loan cash[/url]
— Spotloan Dec 8, 06:25 PM #direct loans <a href=“https://loan.us.org”>loan</a> loan [url=https://loan.us.org]cash loans[/url]
— Online Payday Loans Dec 8, 10:40 PM #online payday loan instant approval <a href=“https://cashadvance.us.org”>cash advance</a> cash advance [url=https://cashadvance.us.org]cash loans online[/url]
— Online Payday Loans Dec 9, 12:37 AM #payday <a href=“https://payday.us.com”>payday cash loan</a> payday [url=https://payday.us.com]direct payday loan lenders[/url]
— Speedycash Dec 9, 04:22 AM #advance payday loans <a href=“https://loan.us.org”>loan</a> loan [url=https://loan.us.org]cash loan[/url]
— Online Loan Dec 9, 04:37 AM #cash loans <a href=“https://loan.us.org”>payday loans online direct lenders</a> online loans [url=https://loan.us.org]cash loan[/url]
— Cash Loan Dec 9, 08:40 AM #direct lender loans <a href=“https://cashadvance.us.org”>payday loans lenders</a> cash advance [url=https://cashadvance.us.org]cash advance[/url]
— Payday Loan Online Dec 9, 11:44 AM #cash loan <a href=https://loansforbadcredit.us.com/>homepage here</a> loans for bad credit [url=https://loansforbadcredit.us.com/]here i found it[/url]
— JoeNip Dec 9, 11:50 AM #payday express <a href=https://paydayloans.us.org/>payday loans online</a> payday loan online [url=https://paydayloans.us.org/]Extra resources[/url]
— JoeNip Dec 9, 12:41 PM #get a loan <a href=“https://loan.us.org”>payday loans</a> online loans [url=https://loan.us.org]payday loan[/url]
— Fastest Payday Loan Dec 9, 02:06 PM #loans online <a href=“https://loan.us.org”>cash loans</a> loan [url=https://loan.us.org]online payday loan[/url]
— Quick Loan Dec 9, 02:48 PM #buy college essays online <a href=https://essayonline.us.com>buy essay online</a> https://writemyessay.us.com/ [url=https://essayonline.us.com]essay online[/url]
— JoeNip Dec 9, 04:29 PM #bad credit payday loans direct lenders <a href=https://badcreditpersonalloans.us.com>personal loans bad credit</a> bad credit personal loans [url=https://badcreditpersonalloans.us.com]payday loans bad credit ontario[/url]
— JamesNip Dec 9, 07:40 PM #online payday advance loan <a href=https://onlineloans.us.com/>the best online payday loans</a> loans online [url=https://onlineloans.us.com/]Visit This Link[/url]
— JoeNip Dec 9, 07:46 PM #buy essay <a href=https://buyessays.us.com>order essay online</a> best essay writing website [url=https://buyessays.us.com]buy essay online[/url]
— JamesNip Dec 9, 09:38 PM #bad credit personal loans online <a href=https://badcreditpersonalloans.us.com>very bad credit payday loans</a> unsecured personal loans with bad credit [url=https://badcreditpersonalloans.us.com]best online loans for bad credit[/url]
— JoeNip Dec 9, 11:34 PM #speedy cash <a href=https://onlineloans.us.com/>loans online bad credit</a> loans online [url=https://onlineloans.us.com/]online loan[/url]
— JoeNip Dec 9, 11:40 PM #free webcam sex <a href=https://webcamsex.us.com>adult webcams</a> free sex chats [url=https://webcamsex.us.com]free webcam sex[/url]
— JamesNip Dec 10, 12:49 AM #loans online <a href=https://onlineloans.us.com/>speedycash</a> payday loans online [url=https://onlineloans.us.com/]http://onlineloans.us.com[/url]
— JamesNip Dec 10, 02:34 AM #personal loans bad credit <a href=https://badcreditpersonalloans.us.com>payday loans for bad credit</a> personal loans bad credit guaranteed [url=https://badcreditpersonalloans.us.com]payday loans bad credit approval[/url]
— JamesNip Dec 10, 03:54 AM #payday loans for bad credit <a href=https://loansforbadcredit.us.com/>bad credit payday loans</a> loans for bad credit [url=https://loansforbadcredit.us.com/]payday loans for bad credit[/url]
— JoeNip Dec 10, 04:07 AM #payday loans online <a href=https://paydayloans.us.org/>payday loan online</a> found here [url=https://paydayloans.us.org/]found it[/url]
— JoeNip Dec 10, 04:51 AM #personal loans bad credit <a href=https://badcreditpersonalloans.us.com>bad credit personal loans</a> payday lenders bad credit [url=https://badcreditpersonalloans.us.com]banks that give personal loans with bad credit[/url]
— JoeNip Dec 10, 07:40 AM #payday loans online colorado <a href=https://paydayloans.us.org/>instant payday loans online direct lenders</a> payday express [url=https://paydayloans.us.org/]payday loans online[/url]
— JamesNip Dec 10, 08:01 AM #how to write an intro for an essay <a href=https://essaywritingservices.us.com>essay writing service</a> top essay writing services [url=https://essaywritingservices.us.com]essay writing service[/url]
— JoeNip Dec 10, 09:01 AM #guaranteed bad credit personal loans <a href=https://badcreditpersonalloans.us.com>easy loans to get with bad credit</a> bad credit payday loans [url=https://badcreditpersonalloans.us.com]personal loans bad credit[/url]
— JamesNip Dec 10, 09:05 AM #essay writing service <a href=https://essaywritingservices.us.com>best uk essay writing service</a> essays writing services [url=https://essaywritingservices.us.com]writing college essay[/url]
— JamesNip Dec 10, 12:29 PM #pay day loans <a href=https://paydayloans.us.org/>small payday loans online</a> pay day loans [url=https://paydayloans.us.org/]loans for bad credit[/url]
— JamesNip Dec 10, 01:48 PM #buy essays online <a href=https://buyessays.us.com>buy essay online cheap</a> argumentative essay help [url=https://buyessays.us.com]order essay online[/url]
— JamesNip Dec 10, 02:53 PM #college essay prompts <a href=https://collegeessay.us.com>essays paying college athletes</a> descriptive essay help [url=https://collegeessay.us.com]write a college essay[/url]
— JoeNip Dec 10, 04:37 PM #bad credit personal loans <a href=https://badcreditpersonalloans.us.com>bad credit personal loans</a> same day payday loans for bad credit [url=https://badcreditpersonalloans.us.com]bad credit loan lenders not brokers[/url]
— JoeNip Dec 10, 05:19 PM #custom essay writing <a href=https://writemyessay.us.com>my homework help</a> click [url=https://writemyessay.us.com]help with my essay[/url]
— JoeNip Dec 10, 08:25 PM #webcam sex <a href=https://webcamsex.us.com>webcam sex chat</a> chat sex [url=https://webcamsex.us.com]adult video chat[/url]
— JoeNip Dec 10, 09:16 PM #HTTP://WRITEMYESSAY.US.COM <a href=https://writemyessay.us.com>http://WriteMyEssay.us.com</a> HTTPS://WRITEMYESSAY.US.COM/ [url=https://writemyessay.us.com]custom essay writing[/url]
— JoeNip Dec 11, 01:11 AM #professional college essay writers <a href=https://buyessay.us.com>website that writes your essay for you</a> order essay paper [url=https://buyessay.us.com]buy essay[/url]
— JoeNip Dec 11, 03:40 AM #homework online <a href=https://essayonline.us.com>online homework</a> write my essay online [url=https://essayonline.us.com]buy essay online[/url]
— JoeNip Dec 11, 05:55 AM #pay for essay online <a href=https://essayonline.us.com>buy essay online</a> buy college essays online [url=https://essayonline.us.com]buy essay online[/url]
— JoeNip Dec 11, 08:46 AM #short term loans online <a href=https://shorttermloans.us.com>payday loans in las vegas with no credit check</a> short term loans [url=https://shorttermloans.us.com]payday loans in las vegas nevada[/url]
— JoeNip Dec 11, 09:33 AM #https://writemyessay.us.com <a href=https://writemyessay.us.com>write my essay</a> view homepage [url=https://writemyessay.us.com]write my paper[/url]
— JoeNip Dec 11, 10:02 AM #Hello! [url=http://mexicanpharmacyhq.com/]online pharmacy[/url] excellent internet site.
— Larrymuh Dec 11, 01:37 PM #write my essay <a href=https://writemyessay.us.com>write my essay online</a> essay help [url=https://writemyessay.us.com]https://WriteMyEssay.us.com/[/url]
— JoeNip Dec 12, 05:23 PM #payday loans for bad credit <a href=https://loansforbadcredit.us.com/>This Site</a> online payday loans for bad credit [url=https://loansforbadcredit.us.com/]payday loans for bad credit[/url]
— JoeNip Dec 12, 07:50 PM #bad credit personal loans guaranteed approval <a href=https://badcreditpersonalloans.us.com>bad credit personal loans reviews</a> personal loans bad credit [url=https://badcreditpersonalloans.us.com]how to get approved for a loan with bad credit[/url]
— JoeNip Dec 12, 08:17 PM #buy essay <a href=https://buyessay.us.com>buy essay cheap</a> buy essay [url=https://buyessay.us.com]help writing college essay[/url]
— JoeNip Dec 12, 10:57 PM #buy essay online <a href=https://buyessays.us.com>top essay writing websites</a> buy essays online [url=https://buyessays.us.com]buy essays online[/url]
— JamesNip Dec 13, 02:04 AM #order essay online cheap quick <a href=https://buyessays.us.com>order essay online cheap quick</a> buy an essay [url=https://buyessays.us.com]persuasive essay help[/url]
— JoeNip Dec 13, 03:09 AM #personal loans for bad credit <a href=https://badcreditpersonalloans.us.com>5000 bad credit loan</a> emergency cash loan bad credit [url=https://badcreditpersonalloans.us.com]payday loans bad credit ok[/url]
— JoeNip Dec 13, 05:41 AM #buy essay papers <a href=https://buyessays.us.com>buy an essay</a> buy an essay cheap [url=https://buyessays.us.com]buy essay[/url]
— JamesNip Dec 13, 06:10 AM #help to write an essay <a href=https://collegeessay.us.com>college essay prompts</a> college essay [url=https://collegeessay.us.com]college essay[/url]
— JoeNip Dec 13, 08:10 AM #online essay writing service <a href=https://essayonline.us.com>buy essay online</a> essay help [url=https://essayonline.us.com]buy papers online[/url]
— JamesNip Dec 13, 09:52 AM #pay day loan <a href=https://loansforbadcredit.us.com/>Learn More Here</a> online lenders [url=https://loansforbadcredit.us.com/]payday loans bad credit[/url]
— JoeNip Dec 13, 11:41 AM #buy essay <a href=https://buyessay.us.com>order essay paper</a> online essay [url=https://buyessay.us.com]order essay now[/url]
— JoeNip Dec 13, 12:21 PM #college essays <a href=https://collegeessay.us.com>descriptive essay help</a> essay writing for college students [url=https://collegeessay.us.com]help me do my essay[/url]
— JoeNip Dec 13, 01:19 PM #payday loans for bad credit <a href=https://loansforbadcredit.us.com/>LOANSFORBADCREDIT.US.COM</a> payday loans bad credit [url=https://loansforbadcredit.us.com/]payday loans for bad credit[/url]
— JoeNip Dec 13, 02:01 PM #quicken loans <a href=https://quickloans.us.com>quick loans</a> quick fast loans [url=https://quickloans.us.com]fast and easy money[/url]
— JamesNip Dec 13, 02:05 PM #payday loans online <a href=https://paydayloans.us.org/>payday loans online direct lenders</a> personal loans [url=https://paydayloans.us.org/]payday loans online no credit check[/url]
— JamesNip Dec 13, 02:12 PM #payday loans online <a href=https://onlineloans.us.com/>More Help</a> online payday loans [url=https://onlineloans.us.com/]payday loans online[/url]
— JamesNip Dec 13, 06:44 PM #buy essay <a href=https://buyessay.us.com>buy an essay online cheap</a> buy essay online [url=https://buyessay.us.com]buy an essay[/url]
— JamesNip Dec 13, 07:26 PM #essay writing service <a href=https://essaywritingservices.us.com>college application essay writing service</a> essay writing service review [url=https://essaywritingservices.us.com]buy pre written essays[/url]
— JamesNip Dec 13, 10:19 PM #webcam sex <a href=https://webcamsex.us.com>live cams</a> free naked webcam [url=https://webcamsex.us.com]webcam sex[/url]
— JamesNip Dec 13, 11:48 PM #sex webcam <a href=https://webcamsex.us.com>free adult sex chat</a> free cam sex chat [url=https://webcamsex.us.com]webcam sex[/url]
— JamesNip Dec 14, 11:11 AM #as explained here <a href=https://essaywritingservices.us.com>essays writing services</a> best essay writing service reviews [url=https://essaywritingservices.us.com]write my essay service[/url]
— JamesNip Dec 14, 12:01 PM #direct payday loan lenders <a href=“https://bestpaydayloans.stream”>best payday loans</a> best payday loans online [url=https://bestpaydayloans.stream]best payday loans[/url] buy an essay <a href=“https://buyessayonline.cricket”>buy an essay</a> buy essay online [url=https://buyessayonline.cricket]buy essay online[/url] payday bad credit loan <a href=“https://paydaybadcreditloan.bid”>best cash advance loans online</a> payday bad credit loan [url=https://paydaybadcreditloan.bid]payday bad credit loan[/url] bad credit payday loans direct lenders <a href=“https://badcreditpaydayloansdirectlenders.cricket”>bad credit payday loans direct lenders</a> bad credit payday loans direct lenders [url=https://badcreditpaydayloansdirectlenders.cricket]bad credit payday loans direct lenders[/url]
— JamesNip Dec 14, 12:05 PM #cam sites <a href=“https://camsites.cricket”>free nude cams</a> cam sites [url=https://camsites.cricket]cam sites[/url] payday lenders direct <a href=“https://paydaylendersdirect.webcam”>fast loans no credit check</a> payday lenders direct [url=https://paydaylendersdirect.webcam]best payday loans[/url] essay prompts <a href=“https://essayprompts.cricket”>college essay prompts</a> essay prompts [url=https://essayprompts.cricket]writing an introduction for a research paper[/url] buy essay online <a href=“https://buyessayonline.cricket”>help with dissertation</a> buy essays online [url=https://buyessayonline.cricket]buy essay online[/url] research report <a href=“https://researchessay.bid”>online essay</a> research essay [url=https://researchessay.bid]do homework online[/url] adult webcams <a href=“https://wifewebcam.cricket”>wife on webcam</a> webcam slut [url=https://wifewebcam.cricket]adult chat[/url] writing a proposal for a research paper <a href=“https://illustrationessay.trade”>illustration essay</a> essay corrector [url=https://illustrationessay.trade]illustration essay[/url] college essays <a href=“https://collegeessaywriter.bid”>write my essay</a> pay for essay writing uk [url=https://collegeessaywriter.bid]essay writer[/url] best payday loans online <a href=“https://bestpaydayloans.stream”>best payday loans online</a> best payday loans online [url=https://bestpaydayloans.stream]best payday loans online[/url] research paper <a href=“https://researchpaperproposal.trade”>term paper</a> research paper proposal [url=https://researchpaperproposal.trade]research paper proposal[/url]
— JamesNip Dec 14, 02:18 PM #short term loans <a href=https://shorttermloans.us.com>loans with bad credit</a> short loans [url=https://shorttermloans.us.com]short term loans[/url]
— JamesNip Dec 14, 03:40 PM #order essay <a href=https://buyessay.us.com>buy an essay cheap</a> buy an essay [url=https://buyessay.us.com]buy an essay online cheap[/url]
— JamesNip Dec 14, 04:33 PM #help with my essay <a href=https://writemyessay.us.com>WriteMyEssay.us.com</a> write my essay [url=https://writemyessay.us.com]write my essay[/url]
— JamesNip Dec 14, 09:28 PM #speedycash <a href=“https://cashadvance.us.org”>online payday loan</a> payday advance loans [url=https://cashadvance.us.org]cash advance lenders[/url]
— Payday Express Dec 14, 09:45 PM #bad credit <a href=“https://loan.us.org”>loan</a> payday loans [url=https://loan.us.org]loan[/url]
— Payday Express Dec 14, 09:51 PM #payday loans no credit check <a href=“https://payday.us.com”>payday</a> the best online payday loans [url=https://payday.us.com]payday[/url]
— Getting A Loan Dec 14, 10:19 PM #direct lender loans <a href=“https://loan.us.org”>loan</a> loan [url=https://loan.us.org]loan[/url]
— Payday Dec 14, 11:37 PM #lesbian sex show <a href=https://webcamsex.us.com>sex webcam</a> sex webcam [url=https://webcamsex.us.com]free adult chat[/url]
— JamesNip Dec 15, 12:31 AM #easy payday loans <a href=“https://loan.us.org”>cash advance loan</a> get a loan [url=https://loan.us.org]online loans[/url]
— Pay Day Loans Dec 15, 01:19 AM #pay day loan <a href=“https://payday.us.com”>installment loan</a> payday loan [url=https://payday.us.com]payday advance loan[/url]
— Loan Dec 15, 01:27 AM #cash advance <a href=“https://cashadvance.us.org”>loan cash</a> cash advance [url=https://cashadvance.us.org]cash advance loan[/url]
— Online Payday Loan Dec 15, 01:58 AM #Amazon Prime!
Organic Matcha Green Tea Powder – 100% Pure Matcha (No Sugar Added – Unsweetened Pure Green Tea – No Coloring Added Like Others)
Get 50% OFF Amazon Coupon Code -> https://bestdeal2222.clickfunnels.com/1-step-2020givegug1jbmx
- INCREASE MEMORY AND CONCENTRATION – The L-Theanine provided in a serving of Matcha Green Tea provides good, clean energy that can last up to 6 hours.
- MOOD ENHANCER – Matcha also contains L-theanine, an amino acid known as a natural mood enhancer.
- ENERGY BOOSTER – There is caffeine in Matcha, however, releases into the bloodstream slowly; resulting in a much gentler influence on the stomach.
- DIGESTION ENHANCER – The gentle caffeine boost is also calming on the rest of the body – many find it gradually aiding with digestion, healing, and cleansing.
- LOWERS CHOLESTEROL – people who drink Match Green Tea on a regular basis show lower levels of LDL (bad) cholesterol while at the same time displaying higher levels of HDL (good) cholesterol. Matcha green tea powder contains 60% EGCg (epigallocatechin gallate) which helps promote these benefits.
- FAT BLOCKER – Matcha green tea contains the polyphenol EGCG, a thermogenic component believed to boost metabolism and may aid the body in burning fat faster.
- INCREDIBLE TASTE – It smells fresh and inviting like freshly blended vegetables. While it has a sweet, natural taste, there are also hundreds of recipes that it can be blended into to help add amazing health benefits to every meal!
Get 50% OFF Amazon Coupon Code -> https://bestdeal2222.clickfunnels.com/1-step-2020givegug1jbmx
— ErnestRow Dec 15, 02:54 AM #buy custom essays online <a href=https://buyessay.us.com>buy essay</a> order essay online cheap quick [url=https://buyessay.us.com]buy essay online[/url]
— JamesNip Dec 15, 03:10 AM #loan <a href=“https://loan.us.org”>loans</a> payday loans [url=https://loan.us.org]online loans no credit check instant approval[/url]
— Fastest Payday Loan Dec 15, 03:33 AM #check into cash <a href=“https://payday.us.com”>advance cash payday loan</a> payday [url=https://payday.us.com]payday[/url]
— Pay Day Loans Dec 15, 03:47 AM #instant online payday loan <a href=“https://instantonlinepaydayloan.cricket”>instant online payday loan</a> payday loans [url=https://instantonlinepaydayloan.cricket]instant online payday loan[/url] college essay help <a href=“https://collegeessayprompts.trade”>college essay heading</a> english paper [url=https://collegeessayprompts.trade]college essay[/url] best payday loans online <a href=“https://bestpaydayloans.stream”>best payday loans online</a> best payday loans online [url=https://bestpaydayloans.stream]online cash advance[/url] online loans direct lenders <a href=“https://onlineloansdirectlenders.stream”>online payday loans direct lenders</a> direct lenders online loans [url=https://onlineloansdirectlenders.stream]cash loans online[/url] common application essay prompts <a href=“https://commonapplicationessayprompts.science”>common application essay prompts</a> common application essay prompts [url=https://commonapplicationessayprompts.science]college essays online[/url] online payday loans direct lenders <a href=“https://badcreditpaydayloansdirectlenders.cricket”>bad credit payday loans direct lenders</a> easiest payday loan to get [url=https://badcreditpaydayloansdirectlenders.cricket]bad credit payday loans direct lenders[/url] free webcam sex <a href=“https://freewebcamsex.stream”>free webcam sex chat</a> free webcam sex chat [url=https://freewebcamsex.stream]free webcam sex chat[/url] college essays <a href=“https://collegepaper.trade”>college paper</a> online physics homework [url=https://collegepaper.trade]compare and contrast essay help[/url]
— JamesNip Dec 15, 04:33 AM #custom essay writing service <a href=https://writemyessay.us.com>essays</a> my homework help [url=https://writemyessay.us.com]write my essay[/url]
— JamesNip Dec 15, 05:54 AM #college essays <a href=“https://buyessays.stream”>scientific research paper</a> buy essays online [url=https://buyessays.stream]maths homework online[/url] payday loans for bad credit <a href=“https://paydayloansforbadcredit.stream”>payday loans for bad credit</a> payday loans for bad credit [url=https://paydayloansforbadcredit.stream]no credit check payday loan[/url] payday cash loan <a href=“https://quickloans.science”>quick loans</a> small loans no credit check [url=https://quickloans.science]cash loans[/url] chat sex <a href=“https://chatsex.trade”>sex chat</a> sex chat [url=https://chatsex.trade]nude video chat[/url] write a college essay <a href=“https://collegeessayprompts.trade”>essay writing service</a> college essay prompts [url=https://collegeessayprompts.trade]college essay prompts[/url] guaranteed payday loans <a href=“https://guaranteedpaydayloans.webcam”>payday loans online</a> guaranteed payday loans [url=https://guaranteedpaydayloans.webcam]payday loan no credit check[/url] the best online payday loans <a href=“https://thebestonlinepaydayloans.trade”>the best online payday loans</a> the best online payday loans [url=https://thebestonlinepaydayloans.trade]payday loan online[/url] free adult cam chat <a href=“https://adultcamsites.trade”>free web cam sluts</a> adult cam sites [url=https://adultcamsites.trade]free adult web cam[/url] common application essay prompts <a href=“https://commonapplicationessayprompts.science”>common application essay prompts</a> common application essay prompts [url=https://commonapplicationessayprompts.science]common application essay prompts[/url] write a paper <a href=“https://writeapaper.stream”>write my paper</a> term paper [url=https://writeapaper.stream]writing a medical research paper[/url]
— JamesNip Dec 15, 06:51 AM #https://essaywritingservices.us.com <a href=https://essaywritingservices.us.com>Resources</a> essay writing service [url=https://essaywritingservices.us.com]best online essay writing services[/url]
— JamesNip Dec 15, 06:58 AM #writing my essay <a href=“https://essaywritingservice.us.org”>essay writing service</a> writing my essay for me [url=https://essaywritingservice.us.org]my assignment help australia[/url]
— Write My Papers Dec 15, 07:33 AM #write my essay online <a href=https://essayonline.us.com>essay help</a> buy essay online [url=https://essayonline.us.com]online essay writer[/url]
— JamesNip Dec 15, 07:34 AM #payday advance <a href=“https://cashadvance.us.org”>payday loans direct lenders</a> cash loans [url=https://cashadvance.us.org]advance cash payday loan[/url]
— Spotloan Dec 15, 07:38 AM #payday <a href=“https://payday.us.com”>payday loans on line</a> direct payday lenders online [url=https://payday.us.com]payday[/url]
— Speedycash Dec 15, 08:42 AM #cash advance <a href=“https://cashadvance.us.org”>loan cash</a> payday loan direct lender [url=https://cashadvance.us.org]cash advance lenders[/url]
— Instant Online Loans Dec 15, 09:29 AM #paper writing <a href=“https://argumentativeessay.us.com”>argument essay</a> spss assignment help [url=https://argumentativeessay.us.com]argumentative essay[/url]
— Homework Now.Com Dec 15, 09:49 AM #payday loans online <a href=“https://payday.us.com”>advance cash payday loan</a> payday advance loan [url=https://payday.us.com]online loans direct lenders[/url]
— Bad Credit Dec 15, 10:13 AM #uk dissertation writing services <a href=“https://researchpaper.us.com”>research essay</a> writing a paper [url=https://researchpaper.us.com]research report[/url]
— Buy An Essay Online Dec 15, 11:30 AM #cash advance <a href=“https://cashadvance.us.org”>faxless payday loans</a> cash advance [url=https://cashadvance.us.org]advance payday loans online[/url]
— Cash Loan Dec 15, 12:55 PM #essay corrector <a href=“https://collegeessaywriter.bid”>do my economics homework</a> college essay writer [url=https://collegeessaywriter.bid]college essays[/url] adult cam sites <a href=“https://adultcamsites.trade”>adult cam sites</a> free adult web cam [url=https://adultcamsites.trade]adult cam[/url] payday loans direct lenders <a href=“https://paydaylendersdirect.webcam”>payday loans direct lenders</a> emergency loan no credit check [url=https://paydaylendersdirect.webcam]direct payday lenders[/url] help with dissertation proposal <a href=“https://collegeessayprompts.trade”>college essay prompts</a> college essay prompts [url=https://collegeessayprompts.trade]college essays[/url] payday loans for bad credit <a href=“https://paydayloansforbadcredit.stream”>payday loan online</a> payday loans for bad credit [url=https://paydayloansforbadcredit.stream]payday loans for bad credit[/url] easy payday loans online <a href=“https://easypaydayloansonline.science”>same day loans</a> easy online payday loans [url=https://easypaydayloansonline.science]easy payday loans online[/url] spotloan <a href=“https://easyonlinepaydayloans.bid”>guaranteed payday loans</a> no credit check loans [url=https://easyonlinepaydayloans.bid]online payday loan application[/url] free sex webcam <a href=“https://freewebcamsex.stream”>free sex webcam</a> free webcam sex [url=https://freewebcamsex.stream]free webcam sex[/url] quick loans 100 approval <a href=“https://quickloans100approval.stream”>cash loan advance</a> quick loans 100 approval [url=https://quickloans100approval.stream]quick loans 100 approval[/url]
— JamesNip Dec 15, 01:25 PM #fastest payday loan <a href=“https://cashadvance.us.org”>loan cash</a> payday cash advances [url=https://cashadvance.us.org]cash advance[/url]
— Payday Express Dec 15, 01:25 PM #college essays <a href=“https://collegeessays.us.com”>college essays</a> person doing homework [url=https://collegeessays.us.com]college essay[/url]
— Homework Online Dec 15, 01:51 PM #payday lenders direct <a href=“https://cashadvance.us.org”>same day payday loans no credit check</a> cash advance [url=https://cashadvance.us.org]payday advance loans[/url]
— Get A Loan Dec 15, 02:49 PM #payday loans <a href=“https://loan.us.org”>payday advance</a> payday loans [url=https://loan.us.org]loan[/url]
— Spotloan Dec 15, 03:35 PM #argument essays <a href=“https://argumentativeessay.us.com”>argument essays</a> argument essay [url=https://argumentativeessay.us.com]help in assignment[/url]
— Assignment Define Dec 15, 05:11 PM #webcam sex <a href=https://webcamsex.us.com>webcam sex</a> sex chat cam [url=https://webcamsex.us.com]webcam sex chat[/url]
— JoeNip Dec 15, 05:40 PM #no credit check emergency loans <a href=“https://payday.us.com”>best cash loans online</a> payday [url=https://payday.us.com]advance cash payday loan[/url]
— Online Loan Dec 15, 06:52 PM #custom essay writing <a href=https://writemyessay.us.com>website to write essays</a> my homework help [url=https://writemyessay.us.com]websites that write essays for you[/url]
— JoeNip Dec 15, 07:03 PM #argumentative essay <a href=“https://argumentativeessay.us.com”>paper writing</a> essay writing [url=https://argumentativeessay.us.com]my homework helper[/url]
— Assignment Notebooks Dec 15, 07:05 PM #writing a history research paper <a href=“https://essay.us.org”>college essay prompts</a> college essay [url=https://essay.us.org]essay writer[/url]
— Write Essay For Me Dec 15, 07:23 PM #advance payday loans <a href=“https://smallpaydayloans.bid”>cash loan advance</a> small payday loans [url=https://smallpaydayloans.bid]online loans direct lenders[/url] write a paper <a href=“https://writeapaper.stream”>write a paper</a> write a paper [url=https://writeapaper.stream]math help homework[/url] money lender no credit check <a href=“https://advancepaydayloans.cricket”>10 top loan companies</a> installment loans no credit check [url=https://advancepaydayloans.cricket]online payday advance[/url] common application essay prompts <a href=“https://commonapplicationessayprompts.science”>online math homework solver</a> art homework help [url=https://commonapplicationessayprompts.science]help with science homework[/url] quick loans <a href=“https://quickloans.trade”>quick loans 100 approval</a> quick loans 100 approval [url=https://quickloans.trade]payday express[/url]
— JamesNip Dec 15, 08:26 PM #college essay <a href=“https://essay.us.org”>outlines for research papers</a> help homework online [url=https://essay.us.org]essay[/url]
— Write Essay Online Dec 15, 08:48 PM #cash loans <a href=“https://quickloans.trade”>emergency loan no credit check</a> quick loan [url=https://quickloans.trade]direct lenders online loans[/url] live free sex chat <a href=“https://freesexcamchat.cricket”>free sex chat sites</a> free sex video chat [url=https://freesexcamchat.cricket]free sex chat sites[/url] speedy cash payday loans online <a href=“https://cashadvanceloan.bid”>advance cash payday loan</a> advance cash payday loan [url=https://cashadvanceloan.bid]cash advance loan[/url] writing my essay <a href=“https://essaywriting.trade”>essay writing</a> do my college homework [url=https://essaywriting.trade]writing my essay[/url] college essay writer <a href=“https://collegeessaywriter.bid”>college essay</a> bbc homework help [url=https://collegeessaywriter.bid]essay corrector[/url]
— JamesNip Dec 15, 10:47 PM #essay writing service <a href=“https://essaywritingservice.us.org”>corporate finance homework help</a> writing my essay for me [url=https://essaywritingservice.us.org]assignment help websites[/url]
— Essay Writer Online Dec 16, 12:43 AM #personal loans bad credit guaranteed <a href=https://badcreditpersonalloans.us.com>payday loans for bad credit uk</a> personal loans with bad credit [url=https://badcreditpersonalloans.us.com]no credit check personal loan[/url]
— JoeNip Dec 16, 12:54 AM #quick loans <a href=https://quickloans.us.com>fast loans lenders</a> quick personal loans in new york [url=https://quickloans.us.com]get money online fast[/url]
— JoeNip Dec 16, 01:40 AM #webcam sex <a href=https://webcamsex.us.com>free webcam sex</a> webcam sex [url=https://webcamsex.us.com]chatgirl[/url]
— JoeNip Dec 16, 02:08 AM #erotic chat room <a href=https://webcamsex.us.com>sex webcam</a> webcam sex [url=https://webcamsex.us.com]cam sluts[/url]
— JoeNip Dec 16, 04:24 AM #instant payday loans <a href=“https://instantpaydayloans.webcam”>instant online loans</a> instant payday loans [url=https://instantpaydayloans.webcam]instant online loans[/url] essay helper <a href=“https://criticalessay.trade”>computer homework help</a> writing the college essay [url=https://criticalessay.trade]essay helper[/url] payday loans lenders <a href=“https://paydayloanslenders.stream”>loan</a> payday loans lenders [url=https://paydayloanslenders.stream]easy approval payday loans[/url] best essay writing service <a href=“https://bestessaywritingservice.cricket”>essay help service</a> best essay writing service [url=https://bestessaywritingservice.cricket]write essay for me[/url] loans online <a href=“https://apaydayloan.bid”>payday loans online no credit check</a> payday loan [url=https://apaydayloan.bid]easy payday loan[/url] direct loan lenders <a href=“https://paydayloandirectlender.webcam”>payday loan direct lender</a> payday loan direct lenders [url=https://paydayloandirectlender.webcam]payday loan direct lender[/url]
— PamNip Dec 16, 05:13 AM #math online homework <a href=“https://bestessaywritingservice.cricket”>engineering assignment help</a> best essay writing service [url=https://bestessaywritingservice.cricket]best essay writing service[/url] instant online loans <a href=“https://instantpaydayloans.webcam”>speedycash</a> best payday loan online [url=https://instantpaydayloans.webcam]payday loans direct lender[/url] erotic sex chat <a href=“https://sexchat.cricket”>webcam sex chat</a> sex video chat [url=https://sexchat.cricket]sex chat free[/url] research essay <a href=“https://researchessay.cricket”>research paper</a> research paper [url=https://researchessay.cricket]research papers[/url] college essay <a href=“https://scholarshipessay.science”>essay corrector</a> argumentative essay [url=https://scholarshipessay.science]do my essay[/url] direct payday lenders online <a href=“https://paydayloansdirectlenders.stream”>advance payday loans online</a> online payday loan lender [url=https://paydayloansdirectlenders.stream]loans online bad credit[/url] bad credit payday loans direct lenders <a href=“https://onlinepaydayloansforbadcredit.bid”>online payday loans for bad credit</a> same day payday loans online [url=https://onlinepaydayloansforbadcredit.bid]online loans no credit check instant approval[/url] short term loans direct lenders <a href=“https://shorttermloansdirectlenders.webcam”>installment loan</a> best payday loans [url=https://shorttermloansdirectlenders.webcam]short term loans direct lenders[/url]
— PamNip Dec 16, 07:42 AM #paydayloans.us.org <a href=https://paydayloans.us.org/>loans for bad credit</a> payday loans online [url=https://paydayloans.us.org/]payday loans online[/url]
— JoeNip Dec 16, 08:32 AM #Get More Info <a href=https://loansforbadcredit.us.com/>loan</a> payday loans for bad credit [url=https://loansforbadcredit.us.com/]https://loansforbadcredit.us.com/[/url]
— JoeNip Dec 16, 09:42 AM #free sex webcam <a href=https://webcamsex.us.com>webcam sex chat</a> adult cam [url=https://webcamsex.us.com]erotic sex chat[/url]
— JoeNip Dec 16, 02:24 PM #personal loans bad credit <a href=https://badcreditpersonalloans.us.com>payday loans for bad credit in pa</a> payday loans bad credit approval [url=https://badcreditpersonalloans.us.com]personal loans bad credit[/url]
— JamesNip Dec 16, 03:37 PM #payday loans for bad credit <a href=https://loansforbadcredit.us.com/>payday loans for bad credit</a> Check This Out [url=https://loansforbadcredit.us.com/]Home Page[/url]
— JoeNip Dec 16, 03:57 PM #chat cam sex <a href=“https://sexchat.cricket”>sex chat online</a> sex chat free [url=https://sexchat.cricket]sex chat[/url] essay to buy <a href=“https://scholarshipessay.science”>scholarship essay</a> hart doing a literature review [url=https://scholarshipessay.science]scholarship essay[/url] payday loans online <a href=“https://onlinepaydayloanlender.loan”>online payday advance loan</a> best payday loan online [url=https://onlinepaydayloanlender.loan]online payday loan lender[/url]
— PamNip Dec 16, 04:02 PM #free webcam sex <a href=https://webcamsex.us.com>webcam sex chat</a> adult webcams [url=https://webcamsex.us.com]webcam sex[/url]
— JoeNip Dec 16, 05:44 PM #payday loans <a href=https://paydayloans.us.org/>next page</a> payday loans online [url=https://paydayloans.us.org/]personal loans[/url]
— JamesNip Dec 16, 05:54 PM #fast loan with bad credit <a href=https://quickloans.us.com>payday loans quickly</a> quick payday loans direct lenders [url=https://quickloans.us.com]quick payday loan online[/url]
— JamesNip Dec 16, 06:20 PM #english paper <a href=“https://collegepaper.cricket”>college essays</a> college paper [url=https://collegepaper.cricket]college essay prompts[/url] critical essay <a href=“https://criticalessay.trade”>essay writing</a> best dissertation services [url=https://criticalessay.trade]critical essay[/url] payday advance no credit check <a href=“https://samedaypaydayloansonline.cricket”>easy online payday loans</a> same day payday loans online [url=https://samedaypaydayloansonline.cricket]cash advance lenders[/url]
— PamNip Dec 16, 06:50 PM #More hints <a href=https://loansforbadcredit.us.com/>payday loans</a> payday loans for bad credit [url=https://loansforbadcredit.us.com/]loans for bad credit[/url]
— JoeNip Dec 16, 08:18 PM #quick loans 100 approval <a href=“https://quickloans.cricket”>cash loans</a> quick loans 100 approval [url=https://quickloans.cricket]quick loans[/url] fastest payday loan <a href=“https://paydayloandirectlender.webcam”>payday loans online direct lender</a> payday advance online [url=https://paydayloandirectlender.webcam]payday loans direct lenders[/url] argument essay <a href=“https://illustrationessay.bid”>argument essay</a> argument essay [url=https://illustrationessay.bid]writing a college essay[/url] easy payday loans online <a href=“https://easyonlinepaydayloans.science”>easy payday loans online</a> easy online payday loans [url=https://easyonlinepaydayloans.science]direct lenders online loans[/url] fastest payday loan <a href=“https://fastestpaydayloan.stream”>payday loan online</a> fastest payday loan [url=https://fastestpaydayloan.stream]fastest payday loan[/url] cash advance lenders <a href=“https://cashadvanceloan.science”>online payday advance loan</a> cash advance loan [url=https://cashadvanceloan.science]cash advance loan[/url] online payday loan instant approval <a href=“https://onlinepaydayloaninstantapproval.loan”>online payday loan lenders</a> online payday loan lenders [url=https://onlinepaydayloaninstantapproval.loan]online payday loan instant approval[/url] writing my paper <a href=“https://schoolpapers.science”>midlothian homework online</a> homework help [url=https://schoolpapers.science]school papers[/url]
— PamNip Dec 16, 08:47 PM #personal loans with bad credit <a href=https://badcreditpersonalloans.us.com>personal loans bad credit</a> bad credit payday loans [url=https://badcreditpersonalloans.us.com]bad credit payday loans[/url]
— JamesNip Dec 16, 09:06 PM #paper writing <a href=“https://argumentativeessay.us.com”>argumentative essay</a> argumentative essay [url=https://argumentativeessay.us.com]argument essay[/url]
— Web Assign Utah Dec 16, 09:28 PM #direct lenders for bad credit <a href=https://loansforbadcredit.us.com/>payday bad credit loan</a> bad credit payday loans direct lenders [url=https://loansforbadcredit.us.com/]payday bad credit loan[/url]
— JoeNip Dec 16, 11:24 PM #my.hrw.com homework help <a href=“https://essay.us.org”>essay</a> essay [url=https://essay.us.org]college essay prompts[/url]
— Buy Essays Online Dec 16, 11:30 PM #online payday loans for bad credit <a href=https://loansforbadcredit.us.com/>direct payday lenders bad credit</a> payday loans bad credit [url=https://loansforbadcredit.us.com/]payday loans for bad credit[/url]
— JamesNip Dec 17, 01:09 AM #help writing essays for college <a href=https://buyessays.us.com>website that writes essay for you</a> buy essay [url=https://buyessays.us.com]buy an essay paper[/url]
— JoeNip Dec 17, 01:12 AM #argumentative essay <a href=“https://argumentativeessay.us.com”>argumentative essay</a> paper writing services [url=https://argumentativeessay.us.com]essay writing[/url]
— Ace Homework Dec 17, 03:23 AM #payday loans bad credit <a href=“https://onlinepaydayloansforbadcredit.bid”>payday loans bad credit</a> loan cash [url=https://onlinepaydayloansforbadcredit.bid]direct lender loans[/url] myimaths online homework <a href=“https://paperwriting.webcam”>buy research papers online no plagiarism</a> paper writing [url=https://paperwriting.webcam]paper writing[/url] quick loans <a href=“https://quickloans.cricket”>quick loans</a> loans online [url=https://quickloans.cricket]quick loans 100 approval[/url]
— PamNip Dec 17, 03:25 AM #https://LoansForBadCredit.us.com/ <a href=https://loansforbadcredit.us.com/>Your Domain Name</a> bad credit loans direct lenders [url=https://loansforbadcredit.us.com/]payday[/url]
— JamesNip Dec 17, 03:47 AM #college essays <a href=“https://collegeessays.us.com”>essay help australia</a> buy essays [url=https://collegeessays.us.com]help with math homework online[/url]
— Assignment Define Dec 17, 03:53 AM #students assignment help <a href=“https://essaywritingservice.us.org”>essay writing service</a> essay writing service [url=https://essaywritingservice.us.org]essay writing service[/url]
— Write Dec 17, 04:56 AM #short term loans online <a href=https://shorttermloans.us.com>short term loans</a> secured personal loans [url=https://shorttermloans.us.com]getting a loan with bad credit[/url]
— JoeNip Dec 17, 05:19 AM #payday <a href=https://onlineloans.us.com/>online payday advance loan</a> article source [url=https://onlineloans.us.com/]payday loans online[/url]
— JamesNip Dec 17, 06:20 AM #buy essay <a href=https://buyessays.us.com>college essay help online</a> buy essay [url=https://buyessays.us.com]essay buy[/url]
— JoeNip Dec 17, 06:30 AM #writing my essay <a href=“https://essaywritingservice.us.org”>essay writing service</a> assignment essay help [url=https://essaywritingservice.us.org]writing my essay[/url]
— Essay Writer Online Dec 17, 07:34 AM #payday loans <a href=https://paydayloans.us.org/>Web Site</a> payday loans online [url=https://paydayloans.us.org/]payday express[/url]
— JoeNip Dec 17, 07:43 AM #loan <a href=“https://loan.us.org”>payday loans</a> loan [url=https://loan.us.org]online loans[/url]
— Best Online Loans Dec 17, 10:41 AM #essay writing online <a href=https://essayonline.us.com>buy cheap essays online</a> buy essay online [url=https://essayonline.us.com]essay online[/url]
— JoeNip Dec 17, 10:43 AM #college essays <a href=“https://collegeessays.us.com”>buy essays</a> college essays [url=https://collegeessays.us.com]college essays[/url]
— Online Essays Dec 17, 12:36 PM #buy college essays <a href=https://buyessays.us.com>buy essays online</a> where can i buy an essay online [url=https://buyessays.us.com]buy an essay[/url]
— JoeNip Dec 17, 12:49 PM #payday <a href=“https://payday.us.com”>direct lenders payday loans</a> payday loans no credit check [url=https://payday.us.com]payday[/url]
— Loan Cash Dec 17, 01:06 PM #cash advance loan <a href=“https://cashadvance.us.org”>online payday advance</a> online payday loan lender [url=https://cashadvance.us.org]cash advance[/url]
— Loans For Bad Credit Dec 17, 01:34 PM #research paper <a href=“https://researchpaper.us.com”>research paper</a> research paper [url=https://researchpaper.us.com]research paper[/url]
— Writing Online Dec 17, 01:52 PM #cash advance <a href=“https://cashadvance.us.org”>payday loans no credit check</a> cash advance [url=https://cashadvance.us.org]paydayloans[/url]
— Pay Day Loans Dec 17, 04:25 PM #bad credit personal loans direct lenders <a href=https://badcreditpersonalloans.us.com>payday loans for bad credit</a> bad credit loans utah [url=https://badcreditpersonalloans.us.com]bad credit personal unsecured loans[/url]
— JoeNip Dec 17, 04:34 PM #best payday loans <a href=“https://bestpaydayloans.stream”>best payday loans online</a> best payday loans online [url=https://bestpaydayloans.stream]best payday loans online[/url] buy essays <a href=“https://buyessays.stream”>professional research paper writers</a> pay for math homework [url=https://buyessays.stream]college algebra homework help[/url] quick loans 100 approval <a href=“https://quickloans100approval.stream”>quick loans 100 approval</a> quick loans 100 approval [url=https://quickloans100approval.stream]payday loan direct lender[/url] research papers <a href=“https://schoolpapers.cricket”>school papers</a> school papers [url=https://schoolpapers.cricket]research papers[/url] assignment writing service australia <a href=“https://commonapplicationessayprompts.science”>pay to do assignment</a> common application essay prompts [url=https://commonapplicationessayprompts.science]writing a research paper proposal[/url] easy online payday loans <a href=“https://easyonlinepaydayloans.bid”>direct loan lenders</a> easy online payday loans [url=https://easyonlinepaydayloans.bid]easy online payday loans[/url] essay help <a href=“https://researchessay.bid”>research papers</a> research paper [url=https://researchessay.bid]research papers[/url]
— JamesNip Dec 17, 04:47 PM #research paper <a href=“https://researchpaper.us.com”>research essay</a> need help with my homework [url=https://researchpaper.us.com]research paper[/url]
— Writing My Essay Dec 17, 05:49 PM #descriptive essay help <a href=https://collegeessay.us.com>help writing essay</a> college essays [url=https://collegeessay.us.com]writing an essay for college admission[/url]
— JoeNip Dec 17, 06:33 PM #essay <a href=“https://essay.us.org”>essay</a> help to write an essay [url=https://essay.us.org]math homework help ontario[/url]
— Pay To Write Essays Dec 17, 07:13 PM #short term loans <a href=https://shorttermloans.us.com>personal loans no credit check</a> loans with poor credit [url=https://shorttermloans.us.com]short term payday loans[/url]
— JoeNip Dec 17, 07:55 PM #buy college essays <a href=“https://collegeessays.us.com”>phd dissertation writing service</a> buy college essays [url=https://collegeessays.us.com]do my college homework[/url]
— Buy College Essays Dec 17, 08:13 PM #no credit check lenders only <a href=“https://cashadvance.us.org”>advance payday loans</a> cash til payday loan [url=https://cashadvance.us.org]cash advance lenders[/url]
— Money Loan Dec 17, 08:41 PM #chat sex <a href=“https://chatsex.trade”>sex chat</a> sex chat [url=https://chatsex.trade]web cam sex chat[/url] research paper abstract <a href=“https://schoolpapers.cricket”>research papers</a> research papers [url=https://schoolpapers.cricket]help with writing research papers[/url] best payday loans <a href=“https://bestpaydayloans.stream”>best payday loans</a> cash loan lenders [url=https://bestpaydayloans.stream]best payday loans online[/url] adult cam sites <a href=“https://adultcamsites.trade”>free adult cam to cam</a> free adult cam to cam [url=https://adultcamsites.trade]fetish cams[/url] research paper <a href=“https://researchwriting.stream”>research writing</a> research writing [url=https://researchwriting.stream]research writing[/url] term paper <a href=“https://collegepaper.trade”>university essay help</a> college entrance essays [url=https://collegepaper.trade]term paper[/url] online loans <a href=“https://quickloans.trade”>quick loans</a> online payday loan lender [url=https://quickloans.trade]quick loans[/url] free webcam sex chat <a href=“https://freewebcamsex.stream”>lesbian show</a> free webcam sex [url=https://freewebcamsex.stream]free webcam sex chat[/url] payday loan direct lenders <a href=“https://quickloans.science”>quick loans</a> payday advance loan [url=https://quickloans.science]cash loans[/url]
— JamesNip Dec 17, 09:17 PM #free xxx webcams <a href=“https://chatsex.trade”>chat sex</a> live sex chat [url=https://chatsex.trade]sex chat[/url] project management assignment help <a href=“https://commonapplicationessayprompts.science”>common application essay prompts</a> college essays online [url=https://commonapplicationessayprompts.science]common application essay prompts[/url] advance cash payday loan <a href=“https://cashadvanceloan.bid”>easy cash payday loan</a> cash advance loan [url=https://cashadvanceloan.bid]cash advance lenders[/url]
— JamesNip Dec 17, 09:40 PM #loans online <a href=“https://loan.us.org”>same day loan</a> loan [url=https://loan.us.org]loan[/url]
— Online Payday Loans Dec 17, 11:20 PM #live sex chat <a href=https://webcamsex.us.com>adult webcams</a> adult webcams [url=https://webcamsex.us.com]chat webcams[/url]
— JoeNip Dec 18, 12:06 AM #essay writing service <a href=“https://essaywritingservice.us.org”>essay writing service</a> need help with essay [url=https://essaywritingservice.us.org]paper writing service[/url]
— Paper Back Writer Dec 18, 12:33 AM #loans online <a href=https://onlineloans.us.com>best cash loans online</a> payday loans online [url=https://onlineloans.us.com]online loans[/url]
— JoeNip Dec 18, 01:11 AM #payday <a href=“https://payday.us.com”>payday loans no credit check</a> payday loan online [url=https://payday.us.com]payday loan[/url]
— Getting A Loan Dec 18, 01:50 AM #college essay <a href=“https://collegeessays.us.com”>i have to do my homework</a> college essays [url=https://collegeessays.us.com]buy essays[/url]
— Essay Buy Dec 18, 02:21 AM #best payday loans online <a href=“https://bestpaydayloans.stream”>payday loans direct lenders only</a> payday advance online [url=https://bestpaydayloans.stream]best payday loans[/url] school papers <a href=“https://schoolpapers.trade”>algebra help</a> essay corrector [url=https://schoolpapers.trade]writing a research paper conclusion[/url] ut online homework <a href=“https://collegepaper.trade”>college paper</a> college admissions essay [url=https://collegepaper.trade]college paper[/url] help in assignment <a href=“https://commonapplicationessayprompts.science”>common application essay prompts</a> database assignment help [url=https://commonapplicationessayprompts.science]common application essay prompts[/url] writing my essay <a href=“https://essaywriting.trade”>writing my essay</a> writing my essay [url=https://essaywriting.trade]homework help alabama[/url]
— JamesNip Dec 18, 03:15 AM #essay writer <a href=“https://essay.us.org”>essay</a> essay [url=https://essay.us.org]argument essay[/url]
— My Homework Now Dec 18, 04:10 AM #personal loans bad credit reviews <a href=https://badcreditpersonalloans.us.com>personal loans bad credit guaranteed</a> personal loans for bad credit [url=https://badcreditpersonalloans.us.com]cash loans for people with bad credit[/url]
— JoeNip Dec 18, 04:47 AM #advance payday loans <a href=“https://advancepaydayloans.cricket”>online payday loans</a> advance payday loans online [url=https://advancepaydayloans.cricket]advance payday loans[/url] easiest payday loan to get <a href=“https://smallpaydayloans.bid”>small payday loans</a> small payday loans [url=https://smallpaydayloans.bid]direct lenders for bad credit[/url] online payday loans for bad credit <a href=“https://paydayloansforbadcredit.stream”>online payday advance loan</a> payday loans for bad credit [url=https://paydayloansforbadcredit.stream]online payday loans for bad credit[/url] essay writing service <a href=“https://collegeessayprompts.trade”>essay writing service</a> argument essay [url=https://collegeessayprompts.trade]college essay prompts[/url] college essays <a href=“https://buyessays.stream”>law homework help</a> college essays [url=https://buyessays.stream]homework help site[/url] psychology dissertation help <a href=“https://schoolpapers.trade”>math help</a> school papers [url=https://schoolpapers.trade]college application essay prompts[/url] get a loan <a href=“https://quickloans100approval.stream”>quick loans 100 approval</a> quick loans 100 approval [url=https://quickloans100approval.stream]10 top loan companies[/url] online payday loans instant approval <a href=“https://easypaydayloansonline.science”>best payday loans online</a> easy payday loans online [url=https://easypaydayloansonline.science]no credit check loan[/url]
— JamesNip Dec 18, 05:28 AM #cash advance <a href=“https://cashadvance.us.org”>payday loans bad credit</a> direct lenders [url=https://cashadvance.us.org]cash loans[/url]
— Cash Advance Dec 18, 05:32 AM #order essay now <a href=https://buyessay.us.com>help with writing essays</a> buy persuasive essay [url=https://buyessay.us.com]buy persuasive essay[/url]
— JoeNip Dec 18, 06:07 AM #payday loan online <a href=“https://payday.us.com”>fast cash loans</a> no credit loans guaranteed approval [url=https://payday.us.com]online payday loans direct lenders[/url]
— Payday Loan Dec 18, 06:12 AM #bad credit personal loans nyc <a href=https://badcreditpersonalloans.us.com>bad credit personal loans</a> personal loans for bad credit [url=https://badcreditpersonalloans.us.com]payday loans for bad credit[/url]
— JoeNip Dec 18, 07:08 AM #a payday loan <a href=“https://payday.us.com”>payday</a> payday cash loan [url=https://payday.us.com]payday loans[/url]
— Paydayloan Dec 18, 07:12 AM #payday <a href=“https://payday.us.com”>payday</a> online payday loans direct lenders [url=https://payday.us.com]payday loans for bad credit[/url]
— Quick Loan Dec 18, 07:58 AM #buy an essay online <a href=https://buyessay.us.com>buy an essay</a> buy essays [url=https://buyessay.us.com]buy essay[/url]
— JamesNip Dec 18, 08:43 AM #https://writemyessay.us.com/ <a href=https://writemyessay.us.com>essay help</a> https://writemyessay.us.com/ [url=https://writemyessay.us.com]Additional Info[/url]
— JamesNip Dec 18, 09:03 AM #buy essays <a href=“https://collegeessays.us.com”>essays paying college athletes</a> college accounting homework help [url=https://collegeessays.us.com]buy assignments[/url]
— Writing My Essay Dec 18, 10:32 AM #essay <a href=“https://essay.us.org”>essay writing</a> essay writer [url=https://essay.us.org]essay[/url]
— Is Homework Helpful Dec 18, 10:34 AM #fast cash loans <a href=https://shorttermloans.us.com>long term loan</a> short term loans no credit checks [url=https://shorttermloans.us.com]need a loan fast[/url]
— JamesNip Dec 18, 12:15 PM #cash advance <a href=“https://cashadvance.us.org”>advance cash payday loan</a> online payday advance [url=https://cashadvance.us.org]cash advance loan[/url]
— Loans Dec 18, 01:42 PM #buy essay cheap <a href=https://buyessay.us.com>buy an essay for college</a> buy essay [url=https://buyessay.us.com]buy an essay cheap[/url]
— JamesNip Dec 18, 01:48 PM #a payday loan <a href=“https://payday.us.com”>payday loan online</a> payday cash loan [url=https://payday.us.com]bad credit[/url]
— Cash Loan Dec 18, 02:54 PM #boob cams <a href=https://webcamsex.us.com>chat with sluts</a> chat video [url=https://webcamsex.us.com]webcam sex[/url]
— JamesNip Dec 18, 05:19 PM #payday loan direct lender <a href=“https://directlenderpaydayloans.cricket”>online payday loans instant approval</a> payday loans direct lender [url=https://directlenderpaydayloans.cricket]payday loan direct lender[/url] best payday loans online <a href=“https://samedaypaydayloansonline.bid”>cash advance loan</a> easy fast payday loans [url=https://samedaypaydayloansonline.bid]same day payday loans online[/url] girl cams <a href=“https://wifewebcam.cricket”>free sex web chat</a> web cam nude [url=https://wifewebcam.cricket]web cam sluts[/url]
— JamesNip Dec 18, 07:38 PM #payday loans no credit check <a href=“https://payday.us.com”>payday cash loan</a> payday loans online [url=https://payday.us.com]a payday loan[/url]
— A Payday Loan Dec 18, 08:12 PM #instant online loans <a href=“https://loan.us.org”>loan</a> loan [url=https://loan.us.org]get a loan[/url]
— Cash Advance Dec 18, 08:58 PM #online loans <a href=“https://loan.us.org”>installment loan</a> loan [url=https://loan.us.org]payday loans online[/url]
— Online Loans Dec 18, 09:29 PM #free chat rooms <a href=https://webcamsex.us.com>webcam sex</a> fuck show [url=https://webcamsex.us.com]erotic sex chat[/url]
— JamesNip Dec 18, 10:57 PM #cash advance <a href=“https://cashadvance.us.org”>cash advance</a> cash advance [url=https://cashadvance.us.org]loans with no credit check[/url]
— Cash Loan Dec 18, 11:40 PM #college essays online <a href=https://essayonline.us.com>online essays</a> buy essay online [url=https://essayonline.us.com]buy essay online[/url]
— JamesNip Dec 19, 12:36 AM #loan cash <a href=“https://cashadvance.us.org”>cash advance</a> cash advance loan [url=https://cashadvance.us.org]payday advance online[/url]
— Payday Loan Dec 19, 03:32 AM #pay for essay online <a href=https://buyessays.us.com>buy an essay online</a> buy essay online [url=https://buyessays.us.com]best websites for essays[/url]
— JamesNip Dec 19, 04:25 AM #payday <a href=“https://payday.us.com”>payday</a> payday loan online [url=https://payday.us.com]payday loans[/url]
— Online Loans Dec 19, 04:36 AM #payday loans online <a href=https://paydayloans.us.org>payday loans online</a> payday loans [url=https://paydayloans.us.org]payday loan online[/url]
— JamesNip Dec 19, 05:50 AM #short loans <a href=https://shorttermloans.us.com>payday loans in pa</a> short term bad credit loans [url=https://shorttermloans.us.com]loans short term no credit check[/url]
— JoeNip Dec 19, 07:12 AM #a payday loan <a href=“https://payday.us.com”>payday</a> payday loan online [url=https://payday.us.com]payday loans online[/url]
— Direct Lenders Dec 19, 08:53 AM #payday loans online direct lender <a href=“https://payday.us.com”>payday</a> payday [url=https://payday.us.com]payday[/url]
— Pay Day Loan Dec 19, 08:55 AM #essay writing service <a href=“https://essaywritingservice.us.org”>paper writing service</a> writing my essay [url=https://essaywritingservice.us.org]writing my essay for me[/url]
— Term Paper Writers Dec 19, 09:49 AM #research paper <a href=“https://researchpaper.us.com”>research paper</a> research paper [url=https://researchpaper.us.com]research paper[/url]
— Buy Papers Online Dec 19, 10:59 AM #payday <a href=“https://payday.us.com”>installment loans no credit check</a> payday [url=https://payday.us.com]payday[/url]
— Payday Express Dec 19, 11:18 AM #cash advance <a href=“https://cashadvance.us.org”>a payday loan</a> quick loan [url=https://cashadvance.us.org]online payday advance[/url]
— Payday Loan Dec 19, 11:43 AM #online payday loan lenders <a href=“https://loan.us.org”>same day payday loans online</a> cash loans no credit check [url=https://loan.us.org]loan[/url]
— Easy Payday Loan Dec 19, 02:21 PM #essay writing service <a href=“https://essaywritingservice.us.org”>writing my essay</a> writing my paper [url=https://essaywritingservice.us.org]math help online[/url]
— Write My Essay Cheap Dec 19, 02:32 PM #writing a paper <a href=“https://researchpaper.us.com”>research paper</a> biology homework help [url=https://researchpaper.us.com]research paper[/url]
— Online Essay Writer Dec 19, 03:49 PM #research papers <a href=“https://researchpaper.us.com”>research paper</a> math homework helpers [url=https://researchpaper.us.com]research paper[/url]
— College Paper Writer Dec 19, 04:39 PM #buy essays <a href=“https://collegeessays.us.com”>college essays</a> college essays [url=https://collegeessays.us.com]buy college essays[/url]
— Buy College Essays Dec 19, 04:45 PM #loan <a href=“https://loan.us.org”>loan</a> direct lenders immediate payment loans [url=https://loan.us.org]loan[/url]
— Online Payday Loans Dec 19, 06:20 PM #essay <a href=“https://essay.us.org”>college essay prompts</a> essay [url=https://essay.us.org]phd dissertation writing service[/url]
— Buy Essays Cheap Dec 19, 08:46 PM #loan <a href=“https://loan.us.org”>loan</a> easy cash payday loan [url=https://loan.us.org]loan[/url]
— Getting A Loan Dec 19, 08:48 PM #college admission essay help <a href=“https://collegeessays.us.com”>college essays</a> college essay help [url=https://collegeessays.us.com]college essays[/url]
— Write Essay For Me Dec 19, 10:17 PM #payday cash loan <a href=“https://payday.us.com”>payday</a> payday advance loan [url=https://payday.us.com]small loans no credit check[/url]
— Online Loans Dec 19, 11:12 PM #essay writing service <a href=“https://essaywritingservice.us.org”>custom research paper writing</a> writing my essay for me [url=https://essaywritingservice.us.org]essay writing service[/url]
— Homework Help Online Dec 19, 11:58 PM #online installment loans <a href=“https://loan.us.org”>loan</a> loan [url=https://loan.us.org]loan[/url]
— Direct Lenders Dec 20, 02:38 AM #payday advance loan <a href=“https://payday.us.com”>direct payday lenders online</a> advance cash payday loan [url=https://payday.us.com]payday loan[/url]
— Loan Dec 20, 03:14 AM #payday loans no credit check <a href=“https://payday.us.com”>payday cash loan</a> fast payday loan [url=https://payday.us.com]payday[/url]
— Spotloan Dec 20, 04:07 AM #loan <a href=“https://loan.us.org”>loan</a> loan [url=https://loan.us.org]loan[/url]
— Online Payday Loans Dec 20, 04:47 AM #research papers <a href=“https://researchpaper.us.com”>research essay</a> research report [url=https://researchpaper.us.com]research paper[/url]
— French Homework Dec 20, 05:37 AM #write literature review <a href=“https://researchpaper.us.com”>writing a paper</a> research paper [url=https://researchpaper.us.com]research paper[/url]
— My Essay Writing Dec 20, 05:39 AM #Congratulations. Here is your 41% Discount
— JamesUsept Dec 20, 11:56 AM #20 Pcs Advanced Biology Lab Anatomy Medical Student Dissecting Dissection Kit
https://www.ebay.com/itm/322900445999
cash advance <a href=“https://cashadvance.us.org”>cash advance</a> online payday loans no credit check [url=https://cashadvance.us.org]easy approval payday loans[/url]
— Payday Loans Online Dec 20, 12:27 PM #payday <a href=“https://payday.us.com”>payday loans online</a> payday [url=https://payday.us.com]online payday loan application[/url]
— Quick Loan Dec 20, 05:13 PM #payday <a href=“https://payday.us.com”>fast payday loan</a> advance cash payday loan [url=https://payday.us.com]payday[/url]
— Easy Payday Loan Dec 20, 05:35 PM #loan cash <a href=“https://cashadvance.us.org”>no credit check lenders only</a> cash advance loan [url=https://cashadvance.us.org]payday loans direct lenders[/url]
— Payday Express Dec 20, 08:20 PM #cash advance <a href=“https://cashadvance.us.org”>cash loans</a> loan cash [url=https://cashadvance.us.org]payday advance loans[/url]
— Direct Lenders Dec 20, 08:36 PM #loan <a href=“https://loan.us.org”>loan</a> payday loans [url=https://loan.us.org]loan[/url]
— Pay Day Loan Dec 21, 12:16 AM #payday loan companies <a href=“https://cashadvance.us.org”>payday loans</a> payday advance online [url=https://cashadvance.us.org]cash loans[/url]
— Money Loan Dec 21, 03:34 AM #online loans direct lenders <a href=“https://payday.us.com”>check into cash</a> payday [url=https://payday.us.com]payday loans online[/url]
— Paydayloan Dec 21, 03:51 AM #payday loan <a href=“https://payday.us.com”>payday loans</a> cash loans no credit check [url=https://payday.us.com]payday[/url]
— Payday Express Dec 21, 04:18 AM #https://1bis-ru.blogspot.ru/ – 1bis-ru|
— Artemsag Dec 21, 05:31 AM #loans <a href=“https://loan.us.org”>loan</a> payday loan [url=https://loan.us.org]loan[/url]
— Instant Online Loans Dec 21, 05:47 AM #loan <a href=“https://loan.us.org”>cash loans</a> loan [url=https://loan.us.org]direct lenders for bad credit[/url]
— Online Payday Loans Dec 21, 07:28 AM #legitimate payday loans online no credit check <a href=https://paydayloans.us.org>payday loans</a> payday loans online no credit check [url=https://paydayloans.us.org]payday loans online[/url]
— JamesNip Dec 21, 07:41 AM #payday cash advance loan <a href=“https://cashadvance.us.org”>payday loans direct lender</a> cash advance [url=https://cashadvance.us.org]cash advance[/url]
— Payday Loans Online Dec 21, 09:01 AM #quick loans no credit check <a href=“https://payday.us.com”>payday</a> payday loans online [url=https://payday.us.com]direct lenders[/url]
— Payday Express Dec 21, 10:03 AM #direct payday lenders online <a href=“https://loan.us.org”>cash loan</a> speedycash [url=https://loan.us.org]online loans[/url]
— Getting A Loan Dec 21, 10:46 AM #direct online lenders <a href=“https://loan.us.org”>loan</a> loan [url=https://loan.us.org]payday loans[/url]
— Easy Payday Loan Dec 21, 12:28 PM #Absolutely NEW update of SEO/SMM software “XRumer 16.0 + XEvil 3.0”:
captchas regignizing of Google, Facebook, Bing, Hotmail, SolveMedia, Yandex,
and more than 8400 another subtypes of captcha,
with highest precision (80..100%) and highest speed (100 img per second).
You can connect XEvil 3.0 to all most popular SEO/SMM software: XRumer, GSA SER, ZennoPoster, Srapebox, Senuke, and more than 100 of other programms.
Interested? You can find a lot of demo videos about XEvil in YouTube.
Good luck!
P.S. XEvil 4.0. break ReCaptcha2 too !
— Twilabog Dec 21, 12:54 PM #payday loans <a href=https://loansforpeoplewithbadcredit.us.com>online payday loans</a> payday loans online [url=https://loansforpeoplewithbadcredit.us.com]payday loans online[/url]
— JamesNip Dec 21, 01:12 PM #payday loans online <a href=https://loansforpeoplewithbadcredit.us.com>payday loans online</a> online payday loans [url=https://loansforpeoplewithbadcredit.us.com]payday loans online no credit check[/url]
— JamesNip Dec 21, 02:42 PM #quick payday loans <a href=https://quickloans.us.com>quick loans</a> quick payday loans with bad credit [url=https://quickloans.us.com]quicken loans rates[/url]
— JamesNip Dec 21, 03:43 PM #payday <a href=“https://payday.us.com”>a payday loan</a> online payday advance [url=https://payday.us.com]best cash loans online[/url]
— Online Payday Loan Dec 21, 04:38 PM #cash advance <a href=“https://cashadvance.us.org”>quick loan</a> loan cash [url=https://cashadvance.us.org]cash advance lenders[/url]
— Instant Online Loans Dec 21, 05:48 PM #advance cash payday loan <a href=“https://cashadvance.us.org”>cash loans</a> 10 top loan companies [url=https://cashadvance.us.org]advance cash payday loan[/url]
— A Payday Loan Dec 21, 07:41 PM #short term loan bad credit <a href=https://shorttermloans.us.com>how to get a loan with no credit</a> short term loans online [url=https://shorttermloans.us.com]short term loans[/url]
— JamesNip Dec 21, 08:17 PM #writers online <a href=https://essayonline.us.com>write my essay online</a> buy essay online [url=https://essayonline.us.com]essay online[/url]
— JamesNip Dec 21, 10:01 PM #payday loans no credit check <a href=“https://payday.us.com”>payday</a> installment loans no credit check [url=https://payday.us.com]quick loan[/url]
— A Payday Loan Dec 21, 11:39 PM #online payday advance <a href=“https://cashadvance.us.org”>cash loans</a> cash advance [url=https://cashadvance.us.org]money lender no credit check[/url]
— Payday Loan Online Dec 22, 01:08 AM #cash loan <a href=“https://loan.us.org”>loan</a> payday loans [url=https://loan.us.org]loan[/url]
— Direct Lender Loans Dec 22, 04:40 AM #essay writing service <a href=https://essaywritingservices.us.com>college essay writer for pay</a> a manual for writers of term papers [url=https://essaywritingservices.us.com]essay writing service review[/url]
— JamesNip Dec 22, 05:30 AM #fast loans lenders <a href=https://quickloans.us.com>quick cash loans reviews</a> quick loans online [url=https://quickloans.us.com]quick loans for bad credit[/url]
— JamesNip Dec 22, 05:32 AM #payday <a href=“https://payday.us.com”>payday loan</a> payday [url=https://payday.us.com]payday express[/url]
— Direct Lender Loans Dec 22, 05:49 AM #payday loan <a href=“https://loan.us.org”>best payday loans online</a> cash loans [url=https://loan.us.org]loan[/url]
— Get A Loan Dec 22, 09:27 AM #payday loans on line <a href=“https://payday.us.com”>payday loan online</a> small loans no credit check [url=https://payday.us.com]best cash advance loans online[/url]
— Online Loans Dec 22, 10:48 AM #bad credit <a href=“https://payday.us.com”>payday loans no credit check</a> payday cash loan [url=https://payday.us.com]cash loans no credit check[/url]
— Best Online Loans Dec 22, 11:46 AM #money loan <a href=“https://cashadvance.us.org”>advance payday loans online</a> payday cash advance loan [url=https://cashadvance.us.org]direct payday loans[/url]
— Direct Lender Loans Dec 22, 03:49 PM #easy fast payday loans <a href=“https://loan.us.org”>cash loan advance</a> easy loans [url=https://loan.us.org]loan[/url]
— Easy Payday Loan Dec 22, 05:28 PM #payday loan online <a href=“https://payday.us.com”>payday loan</a> speedy cash payday loans online [url=https://payday.us.com]payday[/url]
— Online Loan Dec 22, 07:07 PM #loan cash <a href=“https://cashadvance.us.org”>cash advance</a> cash advance [url=https://cashadvance.us.org]cash advance[/url]
— Personal Loans Dec 23, 12:51 AM #10 top loan companies <a href=“https://payday.us.com”>online loans direct lenders</a> payday [url=https://payday.us.com]advance cash payday loan[/url]
— Payday Express Dec 23, 12:53 AM #chat sex <a href=“https://chatsex.trade”>adult webcam</a> sex chat [url=https://chatsex.trade]chat sex[/url] research writing <a href=“https://researchwriting.stream”>research writing</a> research paper [url=https://researchwriting.stream]research writing[/url] quick loans 100 approval <a href=“https://quickloans100approval.stream”>quick loans 100 approval</a> quick loans 100 approval [url=https://quickloans100approval.stream]direct lender payday loans[/url] college essays <a href=“https://collegeessaywriter.bid”>college essay writer</a> college essay writer [url=https://collegeessaywriter.bid]do my assignment for me[/url] online loans direct lenders <a href=“https://onlineloansdirectlenders.stream”>direct payday lenders online</a> same day loan [url=https://onlineloansdirectlenders.stream]speedycash[/url] free sex cam chat <a href=“https://freesexcamchat.cricket”>free sex cam chat</a> live free sex chat [url=https://freesexcamchat.cricket]free adult sex chat[/url]
— JamesNip Dec 23, 06:31 AM #the best online payday loans <a href=“https://thebestonlinepaydayloans.trade”>the best online payday loans</a> payday loans online [url=https://thebestonlinepaydayloans.trade]the best online payday loans[/url] payday loans lenders <a href=“https://smallpaydayloans.bid”>payday loans online</a> best payday loans [url=https://smallpaydayloans.bid]easy payday loans[/url] common application essay prompts <a href=“https://commonapplicationessayprompts.science”>common application essay prompts</a> common application essay prompts [url=https://commonapplicationessayprompts.science]writing my paper[/url] quick loans <a href=“https://quickloans.science”>payday lenders direct</a> payday bad credit loan [url=https://quickloans.science]payday loans[/url] essay corrector <a href=“https://collegeessaywriter.bid”>need homework help</a> essay writer [url=https://collegeessaywriter.bid]do my english homework[/url] free chat rooms <a href=“https://freechatrooms.webcam”>free chat rooms</a> free chat rooms [url=https://freechatrooms.webcam]free sex chat[/url]
— JamesNip Dec 23, 01:23 PM #no credit check lenders only <a href=“https://cashadvancelenders.trade”>small payday loans</a> cash advance lenders [url=https://cashadvancelenders.trade]payday loan direct lender[/url] emergency loans no credit check <a href=“https://quickloans.trade”>quick loans</a> direct loans [url=https://quickloans.trade]emergency loan no credit check[/url] same day payday loans online <a href=“https://samedaypaydayloansonline.bid”>same day payday loans online</a> same day payday loans online [url=https://samedaypaydayloansonline.bid]payday loan direct lenders[/url] webcam asian <a href=“https://freewebcamsex.stream”>free sex webcam</a> free webcam sex [url=https://freewebcamsex.stream]free webcam sex chat[/url]
— JamesNip Dec 23, 06:08 PM #auto insurance quotes california <a href=“https://autoinsurancequotes.us.com”>auto insurance quotes</a> online auto insurance quotes [url=https://autoinsurancequotes.us.com]auto insurance quotes[/url]
— car insurance quote Dec 23, 06:24 PM #car insurance prices <a href=“https://autoinsurancequotes.us.com”>auto insurance quotes</a> car insurance quotes comparison [url=https://autoinsurancequotes.us.com]cheap car insurance quotes[/url]
— online car insurance Dec 23, 06:36 PM #compare auto insurance quotes <a href=“https://comparecarinsurance.us.com”>classic car insurance quote</a> cheapest auto insurance quotes comparison [url=https://comparecarinsurance.us.com]compare car insurance[/url]
— best auto insurance Dec 23, 08:59 PM #speedy cash payday loans online <a href=“https://loan.us.org”>loans online</a> loan [url=https://loan.us.org]loan[/url]
— Pay Day Loans Dec 23, 09:19 PM #auto insurance quotes <a href=“https://autoinsurancequotes.us.com”>cheap car insurance quotes</a> auto insurance quotes comparison [url=https://autoinsurancequotes.us.com]car insurance quotes california[/url]
— auto owners ins Dec 23, 09:24 PM #cheap car insurance <a href=“https://carinsurance.us.org”>car insurance</a> auto insurance [url=https://carinsurance.us.org]car insurance[/url]
— auto owners ins Dec 23, 09:24 PM #progressive auto ins <a href=“https://comparecarinsurance.us.com”>compare car insurance</a> compare car insurance rates [url=https://comparecarinsurance.us.com]liberty mutual car insurance[/url]
— allstate insurance Dec 24, 12:03 AM #direct lender payday loans <a href=“https://payday.us.com”>payday</a> payday loan [url=https://payday.us.com]payday loans on line[/url]
— Online Lenders Dec 24, 01:00 AM #car insurance quotes comparison online <a href=“https://comparecarinsurance.us.com”>motorcycle insurance quote</a> car insurance quote [url=https://comparecarinsurance.us.com]compare auto insurance quotes[/url]
— allstate Dec 24, 02:02 AM #essay writing service <a href=“https://collegeessayprompts.trade”>essay corrector</a> college essay prompts [url=https://collegeessayprompts.trade]college essay prompts[/url] money loan <a href=“https://moneyloan.trade”>money loan</a> payday loan [url=https://moneyloan.trade]money loan[/url] payday cash advance loan <a href=“https://quickloans100approval.stream”>instant online payday loan</a> quick loans 100 approval [url=https://quickloans100approval.stream]quick loans 100 approval[/url] assignment help in australia <a href=“https://collegeessaywriter.bid”>essay corrector</a> writing my essay [url=https://collegeessaywriter.bid]college essay writer[/url] best dissertation services <a href=“https://collegepaper.trade”>alabama homework help online</a> college paper [url=https://collegepaper.trade]college paper[/url] write a paper <a href=“https://writeapaper.stream”>term paper</a> term paper [url=https://writeapaper.stream]write a paper[/url] best cash loans online <a href=“https://samedaypaydayloansonline.bid”>faxless payday loans</a> loans [url=https://samedaypaydayloansonline.bid]same day payday loans online[/url] online loans direct lenders <a href=“https://badcreditpaydayloansdirectlenders.cricket”>bad credit payday loans direct lenders</a> bad credit payday loans direct lenders [url=https://badcreditpaydayloansdirectlenders.cricket]bad credit payday loans direct lenders[/url] research essay <a href=“https://researchessay.bid”>engineering assignment help</a> research essay [url=https://researchessay.bid]research papers[/url]
— JamesNip Dec 24, 02:03 AM #cash payday loans online <a href=“https://cashadvance.us.org”>no credit check loans</a> payday advance [url=https://cashadvance.us.org]loan cash[/url]
— Cash Advance Dec 24, 02:24 AM #cheap auto insurance quotes <a href=“https://autoinsurancequotes.us.com”>online auto insurance quotes</a> thegeneral.com auto insurance [url=https://autoinsurancequotes.us.com]cheap auto insurance quotes[/url]
— direct car insurance Dec 24, 04:13 AM #compare car insurance <a href=“https://comparecarinsurance.us.com”>compare car insurance</a> car insurance quotes comparison online [url=https://comparecarinsurance.us.com]compare auto insurance rates[/url]
— geico Dec 24, 04:34 AM #get a loan <a href=“https://loan.us.org”>quick loan</a> get a loan [url=https://loan.us.org]cash loan[/url]
— Loans Online Dec 24, 04:51 AM #car insurance quotes texas <a href=“https://autoinsurancequotes.us.com”>car insurance in florida</a> car insurance in florida [url=https://autoinsurancequotes.us.com]auto insurance quotes[/url]
— cheap insurance auto Dec 24, 06:09 AM #online car insurance quotes <a href=“https://carinsurance.us.org”>direct car insurance</a> car insurance [url=https://carinsurance.us.org]cheap auto insurance[/url]
— auto insurance quote Dec 24, 06:48 AM #payday <a href=“https://payday.us.com”>payday cash loan</a> payday [url=https://payday.us.com]same day loan[/url]
— Payday Dec 24, 08:17 AM #thegeneral.com auto insurance <a href=“https://comparecarinsurance.us.com”>compare car insurance</a> auto insurance quotes comparison online [url=https://comparecarinsurance.us.com]compare car insurance[/url]
— car insurance cost Dec 24, 09:21 AM #car insurance <a href=“https://carinsurance.us.org”>car insurance</a> motorcycle insurance quotes online [url=https://carinsurance.us.org]car insurance[/url]
— car insurance quotes Dec 24, 10:38 AM #car insurance <a href=“https://carinsurance.us.org”>cheap auto insurance in florida</a> car insurance calculator [url=https://carinsurance.us.org]car insurance[/url]
— auto insurance rates Dec 24, 11:13 AM #installment loan <a href=“https://quickloans.science”>cash loans</a> quick loans [url=https://quickloans.science]quick loan[/url] illustration essay <a href=“https://illustrationessay.trade”>buy an essay</a> need help writing an essay [url=https://illustrationessay.trade]homework hotline online[/url] payday loans direct lenders only <a href=“https://cashadvanceloan.bid”>paydayloans online</a> get a loan [url=https://cashadvanceloan.bid]payday advance loan[/url]
— JamesNip Dec 24, 11:26 AM #cash loans <a href=“https://cashadvance.us.org”>cash advance lenders</a> payday advance online [url=https://cashadvance.us.org]advance cash payday loan[/url]
— Online Payday Loan Dec 24, 11:35 AM #auto insurance quotes <a href=“https://autoinsurancequotes.us.com”>car insurance quotes</a> auto insurance quotes [url=https://autoinsurancequotes.us.com]auto insurance quotes texas[/url]
— ins Dec 24, 12:50 PM #writing essays help <a href=“https://commonapplicationessayprompts.science”>do homework for me</a> where to buy essays online [url=https://commonapplicationessayprompts.science]common application essay prompts[/url] easy loans <a href=“https://easyloans.webcam”>easy payday loans</a> cash loans [url=https://easyloans.webcam]easy online payday loans[/url] webcam masturbation <a href=“https://webcammasturbation.stream”>webcam masturbation</a> webcam dildo [url=https://webcammasturbation.stream]webcam sluts[/url] payday loans bad credit <a href=“https://paydaybadcreditloan.bid”>payday loans bad credit</a> bad credit [url=https://paydaybadcreditloan.bid]payday bad credit loan[/url] college paper <a href=“https://collegepaper.trade”>college paper</a> college paper [url=https://collegepaper.trade]economic homework help[/url] essay helper <a href=“https://essayprompts.cricket”>essay prompts</a> essay prompts [url=https://essayprompts.cricket]essay helper[/url]
— JamesNip Dec 24, 01:51 PM #compare car insurance <a href=“https://comparecarinsurance.us.com”>progressive car insurance</a> compare car insurance [url=https://comparecarinsurance.us.com]compare car insurance[/url]
— auto club insurance Dec 24, 01:56 PM #argumentative essays <a href=“https://argumentativeessay.us.com”>argument essay</a> argumentative essay [url=https://argumentativeessay.us.com]argumentative essay[/url]
— Essay Buy Dec 24, 01:58 PM #paper writing service <a href=“https://essaywritingservice.us.org”>need homework help</a> writing my paper [url=https://essaywritingservice.us.org]essay writing[/url]
— Essay Help Dec 24, 02:06 PM #car insurance <a href=“https://carinsurance.us.org”>compare car insurance</a> cheapest car insurance quotes comparison [url=https://carinsurance.us.org]inexpensive auto insurance[/url]
— cheap car ins Dec 24, 02:40 PM #payday bad credit loan <a href=“https://loan.us.org”>direct lender payday loans</a> best online payday loans [url=https://loan.us.org]loans online[/url]
— Fastest Payday Loan Dec 24, 03:09 PM #auto insurance quotes california <a href=“https://autoinsurancequotes.us.com”>progressive motorcycle insurance</a> car insurance quotes comparison [url=https://autoinsurancequotes.us.com]auto insurance quotes texas[/url]
— safeauto insurance Dec 24, 03:30 PM #auto insurance quotes <a href=“https://autoinsurancequotes.us.com”>cheap auto insurance quotes</a> auto insurance quotes [url=https://autoinsurancequotes.us.com]car insurance quotes[/url]
— geico insurance Dec 24, 03:37 PM #loan <a href=“https://loan.us.org”>loan</a> cash loans [url=https://loan.us.org]loans[/url]
— Online Loan Dec 24, 03:56 PM #pay me to do your homework <a href=“https://essay.us.org”>college essay prompts</a> essay [url=https://essay.us.org]essay[/url]
— Buy Papers Online Dec 24, 04:19 PM #compare car insurance <a href=“https://carinsurance.us.org”>cheapest car insurance</a> cheap auto insurance [url=https://carinsurance.us.org]compare auto insurance rates[/url]
— auto insurance rates Dec 24, 04:35 PM #cheapest auto insurance quotes comparison <a href=“https://comparecarinsurance.us.com”>compare car insurance</a> compare car insurance [url=https://comparecarinsurance.us.com]compare car insurance[/url]
— insurance rates Dec 24, 05:00 PM #loan <a href=“https://loan.us.org”>payday loans</a> loan [url=https://loan.us.org]get a loan[/url]
— Payday Loans Dec 24, 05:05 PM #payday advance loans <a href=“https://cashadvance.us.org”>cash advance</a> online payday advance [url=https://cashadvance.us.org]cash advance[/url]
— Get A Loan Dec 24, 05:55 PM #compare car insurance quotes <a href=“https://carinsurance.us.org”>compare car insurance</a> state farm car insurance quote [url=https://carinsurance.us.org]cheap auto insurance in california[/url]
— best auto insurance Dec 24, 06:00 PM #essay <a href=“https://essay.us.org”>essay</a> argument essay [url=https://essay.us.org]essay[/url]
— Assignments Help Dec 24, 07:18 PM #cheapest car insurance quotes comparison <a href=“https://comparecarinsurance.us.com”>compare car insurance</a> compare auto insurance quotes [url=https://comparecarinsurance.us.com]compare car insurance[/url]
— amica auto insurance Dec 24, 07:43 PM #essay writing service <a href=“https://essaywritingservice.us.org”>essay writing service</a> essay writing [url=https://essaywritingservice.us.org]writing my essay for me[/url]
— Buy Essay.Org Dec 24, 07:44 PM #cheapest car insurance <a href=“https://carinsurance.us.org”>compare auto insurance quotes</a> auto insurance [url=https://carinsurance.us.org]car insurance[/url]
— car insurance online Dec 24, 07:57 PM #payday loans <a href=“https://loan.us.org”>payday loans</a> loans online [url=https://loan.us.org]loan[/url]
— Payday Dec 24, 08:40 PM #essay writing <a href=“https://essay.us.org”>need help with essay writing</a> college essay [url=https://essay.us.org]can t do my homework[/url]
— Buying Essay Dec 24, 08:48 PM #antique car insurance <a href=“https://carinsurance.us.org”>state auto insurance company</a> auto insurance [url=https://carinsurance.us.org]compare auto insurance quotes[/url]
— motorcycle insurance Dec 24, 09:00 PM #dissertation literature review help <a href=“https://argumentativeessay.us.com”>buy a custom research paper</a> argument essay [url=https://argumentativeessay.us.com]argumentative essay[/url]
— Homework Online Dec 24, 09:13 PM #cash loans <a href=“https://loan.us.org”>payday loans</a> payday loan [url=https://loan.us.org]loan[/url]
— Money Loan Dec 24, 09:31 PM #research paper <a href=“https://researchpaper.us.com”>do my research paper</a> research report [url=https://researchpaper.us.com]writing a paper[/url]
— Paper Writer Dec 24, 10:10 PM #writing my essay for me <a href=“https://essaywritingservice.us.org”>paper writing service</a> essay writing service [url=https://essaywritingservice.us.org]writing my paper[/url]
— Buy A Essay Dec 24, 10:36 PM #essay <a href=“https://essay.us.org”>essay writer</a> essay writing [url=https://essay.us.org]essay[/url]
— Google Essay Writer Dec 24, 10:52 PM #home and auto insurance companies <a href=“https://autoinsurancequotes.us.com”>car insurance quotes texas</a> auto insurance quotes [url=https://autoinsurancequotes.us.com]auto insurance quotes[/url]
— auto insurance rates Dec 24, 11:48 PM #cash advance <a href=“https://cashadvance.us.org”>online payday loans</a> advance cash payday loan [url=https://cashadvance.us.org]best payday loan online[/url]
— Cash Advance Dec 25, 12:27 AM #payday loans <a href=“https://loan.us.org”>online loans</a> the best online payday loans [url=https://loan.us.org]no credit check emergency loans[/url]
— Quick Loans Dec 25, 12:45 AM #argumentative essay <a href=“https://argumentativeessay.us.com”>argumentative essay</a> argumentative essay [url=https://argumentativeessay.us.com]paper writing[/url]
— Writers Online Dec 25, 12:57 AM #buy essay australia <a href=“https://researchpaper.us.com”>research paper</a> research paper [url=https://researchpaper.us.com]writing a paper[/url]
— Write Essays For Me Dec 25, 02:35 AM #direct car insurance <a href=“https://autoinsurancequotes.us.com”>auto insurance quotes</a> liberty mutual auto insurance quote [url=https://autoinsurancequotes.us.com]jupiter auto insurance[/url]
— best insurance rates Dec 25, 03:37 AM #college essays <a href=“https://collegeessays.us.com”>college essay</a> buy college essays [url=https://collegeessays.us.com]buy essays[/url]
— Write Essay Online Dec 25, 04:20 AM #payday <a href=“https://payday.us.com”>check into cash</a> payday cash loan [url=https://payday.us.com]payday[/url]
— Cash Advance Dec 25, 05:29 AM #writing my essay for me <a href=“https://essaywritingservice.us.org”>paper writing service</a> essay writing service [url=https://essaywritingservice.us.org]writing my essay for me[/url]
— How To Writing Essay Dec 25, 05:51 AM #cash advance lenders <a href=“https://cashadvance.us.org”>payday advance online</a> online payday loan [url=https://cashadvance.us.org]cash advance[/url]
— Payday Loans Dec 25, 06:56 AM #help writing a college essay <a href=“https://collegeessays.us.com”>college essay prompts</a> college essay [url=https://collegeessays.us.com]college essay help[/url]
— Paper Writer Free Dec 25, 06:58 AM #essay writer <a href=“https://essay.us.org”>college essays</a> dissertation proposal writing [url=https://essay.us.org]argumentative essay[/url]
— My Thesis Dec 25, 07:30 AM #car insurance <a href=“https://carinsurance.us.org”>compare auto insurance quotes</a> car insurance [url=https://carinsurance.us.org]car insurance[/url]
— insurance Dec 25, 07:30 AM #cheapest auto insurance quotes comparison <a href=“https://comparecarinsurance.us.com”>compare car insurance</a> compare auto insurance rates [url=https://comparecarinsurance.us.com]e insurance auto[/url]
— aarp car insurance Dec 25, 08:12 AM #argumentative essay <a href=“https://argumentativeessay.us.com”>website writes essays for you</a> paper writing [url=https://argumentativeessay.us.com]paper writing[/url]
— My Paper Writer Dec 25, 08:33 AM #do my research paper <a href=“https://researchpaper.us.com”>language arts homework help</a> do my research paper [url=https://researchpaper.us.com]need help on math homework[/url]
— My Homework Help Dec 25, 09:07 AM #compare car insurance <a href=“https://carinsurance.us.org”>car insurance</a> car insurance quotes florida [url=https://carinsurance.us.org]car insurance[/url]
— auto insurance Dec 25, 09:38 AM #essay writing <a href=“https://essaywritingservice.us.org”>writing my essay</a> essay writing service [url=https://essaywritingservice.us.org]writing my essay[/url]
— Online Essay Dec 25, 10:23 AM #college essay help <a href=“https://collegeessays.us.com”>college essays</a> library homework help [url=https://collegeessays.us.com]buy college essays[/url]
— Ace Homework Dec 25, 10:25 AM #payday loan online <a href=“https://payday.us.com”>payday advance loan</a> installment loan [url=https://payday.us.com]cash loans no credit check[/url]
— Pay Day Loans Dec 25, 10:35 AM #auto insurance quotes texas <a href=“https://carinsurance.us.org”>auto insurance companies in florida</a> cheap car insurance quotes [url=https://carinsurance.us.org]general car insurance[/url]
— rental car insurance Dec 25, 10:41 AM #write literature review <a href=“https://collegeessays.us.com”>thesis paper</a> college essays [url=https://collegeessays.us.com]buy college essays[/url]
— Buy College Essays Dec 25, 01:00 PM #writing research paper <a href=“https://essay.us.org”>argument essay</a> writing a great research paper [url=https://essay.us.org]college essays[/url]
— Writer Essay Dec 25, 01:13 PM #buy college essays <a href=“https://collegeessays.us.com”>college essays</a> expert assignment help [url=https://collegeessays.us.com]college essay help[/url]
— Write Essays Online Dec 25, 01:48 PM #college essay prompts <a href=“https://essay.us.org”>essay</a> essay [url=https://essay.us.org]essay[/url]
— Writing Online Dec 25, 01:53 PM #no credit check emergency loans <a href=“https://payday.us.com”>advance cash payday loan</a> payday [url=https://payday.us.com]direct lenders for bad credit[/url]
— Quick Loans Dec 25, 02:02 PM #argument essay <a href=“https://essay.us.org”>essay</a> essay [url=https://essay.us.org]argumentative essay[/url]
— Essay Writing Dec 25, 02:55 PM #auto insurance quotes <a href=“https://autoinsurancequotes.us.com”>car insurance quotes comparison</a> auto insurance quotes [url=https://autoinsurancequotes.us.com]auto insurance quotes[/url]
— esurance Dec 25, 03:22 PM #buy college essays <a href=“https://collegeessays.us.com”>college essay help</a> college essays [url=https://collegeessays.us.com]writing the research paper[/url]
— Buy Essay Papers Dec 25, 03:47 PM #best payday loans online <a href=“https://loan.us.org”>payday loan</a> payday loans online [url=https://loan.us.org]loan[/url]
— Loans For Bad Credit Dec 25, 03:49 PM #someone do my homework for me <a href=“https://essaywritingservice.us.org”>essay writing service</a> essay writing [url=https://essaywritingservice.us.org]essay writing service[/url]
— Essay Writer Online Dec 25, 04:58 PM #essay <a href=“https://essay.us.org”>essay</a> essay [url=https://essay.us.org]research paper[/url]
— Write Essay Online Dec 25, 06:12 PM #car insurance quotes comparison online <a href=“https://comparecarinsurance.us.com”>general car insurance quote</a> antique car insurance [url=https://comparecarinsurance.us.com]cheapest car insurance quotes comparison[/url]
— auto insurance Dec 25, 06:38 PM #compare car insurance <a href=“https://comparecarinsurance.us.com”>online car insurance quotes</a> cheapest car insurance quotes comparison [url=https://comparecarinsurance.us.com]compare auto insurance quotes[/url]
— safeauto insurance Dec 25, 07:43 PM #homework help slader <a href=“https://essaywritingservice.us.org”>essay writing service</a> paper writing service [url=https://essaywritingservice.us.org]paper writing service[/url]
— Writer Essay Dec 25, 07:53 PM #buy assignments <a href=“https://collegeessays.us.com”>college essay</a> college essays [url=https://collegeessays.us.com]buy essays[/url]
— My Homework Now Dec 25, 09:01 PM #college essays <a href=“https://collegeessays.us.com”>college essays online</a> college essay [url=https://collegeessays.us.com]buy essays[/url]
— Write My Essays Dec 25, 09:08 PM #college essays <a href=“https://collegeessays.us.com”>college essays</a> write my dissertation uk [url=https://collegeessays.us.com]math homework online[/url]
— Pay For Essay Online Dec 25, 09:18 PM #writing my essay <a href=“https://essaywritingservice.us.org”>website that write essays for you</a> writing my essay for me [url=https://essaywritingservice.us.org]writing my paper[/url]
— Writer Essay Dec 25, 09:24 PM #paper writing service <a href=“https://essaywritingservice.us.org”>writing my essay for me</a> uk dissertation writing [url=https://essaywritingservice.us.org]essay writing service[/url]
— Term Paper Writers Dec 25, 09:31 PM #car insurance <a href=“https://carinsurance.us.org”>car insurance</a> car insurance [url=https://carinsurance.us.org]cheap car insurance[/url]
— car insurance prices Dec 25, 10:05 PM #college essay help <a href=“https://collegeessays.us.com”>college essays</a> college essay prompts [url=https://collegeessays.us.com]i need help writing a essay[/url]
— Online Homework Help Dec 25, 10:21 PM #e insurance auto <a href=“https://comparecarinsurance.us.com”>compare car insurance</a> compare car insurance [url=https://comparecarinsurance.us.com]compare car insurance[/url]
— esurance Dec 26, 12:16 AM #research essay <a href=“https://researchpaper.us.com”>research paper</a> research essay [url=https://researchpaper.us.com]dissertation proposal help[/url]
— Web Assign Utah Dec 26, 01:09 AM #essay writing <a href=“https://essaywritingservice.us.org”>pay for homework help</a> essay writing [url=https://essaywritingservice.us.org]paper writing service[/url]
— Buy Essay Paper Dec 26, 01:54 AM #college essays <a href=“https://collegeessays.us.com”>college essay prompts</a> do my homework assignment [url=https://collegeessays.us.com]person doing homework[/url]
— Is Homework Helpful Dec 26, 02:18 AM #write my assignments <a href=“https://argumentativeessay.us.com”>argument essay</a> help with chemistry homework [url=https://argumentativeessay.us.com]paper writing[/url]
— Buy An Essay Online Dec 26, 03:08 AM #argumentative essay <a href=“https://essay.us.org”>essay writer</a> essay writer [url=https://essay.us.org]argument essay[/url]
— Buy Essays Cheap Dec 26, 03:49 AM #compare auto insurance rates <a href=“https://carinsurance.us.org”>auto insurance</a> cheapest car insurance [url=https://carinsurance.us.org]compare car insurance quotes[/url]
— autoinsurance Dec 26, 04:09 AM #online auto insurance quotes <a href=“https://autoinsurancequotes.us.com”>online auto insurance quotes</a> rental car insurance [url=https://autoinsurancequotes.us.com]auto insurance quotes[/url]
— cheap insurance auto Dec 26, 04:10 AM #argumentative essay <a href=“https://argumentativeessay.us.com”>paper writing</a> buy a research paper online [url=https://argumentativeessay.us.com]argumentative essay[/url]
— Pay For Essay Online Dec 26, 04:15 AM #essay writing <a href=“https://essay.us.org”>essay</a> assignment writing help uk [url=https://essay.us.org]essay writer[/url]
— Writing Online Dec 26, 04:22 AM #compare car insurance quotes <a href=“https://comparecarinsurance.us.com”>compare car insurance</a> compare car insurance [url=https://comparecarinsurance.us.com]compare auto insurance quotes[/url]
— erie auto insurance Dec 26, 05:10 AM #auto insurance quotes comparison <a href=“https://comparecarinsurance.us.com”>go compare car insurance</a> compare car insurance [url=https://comparecarinsurance.us.com]car insurance quotes ontario[/url]
— auto insurance Dec 26, 05:41 AM #writing a paper <a href=“https://researchpaper.us.com”>research paper</a> research paper [url=https://researchpaper.us.com]research essay[/url]
— Custom Essay Writer Dec 26, 05:41 AM #essay writing <a href=“https://essaywritingservice.us.org”>essay writing</a> my.hrw.com homework help [url=https://essaywritingservice.us.org]online essay writing[/url]
— Online Homework Dec 26, 06:34 AM #biology homework help <a href=“https://researchpaper.us.com”>homework help for math</a> writing a paper [url=https://researchpaper.us.com]do my research paper[/url]
— White Paper Writer Dec 26, 06:50 AM #research paper <a href=“https://essay.us.org”>ut online homework</a> essay [url=https://essay.us.org]essay writing[/url]
— Custom Essay Writers Dec 26, 08:40 AM #auto insurance quotes texas <a href=“https://autoinsurancequotes.us.com”>cheap auto insurance quotes</a> online auto insurance quotes [url=https://autoinsurancequotes.us.com]cheap car insurance quotes[/url]
— car insurance quote Dec 26, 08:54 AM #car insurance quotes ontario <a href=“https://comparecarinsurance.us.com”>compare car insurance rates</a> compare auto insurance quotes [url=https://comparecarinsurance.us.com]usagencies auto insurance[/url]
— best auto insurance Dec 26, 09:27 AM #argumentative essay <a href=“https://argumentativeessay.us.com”>argument essays</a> argument essays [url=https://argumentativeessay.us.com]argumentative essay[/url]
— Homework Center Dec 26, 10:28 AM #progressive car insurance <a href=“https://comparecarinsurance.us.com”>liberty mutual car insurance</a> compare car insurance [url=https://comparecarinsurance.us.com]auto insurance quotes comparison[/url]
— nj auto insurance Dec 26, 11:07 AM #buy research paper online <a href=“https://argumentativeessay.us.com”>argumentative essay</a> paper writing [url=https://argumentativeessay.us.com]help with history homework[/url]
— Write Essays Online Dec 26, 11:29 AM #progressive auto insurance quote <a href=“https://autoinsurancequotes.us.com”>auto insurance quotes california</a> auto insurance quotes [url=https://autoinsurancequotes.us.com]online auto insurance quotes[/url]
— online car insurance Dec 26, 11:58 AM #scdl assignments help <a href=“https://essay.us.org”>help on homework</a> help on homework math [url=https://essay.us.org]essay[/url]
— Write Essay Service Dec 26, 12:56 PM #how to write college application essays <a href=“https://essay.us.org”>scdl assignments help</a> college essays [url=https://essay.us.org]where can i buy essays[/url]
— Fake Essay Writer Dec 26, 01:33 PM #essay writing service <a href=“https://essaywritingservice.us.org”>essay writing service</a> essay writing service [url=https://essaywritingservice.us.org]college application essays[/url]
— Writing Essay Online Dec 26, 03:47 PM #cheapest car insurance quotes comparison <a href=“https://comparecarinsurance.us.com”>compare car insurance</a> compare car insurance [url=https://comparecarinsurance.us.com]cheapest auto insurance quotes comparison[/url]
— auto ins Dec 26, 04:25 PM #compare auto insurance <a href=“https://comparecarinsurance.us.com”>compare car insurance</a> compare car insurance [url=https://comparecarinsurance.us.com]cheapest car insurance quotes comparison[/url]
— amica car insurance Dec 26, 04:43 PM #cash loan <a href=“https://loan.us.org”>payday loan</a> loan [url=https://loan.us.org]online loans[/url]
— Pay Day Loans Dec 26, 06:34 PM #quick cash loan <a href=“https://cashadvance.us.org”>cash advance</a> direct lenders of loans [url=https://cashadvance.us.org]cash advance lenders[/url]
— Money Loan Dec 26, 08:37 PM #compare auto insurance rates <a href=“https://comparecarinsurance.us.com”>united auto insurance</a> compare car insurance [url=https://comparecarinsurance.us.com]auto ins[/url]
— car insurances Dec 26, 09:35 PM #loan <a href=“https://loan.us.org”>loan</a> payday loans [url=https://loan.us.org]payday loan[/url]
— Loan Dec 26, 11:57 PM #auto insurance quotes <a href=“https://autoinsurancequotes.us.com”>auto insurance quotes comparison</a> e insurance auto [url=https://autoinsurancequotes.us.com]car insurance quotes comparison[/url]
— car insurance quote Dec 27, 12:48 AM #payday advance online <a href=“https://cashadvance.us.org”>advance cash payday loan</a> cash advance [url=https://cashadvance.us.org]faxless payday loans[/url]
— Online Lenders Dec 27, 01:41 AM #loan <a href=“https://loan.us.org”>payday loans</a> emergency loans no credit check [url=https://loan.us.org]15 minute loans direct lenders[/url]
— Loans Dec 27, 03:04 AM #nationwide <a href=“https://comparecarinsurance.us.com”>compare car insurance rates</a> general car insurance quote [url=https://comparecarinsurance.us.com]compare auto insurance quotes[/url]
— vehicle insurance Dec 27, 03:36 AM #cheapest car insurance <a href=“https://carinsurance.us.org”>compare car insurance rates</a> carinsurance [url=https://carinsurance.us.org]auto-owners insurance[/url]
— state auto insurance Dec 27, 04:27 AM #cash advance lenders <a href=“https://cashadvance.us.org”>10 top loan companies</a> advance cash payday loan [url=https://cashadvance.us.org]cash advance[/url]
— Quick Loans Dec 27, 07:23 AM #car insurance quotes comparison <a href=“https://comparecarinsurance.us.com”>compare car insurance</a> thegeneral.com auto insurance [url=https://comparecarinsurance.us.com]compare car insurance[/url]
— auto ins Dec 27, 07:24 AM #payday advance loans <a href=“https://cashadvance.us.org”>cash advance</a> payday loan direct lender [url=https://cashadvance.us.org]cash advance[/url]
— Spotloan Dec 27, 08:29 AM #auto insurance quotes texas <a href=“https://autoinsurancequotes.us.com”>cheap auto insurance quotes</a> auto insurance quotes [url=https://autoinsurancequotes.us.com]car insurance quotes[/url]
— geico auto insurance Dec 27, 11:53 AM #loans <a href=“https://loan.us.org”>payday loan</a> loans [url=https://loan.us.org]payday loans[/url]
— Cash Advance Dec 27, 12:12 PM #car insurance calculator <a href=“https://carinsurance.us.org”>home and auto insurance</a> cheapest car insurance quotes comparison [url=https://carinsurance.us.org]cheapest car insurance[/url]
— car insurance cost Dec 27, 01:27 PM #online loans <a href=“https://loan.us.org”>guaranteed payday loans</a> cash loan [url=https://loan.us.org]speedycash[/url]
— Best Online Loans Dec 27, 01:39 PM #loan cash <a href=“https://cashadvance.us.org”>loan cash</a> payday loans bad credit [url=https://cashadvance.us.org]getting a loan[/url]
— Payday Express Dec 27, 01:42 PM #cash loans <a href=“https://cashadvance.us.org”>payday advance</a> short term payday loan [url=https://cashadvance.us.org]cash advance[/url]
— Quick Loan Dec 27, 02:48 PM #a payday loan <a href=“https://payday.us.com”>a payday loan</a> fast payday loan [url=https://payday.us.com]bad credit[/url]
— Speedycash Dec 27, 03:40 PM #safeco auto insurance <a href=“https://comparecarinsurance.us.com”>compare car insurance</a> compare car insurance [url=https://comparecarinsurance.us.com]compare car insurance[/url]
— best insurance Dec 27, 04:25 PM #geico car insurance quote <a href=“https://carinsurance.us.org”>compare auto insurance rates</a> carinsurance [url=https://carinsurance.us.org]cheap car insurance quotes[/url]
— e insurance auto Dec 27, 04:36 PM #compare auto insurance quotes <a href=“https://autoinsurancequotes.us.com”>auto insurance quotes</a> auto insurance quotes comparison [url=https://autoinsurancequotes.us.com]auto insurance quotes california[/url]
— cheap car ins Dec 27, 05:31 PM #argument essays <a href=“https://argumentativeessay.us.com”>argumentative essays</a> do my physics homework [url=https://argumentativeessay.us.com]argumentative essay[/url]
— Assignment Operators Dec 27, 07:12 PM #cash advance <a href=“https://cashadvance.us.org”>loan cash</a> speedy cash [url=https://cashadvance.us.org]payday faxless fast cash loan[/url]
— Instant Online Loans Dec 27, 07:32 PM #car insurance online <a href=“https://comparecarinsurance.us.com”>geico auto insurance quote</a> compare car insurance [url=https://comparecarinsurance.us.com]auto insurance quotes comparison[/url]
— affordable insurance Dec 27, 07:39 PM #payday advance online <a href=“https://cashadvance.us.org”>cash advance</a> online loan [url=https://cashadvance.us.org]cash advance lenders[/url]
— Paydayloan Dec 27, 07:59 PM #payday loan companies <a href=“https://cashadvance.us.org”>payday advance loans</a> cash advance lenders [url=https://cashadvance.us.org]cash advance[/url]
— Loan Cash Dec 27, 08:41 PM #loan <a href=“https://loan.us.org”>cash loans</a> loans [url=https://loan.us.org]payday loan[/url]
— Cash Advance Dec 27, 09:00 PM #direct car insurance <a href=“https://autoinsurancequotes.us.com”>car insurance quotes comparison</a> auto insurance quotes [url=https://autoinsurancequotes.us.com]auto insurance quotes[/url]
— allstate Dec 27, 09:48 PM #car insurance quotes comparison online <a href=“https://comparecarinsurance.us.com”>motorcycle insurance quotes online comparison</a> top ten auto insurance companies [url=https://comparecarinsurance.us.com]list of car insurance companies[/url]
— auto owners ins Dec 27, 10:55 PM #a payday loan <a href=“https://payday.us.com”>paydayloan</a> advance cash payday loan [url=https://payday.us.com]payday loans[/url]
— Pay Day Loan Dec 27, 11:00 PM #compare car insurance <a href=“https://comparecarinsurance.us.com”>auto insurance quotes comparison online</a> compare car insurance quotes [url=https://comparecarinsurance.us.com]car insurance quotes comparison online[/url]
— allstate insurance Dec 27, 11:33 PM #payday loans direct lenders only <a href=“https://loan.us.org”>cash loan</a> payday loan [url=https://loan.us.org]cash loan[/url]
— A Payday Loan Dec 27, 11:48 PM #progressive auto insurance quote <a href=“https://autoinsurancequotes.us.com”>car insurance comparisons</a> cheap car insurance quotes [url=https://autoinsurancequotes.us.com]online auto insurance quotes[/url]
— geico insurance Dec 28, 12:12 AM #essay writing <a href=“https://essaywritingservice.us.org”>help in homework</a> where can i buy essays [url=https://essaywritingservice.us.org]paper writing service[/url]
— Assignment Define Dec 28, 12:22 AM #college essay idea <a href=“https://essay.us.org”>college application essays</a> writing a great research paper [url=https://essay.us.org]essay[/url]
— Assignment Define Dec 28, 12:41 AM #instant online loans <a href=“https://loan.us.org”>pay day lenders</a> loan [url=https://loan.us.org]direct lenders payday loans[/url]
— Speedy Cash Dec 28, 12:42 AM #payday advance loan <a href=“https://payday.us.com”>advance cash payday loan</a> quick loans no credit check [url=https://payday.us.com]speedy cash payday loans online[/url]
— Cash Advance Dec 28, 03:02 AM #advance cash payday loan <a href=“https://cashadvance.us.org”>advance cash payday loan</a> cash advance [url=https://cashadvance.us.org]loan cash[/url]
— Cash Loan Dec 28, 03:14 AM #college essays <a href=“https://collegeessays.us.com”>college essays</a> college essay help [url=https://collegeessays.us.com]college essays[/url]
— My Homework Now Dec 28, 03:22 AM #essay writing service <a href=“https://essaywritingservice.us.org”>essay writing service</a> paper writing service [url=https://essaywritingservice.us.org]maths online homework[/url]
— Buying An Essay Dec 28, 03:37 AM #car insurance <a href=“https://carinsurance.us.org”>car insurance</a> cheap car insurance quotes [url=https://carinsurance.us.org]compare auto insurance[/url]
— insurance quote Dec 28, 03:56 AM #cash advance <a href=“https://cashadvance.us.org”>cash advance</a> direct lender payday loans [url=https://cashadvance.us.org]cash advance loan[/url]
— Getting A Loan Dec 28, 04:31 AM #online auto insurance quotes <a href=“https://autoinsurancequotes.us.com”>state farm car insurance</a> car insurance quotes [url=https://autoinsurancequotes.us.com]car insurance quotes texas[/url]
— insurance companies Dec 28, 04:55 AM #auto insurance quotes comparison <a href=“https://comparecarinsurance.us.com”>cheapest car insurance quotes comparison</a> motorcycle insurance quotes online comparison [url=https://comparecarinsurance.us.com]compare car insurance[/url]
— car insurance rates Dec 28, 05:16 AM #compare auto insurance <a href=“https://carinsurance.us.org”>auto insurance</a> progressive auto insurance [url=https://carinsurance.us.org]cheap auto insurance[/url]
— accurate automotive Dec 28, 05:58 AM #loan <a href=“https://loan.us.org”>payday loans online</a> loans [url=https://loan.us.org]cash loan[/url]
— Loans Dec 28, 06:28 AM #argument essay <a href=“https://argumentativeessay.us.com”>buy a custom research paper</a> dissertation editing service [url=https://argumentativeessay.us.com]argumentative essay[/url]
— Custom Essay Writer Dec 28, 07:07 AM #direct lender loans <a href=“https://cashadvance.us.org”>cash advance</a> cash advance lenders [url=https://cashadvance.us.org]cash advance loan[/url]
— Cash Advance Dec 28, 07:31 AM #auto insurance quotes <a href=“https://autoinsurancequotes.us.com”>car insurance quotes</a> auto insurance quotes california [url=https://autoinsurancequotes.us.com]auto insurance quotes[/url]
— vehicle insurance Dec 28, 07:39 AM #auto insurance quotes comparison <a href=“https://comparecarinsurance.us.com”>compare car insurance</a> classic auto insurance [url=https://comparecarinsurance.us.com]car insurance quotes comparison online[/url]
— insurance quote Dec 28, 08:12 AM #payday advance online <a href=“https://cashadvance.us.org”>loans online no credit check</a> loan cash [url=https://cashadvance.us.org]loans online bad credit[/url]
— Personal Loans Dec 28, 08:19 AM #loan <a href=“https://loan.us.org”>cash loan</a> online loans [url=https://loan.us.org]speedy cash[/url]
— Best Online Loans Dec 28, 08:35 AM #costco auto insurance <a href=“https://autoinsurancequotes.us.com”>auto insurance quotes</a> cheap auto insurance quotes [url=https://autoinsurancequotes.us.com]costco car insurance quote[/url]
— auto insurance Dec 28, 09:25 AM #online loans direct lenders <a href=“https://payday.us.com”>a payday loan</a> payday [url=https://payday.us.com]payday loans no credit check[/url]
— A Payday Loan Dec 28, 09:55 AM #compare car insurance <a href=“https://comparecarinsurance.us.com”>compare car insurance</a> cheapest auto insurance quotes comparison [url=https://comparecarinsurance.us.com]car insurance quotes in texas[/url]
— insurance rates Dec 28, 09:56 AM #cheapest car insurance <a href=“https://carinsurance.us.org”>cheap car insurance</a> car insurance [url=https://carinsurance.us.org]car insurance[/url]
— nationwide insurance Dec 28, 10:56 AM #college essay prompts <a href=“https://essay.us.org”>essay writing</a> essay writing [url=https://essay.us.org]essay[/url]
— Assignment Helps Dec 28, 11:12 AM #a payday loan <a href=“https://payday.us.com”>payday loans no credit check</a> speedy cash payday loans online [url=https://payday.us.com]payday loan[/url]
— Money Loan Dec 28, 11:39 AM #compare car insurance <a href=“https://carinsurance.us.org”>compare car insurance</a> cheapest car insurance [url=https://carinsurance.us.org]compare car insurance[/url]
— accurate automotive Dec 28, 12:06 PM #cash loans <a href=“https://cashadvance.us.org”>advance cash payday loan</a> cash advance [url=https://cashadvance.us.org]cash advance[/url]
— A Payday Loan Dec 28, 12:16 PM #essay <a href=“https://essay.us.org”>alabama live homework help</a> scdl assignments help [url=https://essay.us.org]how to write college application essays[/url]
— Essay-writer.Org Dec 28, 12:39 PM #payday loans online <a href=“https://loan.us.org”>cash loan</a> loan [url=https://loan.us.org]direct lenders no credit check[/url]
— Personal Loans Dec 28, 02:04 PM #safe auto insurance company <a href=“https://carinsurance.us.org”>home and auto insurance</a> thegeneral.com auto insurance [url=https://carinsurance.us.org]car insurance[/url]
— cheap car ins Dec 28, 02:40 PM #online car insurance instant quote <a href=“https://autoinsurancequotes.us.com”>automobile insurance quotes</a> jupiter auto insurance [url=https://autoinsurancequotes.us.com]auto insurance quotes california[/url]
— aig auto insurance Dec 28, 03:38 PM #cheap car insurance <a href=“https://carinsurance.us.org”>rental car insurance</a> compare auto insurance rates [url=https://carinsurance.us.org]compare car insurance[/url]
— car insurance quote Dec 28, 03:38 PM #car insurance <a href=“https://carinsurance.us.org”>car insurance</a> car insurance [url=https://carinsurance.us.org]car insurance[/url]
— costco car insurance Dec 28, 04:14 PM #writing my essay <a href=“https://essaywritingservice.us.org”>writing my essay</a> paper writing service [url=https://essaywritingservice.us.org]writing essay help[/url]
— Write My Thesis Dec 28, 04:55 PM #argumentative essay <a href=“https://essay.us.org”>essay</a> essay [url=https://essay.us.org]chemical engineering homework help[/url]
— Online Essay Dec 28, 05:41 PM #payday <a href=“https://payday.us.com”>payday loan</a> payday loan [url=https://payday.us.com]payday loans online[/url]
— Instant Online Loans Dec 28, 06:50 PM #cash advance loan <a href=“https://cashadvance.us.org”>cash advance</a> cash advance loan [url=https://cashadvance.us.org]advance cash payday loan[/url]
— Loans Online Dec 28, 07:33 PM #car insurance <a href=“https://carinsurance.us.org”>compare car insurance quotes</a> compare auto insurance rates [url=https://carinsurance.us.org]car insurance[/url]
— aaa car insurance Dec 28, 08:34 PM #auto insurance quotes <a href=“https://autoinsurancequotes.us.com”>online auto insurance quotes</a> car insurance prices [url=https://autoinsurancequotes.us.com]online auto insurance quotes[/url]
— insurance Dec 28, 09:48 PM #cash advance loan <a href=“https://cashadvance.us.org”>cash advance</a> payday advance loans [url=https://cashadvance.us.org]loan cash[/url]
— Online Loan Dec 28, 10:52 PM #compare car insurance <a href=“https://comparecarinsurance.us.com”>compare auto insurance quotes</a> compare car insurance [url=https://comparecarinsurance.us.com]compare car insurance[/url]
— esurance Dec 28, 11:22 PM #payday loan online <a href=“https://payday.us.com”>cash loans online</a> payday advance loan [url=https://payday.us.com]quick loans no credit check[/url]
— Online Loans Dec 28, 11:47 PM #compare car insurance <a href=“https://comparecarinsurance.us.com”>compare car insurance</a> autoownersinsurance.com [url=https://comparecarinsurance.us.com]compare car insurance[/url]
— nj auto insurance Dec 29, 03:39 AM #cash advance loan <a href=“https://cashadvance.us.org”>cash loans</a> advance cash payday loan [url=https://cashadvance.us.org]payday loans no credit check[/url]
— Pay Day Loan Dec 29, 03:58 AM #classic auto insurance <a href=“https://comparecarinsurance.us.com”>compare car insurance quotes</a> compare car insurance [url=https://comparecarinsurance.us.com]compare car insurance[/url]
— insurance Dec 29, 05:21 AM #payday advance online <a href=“https://cashadvance.us.org”>cash advance</a> loan cash [url=https://cashadvance.us.org]no credit check loans[/url]
— Loans For Bad Credit Dec 29, 06:27 AM #advance cash payday loan <a href=“https://payday.us.com”>payday advance loan</a> payday [url=https://payday.us.com]payday[/url]
— Best Online Loans Dec 29, 08:38 AM #auto insurance quotes <a href=“https://autoinsurancequotes.us.com”>auto insurance quotes</a> auto insurance quotes [url=https://autoinsurancequotes.us.com]cheapest car insurance[/url]
— auto club insurance Dec 29, 10:00 AM #payday <a href=“https://payday.us.com”>online payday loan lender</a> payday loans online [url=https://payday.us.com]advance cash payday loan[/url]
— Online Loan Dec 29, 11:24 AM #cheap car insurance quotes <a href=“https://carinsurance.us.org”>car insurance</a> compare auto insurance quotes [url=https://carinsurance.us.org]auto insurance[/url]
— usaa car insurance Dec 29, 12:08 PM #advance cash payday loan <a href=“https://cashadvance.us.org”>online payday advance</a> cash advance [url=https://cashadvance.us.org]cash advance[/url]
— Payday Express Dec 29, 12:10 PM #payday <a href=“https://payday.us.com”>payday loans online</a> payday cash loan [url=https://payday.us.com]payday loans[/url]
— Bad Credit Dec 29, 12:39 PM #compare auto insurance <a href=“https://comparecarinsurance.us.com”>car insurance quotes comparison online</a> cheapest car insurance quotes comparison [url=https://comparecarinsurance.us.com]compare car insurance[/url]
— autoinsurance Dec 29, 03:04 PM #cheap car insurance quotes <a href=“https://carinsurance.us.org”>compare car insurance</a> compare auto insurance [url=https://carinsurance.us.org]cheap car insurance quotes[/url]
— JaneNip Dec 29, 03:57 PM #pay to write my essay <a href=https://writemyessay.us.com>Find Out More</a> write my essay [url=https://writemyessay.us.com]essay writing service[/url]
— JaneNip Dec 29, 04:43 PM #compare car insurance <a href=“https://comparecarinsurance.us.com”>antique car insurance</a> liberty car insurance [url=https://comparecarinsurance.us.com]travelers auto insurance[/url]
— aarp auto insurance Dec 29, 06:37 PM #paper writing <a href=“https://argumentativeessay.us.com”>argumentative essay</a> term papers for sale online [url=https://argumentativeessay.us.com]argumentative essays[/url]
— JaneNip Dec 29, 06:52 PM #loans <a href=“https://loan.us.org”>direct lenders immediate payment loans</a> online loans [url=https://loan.us.org]loan[/url]
— JaneNip Dec 29, 07:09 PM #online auto insurance quotes <a href=“https://autoinsurancequotes.us.com”>auto insurance quotes</a> car insurance quotes california [url=https://autoinsurancequotes.us.com]auto insurance quotes[/url]
— direct car insurance Dec 29, 08:37 PM #homework help.com math <a href=“https://essay.us.org”>essay</a> essay writer [url=https://essay.us.org]essay[/url]
— French Homework Dec 29, 11:02 PM #research essay <a href=“https://researchpaper.us.com”>homework help now</a> writing a paper [url=https://researchpaper.us.com]research paper[/url]
— Online Essay Writers Dec 29, 11:56 PM #custom essay writing <a href=https://writemyessay.us.com>write my paper</a> https://writemyessay.us.com [url=https://writemyessay.us.com]website to write essays[/url]
— JaneNip Dec 30, 12:44 AM #compare car insurance <a href=“https://comparecarinsurance.us.com”>cheapest car insurance quotes comparison</a> compare car insurance [url=https://comparecarinsurance.us.com]compare car insurance[/url]
— car insurance rates Dec 30, 01:39 AM #homework help online <a href=https://essayonline.us.com>homework online</a> writers online [url=https://essayonline.us.com]writers online[/url]
— JaneNip Dec 30, 02:38 AM #full coverage auto insurance <a href=“https://comparecarinsurance.us.com”>compare auto insurance rates</a> compare car insurance [url=https://comparecarinsurance.us.com]auto insurance quotes comparison online[/url]
— car insurance cost Dec 30, 02:43 AM #argumentative essays <a href=“https://argumentativeessay.us.com”>argument essays</a> argument essay [url=https://argumentativeessay.us.com]argumentative essay[/url]
— Homework Good Or Bad Dec 30, 03:46 AM #state farm car insurance quote <a href=“https://carinsurance.us.org”>state auto insurance company</a> car insurance [url=https://carinsurance.us.org]compare auto insurance quotes[/url]
— motorcycle insurance Dec 30, 03:51 AM #michigan auto insurance <a href=“https://comparecarinsurance.us.com”>car insurance quotes comparison</a> compare auto insurance rates [url=https://comparecarinsurance.us.com]geico car insurance quote[/url]
— JaneNip Dec 30, 06:53 AM #paper writing service <a href=“https://essaywritingservice.us.org”>essay writing</a> corporate finance homework help [url=https://essaywritingservice.us.org]writing my essay for me[/url]
— Assignment Define Dec 30, 07:12 AM #compare car insurance <a href=“https://comparecarinsurance.us.com”>auto insurance quotes comparison online</a> thegeneral.com auto insurance [url=https://comparecarinsurance.us.com]compare car insurance quotes[/url]
— autoowners insurance Dec 30, 07:51 AM #auto insurance quotes <a href=“https://autoinsurancequotes.us.com”>auto insurance quotes</a> car insurance quotes texas [url=https://autoinsurancequotes.us.com]online auto insurance quotes[/url]
— costco car insurance Dec 30, 09:58 AM #cheapest car insurance <a href=“https://autoinsurancequotes.us.com”>auto insurance quotes</a> car insurance quotes comparison [url=https://autoinsurancequotes.us.com]get auto insurance quote[/url]
— usaa car insurance Dec 30, 10:25 AM #argumentative essay <a href=“https://argumentativeessay.us.com”>best research paper writing service</a> argumentative essay [url=https://argumentativeessay.us.com]argument essays[/url]
— JaneNip Dec 30, 11:05 AM #writing my essay for me <a href=“https://essaywritingservice.us.org”>writing my essay for me</a> homework essay help [url=https://essaywritingservice.us.org]essay writing service[/url]
— Online Essay Dec 30, 11:13 AM #college essay prompts <a href=“https://essay.us.org”>argument essay</a> connect online homework [url=https://essay.us.org]argumentative essay[/url]
— Buy Essays Online Dec 30, 11:23 AM #online payday loan lenders <a href=“https://cashadvance.us.org”>cash advance</a> advance cash payday loan [url=https://cashadvance.us.org]payday advance online[/url]
— Payday Loans Online Dec 30, 12:23 PM #car insurance quotes comparison online <a href=“https://comparecarinsurance.us.com”>auto insurance near me</a> classic auto insurance [url=https://comparecarinsurance.us.com]cheapest car insurance quotes comparison[/url]
— JaneNip Dec 30, 01:31 PM #college essay <a href=“https://essay.us.org”>help to do assignment</a> essay [url=https://essay.us.org]essay writer[/url]
— Good Homework Music Dec 30, 04:05 PM #essay writing <a href=“https://essay.us.org”>college essay prompts</a> do my course [url=https://essay.us.org]term papers for sale online[/url]
— My Homework Now Dec 30, 04:50 PM #payday loans online <a href=“https://loan.us.org”>loan</a> loan [url=https://loan.us.org]payday advance loan[/url]
— Bad Credit Dec 30, 06:25 PM #loans quicken <a href=https://quickloans.us.com>quick money loans</a> fast loans for people with bad credit [url=https://quickloans.us.com]fast loans no credit[/url]
— JaneNip Dec 30, 07:01 PM #write my assignments <a href=“https://collegeessays.us.com”>college admission essays</a> college essays [url=https://collegeessays.us.com]college essay prompts[/url]
— Online Paper Writer Dec 30, 07:49 PM #payday loans <a href=“https://payday.us.com”>installment loan</a> payday advance online [url=https://payday.us.com]payday[/url]
— JaneNip Dec 30, 07:59 PM #payday <a href=“https://payday.us.com”>payday</a> payday loans online [url=https://payday.us.com]payday[/url]
— Online Loans Dec 30, 09:12 PM #buy essays <a href=“https://collegeessays.us.com”>college essays</a> college essays [url=https://collegeessays.us.com]do your own homework[/url]
— Online Homework Help Dec 30, 09:17 PM #advance cash payday loan <a href=“https://payday.us.com”>payday cash loan</a> payday [url=https://payday.us.com]payday[/url]
— Best Payday Loan Dec 30, 10:10 PM #instant loans online <a href=“https://cashadvance.us.org”>cash advance</a> cash advance [url=https://cashadvance.us.org]payday advance[/url]
— Money Loan Dec 30, 11:55 PM #cheap car insurance <a href=“https://carinsurance.us.org”>auto ins</a> compare car insurance rates [url=https://carinsurance.us.org]hartford auto insurance[/url]
— JaneNip Dec 31, 12:03 AM #car insurance quotes texas <a href=“https://autoinsurancequotes.us.com”>online auto insurance quotes</a> online auto insurance quotes [url=https://autoinsurancequotes.us.com]cheap car insurance quotes[/url]
— JaneNip Dec 31, 01:12 AM #10 top loan companies <a href=“https://payday.us.com”>payday loans no credit check</a> payday [url=https://payday.us.com]payday[/url]
— Loan Cash Dec 31, 01:29 AM #loan <a href=“https://loan.us.org”>short term payday loan</a> loan [url=https://loan.us.org]online loans[/url]
— Money Loan Dec 31, 05:32 AM #loan <a href=“https://loan.us.org”>payday loan</a> online loans [url=https://loan.us.org]easy cash payday loan[/url]
— Best Online Loans Dec 31, 06:01 AM #need help with essay writing <a href=https://collegeessay.us.com>college essay writers</a> narrative essay help [url=https://collegeessay.us.com]college essay services[/url]
— JaneNip Dec 31, 06:44 AM #cash advance <a href=“https://cashadvance.us.org”>payday advance loans</a> cash advance [url=https://cashadvance.us.org]cash advance[/url]
— Quick Loan Dec 31, 06:53 AM #cash advance <a href=“https://cashadvance.us.org”>advance cash payday loan</a> payday advance loans [url=https://cashadvance.us.org]cash advance[/url]
— Fastest Payday Loan Dec 31, 08:52 AM #payday <a href=“https://payday.us.com”>payday</a> payday loan online [url=https://payday.us.com]payday[/url]
— Getting A Loan Dec 31, 08:59 AM #loan <a href=“https://loan.us.org”>online loans</a> cash til payday loan [url=https://loan.us.org]payday advance online[/url]
— Payday Loans Dec 31, 09:14 AM #argument essays <a href=“https://argumentativeessay.us.com”>argumentative essay</a> argumentative essay [url=https://argumentativeessay.us.com]essay writing[/url]
— JaneNip Dec 31, 09:59 AM #loan <a href=“https://loan.us.org”>loan</a> cash loans [url=https://loan.us.org]loans[/url]
— Bad Credit Dec 31, 10:33 AM #payday <a href=“https://payday.us.com”>payday loans</a> installment loan [url=https://payday.us.com]payday[/url]
— Instant Online Loans Dec 31, 10:49 AM #payday advance <a href=“https://loan.us.org”>online loans</a> loan [url=https://loan.us.org]loan[/url]
— Speedy Cash Dec 31, 12:19 PM #loan <a href=“https://cashadvance.us.org”>payday advance</a> online payday advance [url=https://cashadvance.us.org]direct lenders of loans[/url]
— Direct Lenders Dec 31, 12:34 PM #college essays <a href=“https://collegeessays.us.com”>college essays</a> college essays [url=https://collegeessays.us.com]spl homework help[/url]
— JaneNip Dec 31, 01:05 PM #installment loans no credit check <a href=“https://loan.us.org”>payday lenders direct</a> online loans [url=https://loan.us.org]loans online[/url]
— Loans Dec 31, 02:05 PM #cash advance <a href=“https://cashadvance.us.org”>cash advance</a> payday advance [url=https://cashadvance.us.org]online payday advance[/url]
— Personal Loans Dec 31, 02:47 PM #research paper <a href=“https://researchpaper.us.com”>research paper</a> research report [url=https://researchpaper.us.com]dissertation writing help uk[/url]
— Essay Writer Online Dec 31, 05:06 PM #payday loans <a href=https://paydayloans.us.org>online payday loans</a> payday loans online [url=https://paydayloans.us.org]payday loans[/url]
— JaneNip Dec 31, 05:12 PM #direct payday lenders online <a href=“https://payday.us.com”>payday</a> payday loans [url=https://payday.us.com]payday[/url]
— Loans Online Dec 31, 05:29 PM #payday cash loan <a href=“https://payday.us.com”>payday loan no credit check</a> direct payday lenders online [url=https://payday.us.com]payday loans[/url]
— Loans For Bad Credit Dec 31, 05:57 PM #buy essay <a href=https://buyessays.us.com>buy essays online</a> buy essay online [url=https://buyessays.us.com]help writing a college essay[/url]
— JaneNip Dec 31, 06:18 PM #argumentative essay <a href=“https://argumentativeessay.us.com”>argument essay</a> paper writing [url=https://argumentativeessay.us.com]paper writing[/url]
— French Homework Dec 31, 06:26 PM #payday loans direct lenders <a href=https://onlineloans.us.com>best online loans</a> loans online [url=https://onlineloans.us.com]payday loans online[/url]
— JaneNip Dec 31, 06:57 PM #essay <a href=“https://essay.us.org”>essay</a> essay writer [url=https://essay.us.org]buy dissertation[/url]
— Pay For Essay Online Dec 31, 08:14 PM #essay <a href=“https://essay.us.org”>college essays</a> it homework help [url=https://essay.us.org]i need to do homework[/url]
— Online Essay Dec 31, 08:16 PM #cheap auto insurance quotes <a href=“https://autoinsurancequotes.us.com”>online auto insurance quotes</a> online auto insurance quotes [url=https://autoinsurancequotes.us.com]general car insurance quote[/url]
— autoinsurance Dec 31, 08:38 PM #help to do assignment <a href=“https://argumentativeessay.us.com”>argumentative essay</a> argument essays [url=https://argumentativeessay.us.com]argumentative essay[/url]
— Custom Essay Writing Dec 31, 08:39 PM #compare car insurance <a href=“https://carinsurance.us.org”>compare car insurance quotes</a> compare auto insurance rates [url=https://carinsurance.us.org]auto ins[/url]
— geico Dec 31, 08:47 PM #payday loans no credit check <a href=“https://payday.us.com”>paydayloan</a> payday [url=https://payday.us.com]payday[/url]
— Pay Day Loans Dec 31, 09:11 PM #cash advance payday loan <a href=“https://cashadvance.us.org”>cash advance</a> fast loans no credit check [url=https://cashadvance.us.org]speedy cash[/url]
— Pay Day Loans Dec 31, 09:25 PM #compare car insurance <a href=“https://comparecarinsurance.us.com”>compare car insurance</a> compare car insurance [url=https://comparecarinsurance.us.com]compare car insurance[/url]
— auto owners ins Dec 31, 09:29 PM #Принимая решение купить в магазине Дармебель или приобрести в Украине мебель на любой вкус ,вы можете быть уверенными в хорошем качестве товара. Надёжность и долговечность при сравнительно низкой стоимости уже давно убедили многих покупателей в правильности выбора, сделанного ими в своё время. Останавливая свой выбор именно на нашей мебели, вы будете изумлены оптимальным соотношением «цена/качество».
А если кто интересуется оборудованием для СТО обратите внимание [url=http://www.stoservice.com.ua]Автосервисное оборудование[/url]
здесь покупали по недорогой цене и весьма довольны.
[url=http://www.darmebel.com.ua/mebel/shkafi/prihozhie/prihozhaya-green-aisa-1.html]Интернет-магазин Дармебель[/url]
— RoMaNmn Dec 31, 09:45 PM #research paper <a href=“https://researchpaper.us.com”>writing a college admissions essay</a> writing a paper [url=https://researchpaper.us.com]research paper[/url]
— Essay Help Dec 31, 10:01 PM #cash advance loan <a href=“https://cashadvance.us.org”>cash advance</a> advance cash payday loan [url=https://cashadvance.us.org]cash advance[/url]
— Online Payday Loans Dec 31, 10:39 PM #commercial auto insurance quotes <a href=“https://autoinsurancequotes.us.com”>auto insurance quotes</a> commercial auto insurance quotes [url=https://autoinsurancequotes.us.com]cheap auto insurance quotes[/url]
— auto owners ins Dec 31, 11:26 PM #speedy cash <a href=“https://cashadvance.us.org”>cash advance</a> payday advance loans [url=https://cashadvance.us.org]cash advance loan[/url]
— Instant Online Loans Jan 1, 12:04 AM #payday advance loans <a href=“https://cashadvance.us.org”>payday advance</a> cash advance [url=https://cashadvance.us.org]cash advance[/url]
— Easy Payday Loan Jan 1, 12:24 AM #cash loans <a href=“https://loan.us.org”>loans</a> direct lender payday loans [url=https://loan.us.org]loan[/url]
— Loans For Bad Credit Jan 1, 12:45 AM #writing my essay <a href=“https://essaywritingservice.us.org”>essay writing service</a> write my college essay for me [url=https://essaywritingservice.us.org]essay writing service[/url]
— Ace Homework Jan 1, 12:54 AM #payday advance loan <a href=“https://payday.us.com”>payday</a> payday loans [url=https://payday.us.com]payday[/url]
— Spotloan Jan 1, 02:00 AM #essay writer <a href=“https://essay.us.org”>do my term paper</a> college essays [url=https://essay.us.org]essay[/url]
— Essay Writings Jan 1, 02:35 AM #payday cash loan <a href=“https://payday.us.com”>payday loans</a> online payday loan lender [url=https://payday.us.com]payday loan online[/url]
— Best Payday Loan Jan 1, 02:55 AM #auto insurance <a href=“https://carinsurance.us.org”>compare car insurance rates</a> car insurance [url=https://carinsurance.us.org]car insurance[/url]
— aarp auto insurance Jan 1, 03:53 AM #bad credit <a href=“https://loan.us.org”>loans</a> online loans [url=https://loan.us.org]easy loans[/url]
— Payday Loans Online Jan 1, 04:11 AM #college essays <a href=“https://collegeessays.us.com”>buy college essays</a> do my assignment [url=https://collegeessays.us.com]engineering assignment help[/url]
— Custom Essay Writers Jan 1, 04:26 AM #buy college essays <a href=“https://collegeessays.us.com”>school papers</a> do my dissertation [url=https://collegeessays.us.com]buy essays[/url]
— Writers Essay Jan 1, 04:32 AM #loan <a href=“https://loan.us.org”>loan</a> payday loans with no credit check [url=https://loan.us.org]cash loan[/url]
— Loan Jan 1, 05:38 AM #i need to do homework <a href=“https://essay.us.org”>dissertation abstracts international online</a> argumentative essay [url=https://essay.us.org]argumentative essay[/url]
— Buy Essays Online Jan 1, 06:05 AM #essay writing <a href=“https://essay.us.org”>argument essay</a> essay writing [url=https://essay.us.org]essay[/url]
— Write Essay Jan 1, 07:47 AM #loan <a href=“https://loan.us.org”>cash loans</a> loan [url=https://loan.us.org]advance payday loans[/url]
— Online Payday Loan Jan 1, 08:04 AM #liberty auto insurance <a href=“https://comparecarinsurance.us.com”>compare car insurance rates</a> insurance quotes [url=https://comparecarinsurance.us.com]general auto insurance[/url]
— usaa auto insurance Jan 1, 08:27 AM #homework help vikings <a href=“https://argumentativeessay.us.com”>best research paper writing service</a> paper writing [url=https://argumentativeessay.us.com]argumentative essay[/url]
— Essay-writer.Org Jan 1, 10:34 AM #car insurance <a href=“https://carinsurance.us.org”>compare car insurance</a> cheap auto insurance in california [url=https://carinsurance.us.org]car insurance[/url]
— automobile insurance Jan 1, 10:34 AM #university essay help <a href=“https://argumentativeessay.us.com”>paper writing</a> argumentative essays [url=https://argumentativeessay.us.com]website that write essays for you[/url]
— Custom Essay Jan 1, 11:19 AM #compare car insurance quotes <a href=“https://carinsurance.us.org”>compare auto insurance rates</a> compare auto insurance [url=https://carinsurance.us.org]cheap car insurance[/url]
— aaa car insurance Jan 1, 11:26 AM #argumentative essays <a href=“https://argumentativeessay.us.com”>dissertation abstracts international online</a> my homework helper [url=https://argumentativeessay.us.com]argumentative essay[/url]
— Help With My Essay Jan 1, 12:06 PM #argumentative essay help <a href=“https://argumentativeessay.us.com”>dissertation literature review help</a> argumentative essay [url=https://argumentativeessay.us.com]essay writing[/url]
— Good Homework Music Jan 1, 01:29 PM #can i pay someone to do my assignment <a href=“https://researchpaper.us.com”>buying essays online safe</a> research essay [url=https://researchpaper.us.com]research paper[/url]
— Writing Online Jan 1, 02:19 PM #college essays <a href=“https://collegeessays.us.com”>college essay help</a> college admission essays [url=https://collegeessays.us.com]buy college essays[/url]
— Write My Essays Jan 1, 02:26 PM #research essay <a href=“https://researchpaper.us.com”>research papers</a> uk assignment writing service [url=https://researchpaper.us.com]apply texas essay prompts[/url]
— Term Paper Writer Jan 1, 02:38 PM #auto insurance quotes <a href=“https://autoinsurancequotes.us.com”>cheap auto insurance quotes</a> auto insurance quotes california [url=https://autoinsurancequotes.us.com]auto insurance quotes texas[/url]
— insurance quotes Jan 1, 03:12 PM #paid homework help <a href=“https://essay.us.org”>college essays</a> c homework help [url=https://essay.us.org]dissertations writing services[/url]
— Buy A Essay Jan 1, 03:40 PM #compare car insurance <a href=“https://comparecarinsurance.us.com”>car insurance quotes comparison online</a> compare auto insurance rates [url=https://comparecarinsurance.us.com]motorcycle insurance quote[/url]
— nationwide insurance Jan 1, 06:06 PM #car insurance quotes <a href=“https://autoinsurancequotes.us.com”>auto insurance quotes</a> online auto insurance quotes [url=https://autoinsurancequotes.us.com]state auto insurance company[/url]
— amica auto insurance Jan 1, 07:16 PM #Venta de en venezuela http://farmaciaenlinea.life/aldan.html precio guatemala.
— Farmacia En Linea Jan 1, 08:25 PM #Comprar en argentina http://farmacia-en-linea.life/hagevir.html venta de en cordoba España.
— Farmacia En Linea Jan 1, 08:26 PM #Como conseguir en venezuela http://farmacia-en-linea.life/biotowa.html comprar España.
— Farmacia En Linea Jan 1, 09:14 PM #Compra zaragoza http://farmaciaenlinea.life/stronazon.html es con receta.
— farmaciaenlinea Jan 1, 09:14 PM #Comprar peru http://farmaciaenlinea.life/preflam.html quiero comprar en Chile.
— FARMACIAENLINEA.life Jan 1, 10:58 PM #Comprar sin receta en barcelona http://farmacia-en-linea.life/torpain.html comprar seguro por internet.
— ONLINE FARMACIA Jan 1, 11:02 PM #cheapest car insurance <a href=“https://carinsurance.us.org”>nationwide auto insurance</a> inexpensive auto insurance [url=https://carinsurance.us.org]compare auto insurance rates[/url]
— car insurance online Jan 1, 11:50 PM #compare car insurance quotes <a href=“https://carinsurance.us.org”>compare car insurance</a> state auto insurance company [url=https://carinsurance.us.org]compare auto insurance rates[/url]
— cheap auto insurance Jan 2, 03:46 AM #car insurance <a href=“https://carinsurance.us.org”>compare car insurance rates</a> compare auto insurance [url=https://carinsurance.us.org]cheapest car insurance[/url]
— low car insurance Jan 2, 05:41 AM #online auto insurance quotes <a href=“https://autoinsurancequotes.us.com”>e insurance auto</a> automobile insurance quotes [url=https://autoinsurancequotes.us.com]online auto insurance quotes[/url]
— insurance companies Jan 2, 06:36 AM #car insurances <a href=“https://autoinsurancequotes.us.com”>auto insurance quotes texas</a> online auto insurance quotes [url=https://autoinsurancequotes.us.com]home and auto insurance companies[/url]
— usaa car insurance Jan 2, 07:37 AM #compare auto insurance quotes <a href=“https://carinsurance.us.org”>erie car insurance</a> compare auto insurance [url=https://carinsurance.us.org]compare auto insurance[/url]
— auto owners ins Jan 2, 07:44 AM #car insurance <a href=“https://carinsurance.us.org”>car insurance</a> cheap auto insurance in california [url=https://carinsurance.us.org]car insurance[/url]
— affordable insurance Jan 2, 09:40 AM #cheapest online car insurance quotes <a href=“https://autoinsurancequotes.us.com”>auto insurance quotes comparison</a> general car insurance quote [url=https://autoinsurancequotes.us.com]car insurance quotes california[/url]
— auto owners ins Jan 2, 10:01 AM #auto insurance quotes comparison <a href=“https://autoinsurancequotes.us.com”>car insurance quotes texas</a> state farm car insurance [url=https://autoinsurancequotes.us.com]auto insurance quotes comparison[/url]
— cheap auto insurance Jan 2, 12:39 PM #automobile insurance quotes <a href=“https://autoinsurancequotes.us.com”>cheap car insurance quotes</a> cheapest online car insurance quotes [url=https://autoinsurancequotes.us.com]car insurance quotes comparison[/url]
— online car insurance Jan 2, 01:21 PM #research paper <a href=“https://researchpaper.us.com”>online essays</a> law homework help [url=https://researchpaper.us.com]writing a paper[/url]
— JaneNip Jan 2, 01:48 PM #online payday loans for bad credit <a href=“https://onlinepaydayloansforbadcredit.bid”>online payday loans for bad credit</a> bad credit payday loans direct lenders [url=https://onlinepaydayloansforbadcredit.bid]online payday loans for bad credit[/url] payday loans online <a href=“https://thebestonlinepaydayloans.loan”>payday advance online</a> the best online payday loans [url=https://thebestonlinepaydayloans.loan]the best online payday loans[/url] research paper <a href=“https://researchessay.cricket”>research papers</a> corporate finance assignment help [url=https://researchessay.cricket]research papers[/url]
— PamNip Jan 2, 02:54 PM #auto insurance quotes <a href=“https://autoinsurancequotes.us.com”>united auto insurance</a> e insurance auto [url=https://autoinsurancequotes.us.com]auto insurance quotes[/url]
— progressive auto ins Jan 2, 03:48 PM #short term loans online <a href=https://shorttermloans.us.com>short term loans online</a> signature loans for bad credit [url=https://shorttermloans.us.com]payday loans san antonio[/url]
— JaneNip Jan 2, 03:52 PM #car insurance <a href=“https://carinsurance.us.org”>compare car insurance quotes</a> cheapest car insurance [url=https://carinsurance.us.org]car insurance[/url]
— auto owners ins Jan 2, 04:10 PM #direct lender <a href=“https://bestpaydayloan.cricket”>fast payday loan</a> best payday loan [url=https://bestpaydayloan.cricket]best payday loan[/url] loans with no credit check <a href=“https://fastestpaydayloan.bid”>fastest payday loan</a> fastest payday loan [url=https://fastestpaydayloan.bid]online payday loan[/url] small online payday loans <a href=“https://smallpaydayloans.cricket”>small payday loans</a> online payday loans [url=https://smallpaydayloans.cricket]small payday loans[/url] research paper <a href=“https://researchessay.cricket”>research essay</a> research essay [url=https://researchessay.cricket]research essay[/url] do my bibliography <a href=“https://researchwriting.webcam”>help on homework math</a> research writing [url=https://researchwriting.webcam]best homework help[/url] fast online payday loans <a href=“https://fastpaydayloans.cricket”>fast payday loans</a> fast online payday loans [url=https://fastpaydayloans.cricket]fast payday loans[/url]
— PamNip Jan 2, 04:31 PM #nationwide auto insurance <a href=“https://carinsurance.us.org”>the hartford auto insurance</a> car insurance [url=https://carinsurance.us.org]cheapest car insurance[/url]
— aarp auto insurance Jan 2, 05:33 PM #cheap car insurance quotes <a href=“https://autoinsurancequotes.us.com”>auto insurance quotes</a> auto insurance quotes california [url=https://autoinsurancequotes.us.com]auto insurance quotes[/url]
— auto ins Jan 2, 06:00 PM #auto insurance quotes online <a href=“https://comparecarinsurance.us.com”>compare car insurance quotes</a> compare auto insurance quotes [url=https://comparecarinsurance.us.com]compare car insurance[/url]
— usaa auto insurance Jan 2, 10:22 PM #Learn More Here <a href=https://paydayloans.us.org>payday loans online</a> best payday loans online no credit check [url=https://paydayloans.us.org]paydayloans.us.org[/url]
— JaneNip Jan 2, 11:19 PM #compare car insurance <a href=“https://comparecarinsurance.us.com”>compare car insurance</a> car insurance quotes comparison online [url=https://comparecarinsurance.us.com]car insurance quotes comparison[/url]
— JaneNip Jan 3, 12:15 AM #loan money <a href=https://shorttermloans.us.com>short term loan lenders</a> 24 hour payday loans [url=https://shorttermloans.us.com]loans online with monthly payments[/url]
— JaneNip Jan 3, 12:51 AM #compare car insurance <a href=“https://carinsurance.us.org”>compare car insurance rates</a> compare auto insurance rates [url=https://carinsurance.us.org]car insurance[/url]
— aaa auto insurance Jan 3, 02:23 AM #loan <a href=“https://loan.us.org”>loan</a> get a loan [url=https://loan.us.org]loans[/url]
— Online Lenders Jan 3, 03:14 AM #payday <a href=“https://payday.us.com”>guaranteed payday loans</a> direct lenders no credit check [url=https://payday.us.com]no credit check emergency loans[/url]
— JaneNip Jan 3, 03:22 AM #cheap liability insurance in texas <a href=“https://autoinsurancequotes.us.com”>auto insurance quotes texas</a> cheap liability insurance in texas [url=https://autoinsurancequotes.us.com]auto insurance quotes[/url]
— accurate automotive Jan 3, 04:37 AM #payday loans <a href=“https://loan.us.org”>loan</a> loan [url=https://loan.us.org]loan[/url]
— Best Online Loans Jan 3, 06:55 AM #car insurance <a href=“https://carinsurance.us.org”>cheap car insurance quotes</a> car insurance [url=https://carinsurance.us.org]auto insurance companies in florida[/url]
— JaneNip Jan 3, 08:04 AM #payday cash loan <a href=“https://payday.us.com”>payday</a> payday [url=https://payday.us.com]quick cash loan[/url]
— Online Payday Loans Jan 3, 08:20 AM #online loans <a href=https://onlineloans.us.com>quick loan</a> best online payday loans [url=https://onlineloans.us.com]link[/url]
— JaneNip Jan 3, 09:11 AM #online payday advance <a href=“https://cashadvance.us.org”>cash advance</a> cash advance [url=https://cashadvance.us.org]payday loans bad credit[/url]
— Payday Loan Jan 3, 10:54 AM #auto insurance quotes <a href=“https://autoinsurancequotes.us.com”>state auto insurance</a> home and auto insurance companies [url=https://autoinsurancequotes.us.com]cheap liability insurance in texas[/url]
— JaneNip Jan 3, 01:58 PM #payday <a href=“https://payday.us.com”>payday</a> payday loans no credit check [url=https://payday.us.com]online payday loan lender[/url]
— Cash Advance Jan 3, 02:03 PM #best payday loans online <a href=“https://bestpaydayloans.stream”>best payday loans online</a> best payday loans [url=https://bestpaydayloans.stream]online payday loans no credit check[/url] write a paper <a href=“https://writeapaper.stream”>need help with assignment</a> term paper [url=https://writeapaper.stream]write a paper[/url] best online payday loans <a href=“https://thebestonlinepaydayloans.trade”>fast online payday loans</a> no credit check payday loans instant approval [url=https://thebestonlinepaydayloans.trade]direct lenders no credit check[/url]
— JamesNip Jan 3, 04:15 PM #bad credit <a href=“https://cashadvanceloan.bid”>easy cash payday loan</a> 15 minute loans direct lenders [url=https://cashadvanceloan.bid]loans online no credit check[/url] payday advance online <a href=“https://cashadvancelenders.trade”>15 minute loans direct lenders</a> payday loan lenders [url=https://cashadvancelenders.trade]pay day lenders[/url] bad credit payday loans direct lenders <a href=“https://badcreditpaydayloansdirectlenders.cricket”>direct online lenders</a> bad credit payday loans direct lenders [url=https://badcreditpaydayloansdirectlenders.cricket]bad credit payday loans direct lenders[/url] paydayloans online <a href=“https://easyloans.webcam”>easy payday loans online</a> easy payday loans online [url=https://easyloans.webcam]easy approval payday loans[/url] free adult cam chat <a href=“https://freesexcamchat.cricket”>free adult cam chat</a> free sex video chat [url=https://freesexcamchat.cricket]webcam slut[/url] wife webcam <a href=“https://wifewebcam.cricket”>wife on webcam</a> sex web cam [url=https://wifewebcam.cricket]online sluts[/url] free sex webcam <a href=“https://freewebcamsex.stream”>free webcam sex</a> free webcam sex [url=https://freewebcamsex.stream]free web cam sluts[/url]
— JamesNip Jan 3, 04:16 PM #best payday loan online <a href=“https://cashadvance.us.org”>payday loans direct lender</a> advance cash payday loan [url=https://cashadvance.us.org]cash advance[/url]
— Direct Lenders Jan 3, 04:59 PM #cash advance loan <a href=“https://cashadvance.us.org”>cash advance</a> payday advance online [url=https://cashadvance.us.org]cash advance loan[/url]
— Payday Loan Jan 3, 08:05 PM #online loans direct lenders <a href=“https://payday.us.com”>payday</a> a payday loan [url=https://payday.us.com]payday cash loan[/url]
— Payday Loans Jan 3, 08:45 PM #payday <a href=“https://payday.us.com”>payday loan</a> advance cash payday loan [url=https://payday.us.com]payday cash loan[/url]
— A Payday Loan Jan 3, 09:56 PM #dissertation proposal help <a href=“https://researchpaper.us.com”>research essay</a> online essays [url=https://researchpaper.us.com]do my online homework[/url]
— Buy Essay.Org Jan 3, 10:37 PM #easiest payday loan to get <a href=“https://payday.us.com”>quick loan</a> payday [url=https://payday.us.com]the best online payday loans[/url]
— Cash Loan Jan 3, 10:51 PM #buying essays online <a href=“https://essay.us.org”>essay</a> essay [url=https://essay.us.org]college essays[/url]
— Writers Essay Jan 4, 02:32 AM #writing my essay <a href=“https://essaywritingservice.us.org”>essay writing service</a> essay writing [url=https://essaywritingservice.us.org]essay writing service[/url]
— Writers Online Jan 4, 03:54 AM #Generico en farmacias de mexico http://farmacia-en-linea.life/tenporal.html comprar generico online Argentina.
— FARMACIA EN LINEA Jan 4, 05:26 AM #argumentative essays <a href=“https://argumentativeessay.us.com”>argument essay</a> need help with assignment [url=https://argumentativeessay.us.com]dissertation literature review help[/url]
— Dissertation Online Jan 4, 06:10 AM #spotloan <a href=“https://onlineloansdirectlenders.stream”>no credit check loans</a> payday loans online direct lenders [url=https://onlineloansdirectlenders.stream]online loans direct lenders[/url] cash advance no credit check <a href=“https://samedaypaydayloansonline.bid”>installment loans no credit check</a> faxless payday loans [url=https://samedaypaydayloansonline.bid]installment loans no credit check[/url] quick loans 100 approval <a href=“https://quickloans100approval.stream”>loans online bad credit</a> same day loan [url=https://quickloans100approval.stream]quick loans 100 approval[/url] direct payday lenders <a href=“https://paydaylendersdirect.webcam”>payday loans bad credit</a> advance cash payday loan [url=https://paydaylendersdirect.webcam]payday lenders direct[/url] fast payday loan <a href=“https://instantonlinepaydayloan.cricket”>instant online payday loan</a> instant online payday loan [url=https://instantonlinepaydayloan.cricket]payday lenders direct[/url] payday loan direct lender <a href=“https://directlenderpaydayloans.cricket”>payday loan direct lender</a> direct lender [url=https://directlenderpaydayloans.cricket]emergency loans no credit check[/url]
— JamesNip Jan 4, 06:32 AM #sex chat <a href=“https://chatsex.trade”>sex chat</a> adult cam sites [url=https://chatsex.trade]fetish cams[/url] research essays <a href=“https://researchpaperproposal.trade”>research paper proposal</a> roman homework help [url=https://researchpaperproposal.trade]term paper[/url] research essay <a href=“https://researchessay.bid”>research essay</a> cengage online homework [url=https://researchessay.bid]research essay[/url] bad credit payday loans direct lenders <a href=“https://badcreditpaydayloansdirectlenders.cricket”>payday loans online</a> fast loans no credit check [url=https://badcreditpaydayloansdirectlenders.cricket]advance cash payday loan[/url] instant online payday loan <a href=“https://instantonlinepaydayloan.cricket”>online payday lenders</a> online loans [url=https://instantonlinepaydayloan.cricket]instant online payday loan[/url] direct online lenders <a href=“https://moneyloan.trade”>payday loan</a> money loan [url=https://moneyloan.trade]quick loans 100 approval[/url] can someone do my homework <a href=“https://buyessayonline.cricket”>buy essay online</a> online essay [url=https://buyessayonline.cricket]buy an essay[/url] same day payday loans online <a href=“https://samedaypaydayloansonline.bid”>same day payday loans online</a> same day payday loans online [url=https://samedaypaydayloansonline.bid]same day payday loans online[/url] money loan <a href=“https://smallpaydayloans.bid”>small payday loans</a> easy payday loans [url=https://smallpaydayloans.bid]small payday loans[/url] paper writer <a href=“https://essaywriting.trade”>essay writing</a> english essay help [url=https://essaywriting.trade]writing my essay[/url]
— JamesNip Jan 4, 06:53 AM #college essay prompts <a href=“https://essay.us.org”>essay cheap</a> essay [url=https://essay.us.org]how to write college application essays[/url]
— Essays Jan 4, 09:08 AM #essay writing service <a href=“https://essaywritingservice.us.org”>career research paper</a> essay writing service [url=https://essaywritingservice.us.org]writing my essay[/url]
— Homework Online Jan 4, 12:21 PM #research report <a href=“https://researchpaper.us.com”>research paper</a> research paper [url=https://researchpaper.us.com]research paper[/url]
— Write An Essay Jan 4, 12:52 PM #loans online <a href=“https://paydaybadcreditloan.bid”>cash advance lenders</a> bad credit payday loans [url=https://paydaybadcreditloan.bid]bad credit payday loans[/url] college application essay <a href=“https://collegeapplicationessay.bid”>college application essay</a> college essay help [url=https://collegeapplicationessay.bid]college application essay[/url] payday advance no credit check <a href=“https://smallpaydayloans.bid”>small payday loans</a> guaranteed payday loans [url=https://smallpaydayloans.bid]small online payday loans[/url] payday advance loans <a href=“https://quickloans.science”>quick loans</a> speedycash [url=https://quickloans.science]quick loans[/url] free sex cams <a href=“https://chatsex.trade”>chat sex</a> chat sex [url=https://chatsex.trade]sex chat[/url] research paper <a href=“https://collegepaper.trade”>term paper</a> pay for assignments australia [url=https://collegepaper.trade]college paper[/url] chat with sluts <a href=“https://freechatrooms.webcam”>free adult chat</a> free chat rooms [url=https://freechatrooms.webcam]free adult sex chat[/url] research paper proposal <a href=“https://researchpaperproposal.trade”>research report</a> research paper [url=https://researchpaperproposal.trade]high school geometry homework help[/url] payday lenders direct <a href=“https://directpaydayloanlenders.webcam”>direct payday loan lenders</a> payday lenders direct [url=https://directpaydayloanlenders.webcam]payday loan direct lenders[/url]
— JamesNip Jan 4, 12:54 PM #argumentative essay <a href=“https://argumentativeessay.us.com”>essay writing</a> argument essay [url=https://argumentativeessay.us.com]argumentative essay[/url]
— Assignment Operators Jan 4, 05:17 PM #payday loans bad credit <a href=“https://paydaybadcreditloan.bid”>best cash loan</a> payday bad credit loan [url=https://paydaybadcreditloan.bid]payday bad credit loan[/url] cash loans <a href=“https://quickloans.trade”>quick loans 100 approval</a> quick loans [url=https://quickloans.trade]same day payday loans online[/url] payday loans <a href=“https://quickloans.science”>quick loans</a> direct payday loan lenders [url=https://quickloans.science]quick loans 100 approval[/url] same day payday loans online <a href=“https://samedaypaydayloansonline.bid”>same day payday loans online</a> online loan [url=https://samedaypaydayloansonline.bid]quick cash loans[/url] payday loan no credit check <a href=“https://moneyloan.trade”>a payday loan</a> cash loans online [url=https://moneyloan.trade]online payday loan lender[/url] webcam masturbation <a href=“https://webcammasturbation.stream”>nude video chat</a> webcam sluts [url=https://webcammasturbation.stream]webcam sluts[/url] help me write my college essay <a href=“https://illustrationessay.trade”>essay corrector</a> essay corrector [url=https://illustrationessay.trade]essay help[/url]
— JamesNip Jan 4, 05:32 PM #do my research paper <a href=“https://researchpaper.us.com”>do my research paper</a> research papers [url=https://researchpaper.us.com]research papers[/url]
— Buy Essay Jan 4, 06:54 PM #essay writing <a href=“https://essay.us.org”>math is fun homework help</a> college essay prompts [url=https://essay.us.org]argumentative essay[/url]
— Write Jan 4, 07:51 PM #direct lender payday loans <a href=“https://directlenderpaydayloans.cricket”>best cash loans online</a> easiest payday loan to get [url=https://directlenderpaydayloans.cricket]payday loans online direct lender[/url] trigonometry homework help <a href=“https://buyessays.stream”>buy essays</a> buy essays [url=https://buyessays.stream]24 hour homework help[/url] essay help <a href=“https://illustrationessay.trade”>college admission essay writing service</a> essay help [url=https://illustrationessay.trade]essay corrector[/url]
— JamesNip Jan 4, 08:58 PM #cfnm show <a href=“https://wifewebcam.cricket”>wife webcam</a> wife on webcam [url=https://wifewebcam.cricket]webcam slut[/url] direct payday loan lenders <a href=“https://directpaydayloanlenders.webcam”>payday advance</a> direct payday loan lenders [url=https://directpaydayloanlenders.webcam]direct payday loan lenders[/url] best payday loans online <a href=“https://bestpaydayloans.stream”>fast loans no credit check</a> best payday loans online [url=https://bestpaydayloans.stream]get a loan[/url] web cam sluts <a href=“https://adultcamsites.trade”>adult cam sites</a> adult cam sites [url=https://adultcamsites.trade]live webcams sex[/url] school papers <a href=“https://schoolpapers.trade”>research papers</a> research papers [url=https://schoolpapers.trade]math help[/url]
— JamesNip Jan 4, 10:05 PM #direct lenders <a href=“https://payday.us.com”>payday express</a> payday [url=https://payday.us.com]same day loan[/url]
— Fastest Payday Loan Jan 5, 03:27 AM #cash til payday loan <a href=“https://cashadvance.us.org”>cash advance lenders</a> cash advance [url=https://cashadvance.us.org]payday advance online[/url]
— Easy Payday Loan Jan 5, 03:28 AM #quick cash loans <a href=“https://payday.us.com”>payday loan</a> speedycash [url=https://payday.us.com]online payday advance[/url]
— Personal Loans Jan 5, 07:37 AM #cash advance <a href=“https://cashadvance.us.org”>payday advance loans</a> cash advance [url=https://cashadvance.us.org]payday advance loans[/url]
— Payday Express Jan 5, 07:45 AM #bad credit payday loans direct lenders <a href=“https://loan.us.org”>loan</a> small loans no credit check [url=https://loan.us.org]easy approval payday loans[/url]
— Bad Credit Jan 5, 09:33 AM #loan <a href=“https://loan.us.org”>cash loan</a> loan [url=https://loan.us.org]loans[/url]
— Money Loan Jan 5, 09:34 AM #cash loan <a href=“https://loan.us.org”>cash loans</a> payday loans [url=https://loan.us.org]installment loans no credit check[/url]
— A Payday Loan Jan 5, 09:36 AM #direct lenders of loans <a href=“https://cashadvance.us.org”>cash loans</a> cash advance loan [url=https://cashadvance.us.org]online payday advance[/url]
— Cash Advance Jan 5, 01:30 PM #payday <a href=“https://payday.us.com”>payday express</a> payday [url=https://payday.us.com]payday advance loan[/url]
— Getting A Loan Jan 5, 01:46 PM #payday advance online <a href=“https://cashadvance.us.org”>cash advance</a> cash advance [url=https://cashadvance.us.org]advance cash payday loan[/url]
— Payday Loan Jan 5, 03:49 PM #cash advance <a href=“https://cashadvance.us.org”>cash advance loan</a> advance cash payday loan [url=https://cashadvance.us.org]bad credit[/url]
— Loan Jan 5, 05:50 PM #no credit check loan <a href=“https://payday.us.com”>payday loan</a> quick loan [url=https://payday.us.com]payday loan online[/url]
— Loans For Bad Credit Jan 5, 06:17 PM #payday loans <a href=“https://payday.us.com”>payday cash loan</a> easy approval payday loans [url=https://payday.us.com]payday[/url]
— Best Online Loans Jan 5, 07:22 PM #writing a synopsis for a research paper <a href=“https://essaywritingservice.us.org”>writing research paper</a> writing my essay for me [url=https://essaywritingservice.us.org]writing my paper[/url]
— Buy Essay Paper Jan 5, 09:33 PM #payday express <a href=“https://payday.us.com”>payday loan no credit check</a> payday loan online [url=https://payday.us.com]online payday loans direct lenders[/url]
— Quick Loans Jan 5, 09:39 PM #Es de venta libre http://farmaciaenlinea.life/simvalip.html mejor web para comprar generico.
— FARMACIA EN LINEA Jan 5, 09:47 PM #writing my essay for me <a href=“https://essaywritingservice.us.org”>essay writing</a> paper writing service [url=https://essaywritingservice.us.org]writing my paper[/url]
— Online Essay Writer Jan 5, 10:26 PM #advance cash payday loan <a href=“https://payday.us.com”>direct payday lenders online</a> payday [url=https://payday.us.com]payday[/url]
— Spotloan Jan 5, 11:25 PM #payday loan <a href=“https://payday.us.com”>payday advance loan</a> payday loans direct lenders only [url=https://payday.us.com]payday loan[/url]
— Instant Online Loans Jan 6, 12:17 AM #cash advance <a href=“https://cashadvance.us.org”>payday advance loans</a> cash advance [url=https://cashadvance.us.org]cash advance[/url]
— Best Online Loans Jan 6, 01:01 AM #do homework online <a href=“https://collegeessays.us.com”>statistics assignment help</a> write my assignments [url=https://collegeessays.us.com]school homework help[/url]
— Buy Essays Online Jan 6, 02:12 AM #essay writing service <a href=“https://essaywritingservice.us.org”>kinetic books online homework</a> essay writing service [url=https://essaywritingservice.us.org]writing my essay for me[/url]
— Write Essays Online Jan 6, 03:12 AM #cash advance <a href=“https://cashadvance.us.org”>cash advance</a> payday loans [url=https://cashadvance.us.org]cash advance lenders[/url]
— Bad Credit Jan 6, 03:25 AM #direct lenders <a href=“https://loan.us.org”>payday loan near me</a> payday loans [url=https://loan.us.org]online loans[/url]
— Loans Online Jan 6, 03:46 AM #direct lenders for bad credit <a href=“https://cashadvance.us.org”>cash loans</a> cash advance [url=https://cashadvance.us.org]payday advance loans[/url]
— Loans Online Jan 6, 04:55 AM #essay writing service <a href=“https://essaywritingservice.us.org”>my maths homework online</a> physical science homework help [url=https://essaywritingservice.us.org]essay writing service[/url]
— English Essay Writer Jan 6, 07:46 AM #writing a college admissions essay <a href=“https://researchpaper.us.com”>writing a paper</a> do my book report [url=https://researchpaper.us.com]research report[/url]
— Essay Writing Tip Jan 6, 10:34 AM #essay writer <a href=“https://essay.us.org”>argument essay</a> do homework online [url=https://essay.us.org]outlines for research papers[/url]
— Write My Papers Jan 6, 01:01 PM #college essays <a href=“https://collegeessays.us.com”>college essay help</a> college essay prompts [url=https://collegeessays.us.com]buy college essays[/url]
— Buying An Essay Jan 6, 04:16 PM #essay <a href=“https://essay.us.org”>college essay</a> assignment solution help [url=https://essay.us.org]help me on my math homework[/url]
— Essay-writer.Org Jan 6, 05:11 PM #homework help number <a href=“https://essaywritingservice.us.org”>paper writing service</a> essay writing service [url=https://essaywritingservice.us.org]writing my paper[/url]
— Homework Assignments Jan 6, 05:40 PM #payday <a href=“https://payday.us.com”>payday loan</a> payday advance loan [url=https://payday.us.com]fast cash loans[/url]
— Payday Loan Jan 7, 03:02 PM #loan cash <a href=“https://cashadvance.us.org”>online payday loan</a> payday advance online [url=https://cashadvance.us.org]cash advance[/url]
— Loans Online Jan 7, 03:49 PM #payday loans <a href=“https://loan.us.org”>cash advance no credit check</a> no credit check lenders only [url=https://loan.us.org]get a loan[/url]
— Bad Credit Jan 7, 07:24 PM #fast payday loans <a href=“https://cashadvance.us.org”>best payday loans</a> payday advance online [url=https://cashadvance.us.org]payday loans online direct lenders[/url]
— Online Loans Jan 7, 07:36 PM #online loans <a href=“https://cashadvance.us.org”>advance payday loans online</a> cash loans online [url=https://cashadvance.us.org]cash advance[/url]
— Payday Jan 7, 08:20 PM #advance payday loans <a href=“https://cashadvance.us.org”>cash advance</a> paydayloan [url=https://cashadvance.us.org]cash advance[/url]
— Speedycash Jan 7, 09:35 PM #writing a paper <a href=“https://researchpaper.us.com”>research report</a> my assignment help [url=https://researchpaper.us.com]research paper[/url]
— Essay Write Jan 7, 10:38 PM #homework help victorians <a href=“https://essaywritingservice.us.org”>essay writing</a> paper writing service [url=https://essaywritingservice.us.org]need help with essay[/url]
— Ace Homework Jan 8, 12:36 AM #college essays <a href=“https://collegeessays.us.com”>i need help with homework</a> college essays [url=https://collegeessays.us.com]college essay help[/url]
— Online Essay Writing Jan 8, 12:38 AM #easy approval payday loans <a href=“https://loan.us.org”>payday loan</a> cash loan [url=https://loan.us.org]cash advance loan[/url]
— Cash Loan Jan 8, 12:49 AM #payday <a href=“https://payday.us.com”>payday loan online</a> payday loan online [url=https://payday.us.com]payday[/url]
— Loan Cash Jan 8, 01:54 AM #advance payday loans <a href=“https://payday.us.com”>payday</a> payday loan online [url=https://payday.us.com]payday[/url]
— Cash Loan Jan 8, 02:22 AM #cash advance <a href=“https://cashadvance.us.org”>payday advance loans</a> loan cash [url=https://cashadvance.us.org]payday advance[/url]
— Pay Day Loans Jan 8, 03:26 AM #cash advance <a href=“https://cashadvance.us.org”>best payday loans</a> payday loans online direct lenders [url=https://cashadvance.us.org]payday advance loans[/url]
— Quick Loan Jan 8, 03:33 AM #online payday advance <a href=“https://cashadvance.us.org”>payday advance loans</a> cash advance [url=https://cashadvance.us.org]small loans no credit check[/url]
— Getting A Loan Jan 8, 05:57 AM #cash advance <a href=“https://cashadvance.us.org”>direct payday lenders online</a> cash advance [url=https://cashadvance.us.org]loan cash[/url]
— Loan Cash Jan 8, 06:04 AM #college essays <a href=“https://collegeessays.us.com”>college essays</a> college essay [url=https://collegeessays.us.com]college essay[/url]
— Buy Essay.Org Jan 8, 07:07 AM #payday loans <a href=“https://loan.us.org”>loan</a> online payday loan [url=https://loan.us.org]payday loans online[/url]
— Payday Loans Online Jan 8, 08:58 AM #best payday loan online <a href=“https://cashadvance.us.org”>cash advance</a> faxless payday loan same day [url=https://cashadvance.us.org]online payday advance loan[/url]
— Speedy Cash Jan 8, 09:12 AM #essay writing service <a href=“https://essaywritingservice.us.org”>writing my essay for me</a> website that does homework for you [url=https://essaywritingservice.us.org]help with an essay[/url]
— Is Homework Helpful Jan 8, 09:18 AM #payday <a href=“https://payday.us.com”>payday cash loan</a> advance cash payday loan [url=https://payday.us.com]10 top loan companies[/url]
— Cash Loan Jan 8, 09:51 AM #loans online <a href=“https://loan.us.org”>loans online</a> fast payday loans [url=https://loan.us.org]payday loans[/url]
— Online Loan Jan 8, 10:23 AM #payday advance loans <a href=“https://cashadvance.us.org”>payday advance online</a> getting a loan [url=https://cashadvance.us.org]cash loans[/url]
— Getting A Loan Jan 8, 10:44 AM #research paper <a href=“https://researchpaper.us.com”>assignment help reviews</a> research paper [url=https://researchpaper.us.com]homework help website[/url]
— Assignment Of Leases Jan 8, 11:03 AM #sex chat <a href=“https://chatsex.bid”>chat sex</a> sex chat [url=https://chatsex.bid]sex chat[/url] quick loan <a href=“https://quickloans.trade”>quick loans</a> payday loans [url=https://quickloans.trade]quick loans[/url] college essay prompts <a href=“https://essayprompts.cricket”>write essay</a> essay prompts [url=https://essayprompts.cricket]essay helper[/url] dissertation services <a href=“https://collegepaper.trade”>college essays</a> write my college essay for me [url=https://collegepaper.trade]college paper[/url] free sex cam chat <a href=“https://freesexcamchat.cricket”>free sex cam chat</a> free sex cam chat [url=https://freesexcamchat.cricket]free sex cam chat[/url]
— JamesNip Jan 8, 12:07 PM #research paper <a href=“https://researchpaper.us.com”>research paper</a> research paper [url=https://researchpaper.us.com]statistics homework helper[/url]
— Writing My Essay Jan 8, 01:06 PM #cash advance lenders <a href=“https://cashadvance.us.org”>direct online lenders</a> payday advance online [url=https://cashadvance.us.org]payday advance online[/url]
— Personal Loans Jan 8, 01:56 PM #argumentative essay <a href=“https://argumentativeessay.us.com”>persuasive writing homework</a> paper writing [url=https://argumentativeessay.us.com]argumentative essay[/url]
— Term Paper Writer Jan 8, 03:04 PM #college essay prompts <a href=“https://collegeessays.us.com”>i need help with homework</a> college essays [url=https://collegeessays.us.com]college essays[/url]
— Essay Writings Jan 8, 03:07 PM #research paper <a href=“https://researchpaper.us.com”>university essay help</a> research report [url=https://researchpaper.us.com]writing a paper[/url]
— Assignment Of Leases Jan 8, 03:48 PM #online payday advance <a href=“https://cashadvance.us.org”>cash advance</a> cash advance loan [url=https://cashadvance.us.org]online payday advance[/url]
— Payday Loan Jan 8, 06:12 PM #payday loan online <a href=“https://payday.us.com”>payday loan</a> payday cash loan [url=https://payday.us.com]payday[/url]
— Loan Jan 8, 07:02 PM #earth science homework help <a href=“https://collegeessays.us.com”>buy college essays</a> college essay [url=https://collegeessays.us.com]buy essays[/url]
— English Essay Writer Jan 8, 08:23 PM #essay writing service <a href=“https://essaywritingservice.us.org”>paper writing service</a> writing my paper [url=https://essaywritingservice.us.org]essay writing service[/url]
— Writers Essay Jan 8, 08:47 PM #best cash advance loans online <a href=“https://directlenderpaydayloans.cricket”>payday loan direct lender</a> direct lender payday loans [url=https://directlenderpaydayloans.cricket]payday loan direct lender[/url] direct lender loans <a href=“https://thebestonlinepaydayloans.trade”>the best online payday loans</a> the best online payday loans [url=https://thebestonlinepaydayloans.trade]fast online payday loans[/url] illustration essay <a href=“https://illustrationessay.trade”>essay corrector</a> essay help [url=https://illustrationessay.trade]illustration essay[/url] a payday loan <a href=“https://moneyloan.trade”>money loan</a> money loan [url=https://moneyloan.trade]money loan[/url] webcam masturbation <a href=“https://webcammasturbation.stream”>webcam masturbation</a> webcam masturbation [url=https://webcammasturbation.stream]webcam masturbation[/url] cash advance lenders <a href=“https://cashadvancelenders.trade”>cash advance lenders</a> cash advance lenders [url=https://cashadvancelenders.trade]easy payday loans[/url] common application essay prompts <a href=“https://commonapplicationessayprompts.science”>homework help.com math</a> help on writing an essay [url=https://commonapplicationessayprompts.science]common application essay prompts[/url] research papers <a href=“https://researchpaperproposal.trade”>do my maths homework</a> research paper proposal [url=https://researchpaperproposal.trade]do my paper[/url] college essay writer <a href=“https://collegeessaywriter.bid”>spss assignment help</a> college essay writer [url=https://collegeessaywriter.bid]online essay[/url]
— JamesNip Jan 8, 09:10 PM #college essays <a href=“https://collegeessays.us.com”>website to write essays</a> college essay prompts [url=https://collegeessays.us.com]buy college essays[/url]
— Help With My Essay Jan 8, 09:56 PM #online chemistry homework <a href=“https://essay.us.org”>connect online homework</a> argument essay [url=https://essay.us.org]essay[/url]
— Essay Writings Jan 8, 10:02 PM #cash advance <a href=“https://cashadvance.us.org”>the best online payday loans</a> advance cash payday loan [url=https://cashadvance.us.org]payday advance loans[/url]
— Bad Credit Jan 8, 10:06 PM #payday loans direct lenders <a href=“https://loan.us.org”>loan</a> loan cash [url=https://loan.us.org]cash loans[/url]
— Online Payday Loans Jan 8, 11:56 PM #dissertation abstracts international online <a href=“https://argumentativeessay.us.com”>research paper heading</a> argumentative essays [url=https://argumentativeessay.us.com]argumentative essay[/url]
— Aa Seat Assignment Jan 9, 12:01 AM #writing my paper <a href=“https://essaywritingservice.us.org”>online assignment help</a> essay writing service [url=https://essaywritingservice.us.org]kinetic books online homework[/url]
— Random Assignments Jan 9, 01:44 AM #direct lenders payday loans <a href=“https://samedaypaydayloansonline.bid”>no credit check payday loans instant approval</a> same day payday loans online [url=https://samedaypaydayloansonline.bid]bad credit loans direct lenders[/url] buy essay online <a href=“https://buyessayonline.cricket”>buy essay online</a> buy essay online [url=https://buyessayonline.cricket]buy essay online[/url] essay writing <a href=“https://bestessaywritingservice.science”>best essay writing service</a> homework math help [url=https://bestessaywritingservice.science]paper writing[/url] online payday loans instant approval <a href=“https://badcreditpaydayloansdirectlenders.cricket”>short term loans direct lenders</a> bad credit payday loans direct lenders [url=https://badcreditpaydayloansdirectlenders.cricket]bad credit payday loans direct lenders[/url] research paper <a href=“https://collegepaper.trade”>college paper</a> college paper [url=https://collegepaper.trade]hart doing a literature review[/url] free nude cams <a href=“https://camsites.cricket”>webcam pussy</a> free sex cam chat [url=https://camsites.cricket]cam sites[/url] quick loans 100 approval <a href=“https://quickloans100approval.stream”>bad credit payday loans direct lenders</a> quick loans 100 approval [url=https://quickloans100approval.stream]no credit check payday loan[/url] slader homework help <a href=“https://collegeapplicationessay.bid”>college essay help</a> college essay help [url=https://collegeapplicationessay.bid]buy a essay[/url] term paper <a href=“https://writeapaper.stream”>write a paper</a> write a paper [url=https://writeapaper.stream]write a paper[/url] school papers <a href=“https://schoolpapers.cricket”>buy papers</a> school papers [url=https://schoolpapers.cricket]do my math class[/url]
— JamesNip Jan 9, 02:13 AM #best cash advance loans online <a href=“https://payday.us.com”>payday loan</a> payday loan [url=https://payday.us.com]direct lenders immediate payment loans[/url]
— Easy Payday Loan Jan 9, 02:34 AM #cash loans <a href=“https://cashadvance.us.org”>cash loans</a> direct payday lenders [url=https://cashadvance.us.org]loan cash[/url]
— Loans For Bad Credit Jan 9, 05:39 AM #college essays <a href=“https://collegeessays.us.com”>how to write an application essay</a> college essay prompts [url=https://collegeessays.us.com]contrast essay[/url]
— Write My Essay Cheap Jan 9, 06:26 AM #cash advance <a href=“https://cashadvance.us.org”>advance cash payday loan</a> loans with no credit check [url=https://cashadvance.us.org]cash advance[/url]
— Cash Advance Jan 9, 07:27 AM #online payday loan lender <a href=“https://quickloans100approval.stream”>best payday loans online</a> quick loans 100 approval [url=https://quickloans100approval.stream]short term loans direct lenders[/url] research papers <a href=“https://researchpaperproposal.trade”>assignment help review</a> research paper proposal [url=https://researchpaperproposal.trade]please do my homework[/url] online payday lenders <a href=“https://instantonlinepaydayloan.cricket”>instant online payday loan</a> fast payday loan [url=https://instantonlinepaydayloan.cricket]instant online payday loan[/url] paydayloans <a href=“https://easyonlinepaydayloans.bid”>easy online payday loans</a> easy online payday loans [url=https://easyonlinepaydayloans.bid]easy online payday loans[/url] college essay prompts <a href=“https://collegeessayprompts.trade”>write a research paper</a> college essay help [url=https://collegeessayprompts.trade]college essay prompts[/url]
— JamesNip Jan 9, 08:35 AM #easy loans <a href=“https://easyloans.webcam”>bad credit loans direct lenders</a> direct lender [url=https://easyloans.webcam]easy loans[/url] cash advance payday loan <a href=“https://badcreditpaydayloansdirectlenders.cricket”>bad credit payday loans direct lenders</a> payday cash loan [url=https://badcreditpaydayloansdirectlenders.cricket]bad credit payday loans direct lenders[/url] quick loans <a href=“https://quickloans.science”>easy approval payday loans</a> online payday advance [url=https://quickloans.science]quick loans[/url] buy an essay <a href=“https://illustrationessay.trade”>my.hrw.com homework help</a> algebra help [url=https://illustrationessay.trade]essay checker[/url] direct online lenders <a href=“https://advancepaydayloans.cricket”>advance payday loans</a> online payday loans [url=https://advancepaydayloans.cricket]online payday loans[/url] write my paper <a href=“https://writeapaper.stream”>professional essay writing help</a> write my paper for me [url=https://writeapaper.stream]help writing college essays[/url] small payday loans <a href=“https://directpaydayloanlenders.webcam”>quick loans</a> direct payday loan lenders [url=https://directpaydayloanlenders.webcam]direct payday loan lenders[/url] instant online payday loan <a href=“https://instantonlinepaydayloan.cricket”>online lenders</a> cash loans no credit check [url=https://instantonlinepaydayloan.cricket]instant online payday loan[/url]
— JamesNip Jan 9, 08:46 AM #essay writing <a href=“https://essaywritingservice.us.org”>essay writing service</a> writing my paper [url=https://essaywritingservice.us.org]writing my essay[/url]
— Buy Essay.Org Jan 9, 11:02 AM #research paper <a href=“https://researchpaper.us.com”>research report</a> research report [url=https://researchpaper.us.com]do my research paper[/url]
— Essay Writing Online Jan 9, 11:26 AM #cash advance <a href=“https://cashadvance.us.org”>emergency loan no credit check</a> cash loans [url=https://cashadvance.us.org]online payday loan lender[/url]
— Get A Loan Jan 9, 11:52 AM #essay writing <a href=“https://essaywritingservice.us.org”>essay writing service</a> writing my essay [url=https://essaywritingservice.us.org]essay writing service[/url]
— Write Essay Service Jan 9, 12:38 PM #direct lenders <a href=“https://payday.us.com”>short term payday loan</a> advance cash payday loan [url=https://payday.us.com]payday[/url]
— Online Loans Jan 9, 12:57 PM #payday loans online <a href=“https://loan.us.org”>loans</a> payday loans direct lender [url=https://loan.us.org]pay day loan[/url]
— Payday Loans Online Jan 9, 02:07 PM #payday loan companies <a href=“https://samedaypaydayloansonline.bid”>no credit check payday loan</a> advance payday loans [url=https://samedaypaydayloansonline.bid]same day payday loans online[/url] same day loans <a href=“https://paydaylendersdirect.webcam”>direct payday lenders online</a> no credit check payday loans [url=https://paydaylendersdirect.webcam]payday loans direct lenders[/url] webcam masturbation <a href=“https://webcammasturbation.stream”>webcam sluts</a> webcam masturbation [url=https://webcammasturbation.stream]webcam masturbation[/url] webcam slut <a href=“https://wifewebcam.cricket”>webcam slut</a> wife on webcam [url=https://wifewebcam.cricket]wife on webcam[/url] same day loan <a href=“https://paydayloansnocreditcheck.webcam”>payday loans for bad credit</a> payday loans no credit check [url=https://paydayloansnocreditcheck.webcam]instant online loans[/url] online payday loan <a href=“https://quickloans.trade”>quick loans</a> same day loans [url=https://quickloans.trade]online loans[/url] slut cams <a href=“https://chatsex.trade”>free sexy webcams</a> chat sex [url=https://chatsex.trade]chat sex[/url] easy approval payday loans <a href=“https://easyloans.webcam”>fastest payday loan</a> easy online payday loans [url=https://easyloans.webcam]easy online payday loans[/url] buy essay online <a href=“https://buyessayonline.cricket”>research papers</a> buy essay online [url=https://buyessayonline.cricket]essay online[/url]
— JamesNip Jan 9, 03:47 PM #essay writing <a href=“https://essay.us.org”>essay writer</a> essay [url=https://essay.us.org]essay writer[/url]
— Homework Center Jan 9, 04:37 PM #online payday lenders <a href=“https://quickloans.science”>loans online</a> loans [url=https://quickloans.science]cash loans[/url] online payday loans direct lenders <a href=“https://quickloans100approval.stream”>money lender no credit check</a> quick loans 100 approval [url=https://quickloans100approval.stream]online payday loans for bad credit[/url] easy payday loans online <a href=“https://easypaydayloansonline.science”>payday loan direct lender</a> a payday loan [url=https://easypaydayloansonline.science]easy online payday loans[/url] instant online payday loan <a href=“https://instantonlinepaydayloan.cricket”>instant online payday loan</a> instant online payday loan [url=https://instantonlinepaydayloan.cricket]instant online payday loan[/url]
— JamesNip Jan 9, 04:48 PM #fastest payday loan <a href=“https://cashadvance.us.org”>best payday loans</a> fast loans no credit check [url=https://cashadvance.us.org]online payday advance[/url]
— Online Payday Loan Jan 9, 05:17 PM #contrast essay <a href=“https://collegeessays.us.com”>college essays</a> buy college essays [url=https://collegeessays.us.com]school papers[/url]
— Buy Cheap Essay Jan 9, 07:07 PM #loans online <a href=“https://loan.us.org”>cash loans</a> payday loans on line [url=https://loan.us.org]paydayloans[/url]
— Online Payday Loan Jan 9, 07:29 PM #essay writing service <a href=“https://essaywritingservice.us.org”>essay writing service</a> writing my paper [url=https://essaywritingservice.us.org]writing my paper[/url]
— School Assignments Jan 9, 07:34 PM #fast payday loan <a href=“https://payday.us.com”>a payday loan</a> payday [url=https://payday.us.com]payday advance loan[/url]
— Bad Credit Jan 9, 07:55 PM #college paper <a href=“https://collegepaper.trade”>research paper for sale</a> college paper [url=https://collegepaper.trade]managerial accounting assignment help[/url] essay helper <a href=“https://essayprompts.cricket”>buy essay now</a> homework help tudors [url=https://essayprompts.cricket]essay prompts[/url] direct loans <a href=“https://quickloans100approval.stream”>instant loans online</a> payday loans direct lenders [url=https://quickloans100approval.stream]quick loans 100 approval[/url]
— JamesNip Jan 9, 09:14 PM #research paper <a href=“https://researchpaper.us.com”>writing a paper</a> research paper [url=https://researchpaper.us.com]research paper[/url]
— Essays Jan 9, 10:23 PM #car insurance <a href=“https://carinsurance.us.org”>compare auto insurance quotes</a> compare auto insurance rates [url=https://carinsurance.us.org]car insurance[/url]
— costco car insurance Jan 9, 11:33 PM #psychology assignment help <a href=“https://writeapaper.stream”>write a paper</a> term paper [url=https://writeapaper.stream]write a paper[/url] quick loans <a href=“https://quickloans.science”>quick loans 100 approval</a> online cash advance [url=https://quickloans.science]loans[/url] college paper <a href=“https://collegepaper.trade”>best college application essay</a> college paper [url=https://collegepaper.trade]research paper[/url] direct payday loan lenders <a href=“https://directpaydayloanlenders.webcam”>direct payday loan lenders</a> payday lenders direct [url=https://directpaydayloanlenders.webcam]payday loan direct lenders[/url] cash loan lenders <a href=“https://onlineloansdirectlenders.stream”>online payday loans direct lenders</a> quick cash loan [url=https://onlineloansdirectlenders.stream]direct payday lenders bad credit[/url] argument essay <a href=“https://collegeessayprompts.trade”>finance dissertation help</a> argument essay [url=https://collegeessayprompts.trade]college essay help[/url] webcam sluts <a href=“https://webcammasturbation.stream”>dildo show</a> webcam masturbation [url=https://webcammasturbation.stream]webcam dildo[/url]
— JamesNip Jan 9, 11:43 PM #cheap liability insurance in texas <a href=“https://carinsurance.us.org”>car insurance</a> compare auto insurance rates [url=https://carinsurance.us.org]compare auto insurance[/url]
— autoinsurance Jan 10, 12:43 AM #auto insurance quotes comparison online <a href=“https://comparecarinsurance.us.com”>auto insurance quotes comparison</a> infinity car insurance [url=https://comparecarinsurance.us.com]cheapest car insurance quotes comparison[/url]
— insurance companies Jan 10, 01:18 AM #auto insurance quotes <a href=“https://autoinsurancequotes.us.com”>car insurance quotes</a> auto insurance quotes [url=https://autoinsurancequotes.us.com]direct car insurance[/url]
— allstate Jan 10, 01:25 AM #payday loan direct lenders <a href=“https://paydaylendersdirect.webcam”>payday lenders direct</a> payday lenders direct [url=https://paydaylendersdirect.webcam]payday loans direct lenders[/url] cmp.org homework help <a href=“https://bestessaywritingservice.science”>best essay writing service</a> writing my essay [url=https://bestessaywritingservice.science]essay writer website[/url] small payday loans <a href=“https://smallpaydayloans.bid”>instant loans online</a> best payday loans [url=https://smallpaydayloans.bid]small payday loans[/url] free sex cam <a href=“https://camsites.cricket”>cam sites</a> cam online [url=https://camsites.cricket]adult video chat[/url]
— JamesNip Jan 10, 02:11 AM #cheapest car insurance <a href=“https://carinsurance.us.org”>cheap car insurance quotes</a> car insurance [url=https://carinsurance.us.org]car insurance[/url]
— best auto insurance Jan 10, 02:23 AM #research paper <a href=“https://researchpaper.us.com”>research paper</a> paper writing service [url=https://researchpaper.us.com]research report[/url]
— Paper Writer Free Jan 10, 03:01 AM #compare car insurance <a href=“https://carinsurance.us.org”>car insurance</a> compare auto insurance quotes [url=https://carinsurance.us.org]compare car insurance quotes[/url]
— car insurance Jan 10, 05:05 AM #car insurance quotes comparison <a href=“https://comparecarinsurance.us.com”>compare auto insurance</a> compare car insurance [url=https://comparecarinsurance.us.com]infinity car insurance[/url]
— state auto insurance Jan 10, 05:20 AM #car insurance <a href=“https://carinsurance.us.org”>compare auto insurance</a> state farm car insurance quote [url=https://carinsurance.us.org]car insurance[/url]
— safeauto insurance Jan 10, 05:30 AM #list of car insurance companies <a href=“https://carinsurance.us.org”>cheap car insurance</a> compare auto insurance [url=https://carinsurance.us.org]compare car insurance quotes[/url]
— best car insurance Jan 10, 05:54 AM #homework help online chat <a href=“https://essay.us.org”>essay</a> college essay prompts [url=https://essay.us.org]essay[/url]
— Homework Center Jan 10, 05:59 AM #payday bad credit loan <a href=“https://paydaybadcreditloan.bid”>payday bad credit loan</a> payday loans for bad credit [url=https://paydaybadcreditloan.bid]payday loans for bad credit[/url] college essay help <a href=“https://collegeapplicationessay.bid”>college application essay</a> someone do my homework for me [url=https://collegeapplicationessay.bid]best dissertation writing services[/url] research report <a href=“https://researchwriting.stream”>psychology essays</a> research writing [url=https://researchwriting.stream]illustration essay[/url] easy payday loans online <a href=“https://easypaydayloansonline.science”>best payday loans online</a> easy payday loans online [url=https://easypaydayloansonline.science]easy payday loans online[/url] free chat rooms <a href=“https://freechatrooms.webcam”>free chat rooms</a> free chat rooms [url=https://freechatrooms.webcam]free adult chat[/url] easy payday loans online <a href=“https://quickloans100approval.stream”>internet payday loans</a> quick loans 100 approval [url=https://quickloans100approval.stream]quick loans 100 approval[/url]
— JamesNip Jan 10, 07:08 AM #research paper <a href=“https://researchpaper.us.com”>research paper</a> research paper [url=https://researchpaper.us.com]expert assignment help[/url]
— Buy Essay Cheap Jan 10, 08:52 AM #cheapest car insurance quotes comparison <a href=“https://comparecarinsurance.us.com”>cheapest car insurance quotes comparison</a> compare car insurance [url=https://comparecarinsurance.us.com]cheapest car insurance quotes comparison[/url]
— progressive auto ins Jan 10, 09:12 AM #car insurance <a href=“https://carinsurance.us.org”>car insurance</a> car insurance [url=https://carinsurance.us.org]liberty car insurance[/url]
— insurance auto Jan 10, 09:33 AM #compare car insurance rates <a href=“https://carinsurance.us.org”>compare car insurance rates</a> car insurance [url=https://carinsurance.us.org]cheap car insurance in florida[/url]
— affordable insurance Jan 10, 10:40 AM #compare car insurance <a href=“https://comparecarinsurance.us.com”>compare car insurance</a> state farm auto insurance quote [url=https://comparecarinsurance.us.com]autoownersinsurance.com[/url]
— autoowners insurance Jan 10, 11:16 AM #compare car insurance <a href=“https://comparecarinsurance.us.com”>comprehensive car insurance comparison</a> compare car insurance [url=https://comparecarinsurance.us.com]compare car insurance[/url]
— autoinsurance Jan 10, 11:26 AM #loans <a href=“https://directlenderpaydayloans.cricket”>payday loan direct lender</a> payday loan direct lender [url=https://directlenderpaydayloans.cricket]direct lender payday loans[/url] payday lenders direct <a href=“https://paydaylendersdirect.webcam”>payday lenders direct</a> payday lenders direct [url=https://paydaylendersdirect.webcam]bad credit payday loans[/url] instant online loans <a href=“https://instantonlinepaydayloan.cricket”>cash til payday loan</a> direct online lenders [url=https://instantonlinepaydayloan.cricket]speedy cash[/url] cash advance loan <a href=“https://cashadvanceloan.bid”>cash advance loan</a> online payday advance loan [url=https://cashadvanceloan.bid]pay day lenders[/url] quick loans <a href=“https://quickloans.science”>15 minute loans direct lenders</a> cash loans [url=https://quickloans.science]quick loans 100 approval[/url] advance payday loans <a href=“https://advancepaydayloans.cricket”>payday advance loan</a> payday advance [url=https://advancepaydayloans.cricket]payday cash advance loan[/url] payday cash advance loan <a href=“https://paydaybadcreditloan.bid”>online payday advance</a> payday loans bad credit [url=https://paydaybadcreditloan.bid]payday bad credit loan[/url] online payday loans <a href=“https://easyonlinepaydayloans.bid”>easy online payday loans</a> easy online payday loans [url=https://easyonlinepaydayloans.bid]easy online payday loans[/url] quick loans <a href=“https://quickloans.trade”>payday loans</a> online payday loans instant approval [url=https://quickloans.trade]loans[/url] quick loans 100 approval <a href=“https://quickloans100approval.stream”>no credit loans guaranteed approval</a> quick loans 100 approval [url=https://quickloans100approval.stream]direct lenders immediate payment loans[/url]
— JamesNip Jan 10, 11:55 AM #car insurance quotes california <a href=“https://autoinsurancequotes.us.com”>auto insurance quotes texas</a> state auto insurance company [url=https://autoinsurancequotes.us.com]auto insurance quotes[/url]
— safe auto insurance Jan 10, 12:03 PM #college essays <a href=“https://collegeessays.us.com”>college essay</a> college essay prompts [url=https://collegeessays.us.com]college essay prompts[/url]
— Online Essay Writing Jan 10, 12:59 PM #writing my essay for me <a href=“https://essaywritingservice.us.org”>science homework help ks3</a> math homework doer [url=https://essaywritingservice.us.org]essay writing service[/url]
— Dissertation Online Jan 10, 01:43 PM #car insurance <a href=“https://carinsurance.us.org”>cheap car insurance quotes</a> compare car insurance quotes [url=https://carinsurance.us.org]compare auto insurance quotes[/url]
— rental car insurance Jan 10, 01:57 PM #writing a paper <a href=“https://researchpaper.us.com”>research report</a> math homework helpers [url=https://researchpaper.us.com]research report[/url]
— Writing Online Jan 10, 02:29 PM #compare car insurance rates <a href=“https://comparecarinsurance.us.com”>compare car insurance</a> compare car insurance [url=https://comparecarinsurance.us.com]full coverage auto insurance[/url]
— vehicle insurance Jan 10, 02:36 PM #college essays <a href=“https://collegeessays.us.com”>college essay prompts</a> english homework helper [url=https://collegeessays.us.com]college essay[/url]
— Write Essay Service Jan 10, 02:50 PM #instant payday loans <a href=“https://instantpaydayloans.webcam”>instant online loans</a> bad credit [url=https://instantpaydayloans.webcam]instant payday loans[/url] good college essays <a href=“https://goodcollegeessays.science”>buy essays</a> college essay help [url=https://goodcollegeessays.science]i need help with my assignment[/url] best payday loan online <a href=“https://bestpaydayloan.stream”>best payday loan online</a> best payday loan online [url=https://bestpaydayloan.stream]best payday loan online[/url]
— JamesNip Jan 10, 03:21 PM #car insurance quotes florida <a href=“https://carinsurance.us.org”>car insurance</a> compare auto insurance [url=https://carinsurance.us.org]compare car insurance[/url]
— amica auto insurance Jan 10, 03:25 PM #loans online <a href=“https://loan.us.org”>payday loans</a> best cash loan [url=https://loan.us.org]payday loans online[/url]
— Pay Day Loans Jan 10, 03:26 PM #college essays <a href=“https://collegeessays.us.com”>buy essays</a> i need help with my assignment [url=https://collegeessays.us.com]dissertation writer[/url]
— Assignments Help Jan 10, 03:38 PM #payday loans bad credit <a href=“https://cashadvance.us.org”>cash advance</a> direct payday lenders online [url=https://cashadvance.us.org]cash advance[/url]
— Loan Cash Jan 10, 05:08 PM #research papers <a href=“https://researchpaper.us.com”>research paper</a> research papers [url=https://researchpaper.us.com]research report[/url]
— My Thesis Jan 10, 06:38 PM #top car insurance companies <a href=“https://carinsurance.us.org”>car insurance</a> auto insurance companies in florida [url=https://carinsurance.us.org]aaa auto insurance quote[/url]
— aaa auto insurance Jan 10, 06:50 PM #general auto insurance quotes <a href=“https://autoinsurancequotes.us.com”>hagerty classic car insurance</a> online car insurance quote [url=https://autoinsurancequotes.us.com]online car insurance quote[/url]
— vehicle insurance Jan 10, 07:45 PM #research paper <a href=“https://researchpaper.us.com”>research essay</a> research paper [url=https://researchpaper.us.com]research paper[/url]
— Help With My Essay Jan 10, 08:04 PM #college essays <a href=“https://collegeessays.us.com”>buy college essays</a> college essays [url=https://collegeessays.us.com]college essay prompts[/url]
— Writing Essay Online Jan 10, 08:08 PM #compare car insurance <a href=“https://comparecarinsurance.us.com”>aarp insurance auto</a> car insurance quotes comparison online [url=https://comparecarinsurance.us.com]auto insurance quotes comparison[/url]
— low car insurance Jan 10, 09:03 PM #auto insurance quotes <a href=“https://autoinsurancequotes.us.com”>auto insurance quotes</a> auto insurance quotes [url=https://autoinsurancequotes.us.com]online auto insurance quotes[/url]
— autoinsurance Jan 10, 09:28 PM #best pay day loans <a href=“https://guaranteedpaydayloans.webcam”>guaranteed payday loans</a> easy payday loans [url=https://guaranteedpaydayloans.webcam]advance payday loans[/url] spotloan <a href=“https://paydaylendersdirect.webcam”>payday loans direct lenders</a> payday lenders direct [url=https://paydaylendersdirect.webcam]payday loans direct lenders[/url] project management assignment help <a href=“https://commonapplicationessayprompts.science”>homework solutions online</a> primary homework help victorians [url=https://commonapplicationessayprompts.science]buy essay australia[/url] bad credit payday loans direct lenders <a href=“https://badcreditpaydayloansdirectlenders.cricket”>payday advance loans</a> no credit check payday loans [url=https://badcreditpaydayloansdirectlenders.cricket]bad credit payday loans direct lenders[/url]
— JamesNip Jan 10, 11:06 PM #compare car insurance rates <a href=“https://carinsurance.us.org”>compare car insurance</a> car insurance [url=https://carinsurance.us.org]compare auto insurance rates[/url]
— auto club insurance Jan 10, 11:09 PM #car insurance <a href=“https://carinsurance.us.org”>compare car insurance quotes</a> auto insurance near me [url=https://carinsurance.us.org]cheapest car insurance[/url]
— rental car insurance Jan 10, 11:13 PM #loan <a href=“https://loan.us.org”>loan</a> loan [url=https://loan.us.org]get a loan[/url]
— Loans Online Jan 11, 12:30 AM #car insurance quotes <a href=“https://carinsurance.us.org”>compare car insurance</a> cheap auto insurance [url=https://carinsurance.us.org]motorcycle insurance quotes online[/url]
— cheap insurance Jan 11, 01:33 AM #cheap car insurance in georgia <a href=“https://autoinsurancequotes.us.com”>car insurance quotes texas</a> auto insurance quotes [url=https://autoinsurancequotes.us.com]online auto insurance quotes[/url]
— accurate automotive Jan 11, 01:39 AM #common application essay prompts <a href=“https://commonapplicationessayprompts.science”>homework helper</a> helping with homework [url=https://commonapplicationessayprompts.science]common application essay prompts[/url] homework help english <a href=“https://schoolpapers.cricket”>dissertation online</a> research papers [url=https://schoolpapers.cricket]research papers[/url] instant online payday loan <a href=“https://instantonlinepaydayloan.cricket”>cash til payday loan</a> instant online payday loan [url=https://instantonlinepaydayloan.cricket]speedy cash payday loans online[/url] buy essay online <a href=“https://buyessayonline.cricket”>buy essay online</a> buy essay online [url=https://buyessayonline.cricket]buy essay online[/url] homework help phone number <a href=“https://schoolpapers.trade”>school papers</a> essay corrector [url=https://schoolpapers.trade]school papers[/url] quick loans 100 approval <a href=“https://quickloans100approval.stream”>paydayloans online</a> quick loans 100 approval [url=https://quickloans100approval.stream]loans online bad credit[/url] argument essay <a href=“https://collegeessayprompts.trade”>college essay prompts</a> college essay prompts [url=https://collegeessayprompts.trade]college essay prompts[/url] payday loans for bad credit <a href=“https://paydaybadcreditloan.bid”>bad credit payday loans</a> payday bad credit loan [url=https://paydaybadcreditloan.bid]payday loans for bad credit[/url] homework math help <a href=“https://bestessaywritingservice.science”>essay writing service</a> essay writing service [url=https://bestessaywritingservice.science]need assignment help[/url]
— JamesNip Jan 11, 02:40 AM #safeauto insurance quote <a href=“https://carinsurance.us.org”>car insurance</a> classic car insurance [url=https://carinsurance.us.org]compare car insurance quotes[/url]
— erie auto insurance Jan 11, 03:10 AM #college essay <a href=“https://collegeessays.us.com”>college essay</a> buy college essays [url=https://collegeessays.us.com]college essay help[/url]
— My Essay Writing Jan 11, 05:19 AM #buy college essays <a href=“https://collegeessays.us.com”>university homework help</a> college essays [url=https://collegeessays.us.com]college essay prompts[/url]
— Online Essay Writing Jan 11, 06:19 AM #guaranteed payday loans <a href=“https://cashadvance.us.org”>cash advance</a> payday advance loans [url=https://cashadvance.us.org]loan cash[/url]
— Getting A Loan Jan 11, 06:53 AM #auto ins <a href=“https://carinsurance.us.org”>car insurance</a> compare car insurance rates [url=https://carinsurance.us.org]car insurance[/url]
— insurance rates Jan 11, 07:01 AM #farm bureau auto insurance <a href=“https://carinsurance.us.org”>car insurance</a> compare auto insurance rates [url=https://carinsurance.us.org]car insurance calculator[/url]
— car insurance prices Jan 11, 07:40 AM #pay someone to do my math homework <a href=“https://researchpaperproposal.trade”>research paper</a> research essay [url=https://researchpaperproposal.trade]pay people to do your homework[/url] payday loans no credit check <a href=“https://paydayloansnocreditcheck.webcam”>payday loans no credit check</a> payday loans for bad credit [url=https://paydayloansnocreditcheck.webcam]payday loans no credit check[/url] online payday loans for bad credit <a href=“https://paydayloansforbadcredit.stream”>bad credit payday loans</a> best payday loans online [url=https://paydayloansforbadcredit.stream]no credit check payday loan[/url] free webcam sex chat <a href=“https://freewebcamsex.stream”>free webcam sex chat</a> free webcam sex [url=https://freewebcamsex.stream]free webcam sex chat[/url] college essays <a href=“https://collegepaper.trade”>how to write college essay</a> economic homework help [url=https://collegepaper.trade]college paper[/url] 10 top loan companies <a href=“https://cashadvancelenders.trade”>payday advance online</a> direct lenders of loans [url=https://cashadvancelenders.trade]cash advance loan[/url] payday loan <a href=“https://quickloans.trade”>cash loans</a> quick loans [url=https://quickloans.trade]quick loans 100 approval[/url]
— JamesNip Jan 11, 07:55 AM #car insurance quotes california <a href=“https://autoinsurancequotes.us.com”>state auto insurance</a> auto insurance quotes comparison [url=https://autoinsurancequotes.us.com]car insurance quotes texas[/url]
— auto club insurance Jan 11, 08:36 AM #easy online payday loans <a href=“https://easyonlinepaydayloans.bid”>easy online payday loans</a> same day loans [url=https://easyonlinepaydayloans.bid]small loans no credit check[/url] free sex chat <a href=“https://chatsex.bid”>free sex chat</a> free sex chat [url=https://chatsex.bid]sex chat[/url] cam sites <a href=“https://camsites.cricket”>erotic chat rooms</a> cam sites [url=https://camsites.cricket]cam sites[/url] loan cash <a href=“https://cashadvanceloan.bid”>instant payday loans</a> cash advance loan [url=https://cashadvanceloan.bid]cash advance loan[/url] homework help maths <a href=“https://collegeapplicationessay.bid”>do your own homework</a> civil engineering assignment help [url=https://collegeapplicationessay.bid]college essay help[/url]
— JamesNip Jan 11, 08:58 AM #research report <a href=“https://researchpaper.us.com”>do my research paper</a> research paper [url=https://researchpaper.us.com]research essay[/url]
— Define Assignments Jan 11, 09:24 AM #argument essays <a href=“https://argumentativeessay.us.com”>argumentative essay</a> essay writing [url=https://argumentativeessay.us.com]argumentative essay[/url]
— Homework Help Online Jan 11, 09:29 AM #online car insurance quotes <a href=“https://comparecarinsurance.us.com”>insurance for cars</a> online car insurance quotes [url=https://comparecarinsurance.us.com]compare car insurance[/url]
— nj auto insurance Jan 11, 09:57 AM #fast cash loans with no credit check <a href=“https://loan.us.org”>get a loan</a> loan [url=https://loan.us.org]loan[/url]
— JaneNip Jan 11, 10:08 AM #sex chat <a href=“https://chatsex.trade”>sex chat</a> sex chat [url=https://chatsex.trade]sex chat[/url] direct payday loan lenders <a href=“https://samedaypaydayloansonline.bid”>same day payday loans online</a> direct lenders [url=https://samedaypaydayloansonline.bid]same day payday loans online[/url] illustration essay <a href=“https://illustrationessay.trade”>illustration essay</a> buy an essay [url=https://illustrationessay.trade]illustration essay[/url] easy online payday loans <a href=“https://easyonlinepaydayloans.bid”>easy online payday loans</a> direct lenders payday loans [url=https://easyonlinepaydayloans.bid]online installment loans[/url] cam sites <a href=“https://camsites.cricket”>free live sex chat</a> free live sex chat [url=https://camsites.cricket]cam sites[/url] online loans direct lenders <a href=“https://onlineloansdirectlenders.stream”>direct lenders online loans</a> online loans direct lenders [url=https://onlineloansdirectlenders.stream]paydayloan[/url]
— JamesNip Jan 11, 10:34 AM #paper writing <a href=“https://argumentativeessay.us.com”>argument essay</a> argument essays [url=https://argumentativeessay.us.com]college paper writing service[/url]
— Buying Essays Online Jan 11, 10:39 AM #earth science homework help <a href=“https://schoolpapers.trade”>do my history homework</a> school papers [url=https://schoolpapers.trade]online essay[/url] research essay <a href=“https://essayprompts.cricket”>best homework help sites</a> essay prompts [url=https://essayprompts.cricket]essay prompts[/url] writing my essay <a href=“https://essaywriting.trade”>apply texas essay prompts</a> writing my essay [url=https://essaywriting.trade]i have to do my homework[/url]
— JamesNip Jan 11, 11:56 AM #cheap auto insurance quotes <a href=“https://autoinsurancequotes.us.com”>auto insurance quotes</a> auto insurance quotes [url=https://autoinsurancequotes.us.com]auto insurance quotes[/url]
— e insurance auto Jan 11, 12:39 PM #same day payday loans online <a href=“https://samedaypaydayloansonline.cricket”>online payday loans for bad credit</a> same day payday loans online [url=https://samedaypaydayloansonline.cricket]payday loan direct lender[/url] payday loan near me <a href=“https://fastestpaydayloan.bid”>online payday loan</a> no credit check payday loans [url=https://fastestpaydayloan.bid]easy payday loan[/url] quick loans 100 approval <a href=“https://quickloans.cricket”>same day payday loans online</a> quick loans [url=https://quickloans.cricket]cash loans[/url] online phd no dissertation <a href=“https://criticalessay.trade”>argument essay</a> term papers online [url=https://criticalessay.trade]critical essay[/url]
— PamNip Jan 11, 12:40 PM #research paper <a href=“https://researchpaper.us.com”>doing your homework</a> writing a paper [url=https://researchpaper.us.com]homework help for math[/url]
— Essay Online Jan 11, 12:48 PM #same day loan <a href=“https://payday.us.com”>payday cash loan</a> payday [url=https://payday.us.com]easiest payday loan to get[/url]
— Get A Loan Jan 11, 01:10 PM #compare auto insurance rates <a href=“https://comparecarinsurance.us.com”>nationwide</a> compare car insurance [url=https://comparecarinsurance.us.com]access auto insurance[/url]
— carinsurance Jan 11, 01:12 PM #personal loans bad credit texas <a href=https://badcreditpersonalloans.us.com>payday loans bad credit today</a> payday loans bad credit [url=https://badcreditpersonalloans.us.com]small personal loans bad credit[/url]
— JaneNip Jan 11, 01:42 PM #car insurance <a href=“https://carinsurance.us.org”>esurance auto insurance</a> antique car insurance [url=https://carinsurance.us.org]cheap car insurance[/url]
— auto owners ins Jan 11, 01:52 PM #loan <a href=“https://loan.us.org”>loan</a> loans with no credit check [url=https://loan.us.org]payday express[/url]
— Payday Loans Online Jan 11, 02:02 PM #cash advance <a href=“https://cashadvance.us.org”>loan cash</a> bad credit [url=https://cashadvance.us.org]payday advance[/url]
— Online Lenders Jan 11, 02:14 PM #compare auto insurance rates <a href=“https://carinsurance.us.org”>compare car insurance quotes</a> car insurance [url=https://carinsurance.us.org]cheap car insurance[/url]
— auto insurance rates Jan 11, 02:38 PM #help writing essays for college <a href=“https://essay.us.org”>essay</a> essay writing [url=https://essay.us.org]college essay prompts[/url]
— School Assignments Jan 11, 02:44 PM #essay <a href=“https://essay.us.org”>essay</a> online homework calendar [url=https://essay.us.org]essay writing[/url]
— Write Essays Jan 11, 02:47 PM #online loans direct lenders <a href=“https://cashadvance.us.org”>payday advance loans</a> loans online bad credit [url=https://cashadvance.us.org]loan cash[/url]
— JaneNip Jan 11, 03:02 PM #college essay prompts <a href=“https://collegepaper.cricket”>college paper</a> pay to do my assignment [url=https://collegepaper.cricket]research paper[/url] same day payday loans online <a href=“https://samedaypaydayloansonline.cricket”>bad credit payday loans</a> payday loans online direct lender [url=https://samedaypaydayloansonline.cricket]online payday loans direct lenders[/url] online payday loan lender <a href=“https://paydayloandirectlender.webcam”>payday loan direct lender</a> best cash advance loans online [url=https://paydayloandirectlender.webcam]direct lender payday loans[/url] payday loans direct lenders <a href=“https://paydayloanslenders.stream”>quick loan</a> loans with no credit check [url=https://paydayloanslenders.stream]payday loans lenders[/url] quick loans <a href=“https://quickloans.cricket”>quick loans</a> quick loan [url=https://quickloans.cricket]quick loans 100 approval[/url] school papers <a href=“https://schoolpapers.science”>school papers</a> research papers [url=https://schoolpapers.science]research essay[/url] online payday loan lender <a href=“https://onlinepaydayloaninstantapproval.loan”>online payday loan lenders</a> online pay day loans [url=https://onlinepaydayloaninstantapproval.loan]instant online payday loan[/url]
— JamesNip Jan 11, 03:05 PM #kinetic books online homework <a href=“https://essaywritingservice.us.org”>paper write</a> buy a research paper for college [url=https://essaywritingservice.us.org]essay writing[/url]
— Aa Seat Assignment Jan 11, 03:25 PM #do my math course <a href=“https://schoolpapers.science”>school papers</a> do my math homework for me [url=https://schoolpapers.science]homework assignments online[/url] college essay help <a href=“https://collegeessayhelp.cricket”>college essay help</a> college essay help [url=https://collegeessayhelp.cricket]college essay help[/url] best payday loan <a href=“https://bestpaydayloan.cricket”>best payday loan</a> best payday loans [url=https://bestpaydayloan.cricket]best payday loan[/url] pay day loan <a href=“https://samedaypaydayloansonline.cricket”>same day payday loans online</a> no credit check lenders only [url=https://samedaypaydayloansonline.cricket]easy approval payday loans[/url] webcam amateur <a href=“https://webcampussy.webcam”>webcam pussy</a> webcam pussy [url=https://webcampussy.webcam]webcam pussy[/url] 15 minute loans direct lenders <a href=“https://paydayloandirectlender.webcam”>payday loans direct lenders</a> payday loan direct lender [url=https://paydayloandirectlender.webcam]direct lenders payday loans[/url] writing a paper <a href=“https://paperwriting.webcam”>research paper</a> term paper [url=https://paperwriting.webcam]persuasive writing homework[/url]
— PamNip Jan 11, 04:26 PM #loan <a href=“https://loan.us.org”>online loans</a> loan [url=https://loan.us.org]payday loans online[/url]
— Payday Express Jan 11, 05:14 PM #getting a loan <a href=“https://cashadvance.us.org”>advance cash payday loan</a> payday loan direct lenders [url=https://cashadvance.us.org]cash advance[/url]
— Money Loan Jan 11, 05:26 PM #advance cash payday loan <a href=“https://payday.us.com”>payday</a> direct lenders [url=https://payday.us.com]payday advance online[/url]
— Payday Loans Jan 11, 05:36 PM #payday <a href=“https://payday.us.com”>a payday loan</a> payday [url=https://payday.us.com]no credit check loan[/url]
— JaneNip Jan 11, 05:59 PM #quick loans <a href=“https://quickloans.cricket”>cash til payday loan</a> quick loans [url=https://quickloans.cricket]short term payday loan[/url] best online payday loans <a href=“https://thebestonlinepaydayloans.loan”>best payday loans online</a> online loans [url=https://thebestonlinepaydayloans.loan]the best online payday loans[/url] sex chat free <a href=“https://sexchat.cricket”>sex chat</a> free bbw cams [url=https://sexchat.cricket]sex chat[/url] write essay <a href=“https://criticalessay.trade”>argument essay</a> critical essay [url=https://criticalessay.trade]writing a historical research paper[/url] online installment loans <a href=“https://samedayloans.cricket”>same day loans</a> same day loans [url=https://samedayloans.cricket]online payday loans for bad credit[/url] online payday loan application <a href=“https://onlinepaydayloanlender.loan”>online payday loan lender</a> cash loan lenders [url=https://onlinepaydayloanlender.loan]best payday loan online[/url] free webcam sex <a href=“https://freesexwebcam.webcam”>free webcam sex</a> naked cam [url=https://freesexwebcam.webcam]free webcam sex[/url] instant payday loans <a href=“https://instantpaydayloans.webcam”>instant online loans</a> instant online loans [url=https://instantpaydayloans.webcam]payday loan direct lender[/url] college essay help <a href=“https://collegeessayhelp.cricket”>homework help egypt</a> dissertation abstracts international online [url=https://collegeessayhelp.cricket]college essay help[/url]
— PamNip Jan 11, 06:57 PM #essay writing <a href=“https://essaywritingservice.us.org”>maths homework online</a> maths homework online [url=https://essaywritingservice.us.org]paper writing service[/url]
— Fake Essay Writer Jan 11, 07:27 PM #auto insurance quotes comparison <a href=“https://comparecarinsurance.us.com”>auto insurance near me</a> compare car insurance [url=https://comparecarinsurance.us.com]compare car insurance[/url]
— cheap insurance auto Jan 11, 07:42 PM #payday <a href=“https://payday.us.com”>best cash loans online</a> easy approval payday loans [url=https://payday.us.com]payday[/url]
— Pay Day Loans Jan 11, 07:56 PM #essays papers <a href=“https://essaywritingservice.us.org”>write my assignment for me</a> college essay writer [url=https://essaywritingservice.us.org]buy a research paper for college[/url]
— Best Essay Writer Jan 11, 07:58 PM #top rated auto insurance companies <a href=“https://comparecarinsurance.us.com”>motorcycle insurance quote</a> compare auto insurance [url=https://comparecarinsurance.us.com]compare car insurance[/url]
— car insurance cheap Jan 11, 08:23 PM #payday <a href=“https://payday.us.com”>payday cash loan</a> payday loan [url=https://payday.us.com]best cash loans online[/url]
— Payday Loan Online Jan 11, 10:09 PM #bad credit <a href=“https://payday.us.com”>quick loan</a> no credit check loan [url=https://payday.us.com]payday advance loan[/url]
— Personal Loans Jan 11, 10:23 PM #same day payday loans online <a href=“https://samedaypaydayloansonline.cricket”>loans online no credit check</a> same day payday loans online [url=https://samedaypaydayloansonline.cricket]same day payday loans online[/url] best payday loan online <a href=“https://bestpaydayloan.stream”>cash til payday loan</a> best payday loan online [url=https://bestpaydayloan.stream]online payday loan[/url] best payday loan <a href=“https://bestpaydayloan.cricket”>best payday loan</a> direct lenders payday loans [url=https://bestpaydayloan.cricket]best payday loans[/url] website that writes essay for you <a href=“https://bestessaywritingservice.cricket”>best essay writing service</a> best essay writing service [url=https://bestessaywritingservice.cricket]best essay writing service[/url] math help homework <a href=“https://researchessay.cricket”>how to write research papers</a> pay people to do homework [url=https://researchessay.cricket]research paper on eating disorders[/url] help with finance homework <a href=“https://buyessayonline.stream”>buy essay online</a> online essay [url=https://buyessayonline.stream]essay online[/url] easy loans <a href=“https://cashadvanceloan.science”>cash advance loan</a> small payday loans [url=https://cashadvanceloan.science]online pay day loans[/url]
— PamNip Jan 11, 10:37 PM #research writing <a href=“https://researchwriting.webcam”>university of texas online homework</a> research report [url=https://researchwriting.webcam]college essay help online[/url] quick loans <a href=“https://quickloans.cricket”>quick loans 100 approval</a> cash loans [url=https://quickloans.cricket]best payday loans[/url] paper writing service <a href=“https://bestessaywritingservice.cricket”>best essay writing service</a> best essay writing service [url=https://bestessaywritingservice.cricket]essay writing service[/url] payday loans lenders <a href=“https://paydayloanslenders.stream”>direct lenders payday loans</a> direct lenders payday loans [url=https://paydayloanslenders.stream]payday lenders direct[/url] college paper <a href=“https://collegepaper.cricket”>homework help chemistry</a> college essay prompts [url=https://collegepaper.cricket]websites for essays[/url] sex chat <a href=“https://sexchat.cricket”>sex chat</a> sex chat [url=https://sexchat.cricket]webcam sex chat[/url] easy online payday loans <a href=“https://easyonlinepaydayloans.science”>fast online payday loans</a> easy payday loans online [url=https://easyonlinepaydayloans.science]easy online payday loans[/url] payday loans <a href=“https://shorttermloansdirectlenders.webcam”>best cash loan</a> short term loans direct lenders [url=https://shorttermloansdirectlenders.webcam]online payday loans direct lenders[/url]
— JamesNip Jan 11, 10:47 PM #argumentative essay help <a href=“https://argumentativeessay.us.com”>paper writing</a> paper writing [url=https://argumentativeessay.us.com]website writes essays for you[/url]
— Custom Essays Jan 11, 11:14 PM #college essay prompts <a href=“https://collegeessays.us.com”>buy essays</a> college essay prompts [url=https://collegeessays.us.com]math homework helpers[/url]
— Essay Online Jan 11, 11:14 PM #compare car insurance <a href=“https://comparecarinsurance.us.com”>auto ins</a> compare car insurance rates [url=https://comparecarinsurance.us.com]compare car insurance[/url]
— e insurance auto Jan 11, 11:31 PM #cash advance <a href=“https://cashadvance.us.org”>cash advance</a> advance cash payday loan [url=https://cashadvance.us.org]advance cash payday loan[/url]
— Fastest Payday Loan Jan 11, 11:43 PM #cash advance lenders <a href=“https://cashadvance.us.org”>cash advance loan</a> cash advance loan [url=https://cashadvance.us.org]cash advance[/url]
— Instant Online Loans Jan 11, 11:49 PM #essay writing <a href=“https://essaywritingservice.us.org”>writing my paper</a> writing my essay for me [url=https://essaywritingservice.us.org]writing my essay for me[/url]
— Write My Essay Jan 11, 11:59 PM #interest rates on personal loans <a href=https://badcreditpersonalloans.us.com>bad credit payday loans</a> personal loan form [url=https://badcreditpersonalloans.us.com]personal loans for bad credit[/url]
— JaneNip Jan 12, 12:13 AM #cheap car insurance quotes <a href=“https://autoinsurancequotes.us.com”>auto insurance quotes</a> elephant auto insurance [url=https://autoinsurancequotes.us.com]auto insurance quotes[/url]
— autoinsurance Jan 12, 12:46 AM #loan <a href=“https://loan.us.org”>payday loan</a> loans [url=https://loan.us.org]quick loans no credit check[/url]
— JaneNip Jan 12, 12:53 AM #payday advance loan <a href=“https://payday.us.com”>payday advance loan</a> payday [url=https://payday.us.com]payday loans online[/url]
— Money Loan Jan 12, 01:02 AM #college essay <a href=“https://collegeessays.us.com”>website that writes your essay for you</a> c homework help [url=https://collegeessays.us.com]buy essays[/url]
— My Thesis Jan 12, 01:09 AM #payday loan <a href=“https://payday.us.com”>payday</a> payday [url=https://payday.us.com]payday[/url]
— Getting A Loan Jan 12, 01:15 AM #direct lenders no credit check <a href=“https://loan.us.org”>loan</a> get a loan [url=https://loan.us.org]cash loans no credit check[/url]
— Paydayloan Jan 12, 01:46 AM #payday advance loans <a href=“https://cashadvance.us.org”>loan</a> payday advance loans [url=https://cashadvance.us.org]cash advance[/url]
— Payday Jan 12, 02:10 AM #payday loan online <a href=“https://payday.us.com”>payday advance loan</a> payday loan online [url=https://payday.us.com]direct lender payday loans[/url]
— Get A Loan Jan 12, 03:21 AM #general car insurance <a href=“https://carinsurance.us.org”>car insurance</a> car insurance quotes florida [url=https://carinsurance.us.org]the hartford auto insurance[/url]
— aig auto insurance Jan 12, 04:15 AM #easy loans <a href=“https://loan.us.org”>cash payday loans online</a> payday loans online [url=https://loan.us.org]loans online[/url]
— Spotloan Jan 12, 04:46 AM #payday loans <a href=“https://payday.us.com”>payday loan</a> payday [url=https://payday.us.com]payday[/url]
— Get A Loan Jan 12, 04:55 AM #payday advance loans <a href=“https://cashadvance.us.org”>short term payday loan</a> loan cash [url=https://cashadvance.us.org]cash advance[/url]
— Payday Loans Online Jan 12, 05:03 AM #cash advance <a href=“https://cashadvance.us.org”>cash advance</a> quick loans 100 approval [url=https://cashadvance.us.org]payday advance online[/url]
— JaneNip Jan 12, 05:15 AM #cash advance <a href=“https://cashadvance.us.org”>cash advance</a> payday advance online [url=https://cashadvance.us.org]no credit check loans[/url]
— Loans For Bad Credit Jan 12, 05:23 AM #direct car insurance <a href=“https://autoinsurancequotes.us.com”>car insurance quotes</a> auto insurance quotes texas [url=https://autoinsurancequotes.us.com]auto insurance quotes california[/url]
— amica auto insurance Jan 12, 05:24 AM #car insurance quote <a href=“https://comparecarinsurance.us.com”>compare car insurance quotes</a> compare auto insurance [url=https://comparecarinsurance.us.com]autoownersinsurance.com[/url]
— aig auto insurance Jan 12, 05:33 AM #best cash loans online <a href=“https://payday.us.com”>direct lenders no credit check</a> payday [url=https://payday.us.com]payday loans no credit check[/url]
— Online Payday Loan Jan 12, 05:41 AM #direct lenders online loans <a href=“https://payday.us.com”>payday loan online</a> direct payday lenders bad credit [url=https://payday.us.com]payday[/url]
— Loan Jan 12, 06:01 AM #cash advance <a href=“https://cashadvance.us.org”>cash loans</a> cash advance loan [url=https://cashadvance.us.org]cash advance loan[/url]
— Easy Payday Loan Jan 12, 06:06 AM #no credit check emergency loans <a href=“https://loan.us.org”>payday loans online</a> loan [url=https://loan.us.org]online cash advance[/url]
— Loan Jan 12, 06:49 AM #cash advance loan <a href=“https://cashadvance.us.org”>online payday advance</a> cash advance lenders [url=https://cashadvance.us.org]cash advance lenders[/url]
— Spotloan Jan 12, 07:11 AM #online payday advance <a href=“https://cashadvance.us.org”>payday advance online</a> cash advance [url=https://cashadvance.us.org]cash loans[/url]
— Paydayloan Jan 12, 07:13 AM #school papers <a href=“https://schoolpapers.science”>math help online</a> what website can help me with my math homework [url=https://schoolpapers.science]buy dissertation[/url] direct payday lenders online <a href=“https://onlinepaydayloansdirectlenders.science”>direct lenders online loans</a> direct payday lenders online [url=https://onlinepaydayloansdirectlenders.science]payday loans direct lenders only[/url] payday loans direct lenders <a href=“https://paydayloandirectlender.webcam”>online payday loan lender</a> advance cash payday loan [url=https://paydayloandirectlender.webcam]payday loan direct lender[/url] essay writing service <a href=“https://essaywriting.stream”>essay writing service</a> essay writing [url=https://essaywriting.stream]paper writing[/url] a payday loan <a href=“https://apaydayloan.bid”>payday loan</a> cash advance payday loan [url=https://apaydayloan.bid]best payday loan[/url] payday loan no credit check <a href=“https://cashadvanceloan.science”>payday loans</a> online payday advance loan [url=https://cashadvanceloan.science]loan cash[/url] direct online lenders <a href=“https://bestpaydayloan.cricket”>best payday loan</a> best payday loan [url=https://bestpaydayloan.cricket]best payday loan[/url] theses and dissertations online <a href=“https://bestessaywritingservice.cricket”>need help with my homework</a> homework help accounting [url=https://bestessaywritingservice.cricket]writing my essay[/url] easy online payday loans <a href=“https://easyonlinepaydayloans.science”>easy payday loans online</a> easy cash payday loan [url=https://easyonlinepaydayloans.science]easy online payday loans[/url] masters dissertation writing <a href=“https://scholarshipessay.science”>scholarship essay</a> argument essay [url=https://scholarshipessay.science]scholarship essay[/url]
— JamesNip Jan 12, 07:25 AM #loans <a href=“https://loan.us.org”>payday loans</a> loan [url=https://loan.us.org]pay day lenders[/url]
— Loans For Bad Credit Jan 12, 08:00 AM #loan <a href=“https://loan.us.org”>online lenders</a> loan [url=https://loan.us.org]loan[/url]
— Loans Jan 12, 08:05 AM #do my english homework <a href=“https://collegeessays.us.com”>college essays</a> college essay [url=https://collegeessays.us.com]college essays[/url]
— White Paper Writers Jan 12, 08:09 AM #auto insurance quotes <a href=“https://autoinsurancequotes.us.com”>get auto insurance quote</a> compare auto insurance rates [url=https://autoinsurancequotes.us.com]auto insurance quotes[/url]
— geico Jan 12, 08:24 AM #online payday loan lenders <a href=“https://cashadvance.us.org”>cash advance</a> payday advance [url=https://cashadvance.us.org]cash advance[/url]
— JaneNip Jan 12, 08:53 AM #cheap auto insurance quotes <a href=“https://autoinsurancequotes.us.com”>auto insurance quotes texas</a> cheap auto insurance quotes [url=https://autoinsurancequotes.us.com]cheap car insurance quotes[/url]
— aarp car insurance Jan 12, 09:16 AM #write my essay for me <a href=https://writemyessay.us.com>write my essay for me</a> write my essay [url=https://writemyessay.us.com]write my essay[/url]
— JaneNip Jan 12, 09:16 AM #a payday loan <a href=“https://payday.us.com”>direct lenders</a> direct lenders for bad credit [url=https://payday.us.com]cash loans[/url]
— Online Loans Jan 12, 09:31 AM #argumentative essay <a href=“https://argumentativeessay.us.com”>my math homework online</a> paper writing services [url=https://argumentativeessay.us.com]paper writing[/url]
— Write My Paper Jan 12, 09:39 AM #auto insurance quotes <a href=“https://autoinsurancequotes.us.com”>auto insurance quotes texas</a> elephant auto insurance [url=https://autoinsurancequotes.us.com]auto insurance quotes[/url]
— autoowners insurance Jan 12, 09:49 AM #website that write essays for you <a href=“https://essaywritingservice.us.org”>do my excel project</a> essay writing service [url=https://essaywritingservice.us.org]essay writing[/url]
— Essay Writer Reviews Jan 12, 11:36 AM #cash advance loan <a href=“https://cashadvance.us.org”>cash advance</a> quick loans no credit check [url=https://cashadvance.us.org]online payday advance[/url]
— Online Loans Jan 12, 11:48 AM #payday loans online <a href=“https://payday.us.com”>payday</a> direct lenders no credit check [url=https://payday.us.com]payday loans no credit check[/url]
— Payday Loans Jan 12, 12:03 PM #buy a custom research paper <a href=“https://argumentativeessay.us.com”>essay writing</a> primary help homework [url=https://argumentativeessay.us.com]argumentative essay[/url]
— White Paper Writers Jan 12, 12:38 PM #saint ephrem homework online <a href=“https://researchpaper.us.com”>research paper</a> research essay [url=https://researchpaper.us.com]biology homework help[/url]
— Help With My Essay Jan 12, 12:40 PM #compare car insurance quotes <a href=“https://carinsurance.us.org”>compare auto insurance quotes</a> auto insurance [url=https://carinsurance.us.org]cheapest car insurance[/url]
— safe auto insurance Jan 12, 12:49 PM #loans online <a href=“https://loan.us.org”>no credit check payday loans</a> loan [url=https://loan.us.org]cash loans[/url]
— Best Payday Loan Jan 12, 12:52 PM #loan <a href=“https://loan.us.org”>payday loans online</a> loan [url=https://loan.us.org]a payday loan[/url]
— Pay Day Loan Jan 12, 12:58 PM #cash advance <a href=“https://cashadvance.us.org”>cash advance</a> cash loans [url=https://cashadvance.us.org]online payday loans[/url]
— Quick Loan Jan 12, 01:16 PM #payday loans online bad credit ok <a href=https://loansforpeoplewithbadcredit.us.com>payday loans online direct lenders</a> payday loans online [url=https://loansforpeoplewithbadcredit.us.com]online payday loans direct lenders[/url]
— JaneNip Jan 12, 01:21 PM #the hartford auto insurance <a href=“https://carinsurance.us.org”>online car insurance quotes</a> safeauto insurance quote [url=https://carinsurance.us.org]compare auto insurance[/url]
— esurance Jan 12, 02:02 PM #cash loan <a href=“https://loan.us.org”>loans online</a> small payday loans [url=https://loan.us.org]bad credit[/url]
— Best Payday Loan Jan 12, 02:17 PM #research report <a href=“https://researchpaper.us.com”>writing a paper</a> writing a paper [url=https://researchpaper.us.com]research paper[/url]
— Google Essay Writer Jan 12, 02:17 PM #free online sex chat <a href=“https://freesexwebcam.webcam”>free sex webcam</a> free sex webcam [url=https://freesexwebcam.webcam]adultchat[/url] cash loans <a href=“https://onlinepaydayloansdirectlenders.science”>direct lenders online loans</a> online payday loans direct lenders [url=https://onlinepaydayloansdirectlenders.science]online payday loans direct lenders[/url] easy fast payday loans <a href=“https://fastpaydayloans.cricket”>fast payday loans</a> fast payday loans [url=https://fastpaydayloans.cricket]online payday loan instant approval[/url] free sex webcam chat <a href=“https://freeadultwebcamchat.science”>lesbian sex show</a> free sex webcam chat [url=https://freeadultwebcamchat.science]webcams sex[/url]
— JamesNip Jan 12, 02:35 PM #paydayloans <a href=“https://cashadvance.us.org”>cash advance</a> best cash loan [url=https://cashadvance.us.org]cash advance[/url]
— Loans Online Jan 12, 02:48 PM #paper writing service <a href=“https://essaywritingservice.us.org”>essay writing service</a> writing a synopsis for a research paper [url=https://essaywritingservice.us.org]essay writing service[/url]
— Assignment Operators Jan 12, 04:14 PM #payday advance loan <a href=“https://payday.us.com”>payday loan online</a> payday loan online [url=https://payday.us.com]payday[/url]
— Personal Loans Jan 12, 04:29 PM #essay writing service <a href=“https://paperwriting.webcam”>paper writing</a> paper writing [url=https://paperwriting.webcam]paper writing[/url] webcam sex chat <a href=“https://sexchat.cricket”>sex chat</a> sex chat [url=https://sexchat.cricket]sex chat[/url] same day loans <a href=“https://samedayloans.cricket”>easiest payday loan to get</a> same day loan [url=https://samedayloans.cricket]same day loans[/url] easy cash payday loan <a href=“https://internetpaydayloans.stream”>getting a loan</a> internet payday loans [url=https://internetpaydayloans.stream]online loan[/url] online payday loan application <a href=“https://onlinepaydayloaninstantapproval.loan”>cash loan advance</a> online payday loan [url=https://onlinepaydayloaninstantapproval.loan]online loan[/url] direct lenders payday loans <a href=“https://apaydayloan.bid”>a payday loan</a> best payday loan [url=https://apaydayloan.bid]quick loans[/url] spotloan <a href=“https://easyonlinepaydayloans.science”>easy online payday loans</a> fast online payday loans [url=https://easyonlinepaydayloans.science]easy online payday loans[/url]
— PamNip Jan 12, 04:42 PM #advance cash payday loan <a href=“https://cashadvance.us.org”>cash advance loan</a> online payday advance [url=https://cashadvance.us.org]direct payday loan lenders[/url]
— Best Payday Loan Jan 12, 04:55 PM #payday <a href=“https://payday.us.com”>payday</a> payday [url=https://payday.us.com]payday loans[/url]
— Bad Credit Jan 12, 05:25 PM #online payday advance <a href=“https://cashadvance.us.org”>payday advance</a> online payday loan [url=https://cashadvance.us.org]cash advance[/url]
— Getting A Loan Jan 12, 06:28 PM #online auto insurance quotes <a href=“https://autoinsurancequotes.us.com”>car insurance comparisons</a> cheap auto insurance quotes [url=https://autoinsurancequotes.us.com]auto insurance quotes[/url]
— low car insurance Jan 12, 06:29 PM #payday advance loans <a href=“https://cashadvance.us.org”>online payday advance</a> direct payday lenders [url=https://cashadvance.us.org]direct lenders payday loans[/url]
— Online Lenders Jan 12, 06:46 PM #loan <a href=“https://loan.us.org”>best cash loans online</a> getting a loan [url=https://loan.us.org]loan[/url]
— Online Payday Loan Jan 12, 07:03 PM #payday <a href=“https://payday.us.com”>payday</a> payday loans no credit check [url=https://payday.us.com]direct payday lenders bad credit[/url]
— Best Online Loans Jan 12, 07:15 PM #cash advance <a href=“https://cashadvance.us.org”>direct payday lenders</a> faxless payday loans [url=https://cashadvance.us.org]quick cash loan[/url]
— Best Payday Loan Jan 12, 07:35 PM #auto insurance quotes <a href=“https://autoinsurancequotes.us.com”>auto insurance quotes</a> cheapest car insurance quotes comparison [url=https://autoinsurancequotes.us.com]e insurance auto[/url]
— amica auto insurance Jan 12, 07:58 PM #payday advance online <a href=“https://cashadvance.us.org”>cash advance lenders</a> guaranteed payday loans [url=https://cashadvance.us.org]payday advance loans[/url]
— Bad Credit Jan 12, 08:43 PM #do my college algebra <a href=“https://essay.us.org”>essay writer</a> college essays [url=https://essay.us.org]help on homework[/url]
— Write My Essay Cheap Jan 12, 09:28 PM #cash advance <a href=“https://cashadvance.us.org”>payday loans</a> payday loans with no credit check [url=https://cashadvance.us.org]cash advance[/url]
— Spotloan Jan 12, 09:47 PM #best pay day loans <a href=“https://loan.us.org”>same day loan</a> loan [url=https://loan.us.org]cash loans[/url]
— Cash Loan Jan 12, 10:28 PM #payday cash advances <a href=“https://loan.us.org”>cash loans</a> online pay day loans [url=https://loan.us.org]loan[/url]
— Speedycash Jan 12, 10:40 PM #college essay prompts <a href=“https://collegeessays.us.com”>buy college essays</a> college essay help [url=https://collegeessays.us.com]college essays[/url]
— Homework Online Jan 12, 11:02 PM #cash advance <a href=“https://cashadvance.us.org”>payday advance</a> cash advance [url=https://cashadvance.us.org]advance cash payday loan[/url]
— Instant Online Loans Jan 12, 11:06 PM #cash advance <a href=“https://cashadvance.us.org”>cash advance</a> payday loans online direct lenders [url=https://cashadvance.us.org]direct loans[/url]
— Online Payday Loans Jan 13, 12:16 AM #payday loans no credit check <a href=“https://payday.us.com”>payday loans no credit check</a> payday [url=https://payday.us.com]payday[/url]
— Loans Online Jan 13, 12:24 AM #research paper <a href=“https://researchpaper.us.com”>research papers</a> dissertation writing service uk [url=https://researchpaper.us.com]compare and contrast essay help[/url]
— Buy An Essay Jan 13, 12:33 AM #payday advance online <a href=“https://loan.us.org”>payday loans direct lender</a> loan [url=https://loan.us.org]payday loan[/url]
— Speedy Cash Jan 13, 12:56 AM #cash loans <a href=“https://cashadvance.us.org”>cash advance</a> cash advance [url=https://cashadvance.us.org]loans online bad credit[/url]
— Personal Loans Jan 13, 12:58 AM #check into cash <a href=“https://loan.us.org”>get a loan</a> loan [url=https://loan.us.org]loan[/url]
— A Payday Loan Jan 13, 01:05 AM #loans online no credit check <a href=“https://cashadvance.us.org”>cash advance lenders</a> loan cash [url=https://cashadvance.us.org]online payday loans[/url]
— Best Payday Loan Jan 13, 01:39 AM #pay day loans <a href=“https://cashadvance.us.org”>cash advance</a> cash advance [url=https://cashadvance.us.org]payday advance loans[/url]
— Payday Loans Online Jan 13, 02:33 AM #quick loans <a href=“https://badcreditpaydayloansdirectlenders.cricket”>no credit check payday loans instant approval</a> no credit check emergency loans [url=https://badcreditpaydayloansdirectlenders.cricket]loans online bad credit[/url] wife webcam <a href=“https://chatsex.trade”>sex chat</a> girls chat [url=https://chatsex.trade]free web cam sluts[/url] cash loan advance <a href=“https://paydayloansforbadcredit.stream”>fastest payday loan</a> payday loans for bad credit [url=https://paydayloansforbadcredit.stream]payday loans for bad credit[/url] wife webcam <a href=“https://wifewebcam.cricket”>wife webcam</a> webcam slut [url=https://wifewebcam.cricket]wife webcam[/url] easy online payday loans <a href=“https://easyloans.webcam”>online payday advance</a> easy loans [url=https://easyloans.webcam]advance payday loans online[/url] buy essays <a href=“https://buyessays.stream”>buy essays online</a> buy essays [url=https://buyessays.stream]college essays[/url]
— JamesNip Jan 13, 02:38 AM #fast cash loans with no credit check <a href=“https://cashadvance.us.org”>cash advance</a> cash advance loan [url=https://cashadvance.us.org]cash advance loan[/url]
— Best Online Loans Jan 13, 03:02 AM #loan <a href=“https://loan.us.org”>quick cash loan</a> online payday loans instant approval [url=https://loan.us.org]cash loans[/url]
— Payday Loan Online Jan 13, 03:11 AM #do my research paper <a href=“https://researchpaper.us.com”>buy essays online reviews</a> dissertation proposal writing help [url=https://researchpaper.us.com]do my research paper[/url]
— Define Assignations Jan 13, 03:15 AM #easiest payday loan to get <a href=“https://payday.us.com”>direct lenders</a> best cash advance loans online [url=https://payday.us.com]payday advance loan[/url]
— Get A Loan Jan 13, 04:01 AM #payday advance online <a href=“https://cashadvance.us.org”>cash advance</a> easy approval payday loans [url=https://cashadvance.us.org]cash advance[/url]
— Online Payday Loans Jan 13, 04:18 AM #payday advance <a href=“https://cashadvance.us.org”>loan cash</a> payday advance loans [url=https://cashadvance.us.org]cash advance[/url]
— Easy Payday Loan Jan 13, 04:28 AM #cash advance lenders <a href=“https://cashadvancelenders.trade”>advance cash payday loan</a> direct lenders of loans [url=https://cashadvancelenders.trade]payday advance online[/url] online essay <a href=“https://buyessayonline.cricket”>online essay</a> will you do my homework [url=https://buyessayonline.cricket]buy essay online[/url] payday bad credit loan <a href=“https://paydaybadcreditloan.bid”>small online payday loans</a> payday cash advance loan [url=https://paydaybadcreditloan.bid]bad credit payday loans[/url] payday loans <a href=“https://quickloans.trade”>online loans</a> quick loans [url=https://quickloans.trade]online payday loans[/url] web cam adult <a href=“https://camsites.cricket”>cam sites</a> cam sites [url=https://camsites.cricket]cam sites[/url] college essay writer <a href=“https://collegeessaywriter.bid”>college essay help</a> college essay writer [url=https://collegeessaywriter.bid]college essays[/url]
— JamesNip Jan 13, 04:47 AM #payday loan <a href=“https://payday.us.com”>payday loans</a> quick loans [url=https://payday.us.com]quick loan[/url]
— Payday Jan 13, 06:06 AM #buy custom essays online <a href=“https://essaywritingservice.us.org”>spl homework help</a> uk dissertation writing [url=https://essaywritingservice.us.org]writing my essay for me[/url]
— Premium Assignments Jan 13, 06:28 AM #online lenders <a href=“https://cashadvance.us.org”>payday advance online</a> speedycash [url=https://cashadvance.us.org]cash advance[/url]
— Cash Loan Jan 13, 07:23 AM #no fax payday loan <a href=“https://paydayadvance.us.com”>payday advance</a> payday advance [url=https://paydayadvance.us.com]payday loans lenders[/url]
— Loans For Bad Credit Jan 13, 07:54 AM #cash advance lenders <a href=“https://cashadvance.us.org”>payday advance</a> cash advance [url=https://cashadvance.us.org]loan cash[/url]
— Payday Jan 13, 08:01 AM #payday installment loan <a href=“https://loansonline.us.com”>loans online</a> legit online loans [url=https://loansonline.us.com]money direct[/url]
— Online Lenders Jan 13, 08:45 AM #college essay prompts <a href=“https://essay.us.org”>essay</a> someone do my homework for me [url=https://essay.us.org]argumentative essay[/url]
— Essay Writing Jan 13, 09:04 AM #paper writing service <a href=“https://essaywritingservice.us.org”>online essay writing</a> writing my paper [url=https://essaywritingservice.us.org]essays papers[/url]
— Buy Essays Papers Jan 13, 10:46 AM #bbw live cams <a href=“https://webcammasturbation.stream”>webcam sluts</a> webcam sluts [url=https://webcammasturbation.stream]webcam sluts[/url] easy loans <a href=“https://easyloans.webcam”>easy fast payday loans</a> best cash loan [url=https://easyloans.webcam]easy loans[/url] college essay <a href=“https://collegepaper.trade”>ut online homework</a> research paper [url=https://collegepaper.trade]college paper[/url] direct payday lenders online <a href=“https://paydaylendersdirect.webcam”>10 top loan companies</a> money loan [url=https://paydaylendersdirect.webcam]direct payday lenders online[/url]
— JamesNip Jan 13, 11:25 AM #payday loans for bad credit <a href=“https://loan.us.org”>quick loans</a> loans [url=https://loan.us.org]loan[/url]
— Quick Loan Jan 13, 12:14 PM #easy loans no credit <a href=“https://personalloans.us.org”>personal loans</a> bad credit unsecured loans [url=https://personalloans.us.org]loans personal[/url]
— Personal Loans Jan 13, 01:14 PM #writing a paper <a href=“https://researchpaper.us.com”>research papers</a> do my research paper [url=https://researchpaper.us.com]short essays[/url]
— Define Assignments Jan 13, 01:16 PM #instant online payday loan <a href=“https://instantonlinepaydayloan.cricket”>no credit check loan</a> direct lenders payday loans [url=https://instantonlinepaydayloan.cricket]quick loans 100 approval[/url] instant payday loans <a href=“https://guaranteedpaydayloans.webcam”>internet payday loans</a> online payday loan instant approval [url=https://guaranteedpaydayloans.webcam]internet payday loans[/url] best payday loans online <a href=“https://bestpaydayloans.stream”>no credit check loan</a> faxless payday loan same day [url=https://bestpaydayloans.stream]best payday loans online[/url] webcam slut <a href=“https://wifewebcam.cricket”>webcam slut</a> wife on webcam [url=https://wifewebcam.cricket]free nude cams[/url] i need someone to do my homework <a href=“https://collegeessaywriter.bid”>help me to write an essay</a> write my essay [url=https://collegeessaywriter.bid]college essay writer[/url] essay prompts <a href=“https://essayprompts.cricket”>louisiana homework help</a> essay helper [url=https://essayprompts.cricket]need help with math homework[/url] cam chat <a href=“https://freesexcamchat.cricket”>free sex cam chat</a> free sex cam chat [url=https://freesexcamchat.cricket]free sex cam chat[/url] write my dissertation for me <a href=“https://collegeessayprompts.trade”>college essays</a> essay writing service [url=https://collegeessayprompts.trade]essay writing service[/url]
— JamesNip Jan 13, 01:49 PM #payday lenders direct <a href=“https://cashadvance.us.org”>cash advance</a> cash loans [url=https://cashadvance.us.org]cash advance[/url]
— Loan Jan 13, 02:13 PM #cash advance <a href=“https://cashadvance.us.org”>online payday advance</a> cash advance [url=https://cashadvance.us.org]payday advance[/url]
— Online Loans Jan 13, 03:00 PM #payday advance <a href=“https://paydayadvance.us.com”>loans with bad credit</a> payday advances [url=https://paydayadvance.us.com]payday advances[/url]
— Quick Loans Jan 13, 03:28 PM #payday loan direct lender <a href=“https://directlenderpaydayloans.cricket”>payday loans online direct lender</a> payday loans direct lender [url=https://directlenderpaydayloans.cricket]payday loans online direct lender[/url] best online payday loans <a href=“https://thebestonlinepaydayloans.trade”>online payday loans</a> the best online payday loans [url=https://thebestonlinepaydayloans.trade]the best online payday loans[/url] online installment loans <a href=“https://bestpaydayloans.stream”>best payday loans online</a> best payday loans online [url=https://bestpaydayloans.stream]best payday loans online[/url] research papers <a href=“https://schoolpapers.cricket”>do my english homework for me</a> government homework help [url=https://schoolpapers.cricket]research papers[/url] payday loans lenders <a href=“https://guaranteedpaydayloans.webcam”>advance payday loans</a> guaranteed payday loans [url=https://guaranteedpaydayloans.webcam]guaranteed payday loans[/url]
— JamesNip Jan 13, 03:31 PM #cash loans <a href=“https://cashloans.us.com”>cash loans</a> get cash now [url=https://cashloans.us.com]cash loans[/url]
— Money Loan Jan 13, 03:31 PM #loans online <a href=“https://loansonline.us.com”>loans online direct</a> loans online [url=https://loansonline.us.com]best online loans instant approval[/url]
— Payday Loan Online Jan 13, 03:39 PM #online installment loans direct lenders <a href=“https://personalloans.us.org”>low interest personal loan</a> holiday loan [url=https://personalloans.us.org]personal loans[/url]
— Quick Loan Jan 13, 04:19 PM #bad credit loans <a href=“https://loansforbadcredit.us.org”>loans with bad credit</a> bad credit loans not payday [url=https://loansforbadcredit.us.org]loans 1000[/url]
— Loan Cash Jan 13, 04:26 PM #loans no credit check <a href=“https://loansnocreditcheck.us.com”>personal loan approval</a> loans online no credit check [url=https://loansnocreditcheck.us.com]loans with no credit check[/url]
— Best Payday Loan Jan 13, 04:28 PM #online payday loans no credit check <a href=“https://paydayloansonline.us.org”>payday loans online</a> payday loans online [url=https://paydayloansonline.us.org]payday loans online[/url]
— Loans Jan 13, 04:58 PM #research paper <a href=“https://researchpaper.us.com”>primary homework help saxons</a> do my research paper [url=https://researchpaper.us.com]my assignment help[/url]
— Ace Homework Jan 13, 06:10 PM #college essay prompts <a href=“https://collegeessays.us.com”>buy college essays</a> writing research papers [url=https://collegeessays.us.com]c homework help[/url]
— Essays Jan 13, 06:13 PM #cash loans <a href=“https://loan.us.org”>loans</a> cash loans [url=https://loan.us.org]instant loans online[/url]
— Payday Loans Jan 13, 06:29 PM #writing my paper <a href=“https://essaywritingservice.us.org”>essay writing service</a> writing my paper [url=https://essaywritingservice.us.org]my.hrw.com homework help[/url]
— Term Paper Writers Jan 13, 06:48 PM #installment loans for bad credit <a href=“https://installmentloans.us.com”>installment loans</a> installment loan [url=https://installmentloans.us.com]installment loans[/url]
— Loan Cash Jan 13, 08:58 PM #cash advance loan <a href=“https://cashadvanceloan.us.com”>cash advance loan</a> cash advance loan [url=https://cashadvanceloan.us.com]online payday advance[/url]
— Easy Payday Loan Jan 13, 09:31 PM #small loans for bad credit <a href=“https://loansforbadcredit.us.org”>loans for bad credit</a> unsecured loans for bad credit [url=https://loansforbadcredit.us.org]bad credit loans[/url]
— Cash Loan Jan 13, 09:58 PM #what is a conforming loan <a href=“https://paydayadvance.us.com”>advance payday</a> payday advance [url=https://paydayadvance.us.com]check cash advance[/url]
— Bad Credit Jan 14, 02:22 AM #payday loan online <a href=“https://loansnocreditcheck.us.com”>loan board</a> loans no credit check [url=https://loansnocreditcheck.us.com]loans online no credit check[/url]
— Online Payday Loans Jan 14, 03:08 AM #loans online <a href=“https://loansonline.us.com”>online personal loans</a> loans online [url=https://loansonline.us.com]loans online[/url]
— Fastest Payday Loan Jan 14, 05:57 AM #need cash now <a href=“https://cashloans.us.com”>loan cash</a> cash loans no credit check [url=https://cashloans.us.com]cash loans[/url]
— Online Loan Jan 14, 07:39 AM #online loan <a href=“https://onlineloan.us.com”>loan application</a> online loan [url=https://onlineloan.us.com]online loan[/url]
— Cash Loan Jan 14, 01:12 PM #cash loans bad credit <a href=“https://installmentloans.us.com”>no fax online payday loans</a> money lenders california [url=https://installmentloans.us.com]installment loans guaranteed[/url]
— A Payday Loan Jan 14, 03:46 PM #personal loans <a href=“https://personalloans.us.org”>payday loans victoria</a> online loans no credit check instant deposit [url=https://personalloans.us.org]payday loans lake charles[/url]
— Cash Advance Jan 14, 05:19 PM #installment loans <a href=“https://installmentloans.us.com”>installment loans online</a> quick personal loans online [url=https://installmentloans.us.com]home loans for bad credit[/url]
— Direct Lender Loans Jan 14, 05:21 PM #loans online fast <a href=“https://cashadvanceloan.us.com”>advance loan</a> online payday advance [url=https://cashadvanceloan.us.com]bad credit cash advance[/url]
— Instant Online Loans Jan 14, 05:36 PM #payday loans no credit check same day <a href=“https://paydayloansonline.us.org”>no credit check payday loans instant approval</a> payday loans online [url=https://paydayloansonline.us.org]payday loans online[/url]
— Loan Jan 14, 07:46 PM #ohio cash advance <a href=“https://cashloans.us.com”>cash lenders</a> payday loans no teletrack [url=https://cashloans.us.com]payday cash advance[/url]
— Online Lenders Jan 14, 08:24 PM #best payday loans for bad credit <a href=“https://personalloansonline.us.org”>personal loans online</a> personal loans online [url=https://personalloansonline.us.org]online personal loans[/url]
— Best Online Loans Jan 14, 10:13 PM #loans with bad credit <a href=“https://loansforbadcredit.us.org”>loans in ontario</a> loans for bad credit [url=https://loansforbadcredit.us.org]loans with bad credit[/url]
— Direct Lenders Jan 15, 01:06 AM #cash advance usa <a href=“https://cashadvanceloan.us.com”>cash advance loan</a> cash advance usa [url=https://cashadvanceloan.us.com]cash advance loan[/url]
— Bad Credit Jan 15, 02:30 AM #loans no credit check <a href=“https://loansnocreditcheck.us.com”>pay day board game</a> payday loans no [url=https://loansnocreditcheck.us.com]easy loans no credit check[/url]
— Get A Loan Jan 15, 07:02 AM #homework help victorians <a href=“https://essaywritingservice.us.org”>homework help with math</a> writing my essay for me [url=https://essaywritingservice.us.org]essay writing[/url]
— Custom Essay Writer Jan 16, 05:58 AM #help to write an essay <a href=“https://researchpaper.us.com”>do my research paper</a> research essay [url=https://researchpaper.us.com]research paper[/url]
— Buy Essay Online Jan 16, 07:07 AM #website to write essays <a href=“https://collegeessays.us.com”>college essays</a> dissertations help [url=https://collegeessays.us.com]college essays[/url]
— Online Essays Jan 16, 10:23 AM #writing a paper <a href=“https://researchpaper.us.com”>do my research paper</a> research paper [url=https://researchpaper.us.com]research papers[/url]
— Homework Good Or Bad Jan 16, 10:40 AM #essay writing service <a href=“https://essaywritingservice.us.org”>essay writing service</a> essay writing service [url=https://essaywritingservice.us.org]math homework doer[/url]
— Essay Writings Jan 16, 10:42 AM #argument essay <a href=“https://argumentativeessay.us.com”>argumentative essay</a> essay writing [url=https://argumentativeessay.us.com]argumentative essay[/url]
— Ace Homework Jan 16, 05:03 PM #online loan <a href=https://onlineloans.us.com>payday loans online</a> payday loans online [url=https://onlineloans.us.com]payday loans online[/url]
— JaneNip Jan 16, 10:19 PM #paper writing service <a href=“https://essaywritingservice.us.org”>writing my paper</a> high school essay [url=https://essaywritingservice.us.org]essay writing service[/url]
— Online Essay Help Jan 16, 11:21 PM #buy law essay <a href=https://buyessay.us.com>essays online to buy</a> help in writing an essay [url=https://buyessay.us.com]buy an essay[/url]
— JaneNip Jan 16, 11:23 PM #payday advance <a href=“https://paydayadvance.us.com”>advance payday</a> payday advance [url=https://paydayadvance.us.com]payday advances[/url]
— JaneNip Jan 17, 03:31 AM #loan signing <a href=“https://paydayadvance.us.com”>advance payday</a> payday advance [url=https://paydayadvance.us.com]fast cash advance[/url]
— Speedycash Jan 17, 06:09 AM #no fax online payday loans <a href=“https://loansonline.us.com”>loans online</a> payday loans online [url=https://loansonline.us.com]online loan[/url]
— Quick Loan Jan 17, 09:52 AM #write my essay for me <a href=“https://essays.us.com”>college essays new york times</a> essays online [url=https://essays.us.com]write essays for me[/url]
— Write My Essays Jan 17, 09:53 AM #research paper <a href=“https://researchessay.us.com”>research essay</a> write a research paper [url=https://researchessay.us.com]research essay[/url]
— Buy Essay Online Jan 17, 06:59 PM #cash lenders <a href=“https://cashloans.us.com”>cash loans</a> need money now [url=https://cashloans.us.com]need money now[/url]
— Loans For Bad Credit Jan 17, 09:36 PM #essay writing services <a href=“https://essaywritingservices.us.org”>college essay writing service</a> write a good conclusion [url=https://essaywritingservices.us.org]essay writing services[/url]
— Online Essay Writers Jan 18, 12:49 AM #essay for me <a href=“https://essays.us.com”>essays</a> who to write an essay [url=https://essays.us.com]write essay for me[/url]
— Essay Help Jan 18, 02:05 AM #bad credit personal loans guaranteed approval <a href=“https://personalloans.us.org”>personal loans with bad credit</a> fast payday loans bad credit [url=https://personalloans.us.org]personal loans for poor credit[/url]
— Best Payday Loan Jan 18, 03:26 AM #loans no credit check <a href=“https://loansnocreditcheck.us.com”>loans no credit check</a> loan no credit check [url=https://loansnocreditcheck.us.com]loans no credit check[/url]
— Loans Jan 18, 03:33 AM #essay rewriter <a href=“https://essaywriter.us.com”>essay writer cheap</a> essay rewriter [url=https://essaywriter.us.com]essay maker[/url]
— How To Writing Essay Jan 18, 04:27 AM #personal loans with bad credit <a href=“https://loansforbadcredit.us.org”>loans for bad credit</a> what is a bank loan [url=https://loansforbadcredit.us.org]loans for bad credit[/url]
— Payday Loans Jan 18, 01:56 PM #write my paper <a href=“https://writemypaper.us.com”>customwriting</a> help writing [url=https://writemypaper.us.com]writing a article review[/url]
— Essays Writing Jan 18, 02:22 PM #loans in san antonio <a href=“https://paydayadvance.us.com”>advance payday loan</a> payday advances [url=https://paydayadvance.us.com]payday loans sacramento[/url]
— Payday Jan 18, 04:16 PM #1 hour payday loans <a href=“https://loansonline.us.com”>online loan</a> payday loans online [url=https://loansonline.us.com]online personal loans[/url]
— Quick Loans Jan 18, 09:08 PM #cash loans <a href=“https://cashloans.us.com”>safe online payday loans</a> easy money payday loans [url=https://cashloans.us.com]best debt consolidation loan[/url]
— Money Loan Jan 18, 11:30 PM #write my paper <a href=“https://writemypaper.us.com”>write my paper</a> writing my paper [url=https://writemypaper.us.com]do my paper[/url]
— Buying An Essay Jan 18, 11:53 PM #write my paper for me <a href=“https://writemypaperforme.us.com”>help to write a book</a> help me write [url=https://writemypaperforme.us.com]problem solving critical thinking[/url]
— Homework For Pre K Jan 19, 12:24 AM #paper writing services <a href=“https://paperwritingservice.us.com”>paper writing service</a> paper writing services [url=https://paperwritingservice.us.com]writing letters[/url]
— Free Paper Writer Jan 20, 03:41 AM #unsecured loans for bad credit <a href=“https://loansforbadcredit.us.org”>credit card consolidation loans</a> loans for bad credit [url=https://loansforbadcredit.us.org]unsecured loans for bad credit[/url]
— Speedy Cash Jan 20, 08:41 AM #write my paper for me <a href=“https://writemypaper.us.com”>write my paper</a> urgent essay writing service [url=https://writemypaper.us.com]writing my paper[/url]
— Online Essay Writer Jan 20, 11:53 AM #online loan <a href=“https://onlineloan.us.com”>specialized loan services</a> credit loan calculator [url=https://onlineloan.us.com]online loan[/url]
— Direct Lenders Jan 21, 07:44 AM #custom college essay <a href=“https://argumentessay.us.com”>argument essay</a> easy argumentative essay [url=https://argumentessay.us.com]argument essay[/url]
— Homework Help Online Jan 21, 07:46 AM #loans for bad credit <a href=“https://loansforbadcredit.us.org”>loans bad credit</a> web loans [url=https://loansforbadcredit.us.org]best student loans[/url]
— Cash Loan Jan 21, 10:31 AM #paper writing service <a href=“https://paperwritingservice.us.com”>paper writing service</a> wedding speech writing service [url=https://paperwritingservice.us.com]paper writing service[/url]
— Write Essays Jan 21, 01:44 PM #do your homework <a href=“https://homeworkhelp.us.com”>homework help</a> homework help [url=https://homeworkhelp.us.com]homework[/url]
— Online Paper Writer Jan 21, 04:27 PM #tribal payday loans <a href=“https://installmentloans.us.com”>bad credit installment loans</a> installment loans for bad credit [url=https://installmentloans.us.com]guaranteed approval payday loans[/url]
— Loan Cash Jan 22, 10:02 AM #online term paper <a href=“https://termpaper.us.com”>term paper assistance</a> cheap term papers [url=https://termpaper.us.com]term paper help[/url]
— Photo Assignment Jan 22, 01:41 PM #payday advance <a href=“https://paydayadvance.us.com”>loans without cosigner</a> payday advance [url=https://paydayadvance.us.com]fast cash advance[/url]
— Instant Online Loans Jan 22, 02:38 PM #write my paper <a href=“https://writemypaper.us.com”>write conclusion</a> write my paper [url=https://writemypaper.us.com]best essay writing service review[/url]
— Buy Essay.Org Jan 23, 03:26 AM #Здравствуйте! Если у вас наблюдаются проблемы с потенцией, или же ваша жена не испытывает сексуального наслаждения, не переживайте у вашей проблемы есть решение!
Интернет – аптека поможет вам разрешить это быстро и безопасно. У нас вы можете купить дженерик виагра, а так же женскую виагру и [url=http://mister-vig.ru/]купить виагру доставка по москве[/url] по самым низким ценам в РФ!
Если у вас проблема заключается в том что вы быстро заканчиваете половой акт то вам подойдет таблетки для продления полового акта.
Посетите наш интернет – магазин [url=http://mister-vig.ru/]mister-vig.ru[/url] который работает с 2010 года! Действует доставка курьером по Москве быстро и безопасно.
Мы даем 100% гарантию на все приобретенные препараты! По РФ действует доставка почтой первого класса, в непрозрачном пакете и анонимно!
Mister-vig.ru мы стараемся сделать вашу сексуальную жизнь лучше!
— Koverupit Jan 24, 05:20 AM #write my custom paper <a href=“https://writemypaper.us.com”>write my paper</a> critical thinking and creative problem solving [url=https://writemypaper.us.com]affordable essay writing service[/url]
— Buy Essay Jan 24, 07:31 AM #money loans quick <a href=https://shorttermloans.us.com>short term loans</a> loans today [url=https://shorttermloans.us.com]short term loans[/url]
— JaneNip Jan 24, 09:54 AM #payday loan <a href=“https://paydayloan.us.org”>payday loan</a> payday loan [url=https://paydayloan.us.org]tribal loans guaranteed approval[/url]
— Pay Day Loans Jan 27, 03:05 AM #Whether writing an assessment of a current or traditional talk or critiquing the initiatives of a Toastmasters colleague, the critic must pay attention to specific general criteria. When providing an assessment of a conversation, the critic should notice what worked properly and what desired development. Aims An informative talk seeks to coach the listener about a notion, processor item. These are beneficial shows when the lecturer describes an item. Political messages in many cases are with this nature; a politician attempts ballots from elements, or even the leader seeks action from Congress. These gatherings may add the opening of the hospital wing to toasting the bride and groom in a wedding. Market The content of the presentation can vary based on whether the talk creator is introducing to some bedroom of 10 or 1,000. Often a presentation features a secondary market if it’s likely to be disseminated through the entire greater group via wordofmouth, conventional media or socialmedia. A dialog includes three parts — a release, physique and realization. Your body of the dialog should incorporate details and research that help the speaker’s event or illustrate her level. Delivery The evaluator should consider perhaps the audio built excellent use of slides, props, body gestures along with other visual products. The design of distribution must complement the information of a dialog.
— JohnSnowAttig Feb 27, 06:51 AM #[url=http://my.cbn.com/mod/blog/?username=fb7c1291-c068-45cd-8f5b-b452af51ca17]assignment help com[/url]
Посмотри обязательно: [url=http://kak-sdelat-makijazh.female-rus.ru/]как стать очень красивой и ухоженной[/url]
— МиланаAntax Feb 27, 08:46 AM #Узнай сейсас это : [url=http://kak-sdelat-makijazh.female-rus.ru/]как макияжем сделать нос маленьким[/url]
— NatelkaAntax Feb 28, 07:03 PM #Вы хотите узнать это: [url=http://kak-sdelat-makijazh.female-rus.ru/]как сделать влажный эффект макияжа[/url]
— NatelkaAntax Mar 3, 01:35 AM #[url=http://otdyh-na-more.info-sovety.ru/watch.php?vid=6fcc7703f]израиль отдых с детьми где лучше[/url]
Это должен знать каждый: [url=http://otdyh-na-more.info-sovety.ru/category.php?cat=gde-samyj-luchshij-otdyh&page=38&sortby=title]лучший отдых в тайланде где[/url]
— Morianamap Mar 20, 12:15 PM #А вы это видели, маленькие хитрости: [url=http://poleznye-sovety.kok7.ru/%d0%bf%d0%be%d1%87%d0%b5%d0%bc%d1%83-%d1%81%d1%82%d0%be%d0%b8%d1%82-%d0%b5%d1%81%d1%82%d1%8c-%d1%87%d0%b5%d1%81%d0%bd%d0%be%d0%ba-%d0%ba%d0%b0%d0%b6%d0%b4%d1%8b%d0%b9-%d0%b4%d0%b5%d0%bd%d1%8c_9d89fe127.html]советы для красоты вконтакте[/url]
— KseniaAnype Mar 20, 10:59 PM #Смотреть всем: [url=http://kok7.ru/watch.php?vid=f047ee85b]как приготовить вторые блюда рецепты[/url]
— Kristinkacal Mar 21, 10:02 PM #[url=http://otdyh-na-more.info-sovety.ru/watch.php?vid=2dc4451c8]пляжный отдых в испании где лучше[/url]
Это должен знать каждый: [url=http://otdyh-na-more.info-sovety.ru/watch.php?vid=4b4322308]отдых в тайланде где лучше отзывы[/url]
— Morianamap Mar 22, 06:51 AM #Смотреть всем обязательно : [url=http://kak-sdelat-makijazh.female-rus.ru/]как сделать макияж летней женщине[/url]
— NatelkaAntax Mar 22, 02:26 PM #[url=http://otdyh-na-more.info-sovety.ru/category.php?cat=kuda-poehat-na-more&page=13&sortby=rating&order=DESC]венгрия отдых с детьми где лучше[/url]
Посмотри: [url=http://otdyh-na-more.info-sovety.ru/category.php?cat=semejnyj-otdyh-na-more&page=2&sortby=rating&order=DESC]краснодарский край отдых с детьми где лучше[/url]
— Morianamap Mar 23, 01:03 PM #Посмотри обязательно это: [url=http://kak-sdelat-makijazh.female-rus.ru/]как сделать макияж после лет[/url]
— NatelkaAntax Mar 23, 11:29 PM #[url=https://ketodietusa.us]south beach diet[/url]
— frtadiuMat Apr 18, 02:43 AM #[url=https://ketodietusa.us]atkins diet[/url]
<a href=“https://ketodietusa.us/”>diabetic diet plan</a>
<a href=” https://ketodietusa.us/ “>military diet</a>
[url=https://ketodietusa.us]paleo diet food list[/url]
<a href=“https://ketodietusa.us”>vegan diet</a>
[url=https://ketodietusa.us/]weight watchers[/url]
— hybzkplAssef Apr 18, 02:49 AM #[url=https://ketodietusa.us/]whole 30 diet[/url]
<a href=“https://ketodietusa.us/”>low carb diet</a>
<a href=” https://ketodietusa.us/ “>atkins diet</a>
[url=https://ketodietusa.us]weight watchers[/url]
<a href=“https://ketodietusa.us/”>dukan diet</a>
buy a college essay – [url=https://essaybuy.us/]buy essay[/url]
— omki0ex0 May 5, 03:57 AM #money can t buy everything essay <a href=” https://essaybuy.us/ “>buy an essay</a>
https://essaybuy.us/
http://service.meltwaternews.com/mnews/redirect.html?docid=3677916641&userid=20930&cid=5713&agentid=6072125&type=1&s=79&url=http://essaybuy.us/
buy nothing day essay – [url=https://essaybuy.us/]buy an essay cheap[/url]
— uo9abs31 May 5, 03:57 AM #buy cheap essays online <a href=” https://essaybuy.us/ “>money can t buy happiness essay</a>
https://essaybuy.us/
http://nickgold.info/__media__/js/netsoltrademark.php?d=essaybuy.us
where to buy essays – [url=https://essaybuy.us/]can money buy happiness essay[/url]
— lk2q8op5 May 5, 08:56 AM #money can t buy happiness essay <a href=” https://essaybuy.us/ “>buy essay</a>
https://essaybuy.us/
http://www.cableco-op.com/__media__/js/netsoltrademark.php?d=essaybuy.us/
where can i buy essays online – [url=https://essaybuy.us/]can money buy happiness essay[/url]
— 6wv5n0s9 May 5, 08:56 AM #buy essay cheap <a href=” https://essaybuy.us/ “>buy essays online cheap</a>
https://essaybuy.us/
http://gallery.ccdastro.de/main.php?g2_view=core.UserAdmin&g2_subView=core.UserRecoverPassword&g2_return=https://essaybuy.us/
Здоровое питание
[url=http://kok7.ru/o-samom-glavnom-insult-polipy-v-matke-populyarnye-sredstva-ot-zapora/]диета на основе правильного питания[/url]| [url=http://kok7.ru/tag/mochevaya-kis/]правила правильного питания[/url]
— Dnivildinly May 18, 03:22 PM #<a href=“http://awallpapershub.com/star-wars-photos-wallpaper/“rel=“dofollow”> Persona 5 HD Wallpapers | Background Images </a> <a href=“http://awallpapershub.com/undertale-hd-wallpaper-and-photos/“rel=“dofollow”> Persona 5 HD Wallpapers | Background Images </a>
— kils Aug 12, 02:46 AM #https://custory.com/woori/ – 우리카지노
— 우리카지노 Oct 29, 04:42 AM #Выездной мобильный шиномонтаж в Москве и МО круглосуточно!
— DavidTusly Nov 12, 03:08 AM #Мегафон: +7(495)908-97-71
Мтс: +7(915)448-25-25
Хранение шин.
1. Шиномонтажные работы.
2. Снятие секреток.
3. Переобувка шин.
4. Ремонт проколов и порезов.
Выездной шиномонтаж 24 часа в Москве и МО.
Звоните!
Выездной мобильный шиномонтаж в Москве и МО круглосуточно!
— Davidtoorn Nov 12, 05:05 AM #Мегафон: +7(495)908-97-71
Мтс: +7(915)448-25-25
Хранение шин.
1. Шиномонтажные работы.
2. Снятие секреток.
3. Переобувка шин.
4. Ремонт проколов и порезов.
Выездной шиномонтаж 24 часа в Москве и МО.
Звоните!
Приобрести можно на веб-сайте http://mang.bestseller-super.ru
<h1>Секрет простого и аппетитного похудения – сироп мангустина!</h1>
<p>В связи с нынешними реалиями жизни, когда между напряженной работой и домом практически не остается времени для того, чтобы позаботиться о себе, очень остро стоит вопрос лишнего веса. Многочисленные люди, а в особенности девушки, которые хотели бы похудеть, пьют целый комплекс «волшебных» порошков и таблеток, которые теоретически способны помочь. Однако, практикой этого не происходит. Ничего удивительного в этом нет – каждая девушка неповторима, обобщающий вариант избавления от лишнего веса не работает.</p>
<p>Однако, новый мангустин для похудения серьезно выделяется от других препаратов. Давайте разберемся почему.</p>
<h2>Пополнеть не страшно, страшно с этой проблемой жить!</h2>
<p>Лишний вес – проблема, отравляющая жизнь большинству женщин. Исследования демонстрируют, что больше 90% полных людей мучаются от низкой самооценки и недовольны собственным телом, что невероятно сильно отражается на их личной и общественной жизни.</p>
<p>К огорчению, это не пустые заявления, а факт: лишний вес возникает не просто так, а с серьезными психологическими и физическими проблемами:</p><ul>
<li>Девушки с лишним весом больше подвергаются скачкам давления и головным болям, что может пошатнуть нервную систему и усложняет жизнь. Особенно это ощущается жарким летом.</li>
<li>Страшнейшее последствие ожирения – диабет. Заболевание опасно, первым делом, тем, что зачастую становится предвестником инсульта.</li>
<li>Проблемы с сердцем, приводящие к сердечным катастрофам.</li>
<li>Довольно часто полнота может привести к остеохондрозу и варикозу.</li>
<li>За лишним весом следуют гормональные изменения. Они опасны тем, что способны помешать осуществить мечту большинства женщин – завести ребенка.</li>
<li>И, конечно же, избыточный вес влияет на дыхание.</li></ul>
<p>Избыточный вес также визуально добавляет человеку 7-10 лет, делает его значительно менее привлекательным в глазах окружающих и самого себя.</p>
<h2>Уникальное средство для уникальной Вас</h2>
<p>Главные причины полноты могут быть разными: гормональные сбои, нежная любовь к сладкому, малоактивный стиль жизни, медленный обмен веществ, невозможность правильно питаться из-за графика работы, остаточные последствия родов. Также, как и разными являются характеристики худеющих – начиная от возраста и роста, заканчивая качеством сна. Это не всегда зависит от воли человека – нельзя определить установки собственного организма. Тем не менее, разбираться с лишним весом в любом случае приходится.</p>
<p>Почти все средства для похудения обобщают подобные показатели, пытаясь создать препарат, который способен помочь каждому. Мы идем по другому пути.</p>
<p>Мангустин, сироп для успешного похудения последнего поколения – это препарат, который создается персонально под клиента учитывая все свойства организма. Четыре продолжительных года мы выполняли эксперименты и еще два – создавали уникальную формулу, чтобы Вы остались совершенно довольны эффектом.</p>
<p>Стоит рассказать, почему наше средство получило название «Мангустин» – мангуст и манго абсолютно ничего общего с ним не имеют. Все дело состоит в том, что главным элементом является мангустин – тропический фрукт, произрастающий в Таиланде. Он прославился своей низкой калорийностью, а также набором микроэлементов и витаминов. При этом, настоящий мангустин купить в обыкновенном магазине и похудеть употребляя его не выйдет. Ввиду того, что перевозить плод в страны СНГ — это значит утратить большую часть его свойств. Именно поэтому мы экстрагируем все полезные ингредиенты из фрукта и все это превращается в сироп, помогающий избавиться от избыточных килограммов. Кроме всего прочего, в нашем препарате находятся еще примерно 30 веществ природного происхождения из тропических стран, ведь мы ищем для Вас самые результативные ингредиенты.</p>
<p>Как Вы заметили, все технологии, которые собрал в себе ставший довольно популярным Мангустин – порошок остались позади, также, как и таблетки. Мы постоянно беспокоимся о Вашем комфорте при приеме нашего продукта. В связи с этим мы представляем сироп, который максимально просто растворяется в воде, а затем выпивается.</p>
<p>Результативность нашего средства подтверждена практикой. В случае если вы будете интересоваться откликами на Мангустин, отзыв за отзывом от удовлетворенных заказчиков убедят Вас сделать приобретение. В конечном итоге, и мужчинам, и женщинам, с совершенно разным набором характеристик и особенностей идеально подойдет Мангустин – реальные отзывы от людей, которые проверили результат нашей продукции на деле, Вы имеете возможности увидеть на различных сайтах, посвященных похудению.</p>
<h2>Где можно купить это чудо?</h2>
<p>Хотим обратить внимание на факт того, что найти Мангустин в аптеке или в любом интернет-магазине невозможно. Приобрести качественную продукцию прямо сейчас можно только у нас на сайте, вопреки хитрости бессчетных мошенников.</p>
<p>Если Вы хотите худеть результативно и вкусно, покупайте Мангустин – цена приятно удивит, а город проживания не станет проблемой. Мы осуществляем доставку по России, странам СНГ и даже в Европу.</p>
Приобрести можно на веб-сайте http://mang.bestseller-super.ru
— Craigmob Nov 13, 09:23 PM #Приобрести можно на веб-сайте http://mang.bestseller-super.ru
<h1>Каким способом возможно просто и вкусно сбросить вес – удивительный сироп мангустина!</h1>
<p>В связи с сегодняшними реалиями жизни, когда из-за напряженной работы практически не остается свободного времени, чтобы позаботиться о себе, очень остро стоит проблема лишнего веса. Люди, а в особенности женщины, планирующие сбросить лишний вес, пьют комплекс таблеток и порошков, которые теоретически должны помочь. Однако, практикой этого, к огорчению, не происходит. Ничего необычного в этом нет – любая девушка неповторима, обобщающие способы похудения могут не работать.</p>
<p>Однако, принципиально новый мангустин для похудения отличается от всех остальных конкурирующих продуктов на рынке. Давайте разберемся благодаря чему.</p>
<h2>Поправиться не страшно, страшно жить с этой проблемой!</h2>
<p>Лишний вес – это неприятность, которая отравляет жизнь основной массе девушек. Исследования экспертов показывают, что больше 90% полных людей недовольны собственным телом и страдают от низкой самооценки, что отражается на их личной жизни.</p>
<p>К большому сожалению, это не голословные заявления, а реальный факт: полнота возникает не просто так, а с серьезными психологическими и физическими проблемами:</p><ul>
<li>За лишним весом следуют множественные гормональные изменения. Особенно они опасны тем, что смогут помешать претворить в жизнь мечту большинства женщин – завести детей.</li>
<li>Проблемы с сердцем, приводящие к сердечным катастрофам.</li>
<li>Одно из самых опасных последствий ожирения – диабет. Это заболевание опасно тем, что достаточно часто является предвестником инсульта.</li>
<li>Женщины с излишним весом больше подвергаются головным болям и перепадам давления, что сможет пошатнуть нервную систему и усложняет жизнь. Особенно это ощущается в знойное время года.</li>
<li>Зачастую полнота приводит к варикозу и остеохондрозу.</li>
<li>И, конечно же, полнота воздействует на дыхание.</li></ul>
<p>Избыточный вес также зрительно прибавляет человеку от 7 до 10 лет, это делает его гораздо менее привлекательным в глазах окружающих людей.</p>
<h2>Уникальное средство для уникальной Вас</h2>
<p>Ключевые причины полноты бывают абсолютно разными: медленный обмен веществ, невозможность правильно покушать по причине графика работы, нежная любовь к сладкому, гормональные сбои, остаточные последствия родов, малоактивный стиль жизни. Также, как и многочисленны характеристики худеющих – начиная от возраста и роста, завершая качеством сна. Все это не всегда будет зависеть от воли самого человека – так как не он определяет установки своего организма. Но разбираться с ожирением в итоге приходится.</p>
<p>Почти все современные средства для избавления от лишнего веса обобщают эти показатели, пытаясь создать продукт, который подходит любому человеку. Мы идем по иному пути.</p>
<p>Мангустин, сироп для успешного похудения – это продукт, который проектируется персонально под потребителя учитывая все свойства организма. Четыре продолжительных года мы проводили медицинские исследования, а затем еще два – создавали уникальную формулу, чтобы Вы были совершенно довольны результатом.</p>
<p>Стоит рассказать, по каким причинам средство получило название «Мангустин» – мангуст, также как и манго абсолютно ничего общего с ним не имеют. Все дело в том, что центральным элементом сиропа является мангустин – уникальный фрукт, который растет в Таиланде. Он известен своей низкой калорийностью, а также микроэлементами и витаминами. Но настоящий мангустин купить в супермаркете и худеть употребляя его вы не сможете. Ввиду того, что перевезти этот плод в больших объемах в страны СНГ — значит утратить большую часть его пользы. Именно поэтому мы извлекаем активные ингредиенты из фрукта, а затем превращаем их в насыщенный сироп, который позволяет отделаться от избыточных килограммов. Кроме всего прочего, в нашем препарате находятся еще примерно 30 веществ природного происхождения, так как мы ищем для Вас самые эффективные компоненты.</p>
<p>Как Вы могли заметить, все прогрессивные технологии, которые вобрал в себя ставший популярным Мангустин – порошок уже остались позади, также, как и таблетки. Мы беспокоимся о Вашем комфорте при приеме нашего препарата. В связи с этим мы представляем сироп, который быстро растворяется в воде, а затем принимается внутрь.</p>
<p>Результативность средства подтверждена на практике. Если вы будете интересоваться рецензиями настоящих людей на Мангустин, отзыв за отзывом от наших удовлетворенных покупателей убедят Вас сделать покупку. В результате, и мужчинам, и женщинам, с абсолютно разным набором характеристик и особенностей превосходно подойдет Мангустин – реальные отзывы от тех, кто уже узнал эффект сиропа на деле, Вы увидите на различных сайтах, которые посвящены похудению.</p>
<h2>Где купить данный продукт?</h2>
<p>Хотим обратить Ваше внимание на то, что найти Мангустин в аптеке своего города или в каком угодно интернет-магазине невозможно. Купить качественную надежную продукцию имеется возможность только на страничках нашего сайта, вопреки хитрости мошенников.</p>
<p>В случае если Вы желаете похудеть вкусно и беззаботно, заказывайте Мангустин – цена приятно удивляет, а страна проживания не станет проблемой. Ведь мы производим доставку по России, странам СНГ и даже в Европу.</p>
Приобрести можно на веб-сайте http://mang.bestseller-super.ru
— Craigmob Nov 13, 09:52 PM #Приобрести можно на веб-сайте http://mang.bestseller-super.ru
<h1>Уникальный сироп мангустина – худейте легко и вкусно!</h1>
<p>В нынешних реалиях жизни, когда из-за интенсивной работы почти не остается свободного времени позаботиться о себе, остро в обществе стоит проблема лишнего веса. Многие люди, а в особенности девушки, планирующие похудеть, пьют горы «волшебных» порошков и таблеток, которые в теории могут помочь. Но на практике это, к сожалению, не подтверждается. Ничего удивительного здесь нет – каждая девушка неповторима, обобщающий способ похудения не работает.</p>
<p>Однако, принципиально новый мангустин для похудения отличается от всех остальных продуктов на рынке. И сейчас вы узнаете почему.</p>
<h2>Поправиться не страшно, страшно с данной проблемой жить!</h2>
<p>Лишний вес – это проблема, отравляющая жизнь большинству представительниц прекрасного пола. Наши исследования демонстрируют, что больше 90% полных людей недовольны собой и мучаются от низкой самооценки, что отражается на их личной жизни.</p>
<p>К большому сожалению, это не пустые заявления: лишний вес приходит не просто так, а с физическими и психологическими проблемами:</p><ul>
<li>За избыточным весом следуют гормональные изменения. Особенно они опасны тем, что смогут помешать осуществить мечту большинства женщин – завести ребенка.</li>
<li>Часто полнота приводит к варикозу и остеохондрозу.</li>
<li>Проблемы с сердцем, которые ведут к настоящим катастрофам.</li>
<li>Женщины с лишним весом подвергаются головным болям и перепадам давления, что может пошатнуть нервную систему и усложняет жизнь. Преимущественно это ощущается знойным летом.</li>
<li>Очень опасное последствие ожирения – диабет. Это заболевание опасно, первым делом, тем, что зачастую становится предвестником инсульта.</li>
<li>И, безусловно, полнота влияет на дыхание.</li></ul>
<p>Полнота помимо этого зрительно прибавляет человеку от 7 до 10 лет, это делает его значительно менее привлекательным в глазах окружающих людей.</p>
<h2>Уникальное средство для похудения</h2>
<p>Ключевые причины полноты могут быть разными: невозможность правильно покушать в силу графика работы, малоактивный образ жизни, медленный метаболизм, нежная любовь к сладкому, гормональные сбои, остаточные последствия родов. Также, как и разными являются характеристики худеющих людей – начав от роста и возраста, заканчивая количеством часов сна. Это редко зависит от человека – нельзя определить установки собственного организма. Тем не менее, разбираться с полнотой приходится.</p>
<p>Почти все средства для похудения обобщают приведенные выше показатели, стараясь создать препарат, который будет способен помочь всем. Мы пошли другой дорогой.</p>
<p>Мангустин, сироп для эффективного похудения – это препарат, который проектируется индивидуально под клиента учитывая все особенности организма. Четыре продолжительных года мы выполняли эксперименты и еще два – создавали уникальную формулу, чтобы эффект оказался успешным.</p>
<p>Стоит объяснить, почему средство называется «Мангустин» – мангуст, как и манго не имеют с ним абсолютно ничего общего. Все дело в том, что ключевым звеном является мангустин – это фрукт из Таиланда. Он знаменит своей низкой калорийностью, а также набором витаминов и микроэлементов. Но настоящий мангустин купить в обыкновенном магазине и худеть благодаря его использованию не удастся. По той причине, что перевозить данный плод в страны СНГ — значит растерять основную часть его пользы. В связи с этим мы экстрагируем активные ингредиенты из фрукта и все это превращается в насыщенный сироп, помогающий избавиться от излишних килограммов. Кроме всего прочего, в нашем препарате применяются еще около 30 веществ природного происхождения, так как мы ищем самые эффективные продукты.</p>
<p>Как Вы могли заметить, все самые современные технологии, которые собрал в себе Мангустин – порошок для похудения остались в прошлом, как и таблетки. Мы постоянно думаем о комфорте при приеме нашего препарата. Именно по этой причине мы представляем сироп, который просто разводится в воде, а затем выпивается.</p>
<p>Эффективность средства доказана практикой. В случае если вы будете интересоваться рецензиями на Мангустин, отзыв за отзывом от наших довольных покупателей быстро убедят в необходимости покупки. В результате, и женщинам, и мужчинам, с разным набором личных особенностей и характеристик отлично подойдет Мангустин – реальные отзывы от тех, кто уже испытал результат нашей продукции на себе, Вы имеете возможности разыскать на разных сайтах про похудение.</p>
<h2>Где купить это чудо?</h2>
<p>Обращаем Ваше внимание на тот факт, что отыскать Мангустин в аптеке или в любом интернет-магазине невозможно. Заказать качественную продукцию возможно лишь у нас на сайте, вопреки хитрости мошенников.</p>
<p>При условии, что Вы желаете худеть эффективно и вкусно, приобретайте Мангустин – цена приятно удивит, а страна проживания не будет проблемой. Мы производим доставку по России, странам СНГ и по всей Европе.</p>
Приобрести можно на веб-сайте http://mang.bestseller-super.ru
— Craigmob Nov 14, 01:07 AM #Приобрести можно на веб-сайте http://mang.bestseller-super.ru
<h1>Удивительный сироп мангустина – каким способом можно очень быстро и вкусно сбросить вес!</h1>
<p>В связи с нынешними реалиями жизни, когда из-за интенсивной работы не остается свободного времени для того, чтобы подумать о себе, все острее становится проблема лишнего веса. Люди, а особенно женщины, стремящиеся сбросить лишний вес, пьют «волшебные» порошки и таблетки, которые теоретически помогут. Только на практике этого не происходит. Оно совсем не удивительно – любой человек неповторим, обобщенный метод избавления от лишнего веса не работает.</p>
<p>Но принципиально новый мангустин для похудения выделяется от других продуктов на рынке. И сейчас вы сможете узнать благодаря чему.</p>
<h2>Поправиться не страшно, страшно жить с данной проблемой!</h2>
<p>Лишний вес – неприятность, которая отравляет жизнь большинству людей. Наши исследования демонстрируют, что 90% полных людей мучаются от низкой самооценки и недовольны собой, что отрицательно отражается на их личной и общественной жизни.</p>
<p>Это не пустые заявления: лишний вес приходит не просто так, а с физическими и психологическими проблемами:</p><ul>
<li>За лишним весом следуют гормональные изменения. Особенно они пугают тем, что смогут помешать завести детей.</li>
<li>Женщины с излишним весом подвергаются скачкам давления и головным болям, что усложняет жизнь и сможет пошатнуть нервную систему. Особенно это ощущается знойным летом.</li>
<li>Проблемы с сердцем, которые ведут к настоящим катастрофам.</li>
<li>Одно из самых ужасных последствий ожирения – диабет. Это заболевание опасно, в первую очередь, тем, что достаточно часто становится предвестником инсульта.</li>
<li>Зачастую полнота может привести к остеохондрозу и варикозу.</li>
<li>И, безусловно, избыточный вес воздействует на дыхание.</li></ul>
<p>Избыточный вес визуально добавляет человеку от 7 до 10 лет, это делает его менее привлекательным.</p>
<h2>Уникальное средство для успешного похудения</h2>
<p>Причины полноты могут быть абсолютно разными: медленный обмен веществ, остаточные последствия родов, гормональные сбои, неактивный стиль жизни, невозможность правильно питаться по причине графика работы, любовь к сладкому. Точно также, как и многочисленны характеристики худеющих – начиная от роста и возраста, заканчивая количеством часов сна. Это редко будет зависеть от воли человека – невозможно определить установки своего организма. Но разбираться с полнотой приходится.</p>
<p>Практически все популярные средства для похудения обобщают подобные показатели, стараясь создать препарат, который будет способен помочь абсолютно всем. Мы пошли по другому пути.</p>
<p>Мангустин, сироп для похудения новейшего поколения – это продукт, который проектируется индивидуально под покупателя с учетом всех особенностей организма. Четыре долгих года мы выполняли медицинские исследования, а затем еще два – разрабатывали формулу, чтобы Вы были довольны результатом.</p>
<p>Стоит объяснить, по каким причинам средство называется «Мангустин» – мангуст, как и манго не имеют с ним абсолютно ничего общего. Все дело в том, что ключевым элементом стал мангустин – тропический фрукт из Таиланда. Он прославился низкой калорийностью, а также витаминами и микроэлементами. Тем не менее, настоящий мангустин купить в обычном супермаркете и похудеть с его помощью не получится. Так как перевозить данный плод в страны СНГ — это значит утратить основную часть его пользы. По этой причине мы экстрагируем все полезные ингредиенты из фрукта, а затем превращаем все это в концентрированный сироп, который позволяет избавиться от излишних килограммов. Кроме этого, в нашем препарате используются еще около 30 растительных веществ природного происхождения из тропических стран, так как мы ищем для Вас самые действенные ингредиенты.</p>
<p>Как Вы заметили, все новейшие технологии, которые собрал в себе Мангустин – порошок остались позади, как и таблетки. Мы постоянно заботимся о Вашем комфорте при приеме нашего препарата. По этой причине был разработан сироп, который легко разводится в воде и принимается внутрь.</p>
<p>Эффективность средства подтверждена. В случае если вы будете интересоваться рецензиями людей на Мангустин, отзыв за отзывом от довольных покупателей быстро убедят Вас в необходимости покупки. Как женщинам, так и мужчинам, с разным списком особенностей и характеристик идеально подойдет Мангустин – реальные отзывы от тех, кто узнал действие сиропа на себе, Вы увидите на интернет-сайтах, которые посвящены похудению.</p>
<h2>Где сейчас можно купить это чудо?</h2>
<p>Хотим обратить Ваше внимание на тот факт, что отыскать Мангустин в аптеке или в каком угодно интернет-магазине нет возможности. Купить качественную продукцию имеется возможность лишь у нас на сайте, вопреки хитрости мошенников.</p>
<p>В случае если Вы хотите худеть беззаботно и вкусно, покупайте Мангустин – цена приятно удивляет, а город проживания не является особой проблемой. Мы производим доставку по Российской Федерации, странам СНГ и по всей Европе.</p>
Приобрести можно на веб-сайте http://mang.bestseller-super.ru
— Craigmob Nov 14, 01:16 AM #nice website
— Bandar Togel Terpercaya Mar 15, 12:09 AM #What’s up all, here every person is sharing these kinds of knowledge, therefore it’s good to read this blog, and I used to go to see this website daily. https://123moviesc.to/
— Alan Jul 13, 08:07 PM #Very well explained. Amazing and informative post. Thanks For Sharing.
— cc shop Mar 4, 09:23 AM #Bay Cove Methadone Clinic Cdc Substance Abuse
You stop and tell her that you just proceeded to go to a great new restaurant where the meals and program had been remarkable. Should you, you will complete poorly in school or where you work. Many times (as I actually have) that after you are in control of your quality of life, having simply no health and wellness insurance instantly doesn’t appear relevant. Awaken Stronger And even more Energetic! Without having enough sleeping at night time may increase your likelihood of having problems (of all kinds! ) and is also also the major cause of day time fatigue pertaining to so many people. A Weight Reduction Plan That Will Help You to Eliminate Weight and prevent Type II drug alcohol rehab centers near me!.
<a href=“http://aaa-rehab.com”>Alcohol Rehab Centers</a>
[url=http://aaa-rehab.com]Drug Rehab Centers Near Me[/url]
— Richardbob Mar 27, 11:19 AM #Inpatient Drug And Alcohol Treatment Substance Abuse Programs Near Me
A lot of it depends on how prolonged you’ve got recently been that great symptoms and exactly how awful they’ve been. Ingest toned proteinLean health proteins produces increased metabolism, regulates glucose & insulin levels along with decreases craving for food. You are probably obese mainly because you are ingesting foods that are not good intended for you. We have got pcs and Net for 20 years. Points to consume and what to keep away from is definitely a perennial problem.
<a href=“http://aaa-rehab.com”>Alcohol Rehab Centers</a>
[url=http://aaa-rehab.com]Alcohol Rehab Near Me[/url]
— RichardZek Mar 27, 10:38 PM #You’re so cool! I do not believe I’ve read anything like that before. So great to discover somebody with some original thoughts on this subject matter. Seriously.. many thanks for starting this up. This web site is one thing that’s needed on the web, someone with some originality!
— bbet99 Apr 24, 03:33 AM #<a href=“https://bbet99.website/”>Agen Bola Terfavorit</a>
<a href=“https://bbet99.space/”>Taruhan Bola Terfavorit</a>
<a href=“https://bbet99.website/”>Kasino Online Terlengkap</a>
<a href=“https://88et99.wordpress.com/2020/04/21/ciri-ciri-bandar-kasino-online-top/”>bandar Kasino Online Terlengkap</a>
Thanks for sharing your thoughts. I truly appreciate your efforts and I will be waiting for your further write ups thank you once again.
— bbet99 Apr 28, 04:16 AM #<a href=“https://bbet99.website/”>Agen Bola Terfavorit</a>
<a href=“https://bbet99.space/”>Taruhan Bola Terfavorit</a>
<a href=“https://bbet99.website/”>Kasino Online Terlengkap</a>
<a href=“https://88et99.wordpress.com/2020/04/21/ciri-ciri-bandar-kasino-online-top/”>bandar Kasino Online Terlengkap</a>
купить мужской ремень Николаев онлайн
— Belt Jun 28, 12:35 AM #The Official Website of the Most Trusted Joker123 Slot Agent in Indonesia
— http://www.mitosjoker123.info Jul 20, 05:03 AM #Joker123 Online Slot Game Indonesia’s Most Trusted Online Game
— http://www.tokaijoker.org Jul 20, 05:09 AM #thanks your blogrrrrrrrrrr
— dumps shop online Jul 27, 04:43 AM #<b>… [Trackback]</b>
[…] Find More to that Topic: annasnest.com/article/how-to-make-lined-curtains […]
— dumps worldwide Aug 31, 06:59 AM #When developing a Website Designers, you might be tempted to include all your business aspects, which only ends up ruining the design.
— website designers Apr 7, 06:29 AM #https://www.fiverr.com/share/3b1rYk
Facebook Papers reveal company knew it profited from sex trafficking but took limited action to stop it.
— Ronaldmut Oct 28, 08:31 PM #And former Facebook product manager Frances Haugen testifies before a Senate subcommittee in Washington on Oct. 5, 2021.
Haugen asserted that Facebook consistently chooses profit
Thank you so much for sharing this wonderful post with us.
— Life Experience Degree Oct 27, 05:16 AM #Facebook Papers reveal company knew it profited from sex trafficking but took limited action to stop it.
— casiobet Dec 3, 01:17 AM #And former Facebook product manager Frances Haugen testifies
The Official Website of the Most Trusted Joker123 Slot Agent in Indonesia
Netflix Premium Crack is the most remarkable rendition of the application that is utilized for downloading recordings, motion pictures, and clasps. A streaming interaction that gives grant winning show, movies, information, and a lot more web associated gadgets. The product’s most recent form is brand so different is it’s easy to utilize. The degree of refreshing the appreciate programming. The watchers can watch moment television films or animation as frequently as client need.
— Netflix Premium Crack Dec 26, 12:08 PM #https://lurkapc.com/netflix-premium-crack-latest/
Programmers have the choice of employing Visual Studio Code Crack, a developer tool that combines the simplicity and compact competence of a code editor with the best programmers for their core code-edit debug cycle. This is your initial code editor and the main cross-platform tool for the OSX, Linux, and Windows versions of the Visual Studio family. It also has a powerful code editor that runs quickly and is great for regular use.
— Good Jan 14, 12:10 PM #https://freepropc.com/visual-studio-code-crack-download/
Visual Studio productkey
Visual Studio 2023 Crack is a web-based editor and a cloud-hosted programming environment. It is available to the developer wherever it is needed to increase productivity. As development grows more collaborative and open source procedures such as pull requests become more common, developers must be able to transition between codebases and projects quickly without jeopardising production. As a result, it does not intend to become a coder’s default environment. Instead, it combines a live sharing session, examines the pull request, or does a quick edition—the service is built on Microsoft’s famous free and open-source desktop code editor. Support may also be created for Intelligence, Microsoft’s AI-assisted growth tool already in use. Furthermore, Microsoft introduced the online code editor Visual Studio 2023 Crack as an upgrade.
https://newcrackkey.com/visual-studio-crack-download/
— Visual Studio productkey Jan 24, 09:56 PM #Thanks for sharing. Any recommendations or advice would be greatly appreciated. Appreciate it ..
— hoki1881 Mar 16, 05:00 AM #<a href=“https://hoki1881.xyz/” title=“mpo slot”>mpo slot</a>
Omega89 adalah situs slot gacor terbaik anti rungkad sejak hari ini yang memberikan slot online terpercaya bersama agen resmi terpercaya 2023 dengan bonus terbesar.
omega89
— Omega89 Aug 12, 07:14 AM #omega89 slot
omega89 rtplive
omega89 luckyspin
omega89 online
link alternatif omega89
omega89 vip
omega89 login
omega89 apk
omega89 gacor
omega89 link
omega89 live
omega89 alternatif
omega89 slot login
furniture for bridal room
— furniture for bridal room Feb 27, 11:19 AM #single bed in Lahore
— single bed in Lahore Feb 27, 11:20 AM #l shape sofa in Lahore
— furniture price in lahore Feb 27, 11:21 AM #Center Tables
— Center Tables Feb 28, 08:50 AM #center table for the drawing room price
— center table for drawing room price Feb 28, 08:52 AM #Wardrobe Design Lahore
— Wardrobe Design Lahore Feb 28, 08:54 AM #Wing Chair Lahore
— Wing Chair Lahore Feb 28, 08:57 AM #Bedroom Chairs lahore
— Bedroom Chairs lahore Feb 28, 09:02 AM #Sofa Store Lahore
— Sofa Store Lahore Feb 28, 09:03 AM #Modern Bedroom Furniture
— Modern Bedroom Furniture Feb 28, 09:10 AM #L Shape Sofa
— L shape sofa in Lahore Feb 28, 09:11 AM #Home Furniture Shop
— Home Furniture Shop Feb 28, 09:13 AM #Furniture Showroom
— Furniture Showroom Feb 28, 09:14 AM #https://premuimvapesaustralia.com/
— PRADDO OG May 29, 12:32 PM #You’ve inspired me to start my own blog! Thanks for all the value you provide.
<a href=“https://www.capbluecross.com/wps/portal/cap/home/shop/individual/what-is-pennie”>pennie health insurance</a>
— pennie health insurance Oct 20, 09:11 PM #